The definitive guide to fixing SC400 hesitation issues
 02-04-11, 06:04 PM
#1
Pole Position
Thread Starter
iTrader: (3)

Join Date: Jan 2011
Location: CA
Posts: 382
Likes: 0
Received 0 Likes
on
0 Posts
In the past few weeks I have been researching this issue hard. And what I have found is that its a common problem on these vehicles. I know people have written this up before, but I wanted to consolidate my findings so we can stop wasting money on components that are not bad.
The information is spread out. I want to bring it all into one thread. If anyone else has input for this, add it on.
Ultimately it would appear my issue was my fuel pump ECU and I fixed this by bypassing the fuel ECU.
Ok first is the MAF. People seem to replace this first and it seems like a good percentage of the time, this is not the issue.
Here is the FSM page for the MAF. You will need a multi-meter that reads resistance and DC volts for this check and some insulation piercing leads.
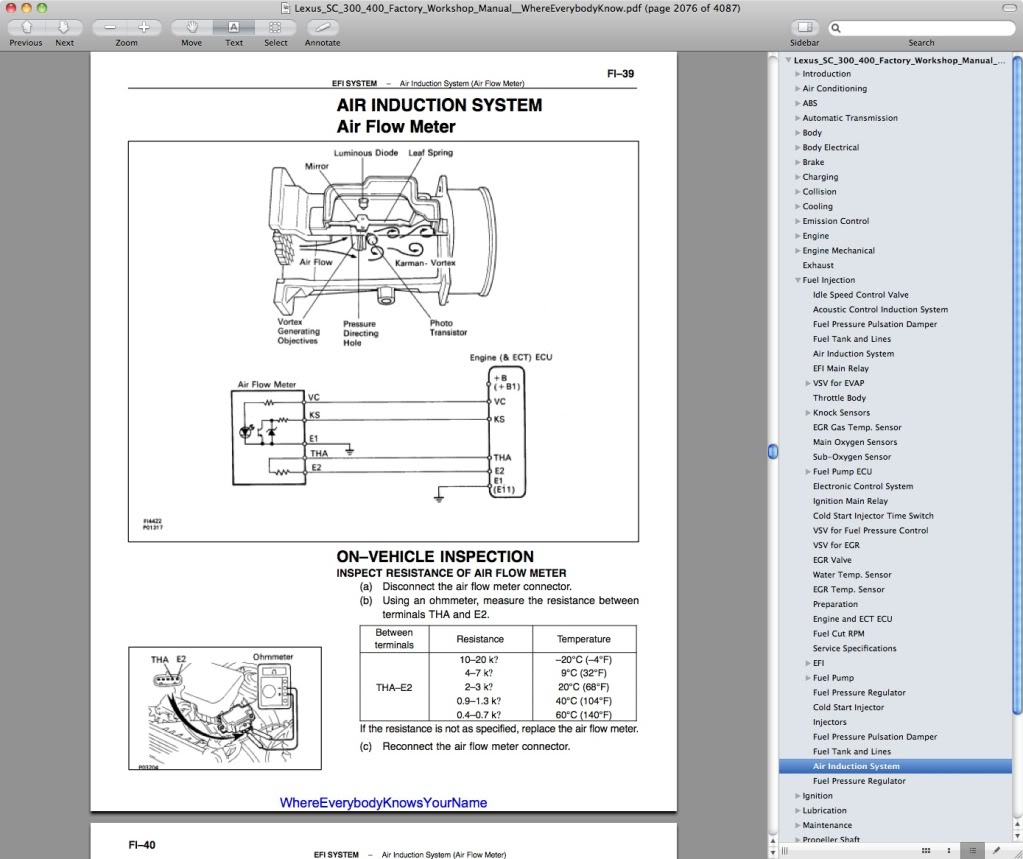
Do your quick resistance check from THA-E2 and see if the resistance is close to whatever the ambient temperature may be. Obviously if there is an open circuit or some other wild reading, your meter is probably bad. Chances are, resistance will be in spec.
Put the connector back on, turn the key to the on position (Do not start), apply your insulation piercing leads to the red connector on your meter. Peel back the rubber boot so you can see the 5 wires.
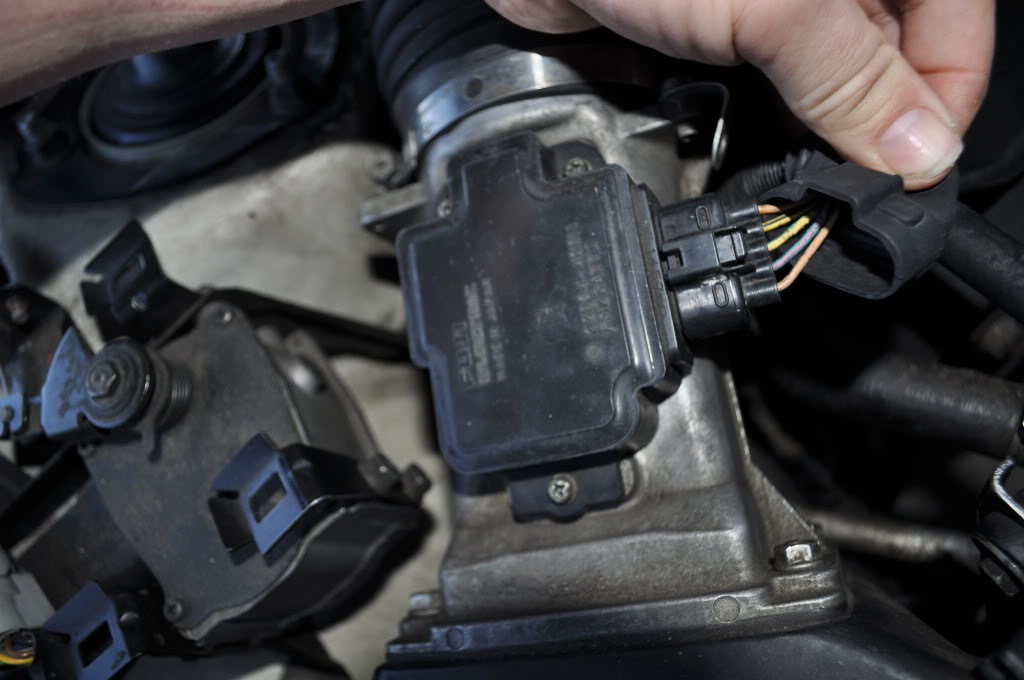
With the volume air flow meter plugged in and back probing, check for a 5.0 volt reference to the volume air flow meter on the Blue/Red wire with the key ON. Check the volume air flow meter grounds on the two Brown wires - look for 0.05 volts or less. Place your black lead on a good ground point to check for voltage.
Now start the car. Check the volume air flow meter output voltage on the Yellow/Green wire - look for 2.0 to 4.0 volts with the engine running. Make sure the output voltage is NOT 0.0 volts or 5.0 volts.
If this all checks out, you have just eliminated your MAF as being bad.
Another possible culprit of hesitation is the idle air control valve. Located right on the front of the plenum you have a few options for checking it.
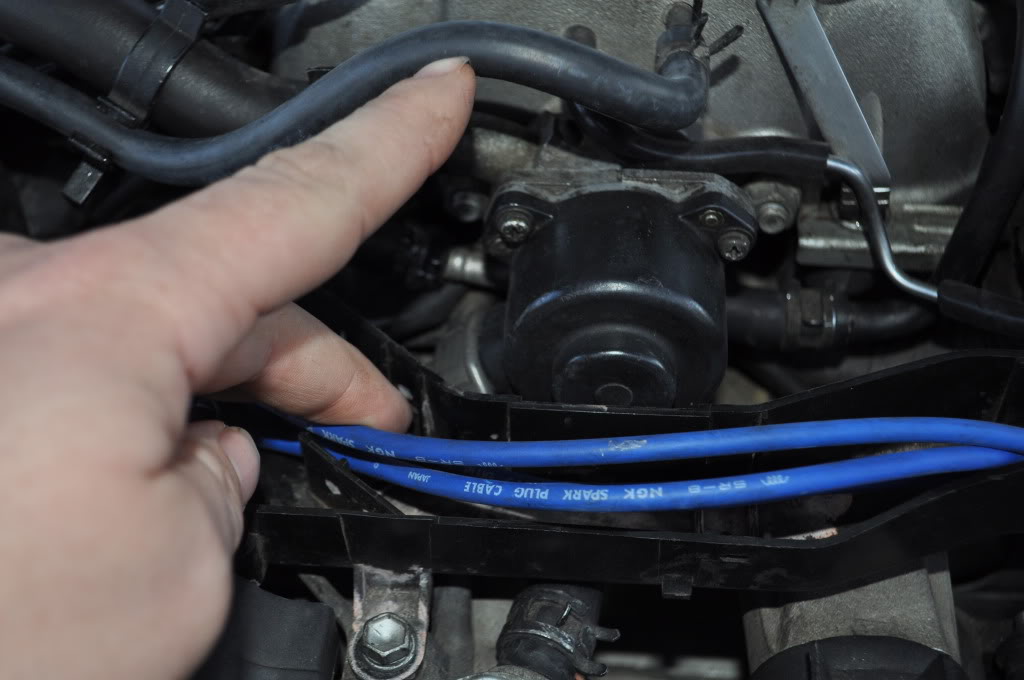
You will have to carefully remove the plug wire tray to get to this.
Undo the 2 bolts holding it to the plenum. Disconnect the cooling lines. Disconnect the connector and pull it out.

Do your resistance checks and if you feel real adventurous, connect your battery leads to it and stroke the valve to verify operation.
You can go one step further and remove the 3 phillips screws holding the stepper motor assembly to the mounting body. Now the full valve is exposed along with the motor armature. Spin it in and out a few times to verify it moves smooth. Clean it up, lube it up and reinstall. OF course replace if any readings are out of spec.
Throttle position sensor checks
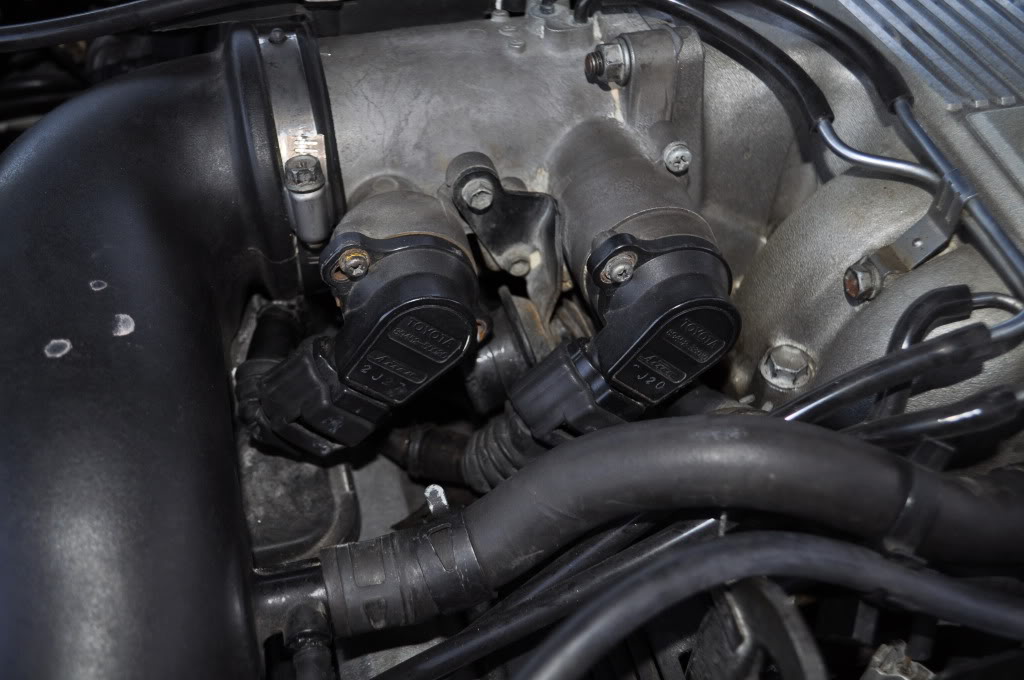
The TPS sensor is the inner most sensor in the picture. Mine has Trac, your might not. Tools you need to check this. A multi meter. A set of feeler gauges, 10mm socket to remove the throttle body cover for access to the stop screw.
And I found this on here. I have to give props to Cure, who suggested this. It works great.
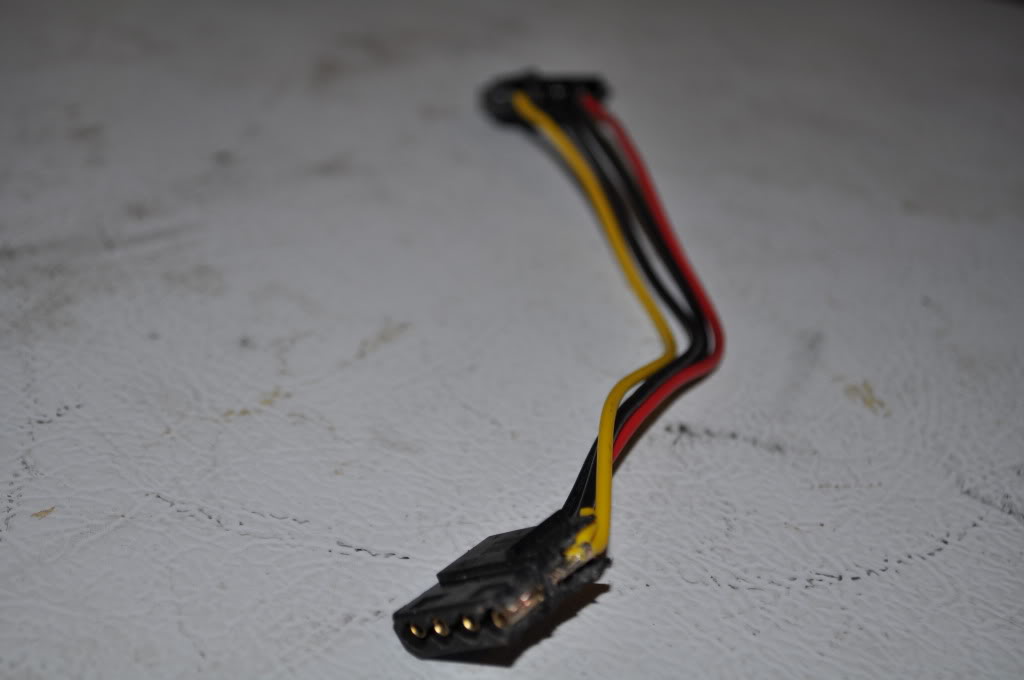
This is a power connector out of a computer. Shave down one side of the connector and it will fit into the TPS sensor perfectly. Now you have a nice place to stick your leads and take your readings.
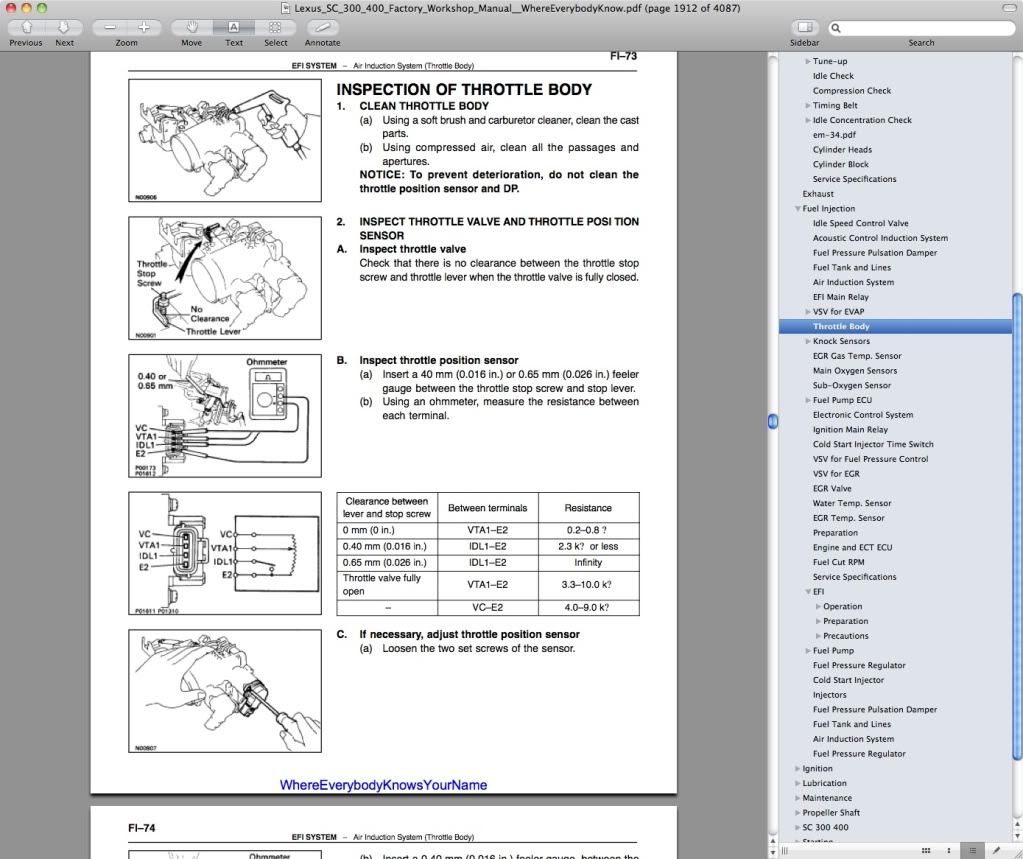
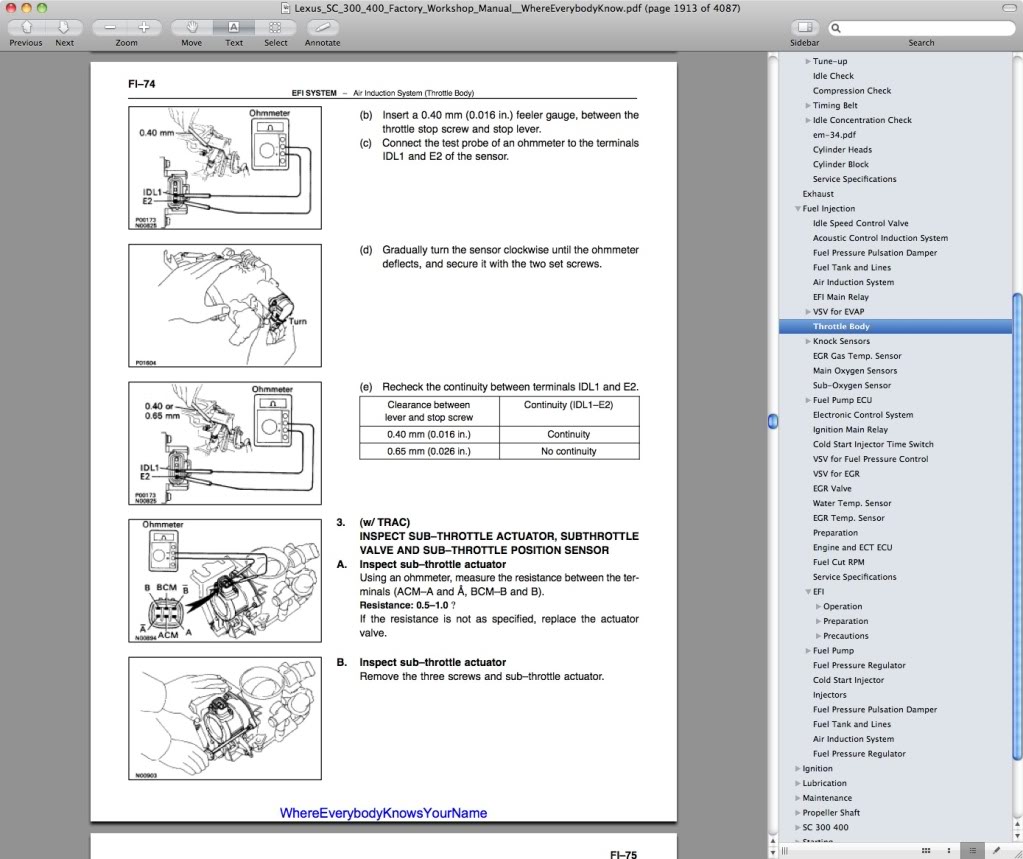
Follow this procedure exactly. I found that setting my gauge to continuity so it made a tone, Insert your 0.40 mm (0.016 in.) feeler gauge, between the throttle stop screw and stop lever. Loosen the screws and turn slowly till continuity disappears, than go back you want it as close as possible. When I did this, all the other readings were right. Might take some trial and error
So if all of these things check out you have did a pretty good job of eliminating your MAF, your IAC valve and your TPS as culprits of hesitation. I will detail the fuel pump ECU checks next. Gotta tend to the children.
The information is spread out. I want to bring it all into one thread. If anyone else has input for this, add it on.
Ultimately it would appear my issue was my fuel pump ECU and I fixed this by bypassing the fuel ECU.
Ok first is the MAF. People seem to replace this first and it seems like a good percentage of the time, this is not the issue.
Here is the FSM page for the MAF. You will need a multi-meter that reads resistance and DC volts for this check and some insulation piercing leads.
Do your quick resistance check from THA-E2 and see if the resistance is close to whatever the ambient temperature may be. Obviously if there is an open circuit or some other wild reading, your meter is probably bad. Chances are, resistance will be in spec.
Put the connector back on, turn the key to the on position (Do not start), apply your insulation piercing leads to the red connector on your meter. Peel back the rubber boot so you can see the 5 wires.
With the volume air flow meter plugged in and back probing, check for a 5.0 volt reference to the volume air flow meter on the Blue/Red wire with the key ON. Check the volume air flow meter grounds on the two Brown wires - look for 0.05 volts or less. Place your black lead on a good ground point to check for voltage.
Now start the car. Check the volume air flow meter output voltage on the Yellow/Green wire - look for 2.0 to 4.0 volts with the engine running. Make sure the output voltage is NOT 0.0 volts or 5.0 volts.
If this all checks out, you have just eliminated your MAF as being bad.
Another possible culprit of hesitation is the idle air control valve. Located right on the front of the plenum you have a few options for checking it.
You will have to carefully remove the plug wire tray to get to this.
Undo the 2 bolts holding it to the plenum. Disconnect the cooling lines. Disconnect the connector and pull it out.
Do your resistance checks and if you feel real adventurous, connect your battery leads to it and stroke the valve to verify operation.
You can go one step further and remove the 3 phillips screws holding the stepper motor assembly to the mounting body. Now the full valve is exposed along with the motor armature. Spin it in and out a few times to verify it moves smooth. Clean it up, lube it up and reinstall. OF course replace if any readings are out of spec.
Throttle position sensor checks
The TPS sensor is the inner most sensor in the picture. Mine has Trac, your might not. Tools you need to check this. A multi meter. A set of feeler gauges, 10mm socket to remove the throttle body cover for access to the stop screw.
And I found this on here. I have to give props to Cure, who suggested this. It works great.
This is a power connector out of a computer. Shave down one side of the connector and it will fit into the TPS sensor perfectly. Now you have a nice place to stick your leads and take your readings.
Follow this procedure exactly. I found that setting my gauge to continuity so it made a tone, Insert your 0.40 mm (0.016 in.) feeler gauge, between the throttle stop screw and stop lever. Loosen the screws and turn slowly till continuity disappears, than go back you want it as close as possible. When I did this, all the other readings were right. Might take some trial and error
So if all of these things check out you have did a pretty good job of eliminating your MAF, your IAC valve and your TPS as culprits of hesitation. I will detail the fuel pump ECU checks next. Gotta tend to the children.
Last edited by brad11140; 02-04-11 at 06:09 PM. Reason: typo


The following users liked this post:
Shajay69 (11-21-21)

Trending Topics
02-06-11, 11:58 AM
#8
Pole Position
Thread Starter
iTrader: (3)
Join Date: Jan 2011
Location: CA
Posts: 382
Likes: 0
Received 0 Likes
on
0 Posts
OK, lets talk about what ultimately fixed my issue and is actually the easiest thing to check. The fuel pump ECU. On the front on the engine, drivers side you will find your diagnostic connector. Open it up and you will find this.
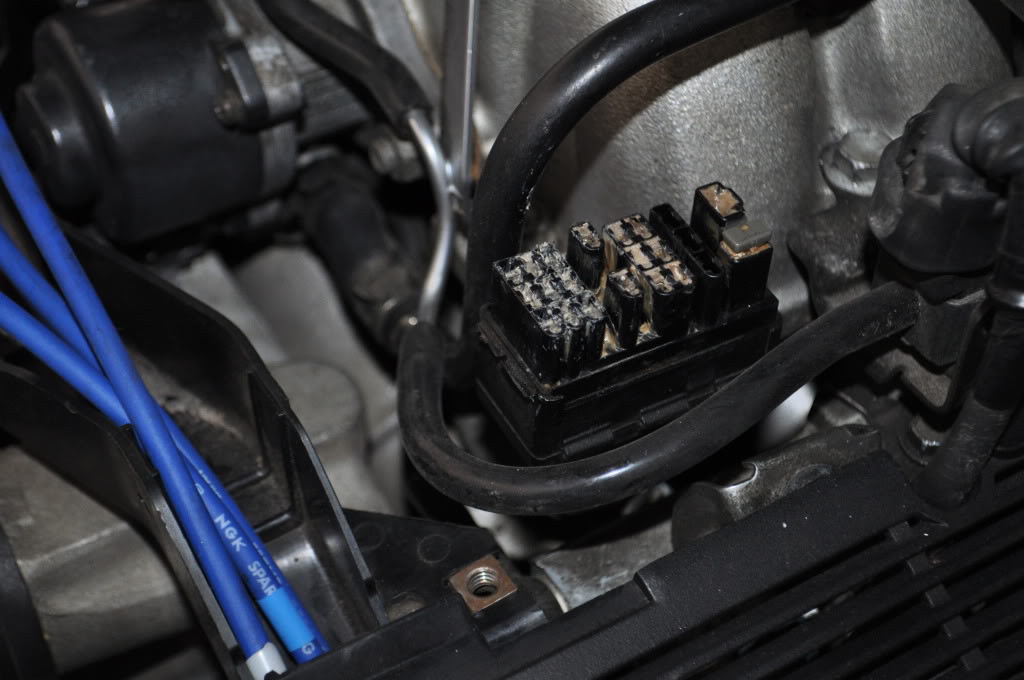
On the extreme front of this connector place a jumper from Fp to +b. Look on the inside of the diagnostic connector lid to verify which ones these are. I am trying to describe without confusing anyone. With these pins jumpered as soon as you turn your key to the ACC position the fuel pump will kick on in high mode and it will stay there. Try jumpering and turning the key on than go up there and listen for fuel flowing. Its easy to hear.
Drive around with it like this for awhile. If your hesitation is gone than you are a good part of the way in having identified your fuel pump ECU as the culprit. MIne was intermittent. Sometimes the ECU operated properly, sometimes it didn't. From what I can guess at low speed the pump was putting out less than the needed pressure, basically starving the engine. It idled nice. So maybe the ECU was not increasing the speed as needed. I don't know. Regardless my problem is gone with the pump operating in high pressure mode all the time.
So if you find this is your problem and you want a permanent fix you can;
- go on eBay and buy a used fuel pump ECU ($80-$100)
- bypass the fuel pump ECU
I chose to bypass at least for the time being. My understanding is that the multi-speed logic was only for pump life. YOur fuel system is designed to operate at high speed and the fuel pressure regulator just releases the unused fuel back to the tank.
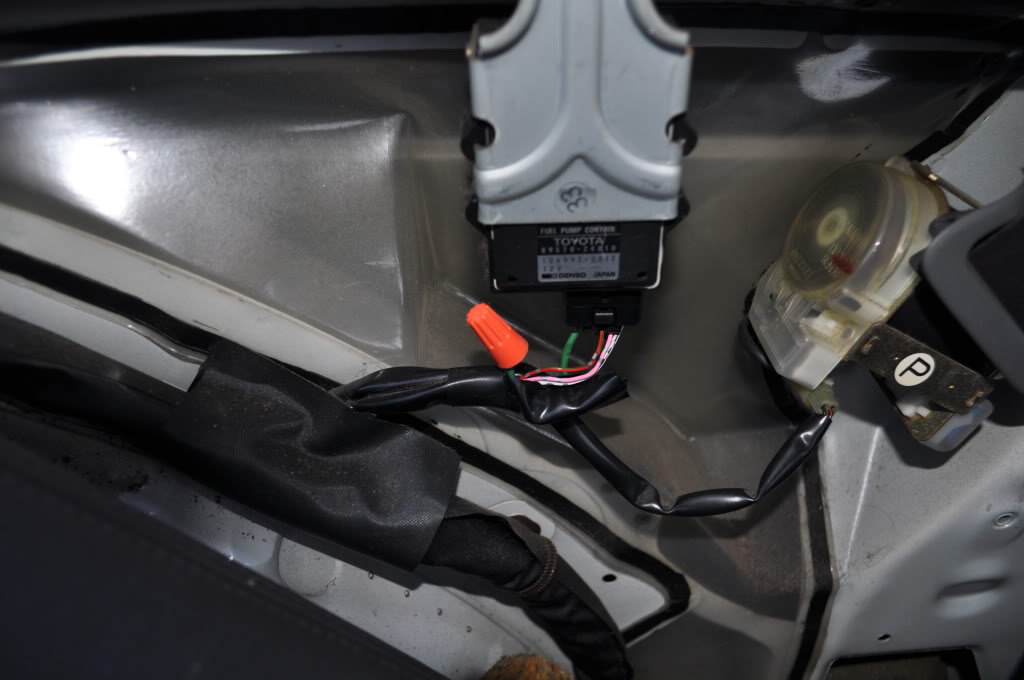
To bypass you will need to remove the back seat. Pull up on the bottom portion and remove. Undo the 4 bolts holding the seat back in place. NOw carefully remove the plastic trim under the driver side quarter window. Behind this panel is the fuel pump ECU. Since I was already here I decided to run the check on it the FSM suggests.
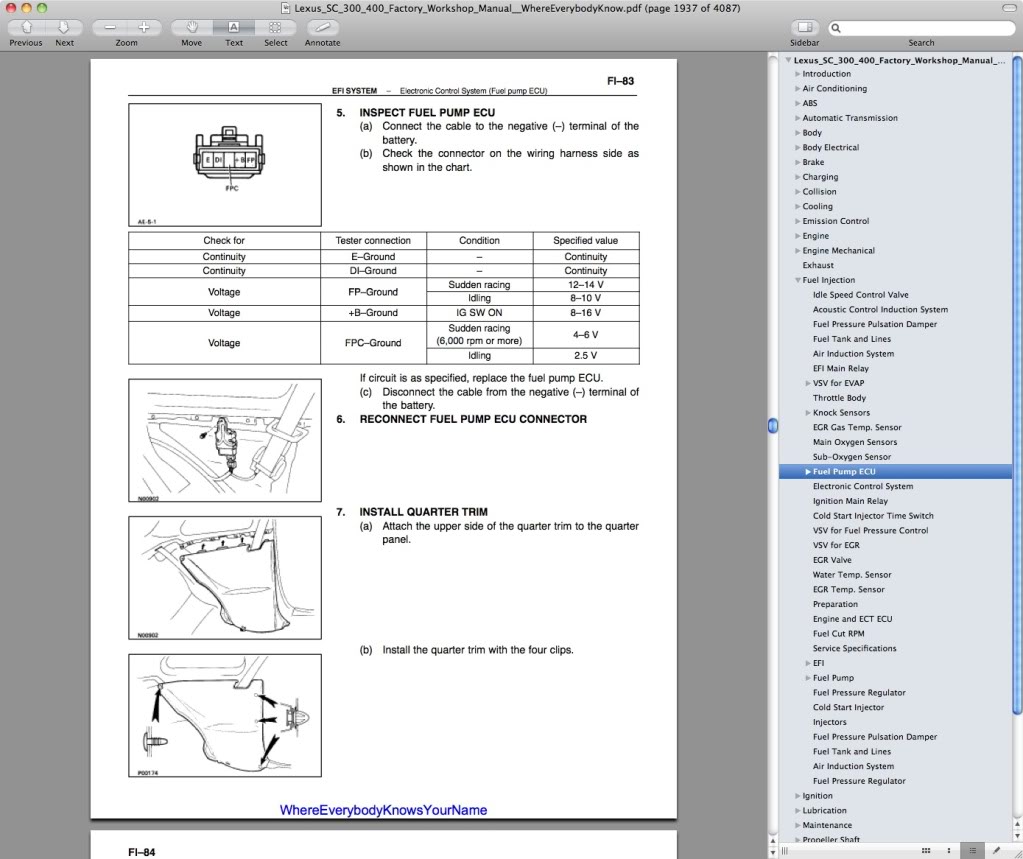
Be careful here. It confused me. I ran through these checks and got every number it said it was supposed to. You will need your meter again and insulation piercing leads.
Under the box it says "if circuit is as specified, replace the fuel pump ECU"
There is a good writeup with pictures on this mod here.
https://www.clublexus.com/forums/per...tures-faq.html
I dont suggest useing a butt connector. I am still deciding if I want to keep it this way. Solder the wires together.
Some other culprits of hesitation that you can replace include the drivers side coil, located directly under the drivers side distributor.
Another thread on here suggested replacing the engine coolant temp sensor. Its like a $20 part and probably doesn't hurt to replace anyway. Remove all of the plastic including the plug wire tray. Its under there in front of the passenger side coil and has the larger green plug on it. I think it was like a 19mm deep well socket to remove.
Also make sure your fuel filter is new. This job was a pain in the you know what. Make sure your tank is low. Open the gas cap and get ready to smell like gas. MEssy but necessary.
On the extreme front of this connector place a jumper from Fp to +b. Look on the inside of the diagnostic connector lid to verify which ones these are. I am trying to describe without confusing anyone. With these pins jumpered as soon as you turn your key to the ACC position the fuel pump will kick on in high mode and it will stay there. Try jumpering and turning the key on than go up there and listen for fuel flowing. Its easy to hear.
Drive around with it like this for awhile. If your hesitation is gone than you are a good part of the way in having identified your fuel pump ECU as the culprit. MIne was intermittent. Sometimes the ECU operated properly, sometimes it didn't. From what I can guess at low speed the pump was putting out less than the needed pressure, basically starving the engine. It idled nice. So maybe the ECU was not increasing the speed as needed. I don't know. Regardless my problem is gone with the pump operating in high pressure mode all the time.
So if you find this is your problem and you want a permanent fix you can;
- go on eBay and buy a used fuel pump ECU ($80-$100)
- bypass the fuel pump ECU
I chose to bypass at least for the time being. My understanding is that the multi-speed logic was only for pump life. YOur fuel system is designed to operate at high speed and the fuel pressure regulator just releases the unused fuel back to the tank.
To bypass you will need to remove the back seat. Pull up on the bottom portion and remove. Undo the 4 bolts holding the seat back in place. NOw carefully remove the plastic trim under the driver side quarter window. Behind this panel is the fuel pump ECU. Since I was already here I decided to run the check on it the FSM suggests.
Be careful here. It confused me. I ran through these checks and got every number it said it was supposed to. You will need your meter again and insulation piercing leads.
Under the box it says "if circuit is as specified, replace the fuel pump ECU"
There is a good writeup with pictures on this mod here.
https://www.clublexus.com/forums/per...tures-faq.html
I dont suggest useing a butt connector. I am still deciding if I want to keep it this way. Solder the wires together.
Some other culprits of hesitation that you can replace include the drivers side coil, located directly under the drivers side distributor.
Another thread on here suggested replacing the engine coolant temp sensor. Its like a $20 part and probably doesn't hurt to replace anyway. Remove all of the plastic including the plug wire tray. Its under there in front of the passenger side coil and has the larger green plug on it. I think it was like a 19mm deep well socket to remove.
Also make sure your fuel filter is new. This job was a pain in the you know what. Make sure your tank is low. Open the gas cap and get ready to smell like gas. MEssy but necessary.
Last edited by brad11140; 02-06-11 at 12:01 PM. Reason: typo
The following users liked this post:
wnyjazz (03-03-18)
02-07-11, 01:29 AM
#11
Awesome info... Please just make sure you never ever take down your photobucket account hehehehee.... There has been many many cool threads with pictures linked to their photobucket or other source and now no longer working 

