

 12-16-14, 11:41 AM
Last edit by: IB Advertising
See related guides and technical advice from our community experts:
Browse all: Lexus IS Lighting Guides
- Lexus: How to Replace Your Dome Light
Step by step instructions for do-it-yourself repairs
Browse all: Lexus IS Lighting Guides

HOW TO: LS430 Interior/Exterior Lights/LED w/Pics & part#s
07-01-10, 01:36 PM
#1
Lead Lap
Thread Starter
Car Used: 2001 Lexus LS 430 w/Nav before M/C
Difficulty: Very Easy to Medium
POST 01: Bulb part numbers and pictures
POST 02: Fog lights to HID and headlight adjustment
POST 03: Interior Bulbs (dome, map, ashtray, puddle)
POST 04: Rear (trunk, license plate, 3rd brake light)
POST 05: Exterior (mirror lights)
POST 06:
POST 07: Bulb locations
POST 28: Dash, door handle, glove box, etc lights (tnx mrsandman)
POST 32: Follow up pictures for post #28
POST 91: LEDs in the radio (tnx weizs13)
Part Numbers:
Low Beam Headlamp Light Bulb Size: HID-D2R
High Beam Headlamp Light Bulb Size: 9005
Fog Light Light Bulb size: 9006
Parking Light Bulb Size: 2825
Front Turn Signal Light Bulb Size: 7440
Rear Turn Signal Light Bulb Size: 992 (7440A)
Tail Light Bulb Size: 2825 or 7443
Stop Light Bulb Size: 7443
High Mount Stop Light Bulb Size: 7440
License Plate Light Bulb Size: 2825
Back Up Light Bulb Size: 7440
Front Sidemarker Light Bulb Size: 2825
Rear Sidemarker Light Bulb Size: 2825
Glove Box Light Bulb Size: 37
Step/Courtesy Light Bulb Size: 194 or 74 or DE3021
Trunk/Cargo Area Light Bulb Size: 194
Instrument-General Light Bulb Size: 194
Sport/Norm, ECT, and Height switches: Lexus pn/90010-01059 (tnx StanVanDam)
Glove Box, Center Console, and Door/Window Switches (tnx mrsandman)
I GOT THE LEDs FROM THIS GUY.. I WOULD RECOMMEND HIM FOR THE QUALITY VS. PRICE
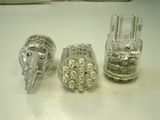
Bulb part numbers and cross reference numbers: (click on pic to make larger)
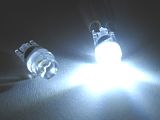
Trunk, puddle light, mirror and license platte: T10 W5W bulb
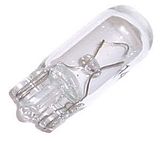
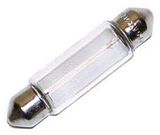
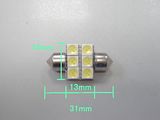
Dome light: 3022 3175 31mm
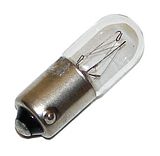
Map Lights: BA9S 1895 T4W

Ashtray 37 bp2 ge74
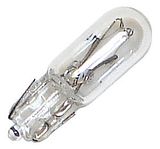
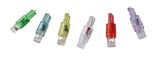
Third (middle) Brake Light: T20S T20W 7440 7443
Difficulty: Very Easy to Medium
POST 01: Bulb part numbers and pictures
POST 02: Fog lights to HID and headlight adjustment
POST 03: Interior Bulbs (dome, map, ashtray, puddle)
POST 04: Rear (trunk, license plate, 3rd brake light)
POST 05: Exterior (mirror lights)
POST 06:
POST 07: Bulb locations
POST 28: Dash, door handle, glove box, etc lights (tnx mrsandman)
POST 32: Follow up pictures for post #28
POST 91: LEDs in the radio (tnx weizs13)
Part Numbers:
Low Beam Headlamp Light Bulb Size: HID-D2R
High Beam Headlamp Light Bulb Size: 9005
Fog Light Light Bulb size: 9006
Parking Light Bulb Size: 2825
Front Turn Signal Light Bulb Size: 7440
Rear Turn Signal Light Bulb Size: 992 (7440A)
Tail Light Bulb Size: 2825 or 7443
Stop Light Bulb Size: 7443
High Mount Stop Light Bulb Size: 7440
License Plate Light Bulb Size: 2825
Back Up Light Bulb Size: 7440
Front Sidemarker Light Bulb Size: 2825
Rear Sidemarker Light Bulb Size: 2825
Glove Box Light Bulb Size: 37
Step/Courtesy Light Bulb Size: 194 or 74 or DE3021
Trunk/Cargo Area Light Bulb Size: 194
Instrument-General Light Bulb Size: 194
Sport/Norm, ECT, and Height switches: Lexus pn/90010-01059 (tnx StanVanDam)
Glove Box, Center Console, and Door/Window Switches (tnx mrsandman)


I GOT THE LEDs FROM THIS GUY.. I WOULD RECOMMEND HIM FOR THE QUALITY VS. PRICE
Bulb part numbers and cross reference numbers: (click on pic to make larger)
Trunk, puddle light, mirror and license platte: T10 W5W bulb


Dome light: 3022 3175 31mm


Map Lights: BA9S 1895 T4W


Ashtray 37 bp2 ge74


Third (middle) Brake Light: T20S T20W 7440 7443


Last edited by RomanTPA; 10-04-11 at 02:16 PM.
 07-01-10, 01:37 PM
#2
Lead Lap
Thread Starter
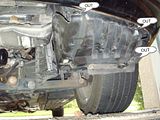
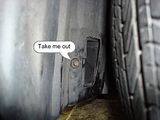
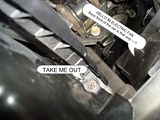
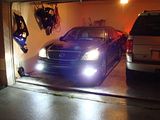
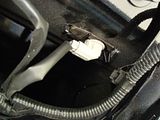
Fog lights to HID conversion
No drilling or cutting or splicing required
0. You will need a 10mm socket and 10mm wrench and zip ties
1. Unscrew the lower covers (pics 1, 2, and 3) same on other side
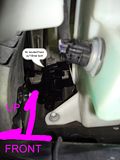
2. Bolt in the HID ballast mount using existing 10mm bolt (pic 4)
3. Place your ballast into the mounted bracket (pic 5)
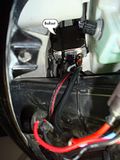
4. Replace your halogen with HID bulb (pic 6)
5. Connect the wires from car to ballast to HID bulb
6. Test your HID and make sure that it works
7. Put everything back together in reverse steps
8. Do the same thing for the passenger side
*Please note the following
*The kit is 100% Plug-and-play
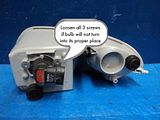
*Make sure you push the bulb ALL the way in for it to turn
*If it will not turn, you might have to loosen 3 screws that will hold it in
(Click on pics to make larger)
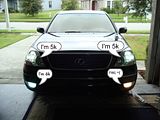
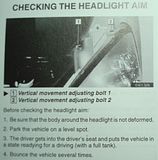
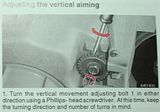
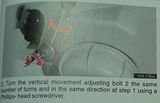
How to adjust your headlights
From what I have noticed, Lo beam moves separately from Hi beam
So you should be able to adjust the Lo beam w/o worrying about Hi beam
Following shots will explain how to adjust your Low beam in 01-03 LS430
No drilling or cutting or splicing required
0. You will need a 10mm socket and 10mm wrench and zip ties
1. Unscrew the lower covers (pics 1, 2, and 3) same on other side
2. Bolt in the HID ballast mount using existing 10mm bolt (pic 4)
3. Place your ballast into the mounted bracket (pic 5)
4. Replace your halogen with HID bulb (pic 6)
5. Connect the wires from car to ballast to HID bulb
6. Test your HID and make sure that it works
7. Put everything back together in reverse steps
8. Do the same thing for the passenger side
*Please note the following
*The kit is 100% Plug-and-play
*Make sure you push the bulb ALL the way in for it to turn
*If it will not turn, you might have to loosen 3 screws that will hold it in
(Click on pics to make larger)


How to adjust your headlights
From what I have noticed, Lo beam moves separately from Hi beam
So you should be able to adjust the Lo beam w/o worrying about Hi beam
Following shots will explain how to adjust your Low beam in 01-03 LS430

Last edited by RomanTPA; 08-23-10 at 08:31 AM.
The following users liked this post:
LexRex (05-21-19)
07-01-10, 01:38 PM
#3
Lead Lap
Thread Starter
I GOT THE LEDs FROM THIS GUY.. I WOULD RECOMMEND HIM FOR THE QUALITY VS. PRICE
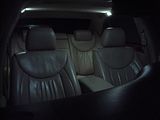
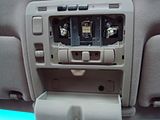
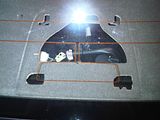
Dome light and Map lights (click on pic to make larger)
1. With a small flathead screwdriver pry open the clear cover
2. Start with the corners closet to the seats and about 1 inch from the corner itself.
3. Very gently pry all the way around and pull the cover down
4. Dome light pull down the end that the closet to the back seats
5. Map lights push-twist-pull
6. Install everything in the reverse order from 5 to 1
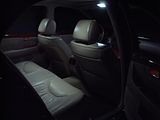
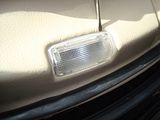
Puddle Lights (click on pic to make larger)
1. With a very small flathead screwdriver pry open the clear cover
2. Pry where the cover snaps on in 4 points around the cover (see picture)
3. To install the cover back on you might need to prop forward the back of the base where the lightbulb sits
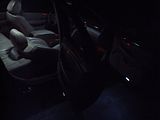
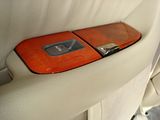
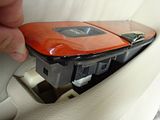
Ashtrays (click on pic to make larger)
1. Use a flat head screw driver
2. From the corner closest to the rear armrest, gently pry up
3. Once the bottom can clear, pull the entire assembly toward the trunk
4. Using a philips screwdriver, unscrew the only screw holding down 2 wires
5. Pull the wires up and there is your bulb
6. To put it back together just do steps in reverse, 5 to 1
Dome light and Map lights (click on pic to make larger)
1. With a small flathead screwdriver pry open the clear cover
2. Start with the corners closet to the seats and about 1 inch from the corner itself.
3. Very gently pry all the way around and pull the cover down
4. Dome light pull down the end that the closet to the back seats
5. Map lights push-twist-pull
6. Install everything in the reverse order from 5 to 1


Puddle Lights (click on pic to make larger)
1. With a very small flathead screwdriver pry open the clear cover
2. Pry where the cover snaps on in 4 points around the cover (see picture)
3. To install the cover back on you might need to prop forward the back of the base where the lightbulb sits

Ashtrays (click on pic to make larger)
1. Use a flat head screw driver
2. From the corner closest to the rear armrest, gently pry up
3. Once the bottom can clear, pull the entire assembly toward the trunk
4. Using a philips screwdriver, unscrew the only screw holding down 2 wires
5. Pull the wires up and there is your bulb
6. To put it back together just do steps in reverse, 5 to 1


Last edited by RomanTPA; 04-23-11 at 11:52 AM.
The following users liked this post:
S2R (03-22-21)
07-01-10, 01:39 PM
#4
Lead Lap
Thread Starter
I GOT THE LEDs FROM THIS GUY.. I WOULD RECOMMEND HIM FOR THE QUALITY VS. PRICE
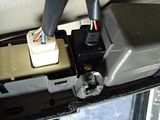
Trunk Lights and License Plate Lights (click on pic to make larger)
1. Pop open the cover around the trunk release latch
2. Take off the clear cover from trunk light
3. From the end closes to the latch, pop out the light base.
4. Disconnect the base or just leave it hanging there
5. With philips screwdriver, Unscrew the two screws holding the trunk handle
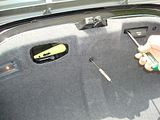
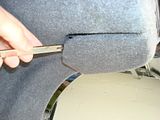
6. remove the corners that cover tail light bulbs (see picture if your are confused)
7. With a small flathead screwdriver or a tiny pry bar, remove 4 black plug things
7.5. One under each corner cover, one in the dead center, and one by trunk handle
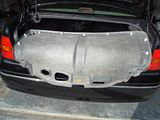
8. Starting from one side working to the other, gently, pop out the 9 plug things that hold the liner up
9. Turn then pull out the license plate bulbs
10. In revers order put it back together and dont forget about the 2nd trunk bulb located further into the trunk

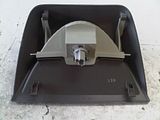
Third Brake Light
1. From the top, slide the entire assembly to the left
2. Pull up on the assembly
3. Unplug the bulb
4. Twist than pull the bulb out
5. to put it back in, repeat first 4 steps in reverse.
Trunk Lights and License Plate Lights (click on pic to make larger)
1. Pop open the cover around the trunk release latch
2. Take off the clear cover from trunk light
3. From the end closes to the latch, pop out the light base.
4. Disconnect the base or just leave it hanging there
5. With philips screwdriver, Unscrew the two screws holding the trunk handle
6. remove the corners that cover tail light bulbs (see picture if your are confused)
7. With a small flathead screwdriver or a tiny pry bar, remove 4 black plug things
7.5. One under each corner cover, one in the dead center, and one by trunk handle
8. Starting from one side working to the other, gently, pop out the 9 plug things that hold the liner up
9. Turn then pull out the license plate bulbs
10. In revers order put it back together and dont forget about the 2nd trunk bulb located further into the trunk


Third Brake Light
1. From the top, slide the entire assembly to the left
2. Pull up on the assembly
3. Unplug the bulb
4. Twist than pull the bulb out
5. to put it back in, repeat first 4 steps in reverse.


Last edited by RomanTPA; 04-23-11 at 11:52 AM.
The following 5 users liked this post by RomanTPA:
07-01-10, 01:40 PM
#5
Lead Lap
Thread Starter
I GOT THE LEDs FROM THIS GUY.. I WOULD RECOMMEND HIM FOR THE QUALITY VS. PRICE
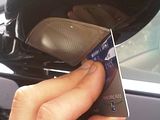
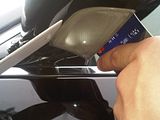
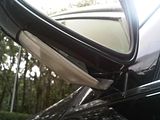
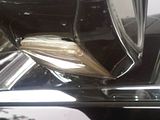
Exterior Mirror Lights (the easy 5min way)
0. IF YOU DO NOT READ THIS OR BE GENTLE, YOU WILL ****** IT UP
1. You will need a tiny pry bar and/or 2 credit cards
2. Slide the card at an angle starting from one corner up until the entire credit card is in (see pic)
3. Pop that side of the light housing out pass the trim thats holding it up
4. With second credit card, following step #2, slide the card through
5. While prying on both credit cards slide them toward the door of the car.
6. Once the end has completely popped out, slide the housing assembly toward the door
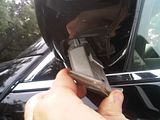
7. Carefully pull the assembly down
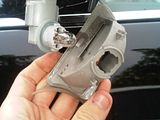
8. Once cleared the mirror, turn the pull off the light assembly from the bulb base
9. Bulb base can only go back in one way.
10. Replace the bulb with LED, then start putting everything back together
11. Put the end closes to the door in first
12. Work your way around with credit cards again to clear the trim that holds the housing in place
Exterior Mirror Lights (the easy 5min way)
0. IF YOU DO NOT READ THIS OR BE GENTLE, YOU WILL ****** IT UP
1. You will need a tiny pry bar and/or 2 credit cards
2. Slide the card at an angle starting from one corner up until the entire credit card is in (see pic)
3. Pop that side of the light housing out pass the trim thats holding it up
4. With second credit card, following step #2, slide the card through
5. While prying on both credit cards slide them toward the door of the car.
6. Once the end has completely popped out, slide the housing assembly toward the door
7. Carefully pull the assembly down
8. Once cleared the mirror, turn the pull off the light assembly from the bulb base
9. Bulb base can only go back in one way.
10. Replace the bulb with LED, then start putting everything back together
11. Put the end closes to the door in first
12. Work your way around with credit cards again to clear the trim that holds the housing in place


Last edited by RomanTPA; 04-23-11 at 11:52 AM.
07-01-10, 02:21 PM
#7
Lead Lap
Thread Starter


Is there a possibility of having electrical problems with the lights because they are LED's?
I have spent only about $25 so far
Last edited by RomanTPA; 08-22-10 at 04:07 PM.
Trending Topics
 07-01-10, 05:46 PM
#9
Lead Lap
Thread Starter
lol. its a new thread. i started a new thread bc the other one was only for interior lights, but i realized that it needs a new threat title and I also wanted to have ALL the info about ALL of the lights in the car in one thread and in the first few posts (hence the reserved space). after im done here, this will be the one and only "GO TO" thread about everything that lights up or glows in the ls430. so keep checking back, bc lights are cheap and its always fun to mess with and to get exactly what you want, so you can have that unique look about your car.

