
Leather car seat cleaning
 09-14-13, 07:53 PM
#1
Driver School Candidate
Thread Starter

Join Date: Mar 2013
Location: California
Posts: 2
Likes: 0
Received 0 Likes
on
0 Posts
Hi everyone! This is my first post. I recently purchased a 2005 RX 330 with tan leather seats. They were really well kept, but I've noticed that the driver's side is starting to become a little darker than I'd like. I've tried wiping the seat down, but it's still not as light as it was. I also tried Meguiar's leather cleaner - which only made my seat worse. Any suggestions?
I've googled this and I've received SO many different "professional" opinions. I'd like to hear what you guys do to maintain your leather.
Thanks for your help!
I've googled this and I've received SO many different "professional" opinions. I'd like to hear what you guys do to maintain your leather.
Thanks for your help!

 09-14-13, 08:20 PM
#3

Welcome to Club Lexus, Infinity5.
You do not mention what color interior you have on your RX. That info may be of some help.
I have used Lexol products for decades now and have never had a problem. However, depending on the reason for the discoloration of your seats you may or may not be able to restore them to their natural color. Try using the Meguiar's on the passenger seat as well to see if it does the same on that side or not. Perhaps the darker color is consistent with the use of this product.
For more information you can search the Automotive Care & Detailing forum here at CL. The moderators will probably move this thread there.
 09-15-13, 09:03 AM
#5
09-15-13, 04:21 PM
#6
Driver School Candidate
Thread Starter
Join Date: Mar 2013
Location: California
Posts: 2
Likes: 0
Received 0 Likes
on
0 Posts
Thank you guys for your warm welcome and responses! 
My interior is all tan. I've heard good things about each product that was mentioned, so I'll probably try them all. (Not all at one time of course ). I'll also check out the Automotive Care & Detailing thread-Thanks for sending RX330inFL.
Have a great week everyone! I'll provide updates!
My interior is all tan. I've heard good things about each product that was mentioned, so I'll probably try them all. (Not all at one time of course
). I'll also check out the Automotive Care & Detailing thread-Thanks for sending RX330inFL.Have a great week everyone! I'll provide updates!
09-15-13, 05:18 PM
#7
Hi everyone! This is my first post. I recently purchased a 2005 RX 330 with tan leather seats. They were really well kept, but I've noticed that the driver's side is starting to become a little darker than I'd like. I've tried wiping the seat down, but it's still not as light as it was. I also tried Meguiar's leather cleaner - which only made my seat worse. Any suggestions?
I've googled this and I've received SO many different "professional" opinions. I'd like to hear what you guys do to maintain your leather.
Thanks for your help!
I've googled this and I've received SO many different "professional" opinions. I'd like to hear what you guys do to maintain your leather.
Thanks for your help!
Trending Topics
 09-16-13, 06:44 AM
#9
A couple of our supporting vendors stock it as does Amazon and several other suppliers.
LM Protection Cream (a water-based fluorocarbon protectant) is unlike oily, greasy conditioners that leave your leather grabby, slippery or shiny. Unlike conditioners, it has the unique advantage of being able to prevent dye transfers from jeans, belts, etc. from ruining your light colored leather. Also unlike conditioners, it dries smooth and silky to the touch so it doesn't attract and hold on to dust and grime.
I use the LM Protection Cream every 2-4 months depending on the condition, environment and usage. Every week, in between treatments, I vacuum and wipe down the leather with a cotton towel dampened with Meguiar's Quik Interior Detailer which leaves added UV protection. This keeps the leather clean and properly hydrated which minimizes the shrinking and swelling cycles. These cycles, caused by hydration changes, are what leads to creasing and eventually cracking.
Last point. You are really not working directly on leather. The surface you see and are addressing is urethane paint which is applied to the leather. If you actually saw the raw leather hyde under the paint you would be astonished at how ugly it looks.
Here is one video of how automotive leather is made:
09-16-13, 11:13 AM
#10

I settled on 1Z/Einszett after a detailer demonstrated some deep leather cleaning with 1Z/Einszett's products and a small random orbital polisher. For heavy stains, I'd recommend their plastic deep cleaner (automotive leather is coated) with a small random orbital polisher (e.g. Griot's). You have to be extremely careful with the orbital polisher or else you can do more harm than good.
Here's a before and after side-by-side photo from that detailer. This was the driver's seat in an LX470:
For normal cleaning and conditioning (and even some heavy), 1Z/Einszett's Lederpflege (Leather Care) works well.
Prior to 1Z/Einszett I was using Leather Master as well. Would also highly recommend them.
Last edited by takeshi74; 09-16-13 at 11:23 AM.
09-16-13, 01:41 PM
#11
Here is a write-up a did a while back that some may find useful.
Leather Care Primer (or more than you want to know about Protected automotive leather.)
In this primer I well tell you what I do and attempt to explain why. I've gotten to these steps through many years (>50) of various product testing, techniques and process changes education and doing extensive leather research.
If you ask a dozen detailers how they care for leather you will probably get a dozen different answers. Most people in the leather industry will tell you that the most important leather care a consumer can do is keep it clean.
The folowing comments apply to automotive (P) protected leather.
My Process:
�Weekly Maintenance: Vacuum and wipe down leather with a white cotton towel dampened with Meguiar's Quik Interior Detailer. Why? To keep the leather clean and properly hydrated which results in less creasing and wear. QID also deposits UV protection.
[B]�Full Detail:[/B ]A 4 step approach every 3-4 months:
I subscribe to the CHAT cleaning method which is suggested by most leading leather professionals.
C = Chemical, H = Heat, A = Agitation, T = Time (dwell time)
When I mix the cleaning solution I use moderately hot water. I typically dilute the LM Strong Leather Cleaner 50/50 with hot water and if I were to use Woolite (Everyday or Delicate) I would also dilute with hot water (10:1 Water to Woolite for strong cleaner and 20:1 for a soft cleaner for normal or lightly soiled conditions.
Steps:
1. I thoroughly vacuum the seats paying special attention to the seams and places like where the seat back meets the seat bottom.
2. I apply some cleaner to a foam applicator pad and squeeze it several times to work up a thick foamy lather, then agitate in circular motions to a small section of the leather (about 1'x1') at a time. I let the foamy mixture dwell for a minute or two then I wipe up the residue with a white, 100% cotton towel. I use white cotton toweling because if the leather is not clean when I wipe up the residue, it will show on the white towel. If the towel does not come up clean I will repeat the cleaning process again until it does. I use a foam applicator because it is gentle and yet effective. Some have asked me if it is ok to use a brush but consider that you are really cleaning paint and if you wouldn't use a brush on your car's paint why would you do so on your painted leather? Better to let the heat and chemical do the work and save the surface of your painted leather.
3. I clean all of the leather then follow with a clean, wrung out, white cotton towel to remove any trace of remaining detergent. [Important step] I remove all traces of the detergent as it can trap and hold dirt if not completely removed. It could also shorten the life of the stitching. I then buff the leather with a dry, white, 100% white cotton towel and let the leather further air dry for 10-15 minutes. A caution, I don't use a lot of water. I don't want to saturate the leather's foam backing, especially if you have perforated leather and around the stitching and seams. If the leather is old and has cracks I want to use minimal water and abrasion as well.
4. I don't use leather conditioners and I'll explain why later in this primer. I use Leather Masters Protection Cream instead. This is a water-based fluorocarbon protectant. There are other suppliers of this type of leather protector, I just happen to prefer LM as they have a long track record of producing this type of protection and has been a high quality product. I apply the protection cream with a white lintless cloth or a clean foam applicator pad and I concentrate on applying a smooth, thin even coat of protection. I do the whole car and then wait 10-15 minutes and gently buff with a 100% cotton towel. This product seals the leather's painted topcoat and is not oily or slippery. This makes leather much easier to clean and highly resistant to dye transfer from jeans and belts, etc. It leaves the original sheen on the leather and it feels silky smooth. This step is akin to applying a sealant to your car's paint.
The most significant thing you can do to preserve leather over time is to keep it clean. Otherwise the dirt will abrade the leather coating and cause early degradation of the painted finish.
This bears repeating... The single most important step to preserve leather is to keep it clean.
You should be aware by now that what you see when looking at protected leather is really just the thin painted urethane topcoat that gives the leather it�s uniform grain and color. The painted topcoat is what makes the leather hyde underneath look like top grain leather. It is what covers the animal skins natural scars and blemishes. It is also what makes the leather resistant to spills and wear.
Every time you slide into the car you are abrading the leather topcoat with any dirt that is on the leather. This is the main reason I don't use conditioners on protected leather. Conditioners are either oily or slippery depending on their makeup and they leave behind a film that holds onto dirt which makes the seats soil and wear more quickly. Sure, the leather will feel nice initially but you are just feeling the film left on the painted topcoat. The feel is short lived and the dirt collects and sticks to the film and the seats then abrade faster. Also consider that the urethane topcoat is impervious to conditioners. It won�t let the oils or wax of the conditioner through to the leather.
If you doubt this try this test. Put a drop of water on your leather seats in an inconspicuous place and let it sit there for an hour. Go back and wipe it up and notice that it has not penetrated the leather topcoat. A water molecule is many times smaller than the complex molecule of a thick oily conditioner and if water can't penetrate the topcoat, a conditioner has no chance of doing so. Often users will tell me that their leather feels softer after using a conditioner and here is why. Leather is made soft in the tanning process. It cannot be made softer that it was originally. Leather can get harder if it has not received proper hydration. If you hydrate leather it will get close to the original factory softness. Leather absorbs moisture through a process called transpiration. This process is effective when the surrounding area has an increased humidity level. So you can soften dried out leather by elevating the humidity or hydration of the leather. You can do this with a weekly wipe-down with a wrung-out towel. Putting a conditioner on the leather may raise the humidity level. If you think some magic has taken place and the oily conditioner has really been absorbed by the leather through the painted topcoat you'd be mistaken. The moisture content of the conditioner (H2O) may have improved the hydration of the leather through transpiration but the leather has not absorbed the oily, messy conditioner.
Conditioning leather that is in good shape can lead to shortening it's life. Conditioning worn and cracked leather is even more detrimental, as the oils can seep through the cracks in the topcoat into the underlying leather and weaken the bond it has to the remaining urethane topcoat, resulting the damaged area expanding.
H2O is the vital lifeblood of leather. Too much and it will shrink and harden as it dries, too little and it will harden and crack. Your goal should be to maintain proper hydration to reduce leathers shrinking and swelling cycles. It is this shrinking and swelling that causes creases and ultimately lead to cracks.
Leather faces a very harsh environment, often it sees temperatures well below zero in the winter in the northern climates and as high as 150� in the summer in the south in a car parked in the sun. When leather gets hot is sheds moisture and when it gets cold it dries out. It's actually remarkable just how well leather handles these extremes but you can help it by maintaining proper hydration and trying to minimize temperature extremes where possible.
If you keep your leather clean and properly hydrated it will last indefinitely.
09-17-13, 06:52 AM
#13
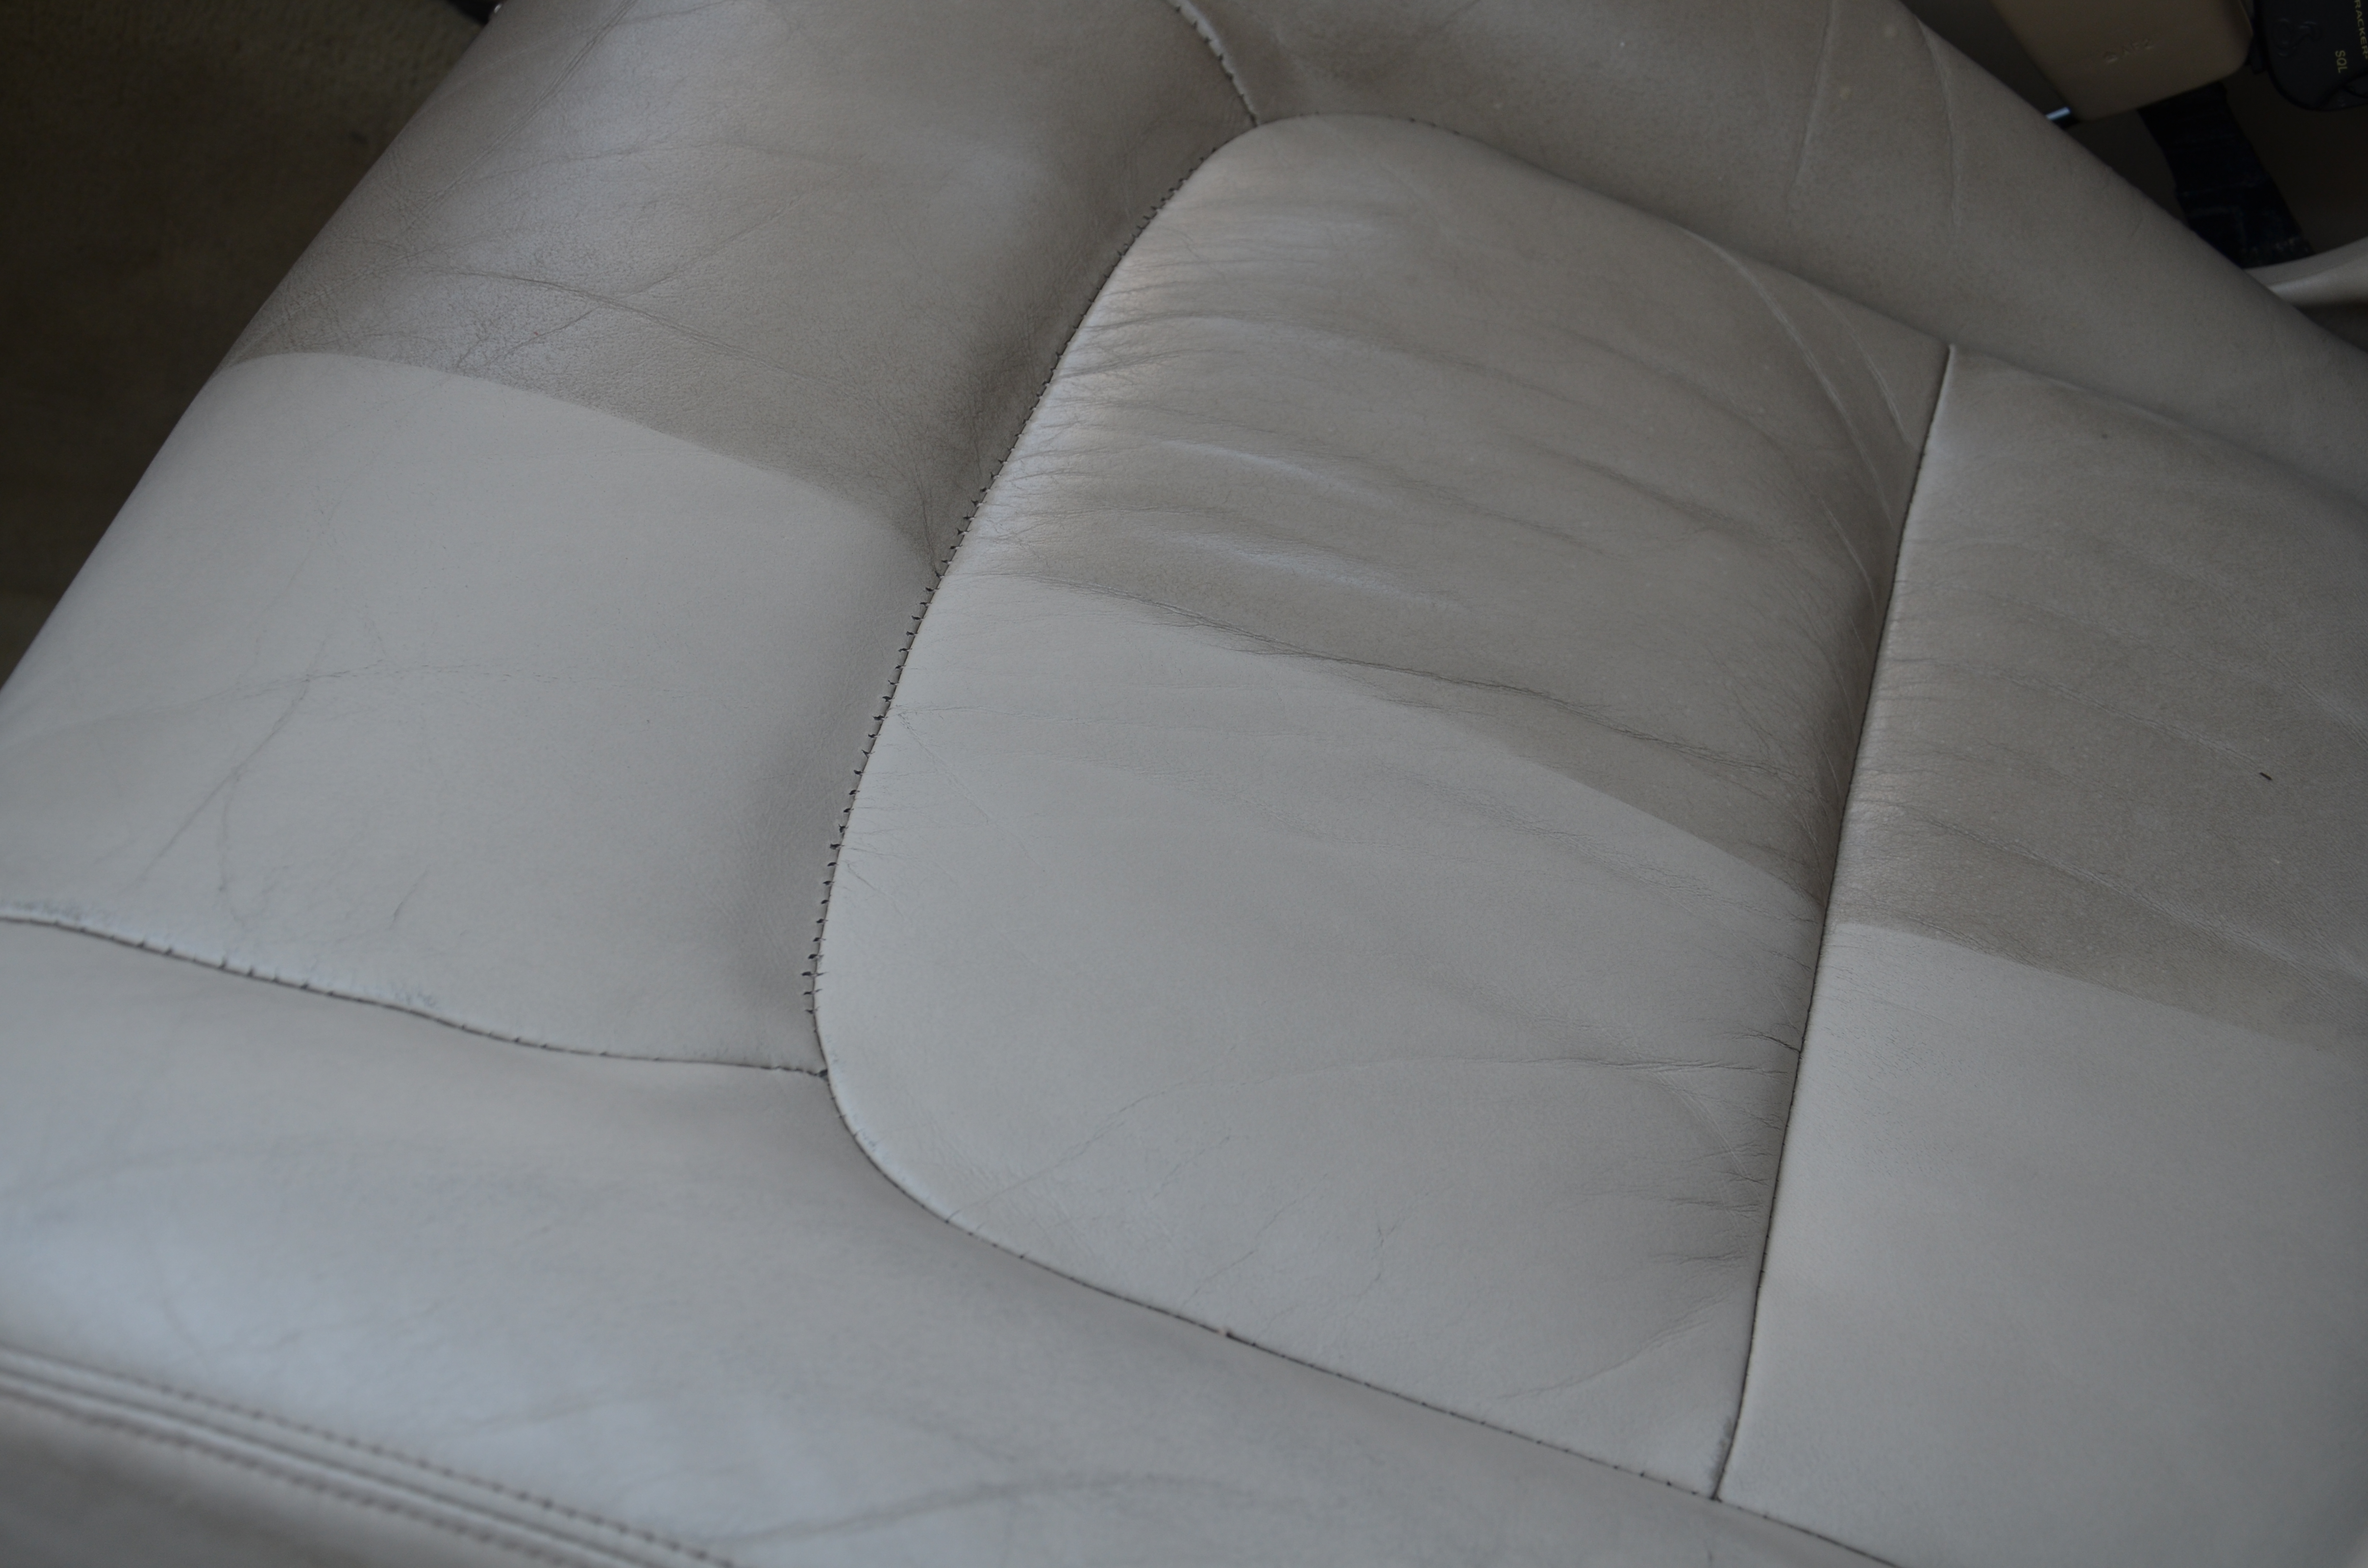
If they are really cracks, you are now into a restoration process. This is rarely successfully accomplished in a DIY process. How about a photo or two? If you have a macro lens try getting a close-up of the affected area(s). If the leather really has cracks and you plan on keeping the vehicle for some time, I'd suggest you take it to a leather restoration shop for a repair estimate. Leather restoration costs go up exponentially as the damaged area expands. Meanwhile, you don't want to get any oils into the cracks as this will cause the surrounding topcoat to loosen its bond to the leather and expand the damage so stay away from conditioners. Another option is finding a good skin from a salvage yard and replacing the damaged leather.
09-17-13, 06:07 PM
#14
Driver School Candidate

Join Date: Aug 2013
Location: NY
Posts: 19
Likes: 0
Received 0 Likes
on
0 Posts
Are they really cracks or just creases. Inspect them with a magnifier to confirm. If they are just creases, hydration will improve this over time. Try wiping the leather with a wrung-out towel once a day for a couple weeks and for the first few days toss the wrung-out towel under the seat for the day. Be cautious about overdoing this as you don't want to introduce so much moisture that mold develops. Slowly re-hydrating the leather will cause it to swell and soften which will reduce the creases. It may not remove them entirely as the leather has already been stretched but you should see improvement.
If they are really cracks, you are now into a restoration process. This is rarely successfully accomplished in a DIY process. How about a photo or two? If you have a macro lens try getting a close-up of the affected area(s). If the leather really has cracks and you plan on keeping the vehicle for some time, I'd suggest you take it to a leather restoration shop for a repair estimate. Leather restoration costs go up exponentially as the damaged area expands. Meanwhile, you don't want to get any oils into the cracks as this will cause the surrounding topcoat to loosen its bond to the leather and expand the damage so stay away from conditioners. Another option is finding a good skin from a salvage yard and replacing the damaged leather.
If they are really cracks, you are now into a restoration process. This is rarely successfully accomplished in a DIY process. How about a photo or two? If you have a macro lens try getting a close-up of the affected area(s). If the leather really has cracks and you plan on keeping the vehicle for some time, I'd suggest you take it to a leather restoration shop for a repair estimate. Leather restoration costs go up exponentially as the damaged area expands. Meanwhile, you don't want to get any oils into the cracks as this will cause the surrounding topcoat to loosen its bond to the leather and expand the damage so stay away from conditioners. Another option is finding a good skin from a salvage yard and replacing the damaged leather.
09-17-13, 07:47 PM
#15
This is a restoration project. If the car is mechanically in good condition and you plan to keep it for a few more years, I'd suggest finding a local leather restoration tech.
If you don't plan on a restoration, you might contact a salvage yard and look for a replacement skin for that seat.
If your plan is to just live with the damage, I'd suggest not using a conditioner on it any longer. A conditioner will cause the cracking and peeling to expand rapidly as the oils get into the leather and loosen the bond to the remaining topcoat.. Only use a water based protector. There are several manufacturers of these leather sealants. Just avoid oily or waxy products. Also any products that contain silicones. The protector wont make the damage look any better but will slow the deterioration a bit.
How old is this vehicle?