
What should I do about my paint swirls?
 02-11-11, 08:46 PM
#1

Okay, so I bought an Obsidian Black '07 IS350 in October. When I got home and washed it, I noticed all the swirls it had. I didn't do anything about it until last month. I tried out Meguiar's Ultimate Compound using an orbital. It got most of the swirls out and it was just light scratches that were left. Today, I washed my car only to find there's even more swirls than ever before!  Any suggestions of what I can try? I don't want to visit the pros and pay like $150 to get buff waxes and that stuff done.
Any suggestions of what I can try? I don't want to visit the pros and pay like $150 to get buff waxes and that stuff done.
 02-11-11, 09:03 PM
#2
Forum Administrator

iTrader: (2)
Did you search this forum for the keywords 'paint swirls' or similar? You'll find dozens of posts with instant answers, no waiting!
Try it with me.
Click search forums
https://www.clublexus.com/forums/search.php
Put 'swirl' in the keyword field and select the 'thread title only' option to narrow your results + pick the detailing forum. You'll get 40+ threads that answer your question right there including the following among many others
https://www.clublexus.com/forums/aut...ighlight=swirl
https://www.clublexus.com/forums/aut...ighlight=swirl
https://www.clublexus.com/forums/aut...ighlight=swirl
Last edited by DaveGS4; 02-11-11 at 09:08 PM.
02-11-11, 09:08 PM
#3
If you don't mind driving up to the Gurnee area when it gets warm outside I can make your car swirl free with my Flex...
Orbitals don't really have alot of power to remove swirls... get yourself a rotary or a nice DA and try some different pads or polish combos...Let me know if you have specific questions!
Orbitals don't really have alot of power to remove swirls... get yourself a rotary or a nice DA and try some different pads or polish combos...Let me know if you have specific questions!
02-12-11, 02:27 PM
#4

Okay, so I bought an Obsidian Black '07 IS350 in October. When I got home and washed it, I noticed all the swirls it had. I didn't do anything about it until last month. I tried out Meguiar's Ultimate Compound using an orbital. It got most of the swirls out and it was just light scratches that were left. Today, I washed my car only to find there's even more swirls than ever before! Any suggestions of what I can try? I don't want to visit the pros and pay like $150 to get buff waxes and that stuff done.
Any suggestions of what I can try? I don't want to visit the pros and pay like $150 to get buff waxes and that stuff done.If you want to do something basic try polishing by hand with the Meguiar's Ultra Finishing Polish M205. Use medium pressure and work the polish in thoroughly. Using a buffer though is a huge help because polishes require more pressure and passes for best results.
If you want a reasonable price on a top quality buffer, pads and polishes to restore the paint yourself, try the DI Packages Porter Cable 7424XP, Meguiar's Polishes and Hydro Pads Basic Kit. This two step process will help permanently remove the swirls and restore a vibrant shine! Best of all this buffer is very safe and easy to use, regardless of prior experience. If you have any questions please don't hesitate to ask!
Greg @ DI
02-12-11, 07:22 PM
#5
Lexus Test Driver
Join Date: Nov 2009
Location: FLORIDA
Posts: 953
Likes: 0
Received 0 Likes
on
0 Posts
Here's a write to read up on so you can get the idea what you can do for your ride and be proud of your own work and pocket the money you will have to pay someone who might do a great job or not.
Finishing with Meguiar�s M105 Ultra Cut Compound
The unique ability of Meguiar�s M105 Ultra Cut Compound to remove scratching and surface defects from paint and leave a remarkably nice finish (while working quickly) has been widely publicized, whether by use with a dual-action (orbital) polisher or with a direct drive rotary polisher. The versatility of this compound isn�t limited to its intended role however: The unique, micro-fine abrasives in M105 are so refined in fact that they are often finer (much) then the fully exhausted abrasives in a traditional diminishing abrasive polish!
This allows M105 to create a truly high gloss, micro scratch free surface that potentially rivals the highest gloss finishes created with other methods and finishing techniques. As an added benefit, the finishing techniques used to achieve that result can save time and help eliminate any chance of unwanted defect return.
Process Overview:
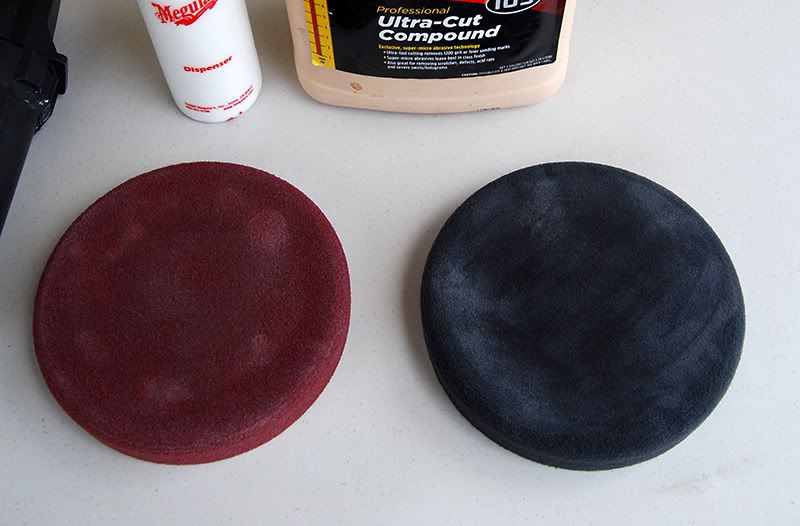
I will be focusing on using M105 with Meguiar�s Softbuff 2.0 pads as well using a dual-action (orbital) polisher. The process I use for finishing M105 consists of taking advantage of Meguiar�s unique abrasives by switching pads (or machines) half way through the process, as explained below. If the entire paint system has already been polished and only light machine marks remain then simply start with the finishing pad.
Step One: Select the appropriate polishing and finishing pads. For the sake of simplicity I am going to use both Meguiar�s Softbuff 2.0 Foam Cutting pad as well as their Softbuff 2.0 Foam Finishing pad. When polishing with a dual-action polisher, I still prefer the more aggressive action from a smaller pad.
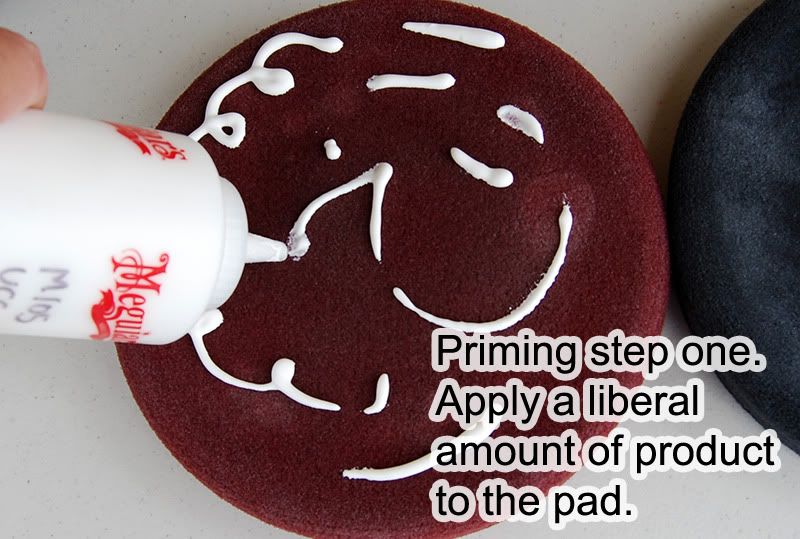
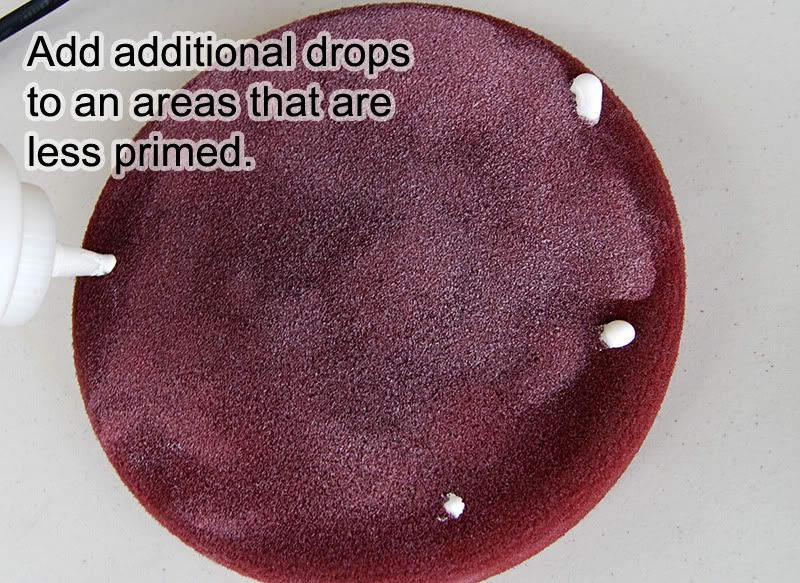
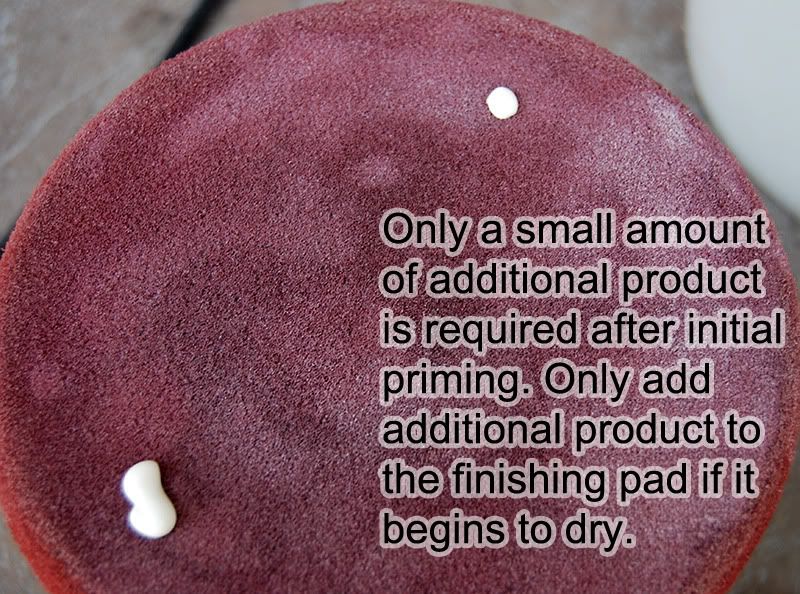
Step Two: Prime each pad with the M105 buffing liquid. This is particularly important for two reasons.
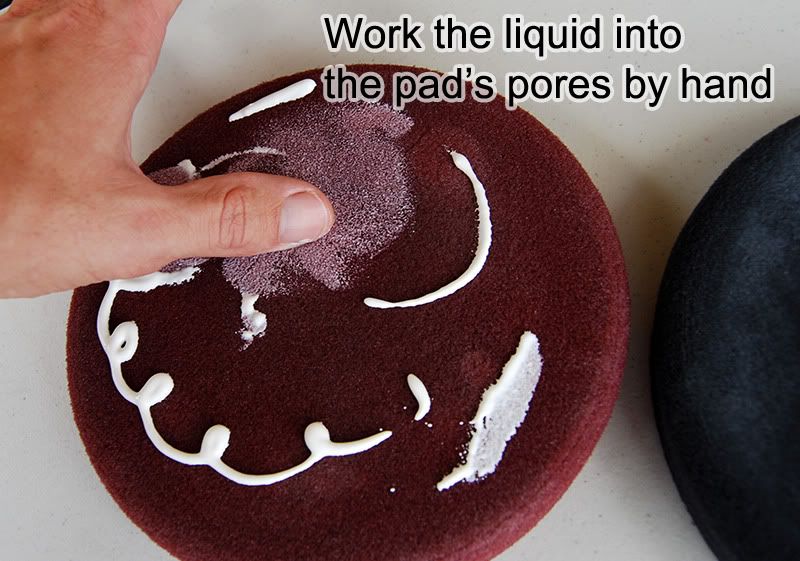
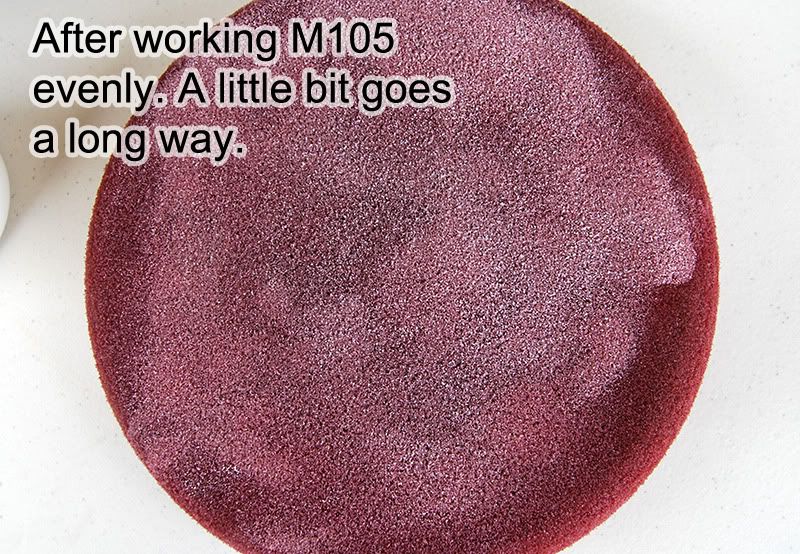
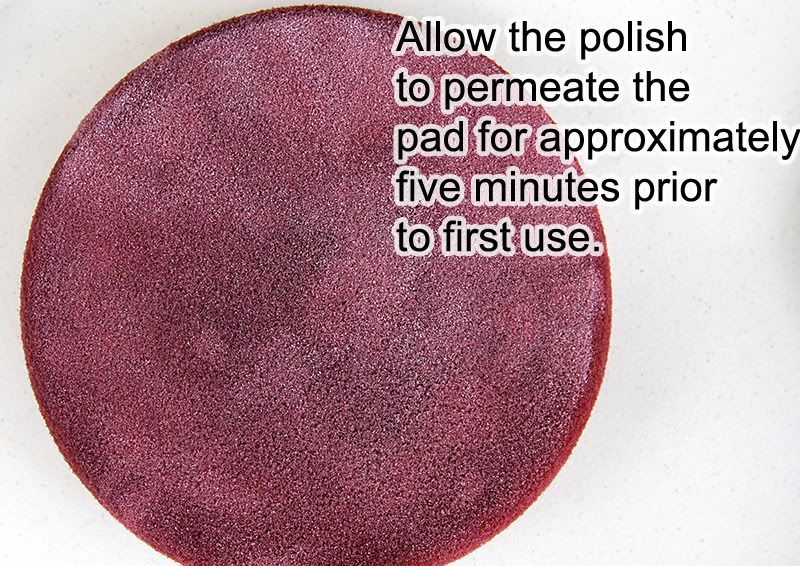
How to prime: Squirt a liberal (but not excessive) amount of product over the pad and immediately begin to work it with your fingers. The goal is coat the face of the pad with product evenly. Allow the polish to permeate the pad for several minutes then remove the excess polish by running the machine and pressing a towel into or using compressed air.
Why is priming important?
For two reasons:
1) When working with non-diminishing abrasives our cutting power limited to how many abrasives can contact the paint at one time (effective surface area). If only two of these fine abrasives are working at a given time we are losing a lot of potential cutting area vs. if two hundred thousand of these fine abrasives are working in unison
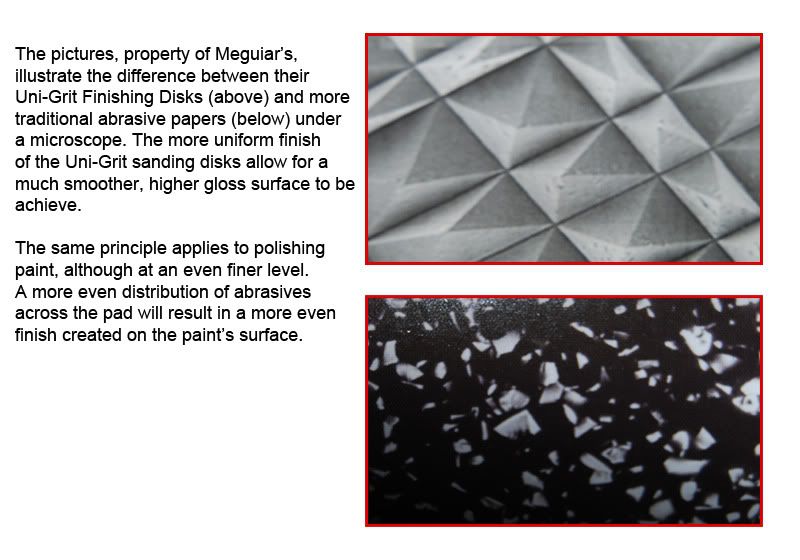
2) Perhaps more importantly for this write up, you want the most microscopically uniform surface available. If you have ever used Meguiar�s Uni-Grit sand paper vs. more traditional abrasive papers would will immediately understand. A more uniform polishing surface creates a more uniform (microscopically level) polished surface. The picture below (from Meguiar�s) illustrates the difference between traditional sanding papers and Meguiar�s Unigrit sanding disks. It is easy to see which will create a higher gloss surface at the microscopic level.
By priming the finishing pad adequately you create a more uniform finishing surface which translates into a higher gloss, micro swirl free finish.
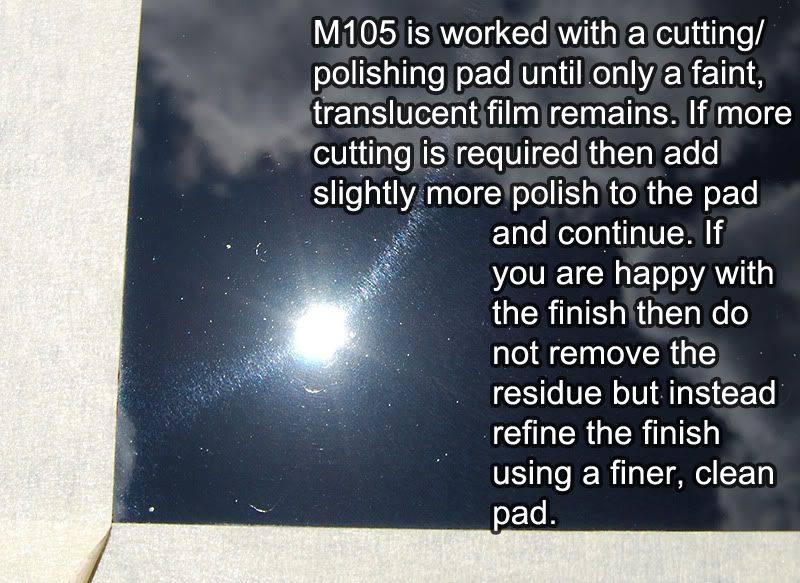
Step Three: Use M105 and a DA in combination with a primed polishing/cutting pad to remove surface defects:
Work a small section, between 2� x 2� and 3� x 3�, depending on your goals, the contours of the body panel, and size of your polishing pad. If the paint requires more correction consider shrinking the working section to allow more focused polishing.
A lot has been written about various techniques and methods for defect removal with Meguiar�s M105 and a dual-action (orbital) polisher so I will offer the following guidelines.
Use enough downward pressure on the head of the machine to engage the pad evenly across the body panel and ensure that the orbital machine is transferred through the pad, to the paint�s surface. Larger and taller pads will require more pressure then a smaller, shorter pad because there is more area absorbing the motion. (Similar to a bowl of Jell-O giggling on itself).
Keep your arm speed constant through out the process and don�t rush. Two inches per second is a great guideline to get started, but like pressure, this is going to be highly dependant on user preference. A little experimentation will so dial you in.
M105 is unique in the fact that it will continue to polish well, even when a product film is no longer present on the paint. However you should check the pad by touch to ensure it is still damp, and inspect the paint by sight to make sure you are still removing defects. If the pad becomes dry to the touch, or you notice that the either the finish quality is degrading or it is no longer effectively removing defects, add more M105. Once the pad is primed you do not need to add at lot. A couple of drops, smear it in with your thumb, and off you go.
Clean your cutting pad frequently, after each section if possible. You can use a brush or towel pressed into the pad (while the machine is running slowly) or compressed air if possible.
Why clean your pad frequently?
The main draw back in achieving a great finish from M105 is not from the polish but from the paint! Abraded paint (polished off the surface) will contaminate the solution and cause the ultra-fine abrasives in M105 to clump to together, creating an uneven polishing surface and degrading the quality of finish achieved. While this is not as important in the polishing/cutting stage as it would be in the finishing stage, I still like to bring the surface to the highest quality possible in each stage. This possibly reduces the work needed on subsequent steps (this is true for all faucets of detailing).
Step Four: Do not remove the residue from the paint when you are doing removing defects from the section unless there is excessive dried residue.
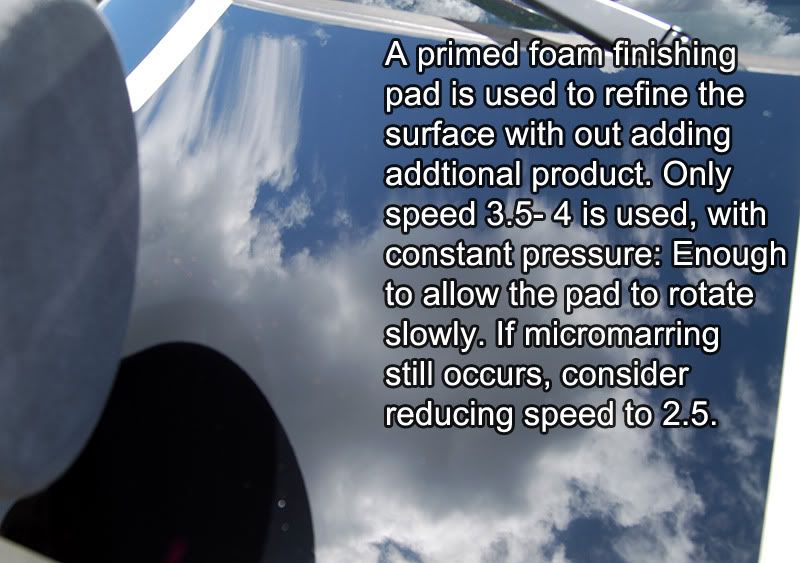
Step Five: Remove any micro marring and achieve a very high gloss finish with M105 in conjunction with a primed and clean finishing pad and a dual action (orbital) polisher. Only add more product to the finishing pad if it becomes dry, and only then a very small amount. However do keep the finishing pad clean! Buff right over the existing residue on the paint.
Because constantly swapping pads isn�t always fun it helps if you have two random orbital polishers. Alternatively you can polish a few sections before switching finishing. Just use common sense and don�t allow the polish to dry on the paint by waiting too long, such as on a very hot day.
Traditional finishing techniques on a dual action (orbital) polisher don�t lend themselves too well to finishing with M105, nor with final polishing in general, in my opinion. This would include reducing pressure and allowing the pad to rotate quickly over the paint.
Don�t reduce pressure and encourage a higher rotational pad speed to �jewel� the paint with a DA and M105. In fact this can cause some unwanted side effects.
Reducing pressure will reduce the orbital motion transferred to the polishing surface from the machine, as the pad will absorb it. We want enough pressure to take up any slack in the pad.
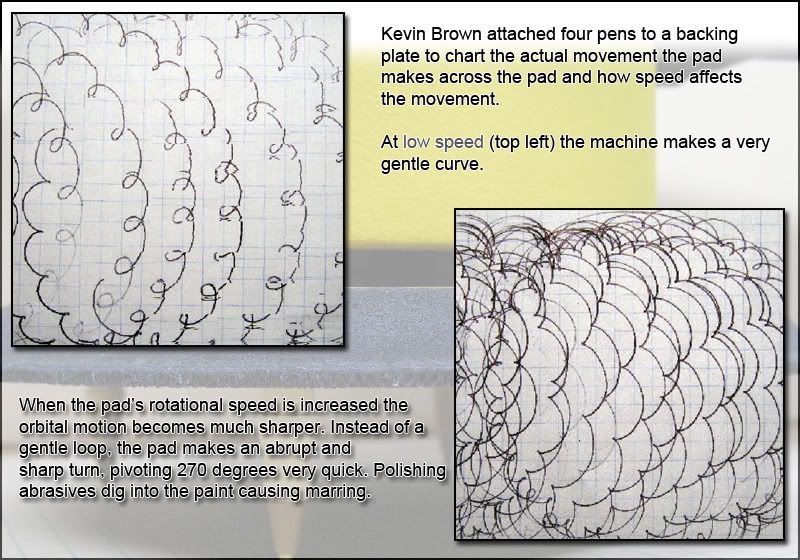
Secondly, when you reduce pressure you will increase the pad�s rotational speed. As the diagram below illustrates, a higher rotational speed in conjunction with the pushing and pulling action for the orbits will cause the pad�s actions to become more abrupt. Instead of a gentle curly-que you will have a more jagged V shape, similar to digging your heal in the ground and pivoting 270 degrees; only in the case of polishing paint it is an abrasive grain that has attached itself to the polishing pad and is being ground into the paint.
The difference in patterns between slow pad speed (top) and a higher rate of rotation (bottom).
Lastly, reducing pressure causes the pad to engage the apint unevenly. As the pad is forced in different directions by the quick, short orbital action and the long sweeping rotational action, different areas of the polishing surface are subjected to different amounts of pressure and cutting action. To create a high gloss, micro scratch free surface you need make the paint as even and as smooth as microscopically possible. Reducing pressure and encouraging more pad rotation is similar to wet sanding paint with your finger tips instead of using a foam block. A sanding block will engage all of the abrasive grains evenly and allow for a more uniform finish. Sanding with your finger tips will cause gouging and a very uneven surface.
Instead of reducing pressure, keep your pressure constant (enough to encourage the pad to evenly conform to the paint�s surface and body contours as well as transfer the orbital motion of the machine to the paint) but reduce speed!
Final polish on speed 3.5-4 using firm (not excessive pressure). Make two to three smooth passes over the area, over lapping each pass slightly, then remove. Continuing to make passes over the area will not increase the finish, but may contaminate the polish reducing the finish.
Wipe off the residue with a soft towel and move on.
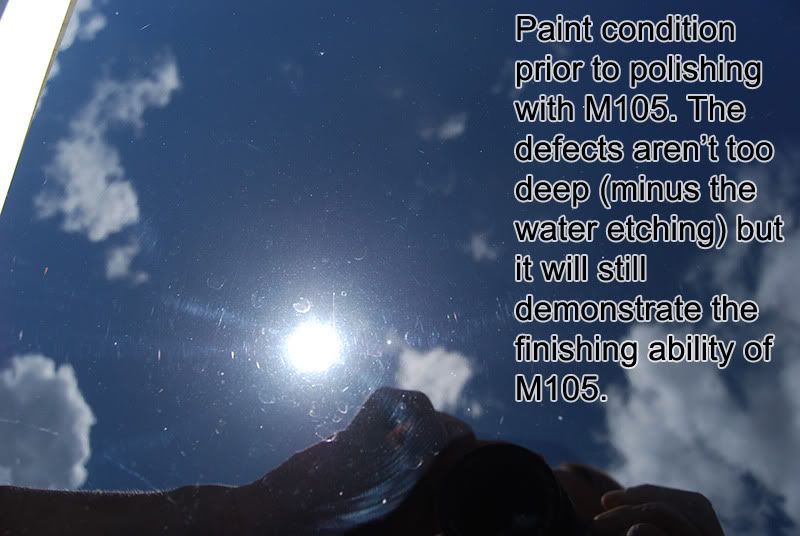
Process in pictures:
Prime pads as illustrated in pictures above.


Cliff Notes:
1) Wash and prep vehicle as needed
2) Prime pads as needed. Always prime a pad prior to its first use.
3) Polish a small section, 2x2 or 3x3 using an aggressive pad appropriate for the level of defect removal.
4) Using the primed and clean finishing pad, polish over the remaining residue with out adding additional product (unless the pad is dry). Use slow arm movement, speed 3.5-4, and just enough pressure to engage the foam. Wipe off.
Common Questions and answers.
I don�t have two machines and it seems like a pain to switch pads frequently, can I polish the entire car with M105 then come back and finish with a softer pad?
Yes. Polish the car as normal but make sure to remove the residue from the paint, like you normally would. Then prime a finishing pad and begin to finish using the guidelines above. The main difference is that you will need to add a small amount of additional product to the pad before each new working area. Make sure to clean you finishing pad often and switch to a clean (but primed) pad when you are no longer achieving the quality of finish.
Do I have to finish polish right after polishing each working section?
No. I would break the hood of my HHR into 4 or 5 polishing sections, and would complete most of those before coming back and final polishing the entire half of the hood. Of course dynamic conditions will effect how well this works. You don�t want to the residue to dry on the surface before final polishing over it.
I tried this technique but am not getting the quality of finish I am used to with other polishes and methods.
Don�t give up yet (if you don�t want to)! Sometimes it takes a little refinement to certain techniques to get the finish and some paint�s simply don�t respond well to certain techniques or products.
How long should it take me to final polish an area, say half of the hood of your HHR?
If you read the run-on sentence slowly and carefully it should take you about the same time as final polishing an area as large as half of the hood as it does to read this because it only takes two to three passes over the areas with light pressure, enough to engage the foam, using speed three point five to four to avoid any jagged edges, because the abrasives do not break down and are already refining the surface from the instant the machine is turned on. Or about 30 seconds.
This write-up is from our Master Detailer Todd Helme.
Enjoy everyone!
02-12-11, 07:24 PM
#6
Lexus Test Driver
Join Date: Nov 2009
Location: FLORIDA
Posts: 953
Likes: 0
Received 0 Likes
on
0 Posts
Here are some kits that will work for you and won't let you down:

Meguiar's M105 Ultra Cut Compound and Meguiar's M205 Ultra Finishing Polish have changed the way that enthusiasts and professional detailers think about random orbital polishes and their ability to do paint correction. The new non-diminishing abrasives used in Meguiar's latest polishes allow the Porter Cable 7424XP to achieve levels of correction once thought to be the domain of professional detailers using rotary polishers, while still offering most of the safety of a random orbital polisher.
ProperAutoCare.com has worked hand in hand with the experts at Meguiar's and Lake Country Manufacturing, along with polishing wizard Kevin Brown, and several of the countries leading professional detailers to create this kit which utilizes Lake Country's 6.5 inch Constant Pressure Flat Pads design to take full advantage of these unique polishes' capabilities. The included Porter Cable 7424XP will accommodate a variety of backing plate sizes for use with different size polishing pads. Use 4-inch Lake Country Constant Pressure Flat pads with the FBP-3.5DA, 3.5 inch Flexible Backing Plate to increase the polishing power of the machine and allow the polisher into tighter areas that larger machines cannot reach.
Meguiar's M105 and M205 polishes deliver a constant polishing action through out the time they are worked. Random orbital style polishers take advantage of this unique property by allowing these polishes to work for a longer time without drying up, ultimately producing better results than commonly thought possible. These super-micro non-diminishing abrasives work better with more pad surface area, which is why we selected Lake Country's Constant Pressure Flat Pads to produce the smoothest polishing action, fastest work results, and best quality of finish.
This kit includes:
1 - Porter Cable 7424XP Polisher
1 - 6" Flexible Hook & Loop Backing Plate
1 - Meguiar's M105 Ultra Cut Compound, 32oz
1 - Meguiar's M205 Ultra Finishing Polish, 32oz
2 - Lake Country Flat 6.5" Orange Power Pads
2 - Lake Country Flat 6.5" White Polishing Pads
1 - Lake Country Flat 6.5" Black Finishing Pad
1 - Meguiar's #34 Final Inspection, 16oz
We include two Lake Country Orange Constant Pressure Flat Power Pads to provide enough power to remove serious defects when used with Meguiar's M105 Ultra Cut Compound. We also include two Lake Country White Constant Pressure Flat Polishing Pads to provide a moderate level of polishing when used with Meguiar's M105 Ultra Cut Compound, or as a great finishing combination when used with Meguiar�s M205 Ultra Finishing Polish. For softer paints, we have included a Lake Country Black Constant Pressure Flat Finishing Pad to increase the gloss on soft paints.
* Meguiar�s M205 Ultra Finishing Polish used with a Lake Country Black Constant Pressure Flat Finishing Pad will remove very light swirl marks and polish the paint to a swirl free, high gloss finish ready for your wax or sealant.
* Meguiar�s M205 Ultra Finishing Polish used with a Lake Country White Constant Pressure Flat Polishing Pad Removes light to moderate defects, compounding marks, and rotary holograms and polishes most paint to a swirl free, high gloss finish ready for your wax or sealant. Some softer paints may require using Meguiar�s M205 Ultra Finishing Polish with a Lake Country Black Constant Pressure Flat Finishing Pad to ensure the highest level of gloss.
* Meguiar�s M105 Ultra Cut Compound used with a Lake Country White Constant Pressure Flat Polishing Pad will remove light to moderate defects. Most paint will require a second polishing step with Meguiar�s M205 Ultra Finishing Polish used with a Lake Country Black Constant Pressure Flat Finishing Pad to ensure the highest level of gloss.
* Meguiar�s M105 Ultra Cut Compound used with a Lake Country Orange Constant Pressure Flat Power Pad will remove moderate to severe defects, bug and water etching, light sanding marks, and blends. This is an aggressive pad and may leave a light hazing on the paint. Removing this haze will require a second polishing step with Meguiar�s M205 Ultra Finishing Polish used with a Lake Country Black Constant Pressure Flat Finishing Pad to ensure the highest level of gloss.
Also check this one out!

This kit includes:
1 - Flex XC3401VRG Dual-Action Polisher
1 - Meguiar's M105 Ultra Cut Compound, 32oz
1 - Meguiar's M205 Ultra Finishing Polish, 32oz
2 - Lake Country Flat 6.5" Orange Power Pads
2 - Lake Country Flat 6.5" White Polishing Pads
1 - Lake Country Flat 6.5" Black Finishing Pad
1 - Meguiar's #34 Final Inspection, 16oz
Machine speed has much to do with your confidence level as you learn to use these polishes. We recommend using speed 5 on the PC 7424 and a speed of 3.5-4 on the Flex XC3401VRG Dual-Action Polisher. Overlap your strokes, using a �slow arm speed� while applying firm pressure. We have found success moving the polisher one to three inches per second allows the polish to correct most blemishes.
The amount of �work� or �cut� accomplished with a non-diminishing abrasive is dependent on the pressure applied to the polisher. For maximum cutting action with the Flex XC3401VRG Dual-Action Polisher, apply 15-20 pounds of pressure on the face of the machine. When using the Porter Cable 7424 random orbital polisher, use enough pressure to slow, but not stall the rotation of the pad. On your final passes over the work area, reduce the pressure and lightly move the machine over the surface to allow the abrasives to jewel away any micro marring left from your polishing.
After polishing a section, remove residue immediately with a high quality microfiber cloth such as our Dragon Fiber Perfect Shine Buffing Cloth.
Because Meguiar's M105 Ultra Cut Compound and Meguiar's M205 Ultra Finishing Polishes' abrasives do not breakdown in the traditional sense, the polishes can be sensitive to contamination. During the polishing process, a trace amount of paint is removed, this can cause the non-diminishing abrasives to �clump� together with the spent paint particles. This can increase the polishing haze left on the paint from heavy polishing, effecting the finish left behind.
ProperAutoCare.com recommends cleaning your pads often by pressing a cotton terry or microfiber cloth against the pad while it spins on the machine. To completely wash the pads use Snappy Clean Pad Cleaning Powder.
Hope at least get you in the right direction, anymore questions you can always call me at PAC.
Meguiar's M105 Ultra Cut Compound and Meguiar's M205 Ultra Finishing Polish have changed the way that enthusiasts and professional detailers think about random orbital polishes and their ability to do paint correction. The new non-diminishing abrasives used in Meguiar's latest polishes allow the Porter Cable 7424XP to achieve levels of correction once thought to be the domain of professional detailers using rotary polishers, while still offering most of the safety of a random orbital polisher.
ProperAutoCare.com has worked hand in hand with the experts at Meguiar's and Lake Country Manufacturing, along with polishing wizard Kevin Brown, and several of the countries leading professional detailers to create this kit which utilizes Lake Country's 6.5 inch Constant Pressure Flat Pads design to take full advantage of these unique polishes' capabilities. The included Porter Cable 7424XP will accommodate a variety of backing plate sizes for use with different size polishing pads. Use 4-inch Lake Country Constant Pressure Flat pads with the FBP-3.5DA, 3.5 inch Flexible Backing Plate to increase the polishing power of the machine and allow the polisher into tighter areas that larger machines cannot reach.
Meguiar's M105 and M205 polishes deliver a constant polishing action through out the time they are worked. Random orbital style polishers take advantage of this unique property by allowing these polishes to work for a longer time without drying up, ultimately producing better results than commonly thought possible. These super-micro non-diminishing abrasives work better with more pad surface area, which is why we selected Lake Country's Constant Pressure Flat Pads to produce the smoothest polishing action, fastest work results, and best quality of finish.
This kit includes:
1 - Porter Cable 7424XP Polisher
1 - 6" Flexible Hook & Loop Backing Plate
1 - Meguiar's M105 Ultra Cut Compound, 32oz
1 - Meguiar's M205 Ultra Finishing Polish, 32oz
2 - Lake Country Flat 6.5" Orange Power Pads
2 - Lake Country Flat 6.5" White Polishing Pads
1 - Lake Country Flat 6.5" Black Finishing Pad
1 - Meguiar's #34 Final Inspection, 16oz
We include two Lake Country Orange Constant Pressure Flat Power Pads to provide enough power to remove serious defects when used with Meguiar's M105 Ultra Cut Compound. We also include two Lake Country White Constant Pressure Flat Polishing Pads to provide a moderate level of polishing when used with Meguiar's M105 Ultra Cut Compound, or as a great finishing combination when used with Meguiar�s M205 Ultra Finishing Polish. For softer paints, we have included a Lake Country Black Constant Pressure Flat Finishing Pad to increase the gloss on soft paints.
* Meguiar�s M205 Ultra Finishing Polish used with a Lake Country Black Constant Pressure Flat Finishing Pad will remove very light swirl marks and polish the paint to a swirl free, high gloss finish ready for your wax or sealant.
* Meguiar�s M205 Ultra Finishing Polish used with a Lake Country White Constant Pressure Flat Polishing Pad Removes light to moderate defects, compounding marks, and rotary holograms and polishes most paint to a swirl free, high gloss finish ready for your wax or sealant. Some softer paints may require using Meguiar�s M205 Ultra Finishing Polish with a Lake Country Black Constant Pressure Flat Finishing Pad to ensure the highest level of gloss.
* Meguiar�s M105 Ultra Cut Compound used with a Lake Country White Constant Pressure Flat Polishing Pad will remove light to moderate defects. Most paint will require a second polishing step with Meguiar�s M205 Ultra Finishing Polish used with a Lake Country Black Constant Pressure Flat Finishing Pad to ensure the highest level of gloss.
* Meguiar�s M105 Ultra Cut Compound used with a Lake Country Orange Constant Pressure Flat Power Pad will remove moderate to severe defects, bug and water etching, light sanding marks, and blends. This is an aggressive pad and may leave a light hazing on the paint. Removing this haze will require a second polishing step with Meguiar�s M205 Ultra Finishing Polish used with a Lake Country Black Constant Pressure Flat Finishing Pad to ensure the highest level of gloss.
Also check this one out!
This kit includes:
1 - Flex XC3401VRG Dual-Action Polisher
1 - Meguiar's M105 Ultra Cut Compound, 32oz
1 - Meguiar's M205 Ultra Finishing Polish, 32oz
2 - Lake Country Flat 6.5" Orange Power Pads
2 - Lake Country Flat 6.5" White Polishing Pads
1 - Lake Country Flat 6.5" Black Finishing Pad
1 - Meguiar's #34 Final Inspection, 16oz
Machine speed has much to do with your confidence level as you learn to use these polishes. We recommend using speed 5 on the PC 7424 and a speed of 3.5-4 on the Flex XC3401VRG Dual-Action Polisher. Overlap your strokes, using a �slow arm speed� while applying firm pressure. We have found success moving the polisher one to three inches per second allows the polish to correct most blemishes.
The amount of �work� or �cut� accomplished with a non-diminishing abrasive is dependent on the pressure applied to the polisher. For maximum cutting action with the Flex XC3401VRG Dual-Action Polisher, apply 15-20 pounds of pressure on the face of the machine. When using the Porter Cable 7424 random orbital polisher, use enough pressure to slow, but not stall the rotation of the pad. On your final passes over the work area, reduce the pressure and lightly move the machine over the surface to allow the abrasives to jewel away any micro marring left from your polishing.
After polishing a section, remove residue immediately with a high quality microfiber cloth such as our Dragon Fiber Perfect Shine Buffing Cloth.
Because Meguiar's M105 Ultra Cut Compound and Meguiar's M205 Ultra Finishing Polishes' abrasives do not breakdown in the traditional sense, the polishes can be sensitive to contamination. During the polishing process, a trace amount of paint is removed, this can cause the non-diminishing abrasives to �clump� together with the spent paint particles. This can increase the polishing haze left on the paint from heavy polishing, effecting the finish left behind.
ProperAutoCare.com recommends cleaning your pads often by pressing a cotton terry or microfiber cloth against the pad while it spins on the machine. To completely wash the pads use Snappy Clean Pad Cleaning Powder.
Hope at least get you in the right direction, anymore questions you can always call me at PAC.
02-14-11, 08:25 AM
#7
Former Sponsor

Join Date: Nov 2009
Location: FL
Posts: 209
Likes: 0
Received 0 Likes
on
0 Posts
Swirls in your paint are microscopic scratches, millions of them running in all directions. The reason they look circular is because the edges of different scratches are reflecting off a central light source.
What causes swirl marks?
Paint (or in the case of modern cars, the clear coat) is farily soft, so any time something abrasive is rubbed over the paint, it scratches... It could be the dirt on the car, a coarse or dirty wash mitt, a coarse drying towel.. etc... Or in the case of the OP, most guys (as in 99%) who use a buffer don't know what they are doing an end up leaving swirls in the paint. This would be guys at dealerships, detail shops, body shops, or cheap (I'll buff your car out for 100-200) detailers.
How do you remove swirls?
Clay or wax will not remove swirls. Wax can help hide swirls, but it will not remove them. Think of your paint like a mountain range or terrain. The peaks of the mountain range represent the top of the paint, the valleys between the mountains are the scratches (the low spots). To remove the swirls you have to remove all of the paint above the lowest point of the valley. You don't remove swirl marks, you remove the paint around the swirl marks to create a fresh, level surface.
This is done by using ultra fine abrasives, usually in a liquid form, called a polish. While it is possible to do this by hand (given you have several days or weeks) it is most effectively done with a machine, the proper products, and experience.
The paint on your car is thin (on Mazda's it is even thinner). You have less than the thickness of a sheet of paper of clear coat to work with, total! If you remove more than 30 percent of this ( 1/3 the thickcness of a sheet of paper) you could comprimise the clear coat and cause long term damage. If you remove even more than that, you could burn through the clear coat and hit the base coat underneath, requiring a respray.
Your best bet is going to be A) take it to a high level professional detailer who can educate you on the best way to wash your car when you are done to prevent creating more scratches or b) buy the proper equipment, take your time, and do the best you can.
Truly leveling paint and making it 'perfect' is an art form, which is why 99% of the polishes out there have fillers. Fillers are oils, waxes, or clays (not detailing clay) that actually mask the swirl marks like make-up. The paint will look great for a couple of hours or days, but soon the make up wears off and you are left with a surface that usually looks worse than what you started with.

Thread
Thread Starter
Forum
Replies
Last Post