
First time detailing LS. Still a little confused after doing research.
 10-01-17 | 11:39 PM
#1
Thread Starter
Racer
Joined: Apr 2016
Posts: 1,846
Likes: 115
From: Sacramento, CA
I've read through quite a few car care threads here, as well as viewed a ton of YouTube videos, and am about to embark on detailing our 2013 LS myself. I plan to invest in the following:
Porter Cable 7424
Astro 4807 Velcro Backing Pad
Chemical Guys Hex-Logic Buffing Pad Kit
Meguiar's Ultimate Liquid Wax
Set of microfiber towels
I am not sure if I should get the Meguiar's Ultimate Compound and/or Ultimate Polish too. I read the Polish is what provides the shine and the Wax is the protectant. My goal/expectation is to get a longer lasting "wet" look than the typical result coming out of an automated carwash. I don't really want to deal with clay baring but please enlighten me on the pitfalls of what I plan to do:
1. Take the car through a car wash (that happens to also apply its own wax, is this a problem?). I'm in California and we are under city ordinances to conserver water. The car wash facility recycles their water, whereas if I wash the car myself then the runoff goes down the storm drain. I have tried Optimum "water less" Wash and Wax and can clean the car with minimal water if that is the recommended route. I just don't have the luxury to spend hours washing and waxing the LS.
2. Drive home, park in the garage, and apply Meguiar's Ultimate Liquid Wax on clean car using either the orange or black pad.
I have some fine scratches and swirls on the trunk lid. Should I hit those areas with the PC 7424 and Ultimate Polish first? Or should I do the whole car with Ultimate Polish then do it again with Ultimate Wax? Thank you for any guidance and recommendations for product/pad combinations to use for this first-timer.
10-02-17 | 06:32 AM
#2
Pole Position
Joined: Dec 2014
Posts: 2,349
Likes: 559
From: il.
I would not even consider proceeding until I clayed the whole car prior to paint correction. Do a search on here for claying. Any speck stuck to the paint prior to buffing can be picked up by the buffer and scratch the surface even more. It's pretty tough to damage the surface with clay if done properly.
10-02-17 | 06:50 AM
#3
Thread Starter
Racer
Joined: Apr 2016
Posts: 1,846
Likes: 115
From: Sacramento, CA
Thank you, Charley. It is that important, huh? Alright, I will make time for the clay bar. I read about the quicker and easier to do nanoskin bars but I don't know how well those really work at absorbing contaminants like a clay bar does. Thank you for the input.
10-02-17 | 07:09 AM
#4
Pole Position
Joined: Dec 2014
Posts: 2,349
Likes: 559
From: il.
I just corrected my 14 black RX last week and used Mother's Brand Speed Clay 2.0. Check around your area at auto parts stores... There are so many different clay bar products out there, just use what works best for you.
The following users liked this post:
FatherTo1 (10-03-17)
10-02-17 | 08:05 AM
#5
1) Wash - use Optimum No Rinse to remove loose dirt and contaminants from your vehicle. Work panel by panel.
2) Decontaminate (detailing clay bar) - with the panel still wet after washing with ONR, mist some more ONR onto the surface for additional lubrication and then use a fine grade clay bar to remove bonded contaminants from the paint.
3) Paint correction / Machine Polishing - use a dual action polisher, paired with the appropriate pads, compounds and polishes to remove superficial defects such as swirl marks and light scratches.
4) Paint Protection - apply the paint protection product of your choice per the manufacturer’s directions (waxes, sealants, and nano coatings are all forms of paint protection).
5) Misc. Other Tasks - dress tires, polish exhaust tips, clean glass, dress plastic, etc. etc. etc.
This is a high level outline of the detailing process. To maximize your results, you should perform all steps.
You had inquired about the importance of decontamination... it is very important, and must be done prior to using a polisher on the paint. If the tiny particles of that have bonded to the paint are not removed, they will likely be broken free while polishing. The tiny particles are then trapped between the face of the pad and the surface of the paint and can actually create tiny scratches as you are polishing. This is why the paint must be perfectly clean prior.
As far as paint correction or machine polishing goes... I highly doubt swirl marks are isolated to just a few ares of your vehicle. Take a look under proper inspection lighting, and I bet you will see that your entire vehicle needs to go through a proper paint correction process.
If you have any questions, please let me know
-Zach
The following users liked this post:
FatherTo1 (10-03-17)
10-03-17 | 02:44 PM
#6
Thread Starter
Racer
Joined: Apr 2016
Posts: 1,846
Likes: 115
From: Sacramento, CA
1) Wash - use Optimum No Rinse to remove loose dirt and contaminants from your vehicle. Work panel by panel.
2) Decontaminate (detailing clay bar) - with the panel still wet after washing with ONR, mist some more ONR onto the surface for additional lubrication and then use a fine grade clay bar to remove bonded contaminants from the paint.
3) Paint correction / Machine Polishing - use a dual action polisher, paired with the appropriate pads, compounds and polishes to remove superficial defects such as swirl marks and light scratches.
4) Paint Protection - apply the paint protection product of your choice per the manufacturer�s directions (waxes, sealants, and nano coatings are all forms of paint protection).
5) Misc. Other Tasks - dress tires, polish exhaust tips, clean glass, dress plastic, etc. etc. etc.
This is a high level outline of the detailing process. To maximize your results, you should perform all steps.
You had inquired about the importance of decontamination... it is very important, and must be done prior to using a polisher on the paint. If the tiny particles of that have bonded to the paint are not removed, they will likely be broken free while polishing. The tiny particles are then trapped between the face of the pad and the surface of the paint and can actually create tiny scratches as you are polishing. This is why the paint must be perfectly clean prior.
As far as paint correction or machine polishing goes... I highly doubt swirl marks are isolated to just a few ares of your vehicle. Take a look under proper inspection lighting, and I bet you will see that your entire vehicle needs to go through a proper paint correction process.
If you have any questions, please let me know
-Zach
I also have a clear bra film that came pre-installed on the car. Should I use the orbital buffer and polish and then wax the clear film too? If not then I'm not sure how to handle the area of paint along the edge of the clear film. Should I reserve the last few inches to do by hand? Thanks again, Zach. We usually get a big downpour this first week of October but the forecasts shows all clear for the next few weeks. This will give me time to gather the tools and plan for the work ahead. Someone just backed into my driver's side rear door. I am getting ready to have it repaired but that reminds me that I probably won't be able to touch or wax that panel for at least 30 days (which means after the rain). Darn it. At least I can still do the rest of the car.
10-03-17 | 10:51 PM
#7
Regular ONR would be preferred, but since you're polishing the car anyways it'll remove the wax that ONR wash & wax will apply. For the clear bra, tape the edge where it meets the paint, so the buffer doesn't come into contact with the film and make it lift. Also, try to avoid getting clay stuck under the film too.
Trending Topics
10-03-17 | 10:56 PM
#8
Thread Starter
Racer
Joined: Apr 2016
Posts: 1,846
Likes: 115
From: Sacramento, CA
Regular ONR would be preferred, but since you're polishing the car anyways it'll remove the wax that ONR wash & wax will apply. For the clear bra, tape the edge where it meets the paint, so the buffer doesn't come into contact with the film and make it lift. Also, try to avoid getting clay stuck under the film too.
10-03-17 | 11:38 PM
#9
Thank you, Blkexcoupe! After taping the edge of the clear bra, do I still use the orbital buffer to polish and wax the main part of the clear bra? Also, clean the car with ONR Wash & Wax, will the wax component get in the way of me clay barring the car next? Basically, will the clay bar still be able to pick up contaminants if the ONR wax layer is on everything?
The clay bar will still be able to pick up contaminants with ONR wax applied.
10-04-17 | 06:51 AM
#10
Thank you very much, Zach! Okay, I will cross out the idea about taking it through the commercial car wash and will set aside a Saturday to use Optimum and clean, decontaminate, and correct. Would you use Optimum No Rinse Wash or is it okay to use the ONR Wash & WAX?? I currently only have the Wash & Wax version.
You are correct, I noticed more scratches on the roof and door panels. I really need to stop going through the convenience of Quick Quack car wash as I am now convinced it is scratching up my paint with grit and dirt that may be trapped in the rollers and brushes. Sigh.
I also have a clear bra film that came pre-installed on the car. Should I use the orbital buffer and polish and then wax the clear film too? If not then I'm not sure how to handle the area of paint along the edge of the clear film. Should I reserve the last few inches to do by hand?
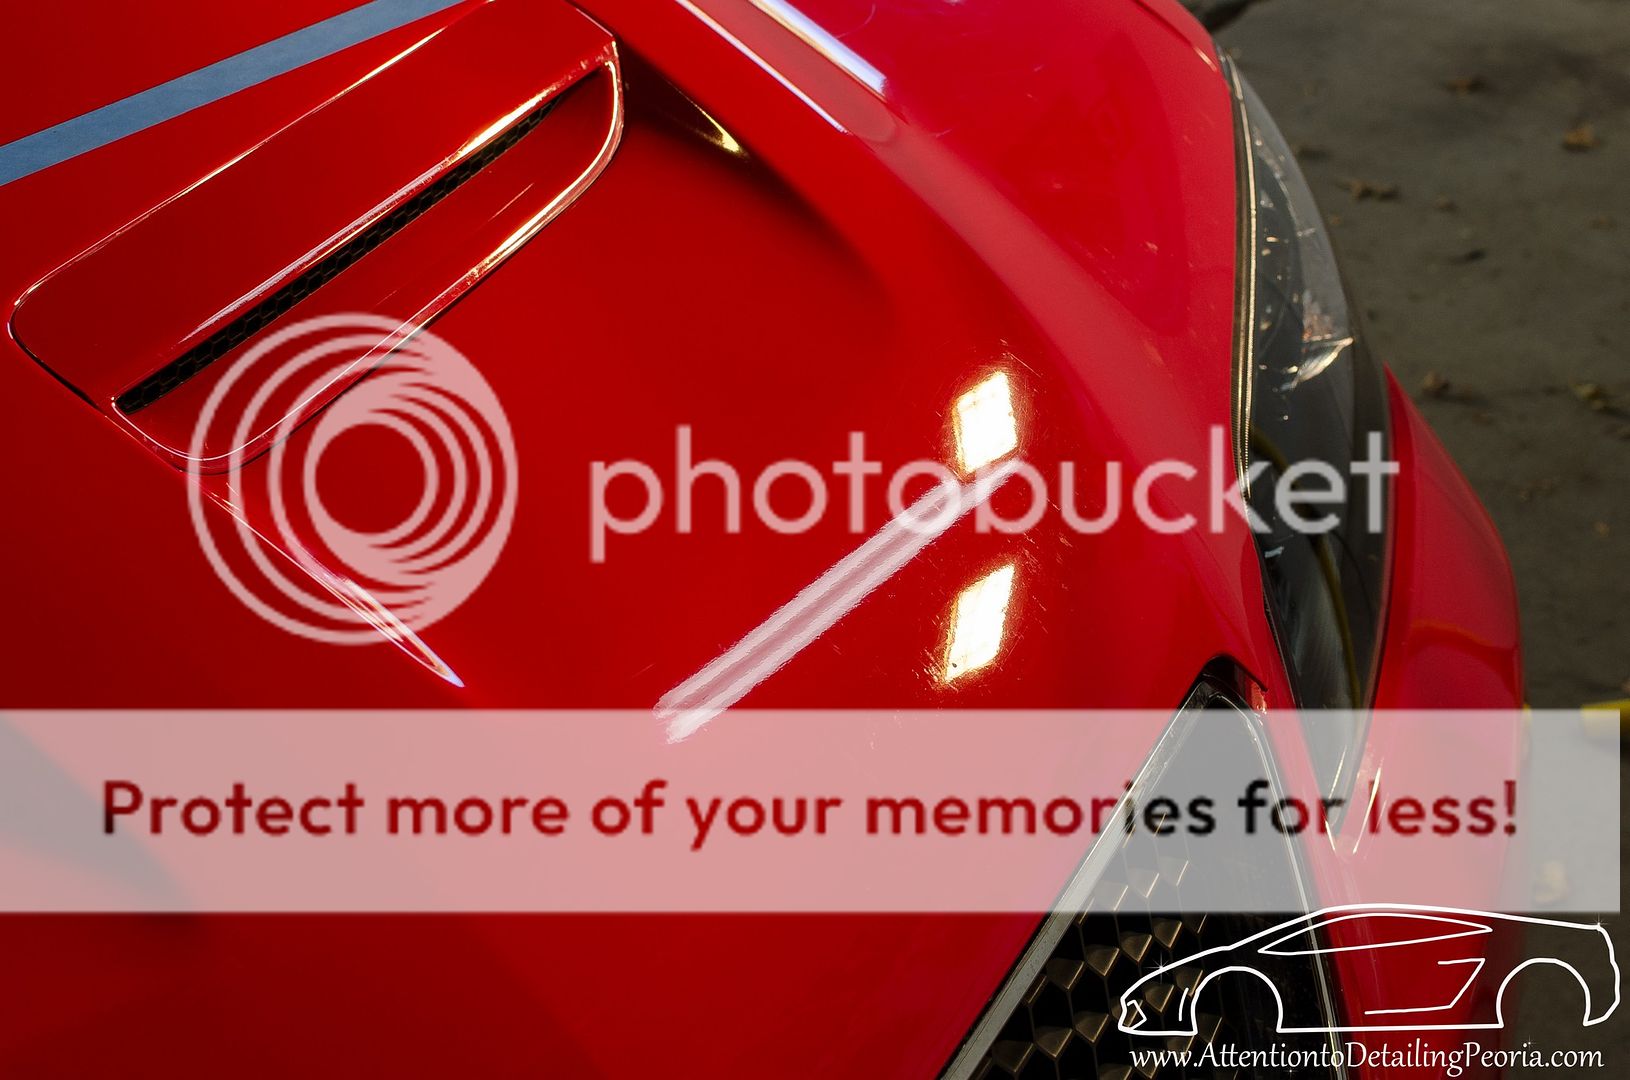
Here is an example of some clear bra that honestly needs to be replaced... but the owner just wanted it cleaned up a bit while we were doing the correction work on the rest of the paint.
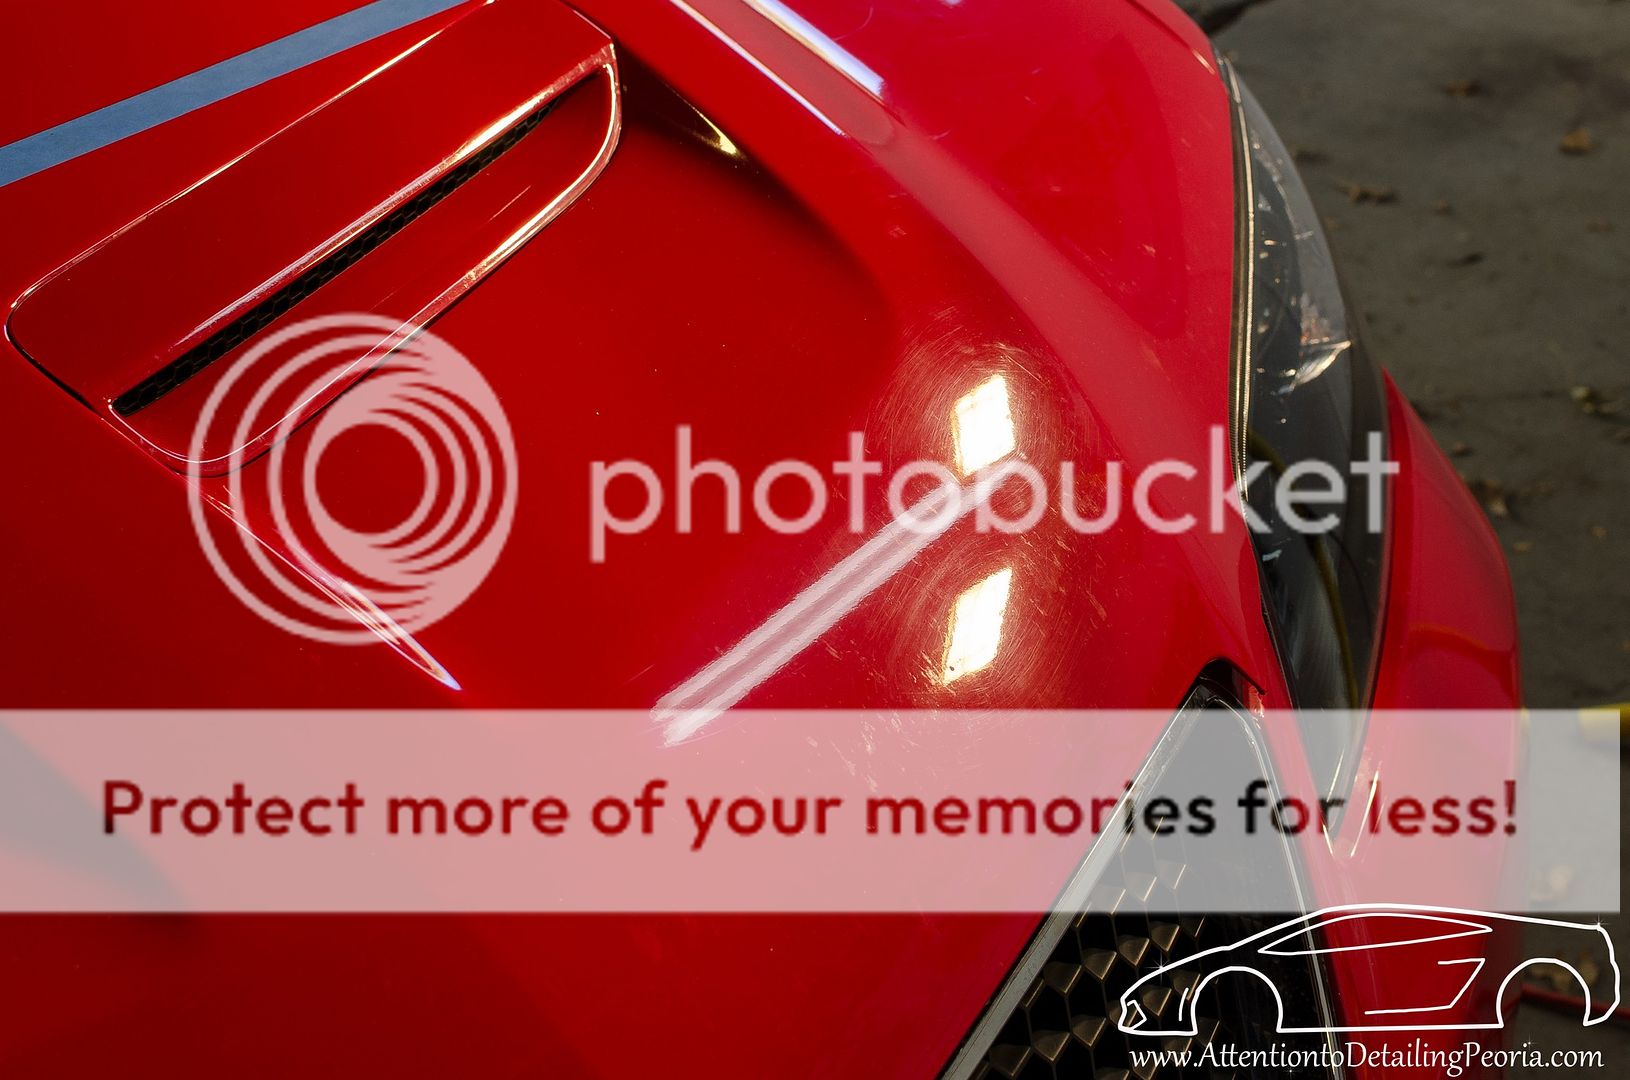
There were tons of tiny imperfections in it from years of driving impacts and some etching from bug guts, but just a light polish cleaned up the haziness from the swirl marks and helped improve the clarity of the worn clear film...
 10-04-17 | 09:02 AM
#11
Thread Starter
Racer
Joined: Apr 2016
Posts: 1,846
Likes: 115
From: Sacramento, CA
Here is an example of some clear bra that honestly needs to be replaced... but the owner just wanted it cleaned up a bit while we were doing the correction work on the rest of the paint.

There were tons of tiny imperfections in it from years of driving impacts and some etching from bug guts, but just a light polish cleaned up the haziness from the swirl marks and helped improve the clarity of the worn clear film...

 10-04-17 | 07:21 PM
#13
Thread Starter
Racer
Joined: Apr 2016
Posts: 1,846
Likes: 115
From: Sacramento, CA
Aww man, I'm really pumped to start on the LS. I waited the full 30 days after my hood was repainted and let a bunch of dirt accumulate before washing the car (admittedly through yet another automated car wash, I will stop doing that). A small dent on my door, due to a clueless driver, is set for repair soon. Are you suggesting I wait much longer beyond the 30-day period before beginning my project? I was planning to order everything soon, perhaps tonight, and planned to start working on the car this weekend and just not clay/polish/wax the door with the dent.
10-05-17 | 06:41 AM
#14
There was no need to wait to wash the car... there is also no need to wait to clay or polish fresh paint as long as you are using body shop safe products. The issue is waxing or sealing fresh paint as it no longer allows the gases to escape from the paint while it is curing which can lead to defects in the finish.
If it has been 30 days, you are likely OK to proceed with the entire process, including waxing and sealing, however I have heard some body shops recommending to wait up to 90 days before applying any sort of wax or sealant. To be safe, I would contact the shop that did the paintwork and get their official recommendation.
If it has been 30 days, you are likely OK to proceed with the entire process, including waxing and sealing, however I have heard some body shops recommending to wait up to 90 days before applying any sort of wax or sealant. To be safe, I would contact the shop that did the paintwork and get their official recommendation.
The following users liked this post:
FatherTo1 (10-05-17)
10-11-17 | 01:24 PM
#15
Thread Starter
Racer
Joined: Apr 2016
Posts: 1,846
Likes: 115
From: Sacramento, CA
Alright, I have all the products and am ready to go this weekend. After washing and claying, when applying the polish do I keep making overlapping passes with the orbital buffer until the polish dries? Same question with the Meguiars Ultimate Liquid Wax. I read the instructions but it's not clear to me whether we keep making passes until the product becomes dry under the orbital buffer OR we make several passes and then stop and let the product dry itself, then completely wipe off once it has dried for a minute or two.