
CCColtsicehockey (Formerly WReuroR) 2008 USB Build
 06-13-23, 10:58 AM
#1
Back when I first bought this car this section didn't exist. The first time around I bought this car the beginning of Sept 2010. I then sold it to a buddy Oct 2015 after purchasing a CTSV Wagon. He was ready to get rid of it last spring and I purchased it back in March of 2022.
Figured I would consolidate some of my old single posts about the car into one here while also documenting everything new. Back then my username was WReuroR and it was until just today actually. A setting update for the site allowed me to request having my username switched to the same one I use on pretty much every other forum and even Instagram.
Original Post Date: Sept 9, 2020
https://www.clublexus.com/forums/is-...een-isf-d.html
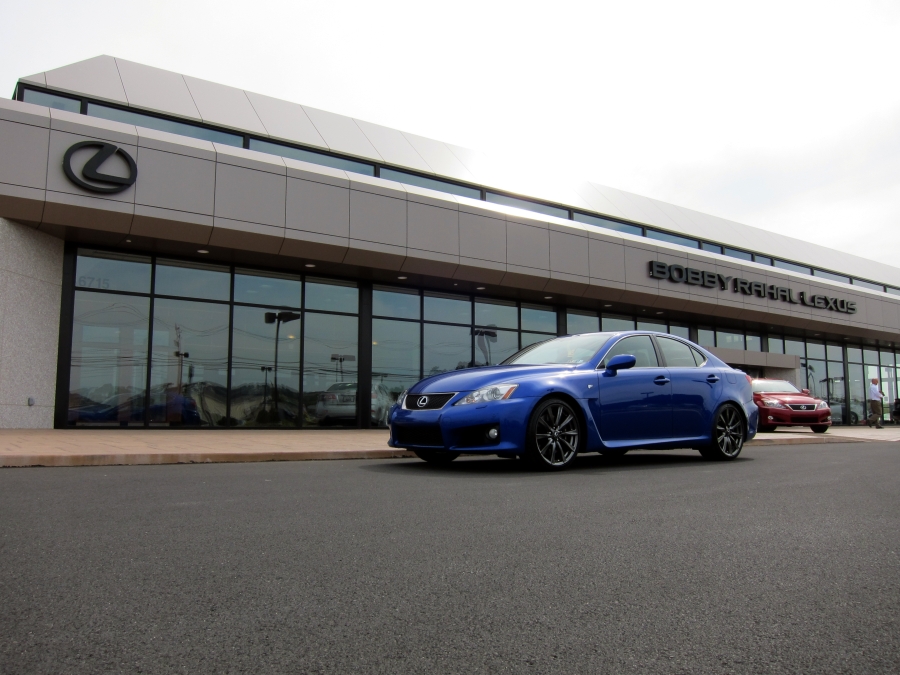
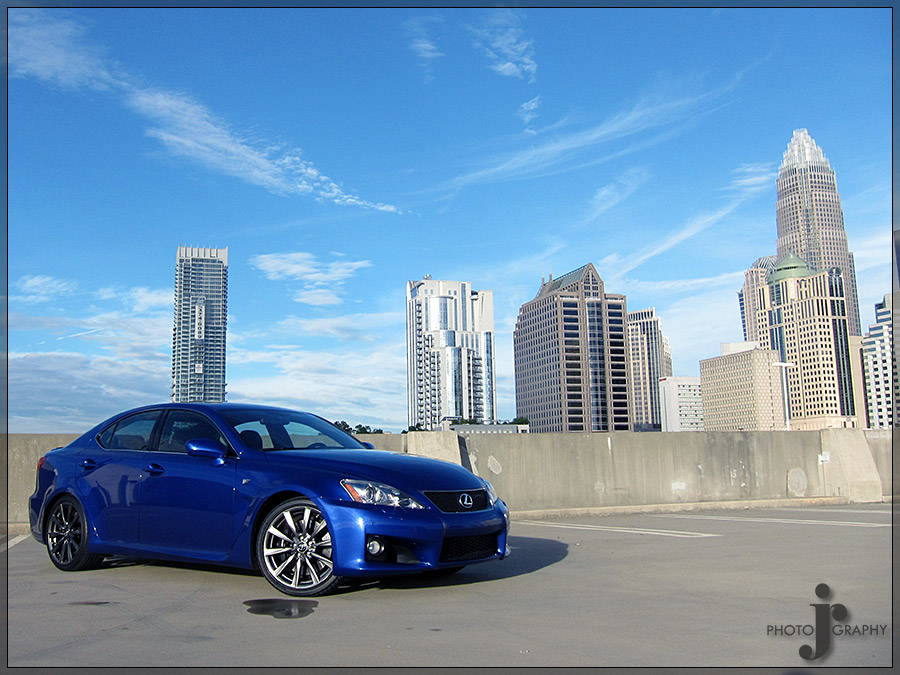
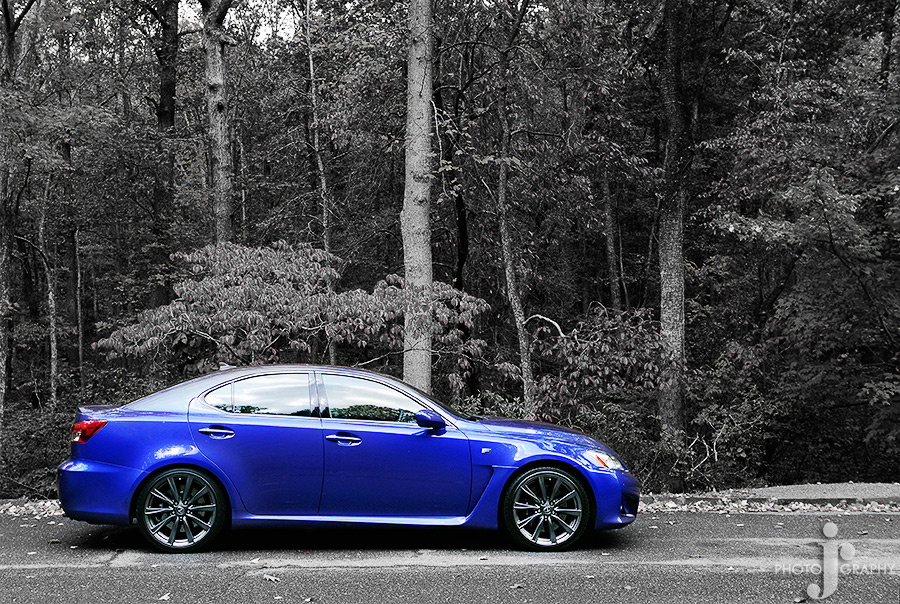
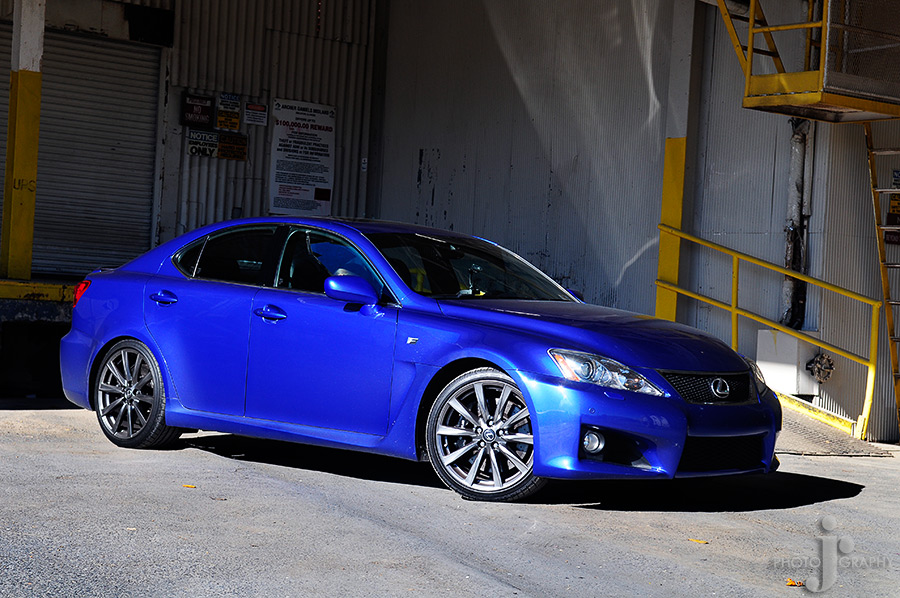
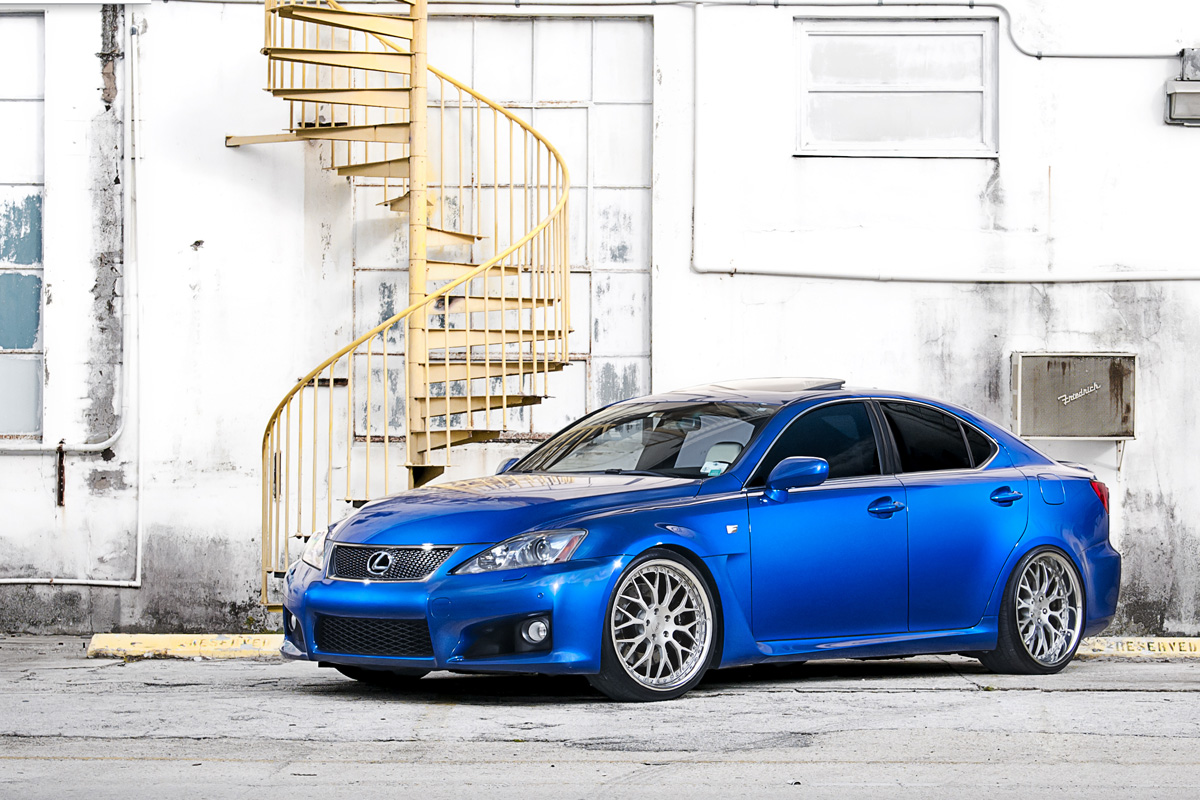
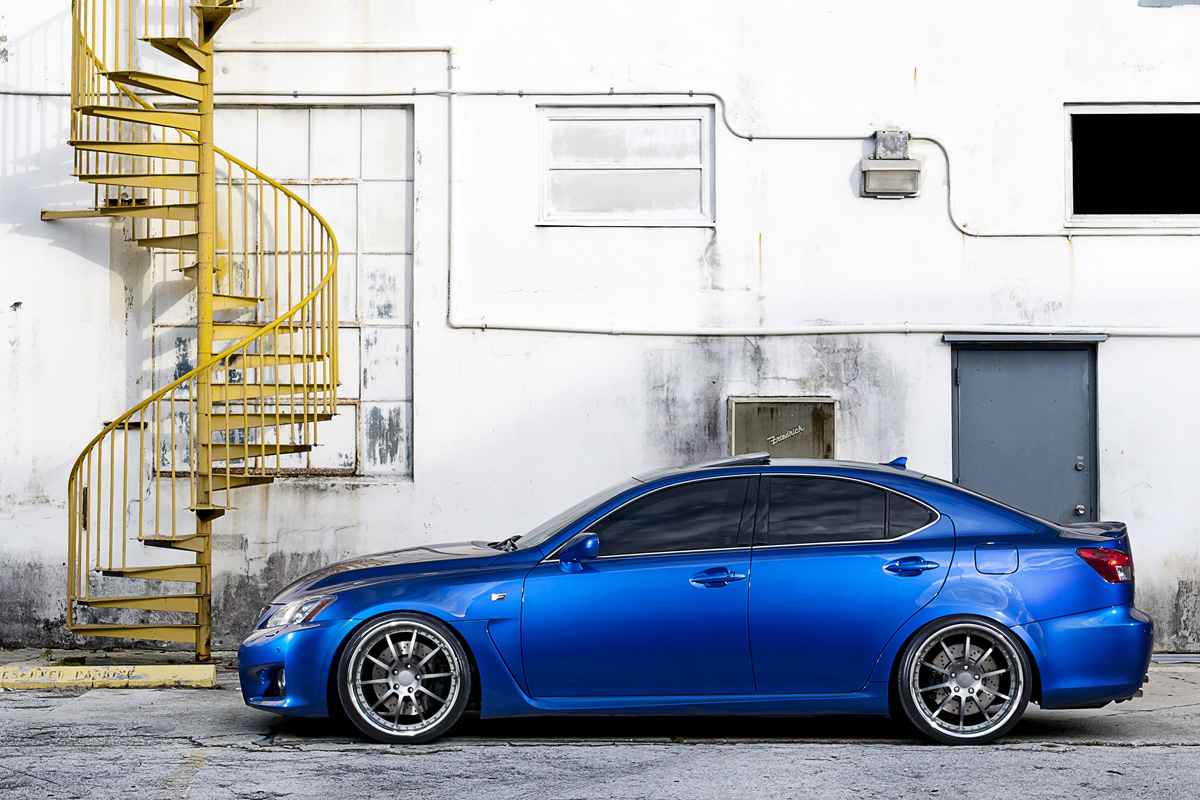
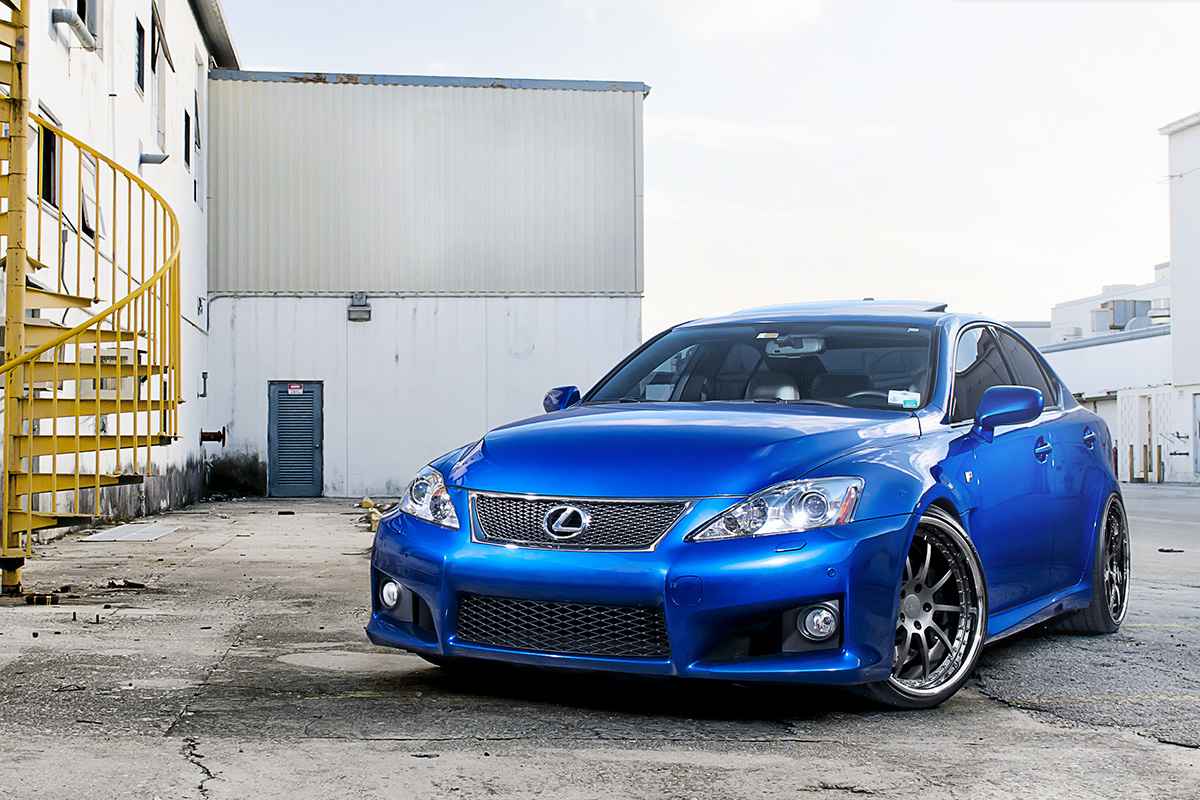
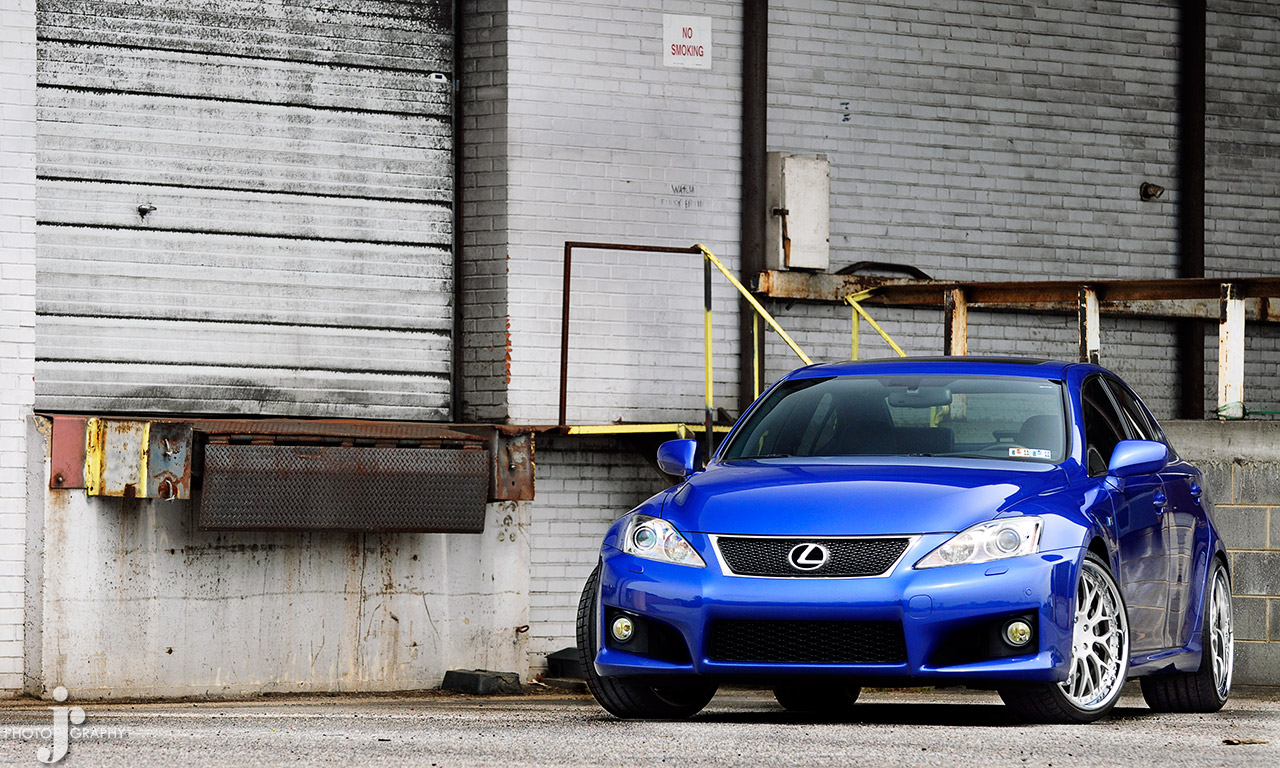
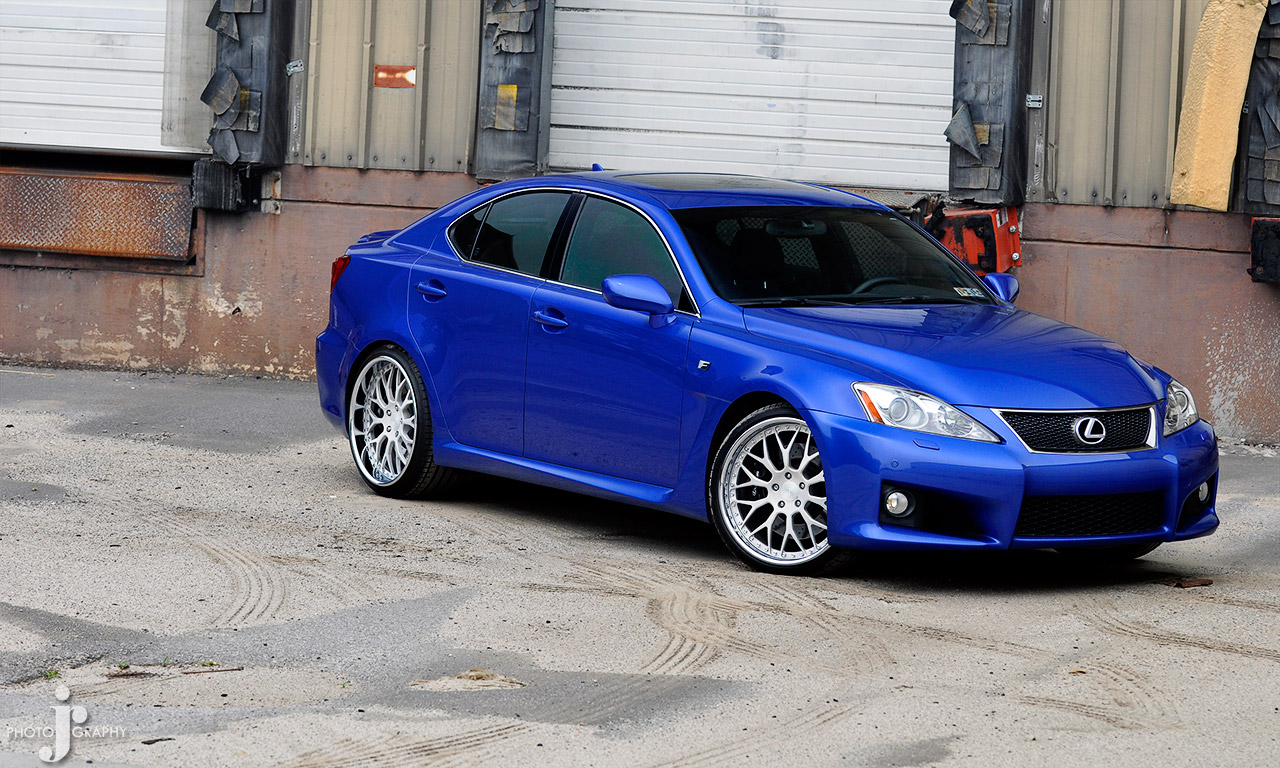
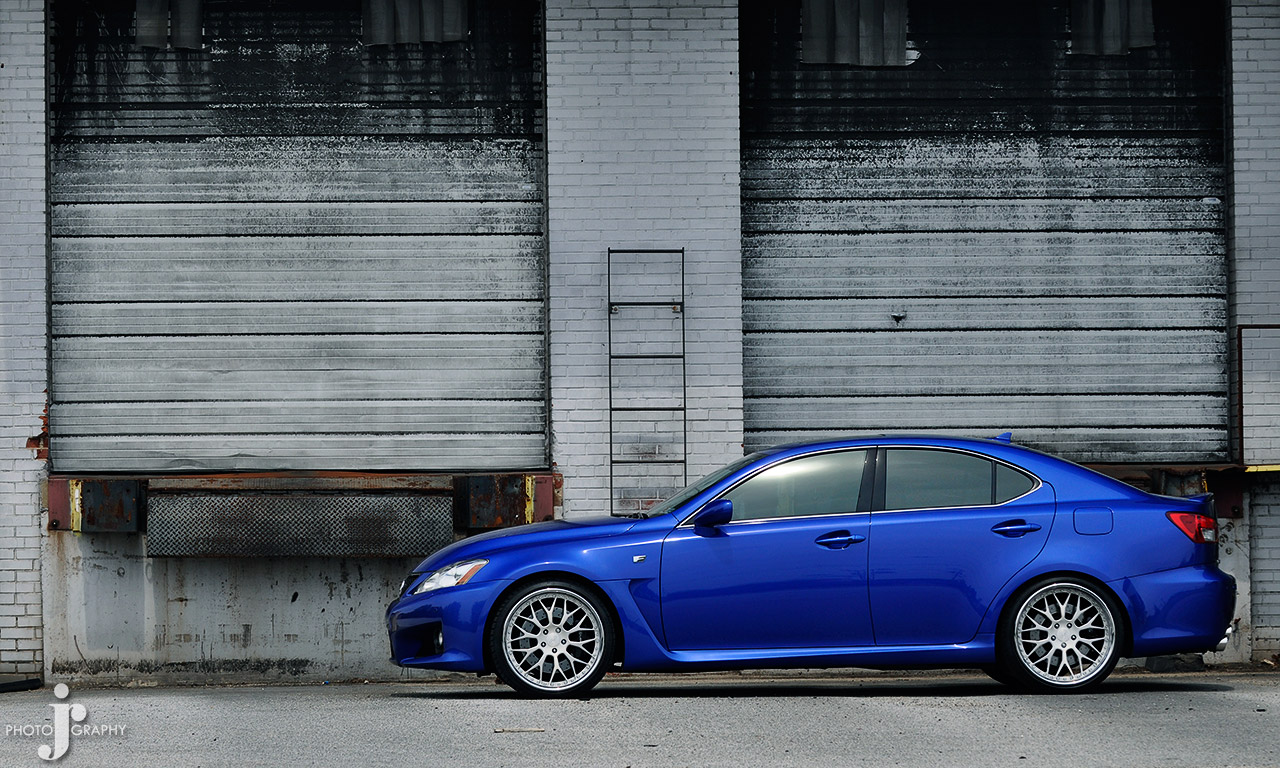
Picked up a used 2008 USB IS-F with 24k miles on it this past Friday. Had originally been looking at a new IS350 to begin with however found the IS-F for just under the price of the new IS350 and couldn't pass it up.
Been loving the car ever since. Picked it up to be my daily as I am to afraid to take other car, fully modified in every way and just never felt safe leaving it anywhere. The car has exceeded my expectations in every way so far. Hopefully, I will stay away from the mod bug that bit with the other car.
Well wouldn't want to leave without posting pics so here it is.
Pickup Day
Some quick shots from the other day


Couple picks of the other car

Other previous looks

http://www.tristatetuners.com/forum/...coltsicehockey
(super build thread if anyone is interested)
Figured I would consolidate some of my old single posts about the car into one here while also documenting everything new. Back then my username was WReuroR and it was until just today actually. A setting update for the site allowed me to request having my username switched to the same one I use on pretty much every other forum and even Instagram.
Original Post Date: Sept 9, 2020
https://www.clublexus.com/forums/is-...een-isf-d.html
Picked up a used 2008 USB IS-F with 24k miles on it this past Friday. Had originally been looking at a new IS350 to begin with however found the IS-F for just under the price of the new IS350 and couldn't pass it up.
Been loving the car ever since. Picked it up to be my daily as I am to afraid to take other car, fully modified in every way and just never felt safe leaving it anywhere. The car has exceeded my expectations in every way so far. Hopefully, I will stay away from the mod bug that bit with the other car.
Well wouldn't want to leave without posting pics so here it is.
Pickup Day
Some quick shots from the other day
Couple picks of the other car
Other previous looks
http://www.tristatetuners.com/forum/...coltsicehockey
(super build thread if anyone is interested)
 06-13-23, 11:00 AM
#2
Original Post Date: October 26, 2010
https://www.clublexus.com/forums/is-...kway-trip.html
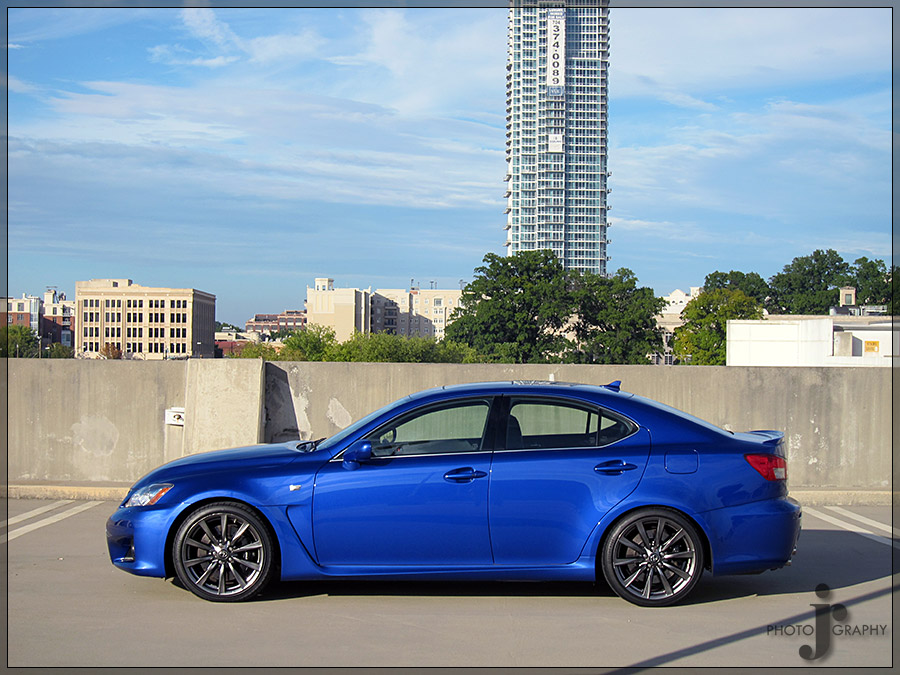
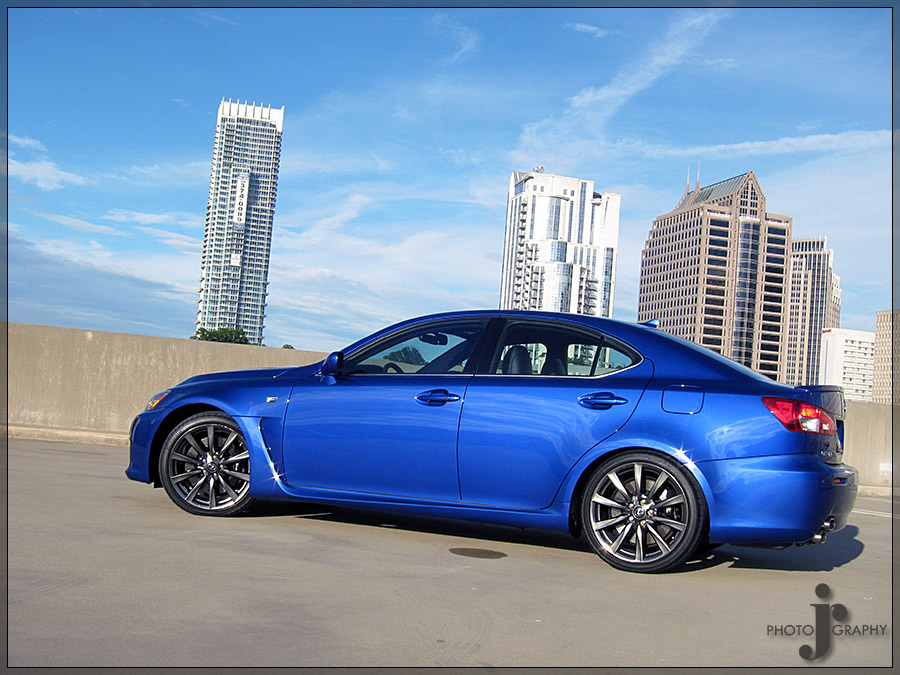
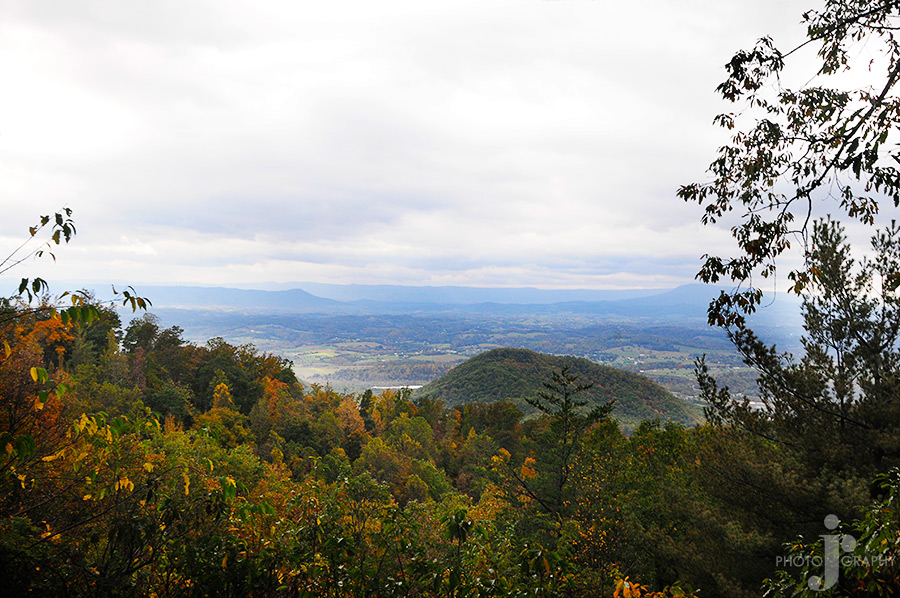
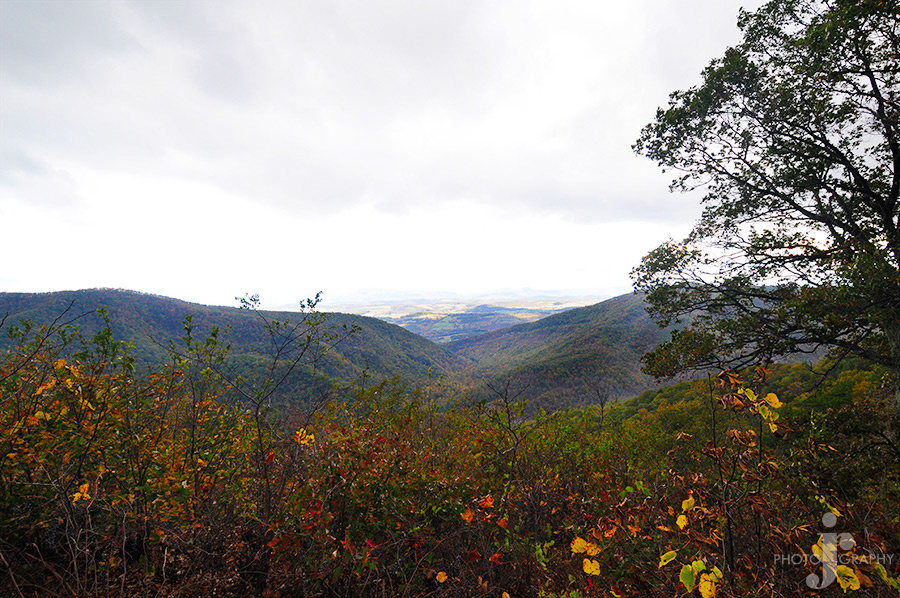
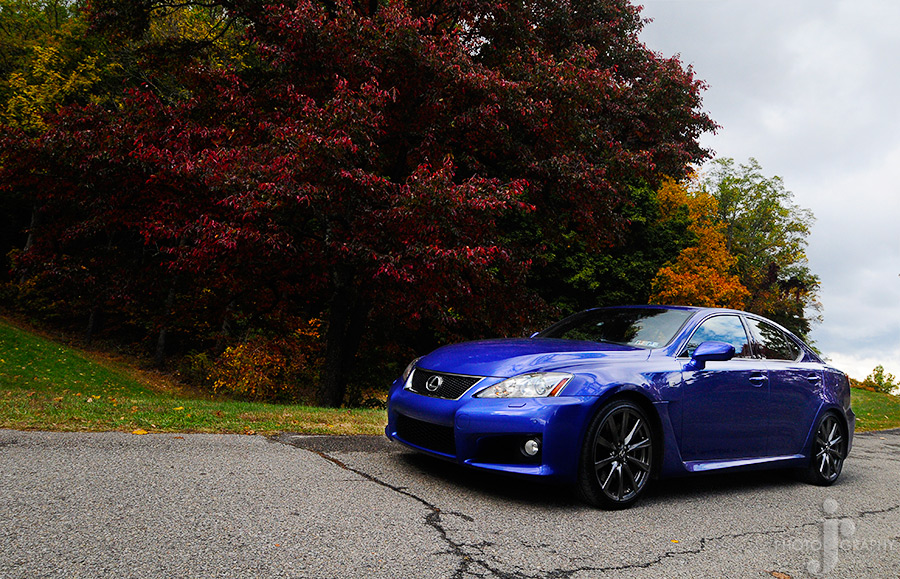
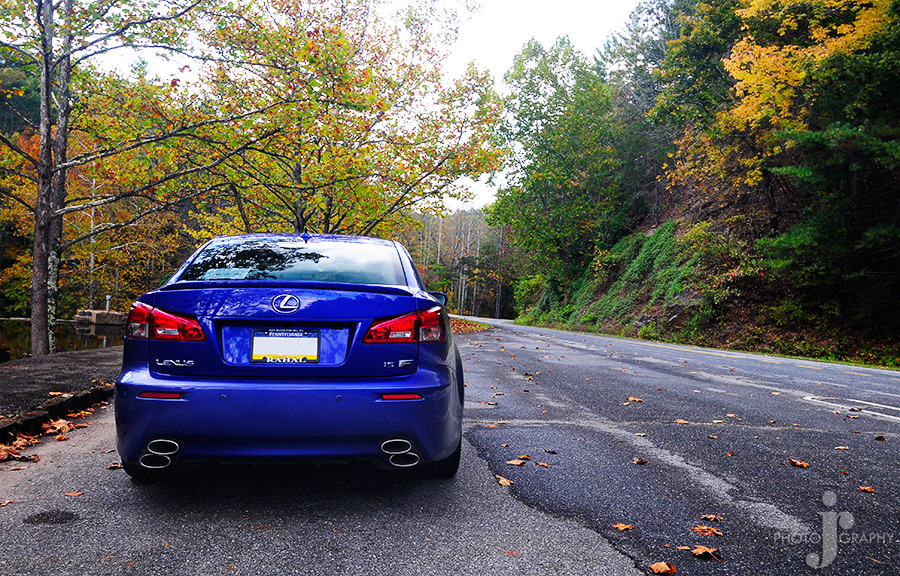
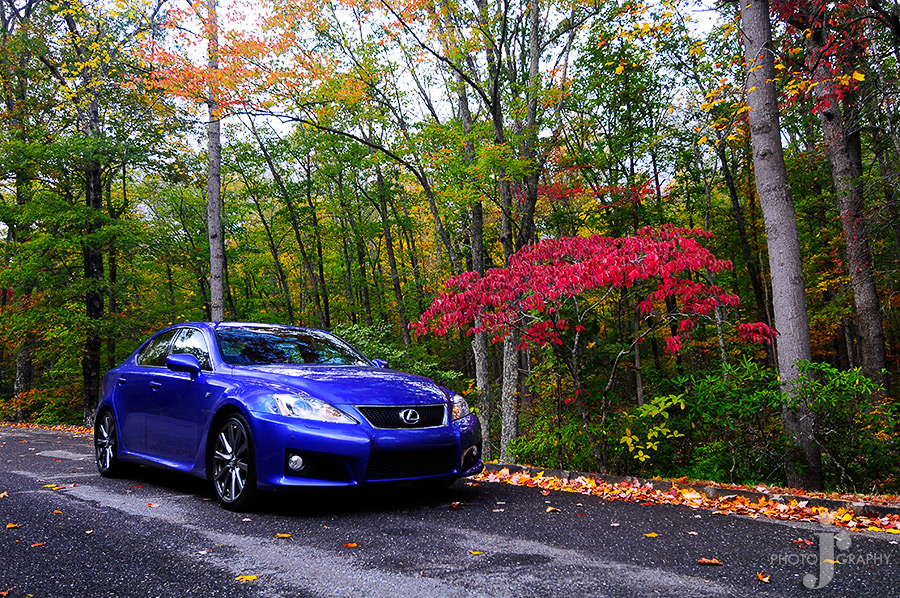
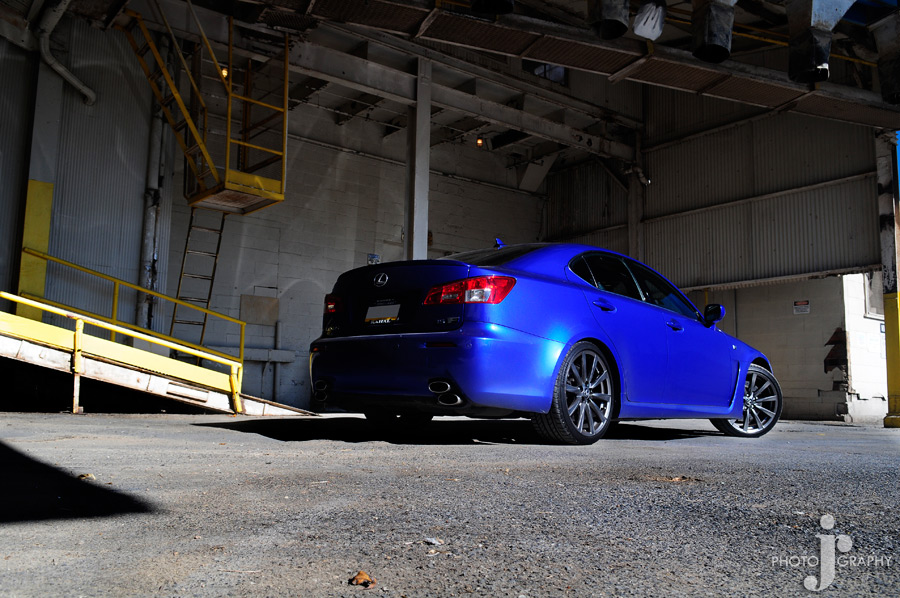
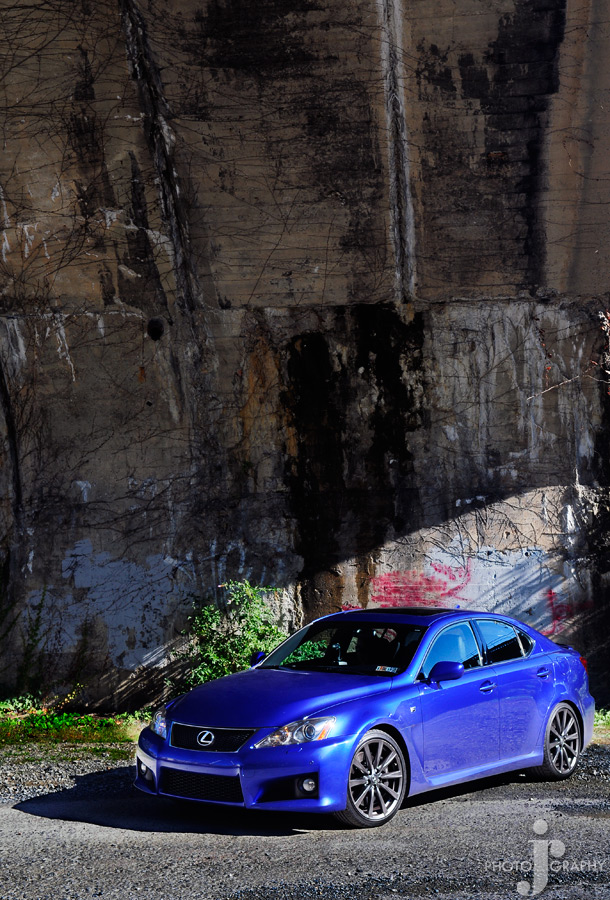
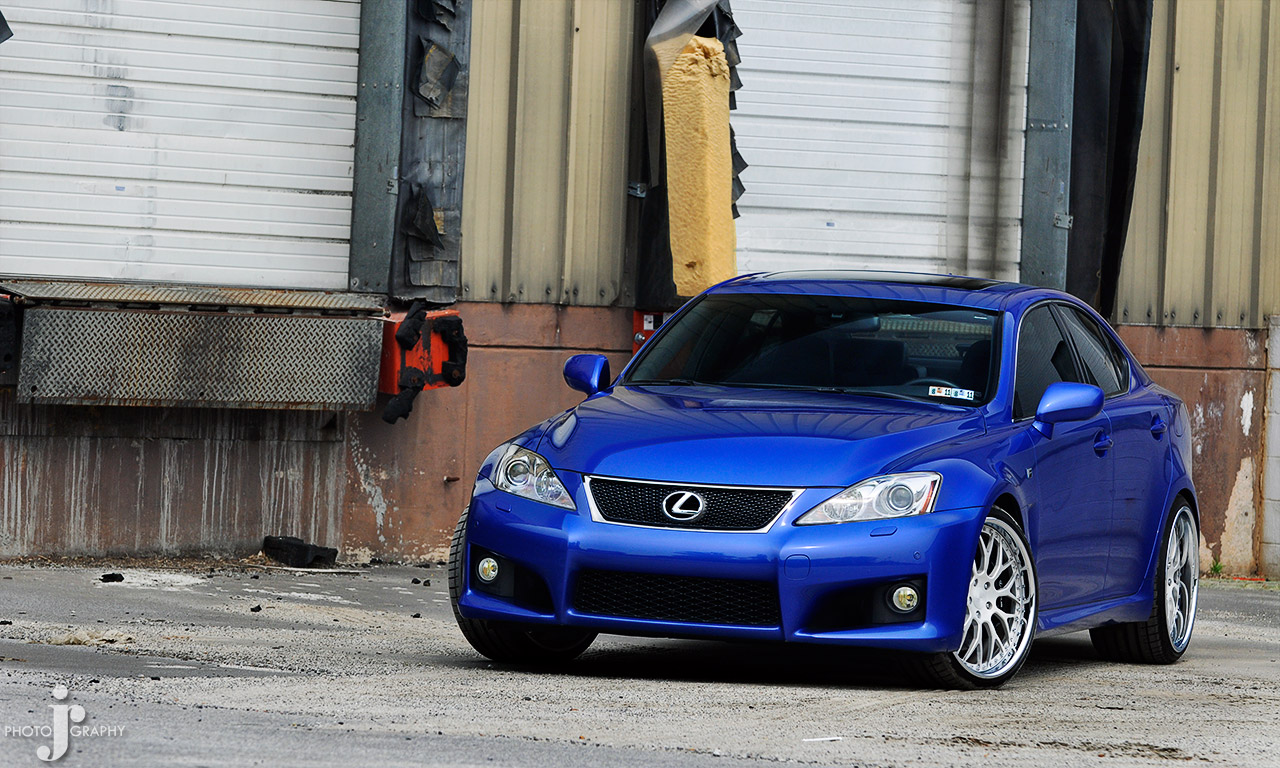
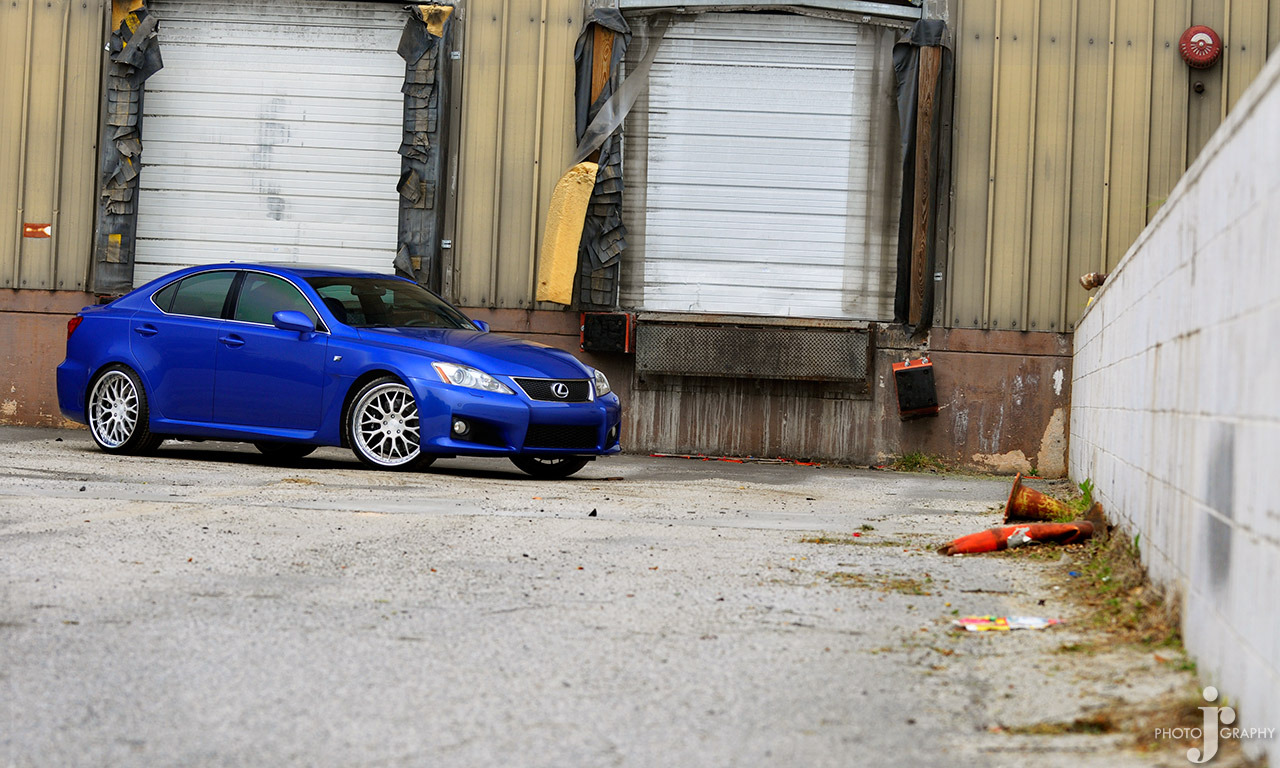
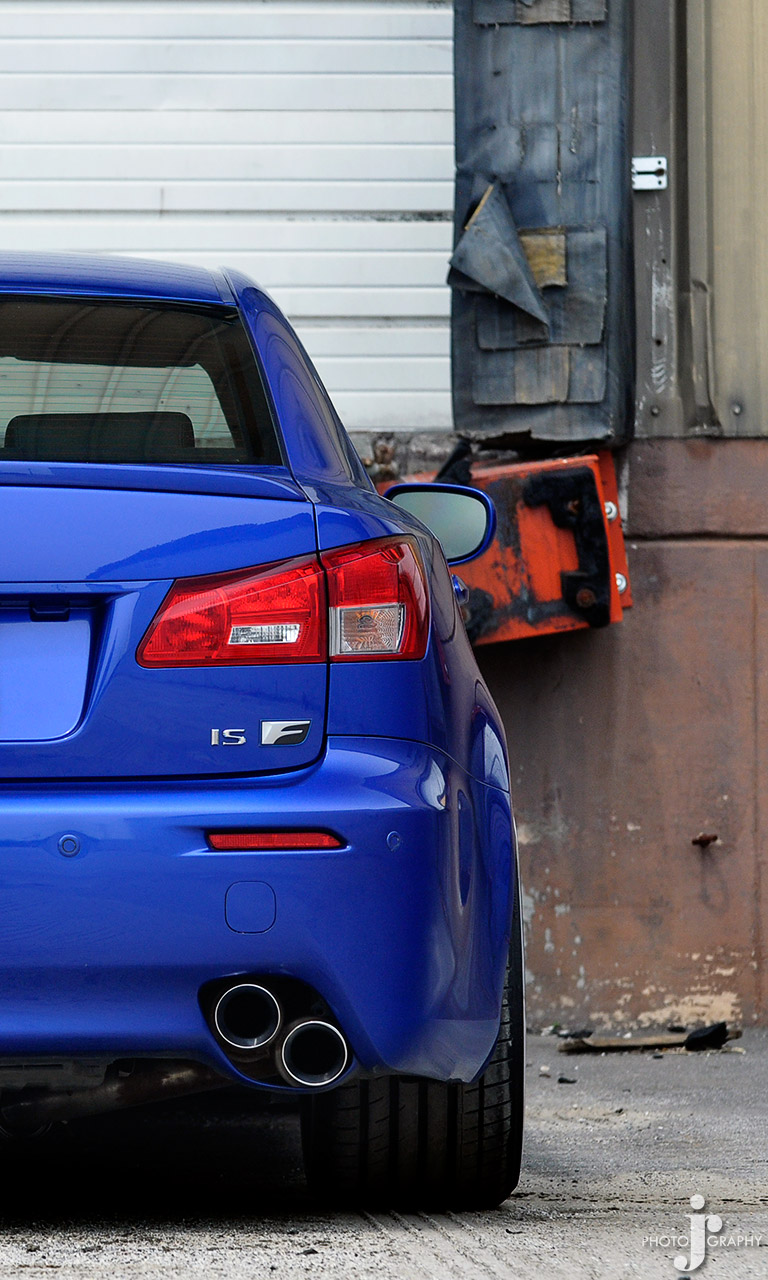
Well two weekends ago I went home to my parents to shoot a car a friend was building for SEMA. On the way I decided to take a small detour for about 2 hours onto a section of the Blue Ridge Parkway. It was my first time driving it and I have to say it was absolutely beautiful since the leaves were beginning to change.
The road was a great drive as well however with reading about how large the fines are being National Park Roads I decided to stay relatively close to the speed limit. The traffic was pretty minimal on the road as well so I was definitely able to enjoy it and the F was absolute blast.
I took some pictures of both the amazing scenery as well as got some good shots of the F as well.

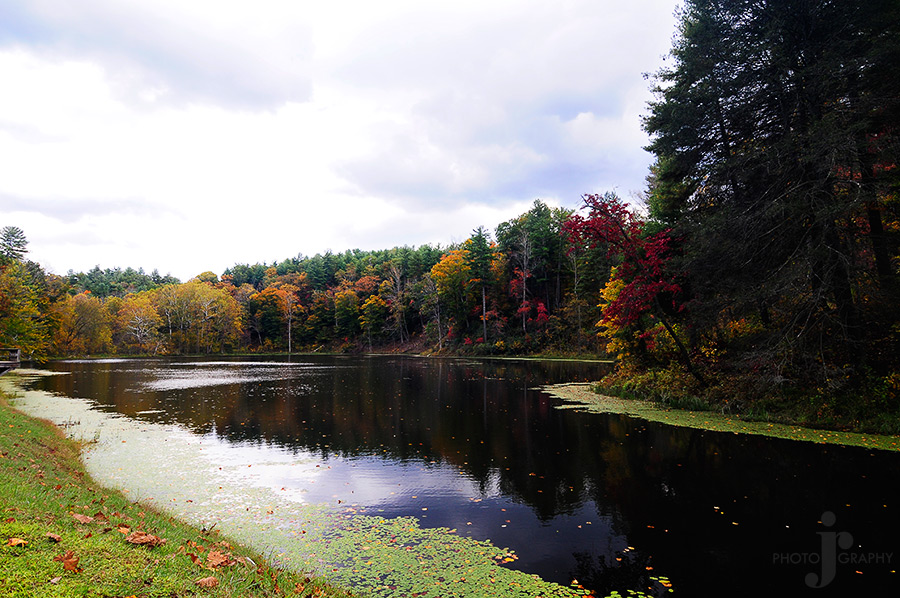
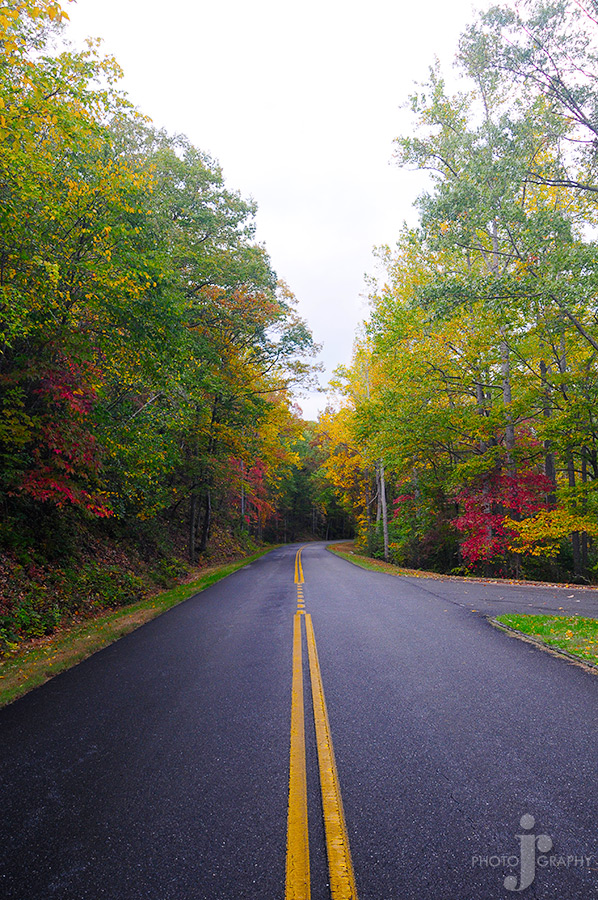
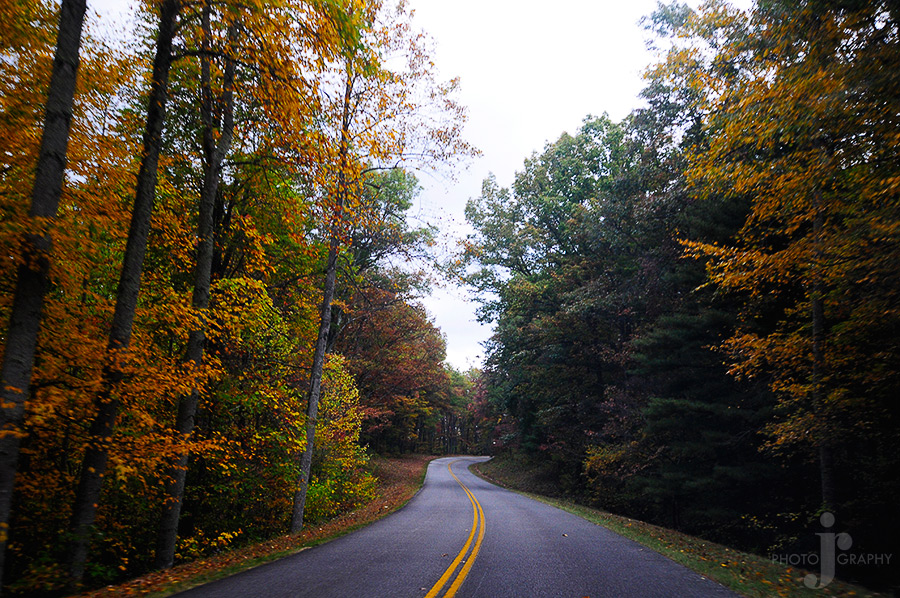
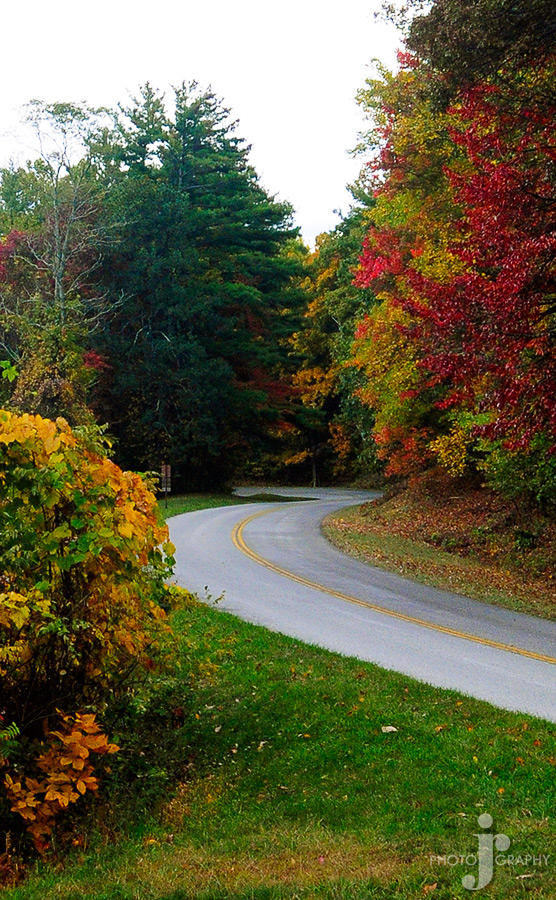
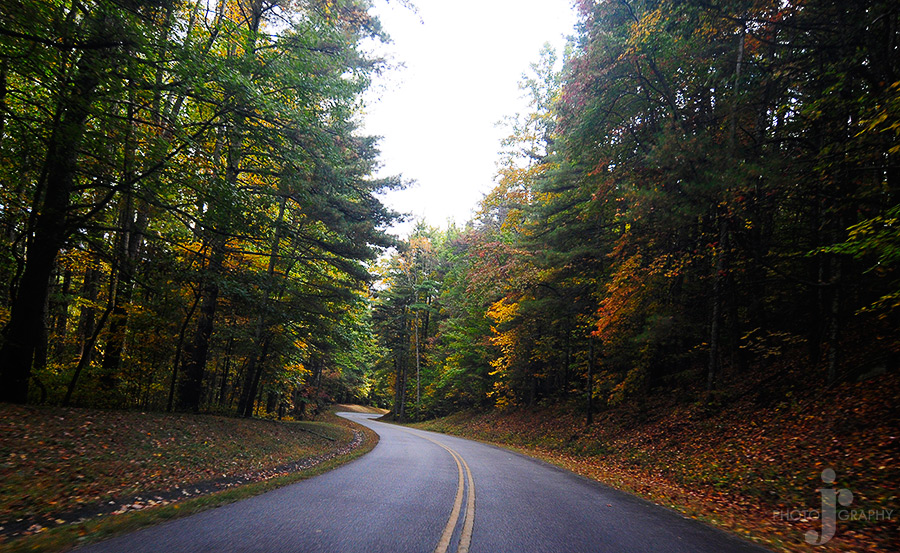
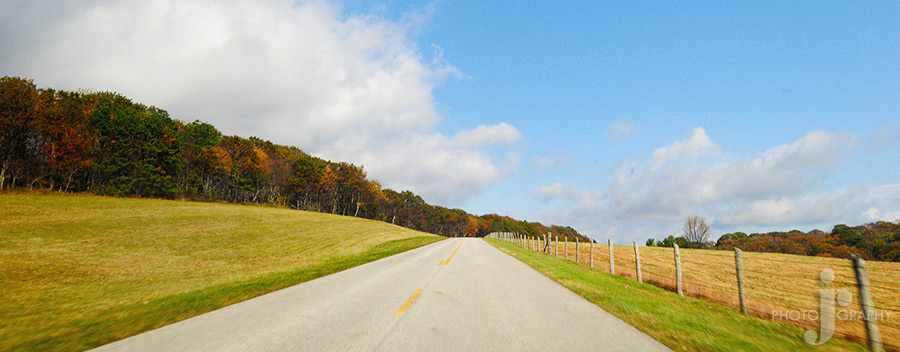
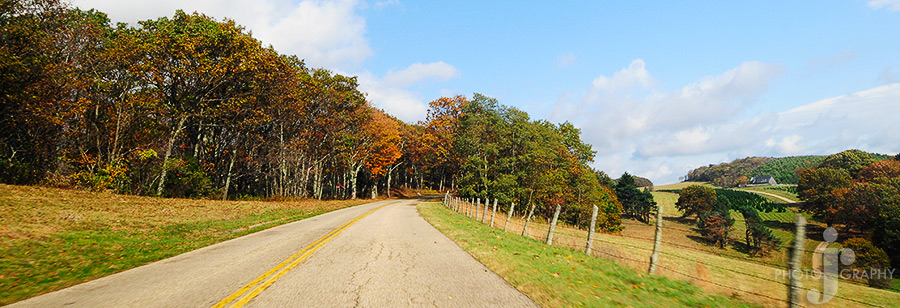

Pics of the F with the amazing fall back drop.
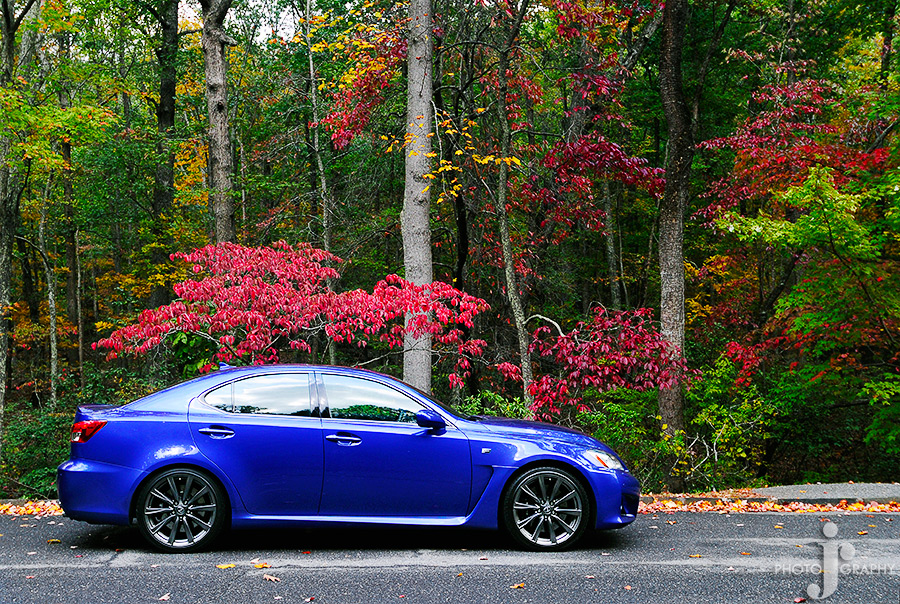
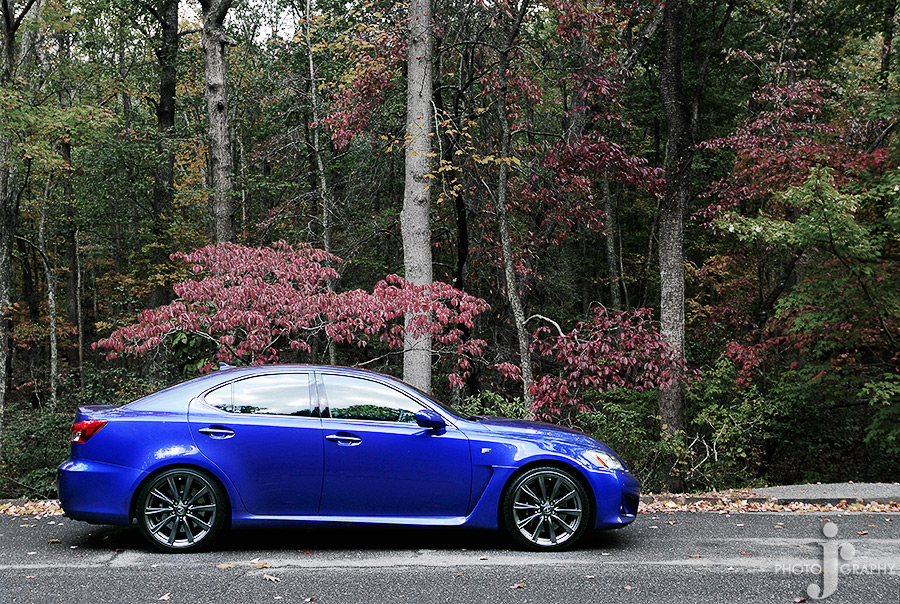
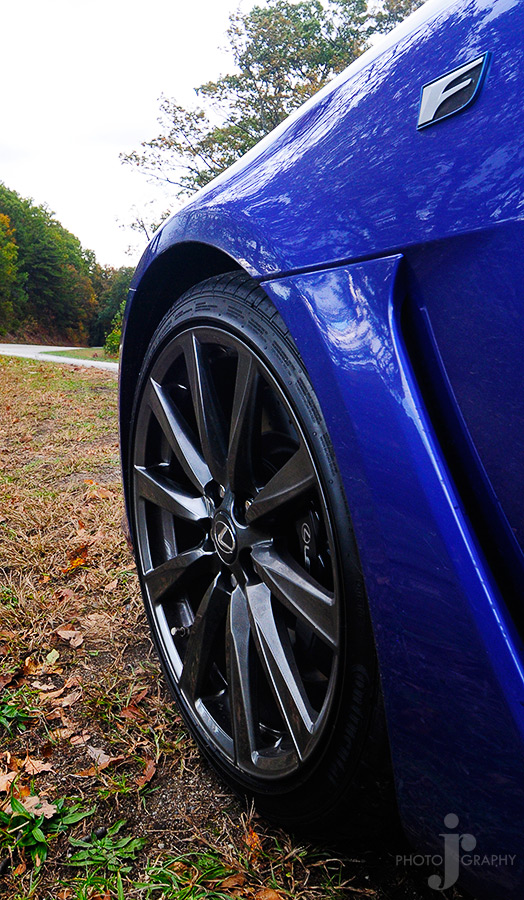
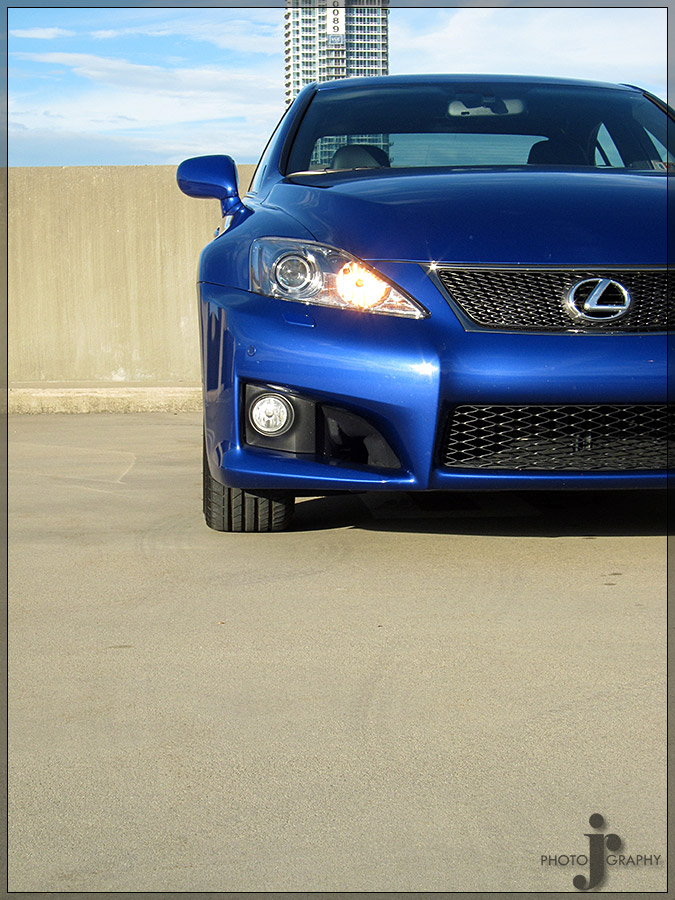
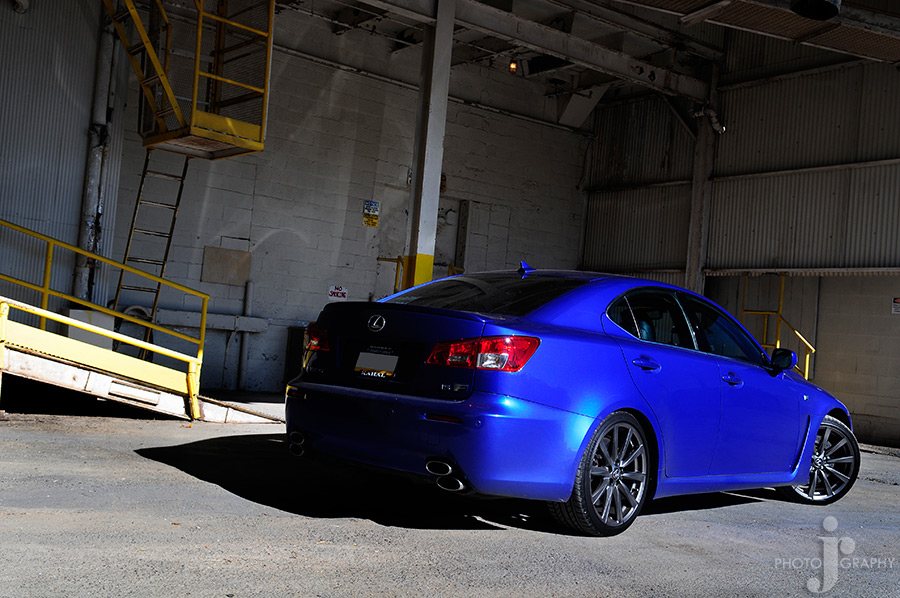
Like I said I was going home to shoot my friends SEMA build car in hope that we will be able to get it featured after it is debuted at SEMA. When I went out to scout some locations for the shoot I used the F to test the lighting and actually got some good shots that were all done in only like 5min of walking around checking out the two locations I had in mind.
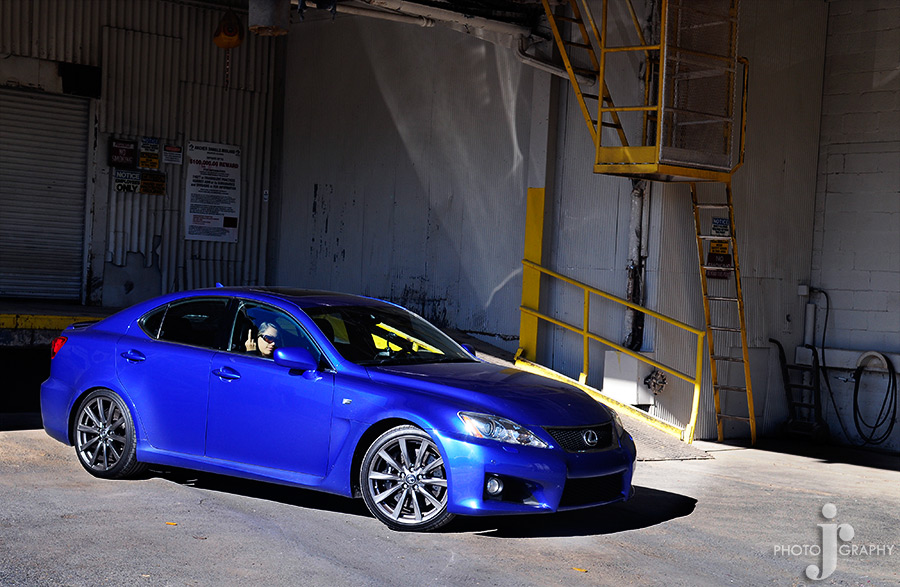
First pic is of the gf wishing we were doing something else rather than driving around checking out shoot locations. Actually she was a good sport since we hung out at the shop for 90% of the weekend so I could continue to shoot the build process I had started shooting the weekend before till they finished on Sunday.

https://www.clublexus.com/forums/is-...kway-trip.html
Well two weekends ago I went home to my parents to shoot a car a friend was building for SEMA. On the way I decided to take a small detour for about 2 hours onto a section of the Blue Ridge Parkway. It was my first time driving it and I have to say it was absolutely beautiful since the leaves were beginning to change.
The road was a great drive as well however with reading about how large the fines are being National Park Roads I decided to stay relatively close to the speed limit. The traffic was pretty minimal on the road as well so I was definitely able to enjoy it and the F was absolute blast.
I took some pictures of both the amazing scenery as well as got some good shots of the F as well.
Pics of the F with the amazing fall back drop.
Like I said I was going home to shoot my friends SEMA build car in hope that we will be able to get it featured after it is debuted at SEMA. When I went out to scout some locations for the shoot I used the F to test the lighting and actually got some good shots that were all done in only like 5min of walking around checking out the two locations I had in mind.
First pic is of the gf wishing we were doing something else rather than driving around checking out shoot locations. Actually she was a good sport since we hung out at the shop for 90% of the weekend so I could continue to shoot the build process I had started shooting the weekend before till they finished on Sunday.
The following users liked this post:
BS ISF (06-14-23)
06-13-23, 11:00 AM
#3
Original Post Date: February 18, 2011
https://www.clublexus.com/forums/is-...deo-clips.html
Love these exhaust tips

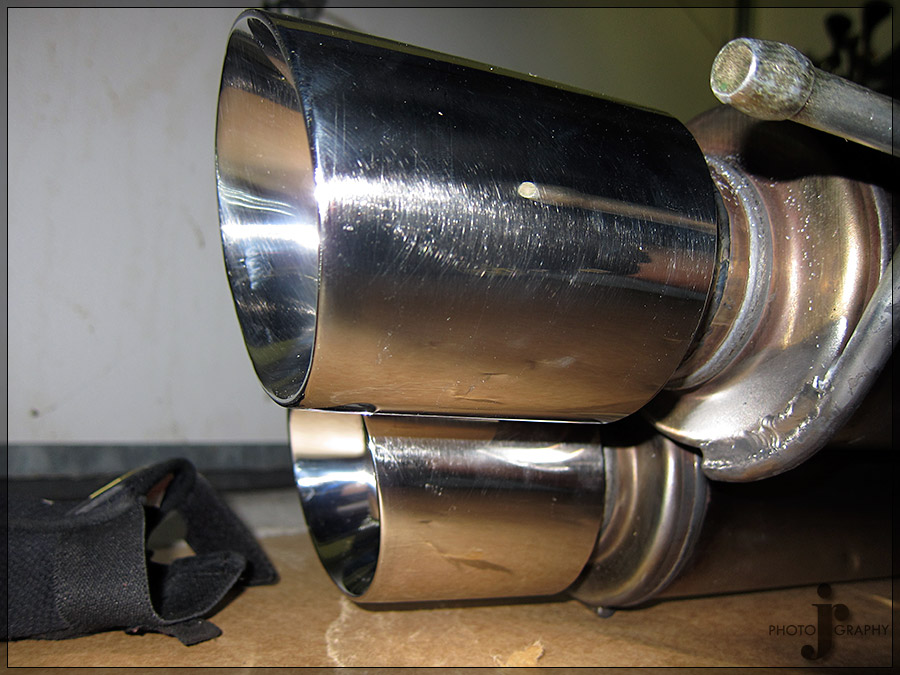
Clamps for muffler connection


Finally installed
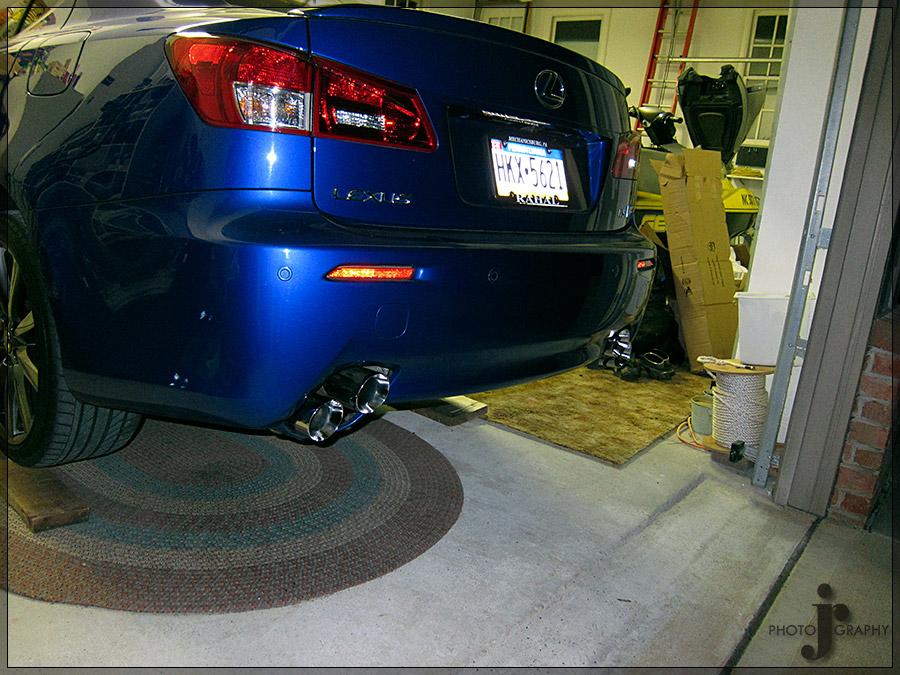
I will have to get some day time pictures later on maybe this weekend but I haven't had anytime yet.
Video Comparrision of 2nd cat & muffler delete and ISS Forged Track Exhaust.
https://www.clublexus.com/forums/is-...deo-clips.html
Love these exhaust tips
Clamps for muffler connection
Finally installed
I will have to get some day time pictures later on maybe this weekend but I haven't had anytime yet.
Video Comparrision of 2nd cat & muffler delete and ISS Forged Track Exhaust.
Last edited by CCColtsicehockey; 06-13-23 at 11:04 AM.
The following users liked this post:
BS ISF (06-14-23)
06-13-23, 11:01 AM
#4
Original Post Date: March 8, 2011
https://www.clublexus.com/forums/is-...wo-wheels.html
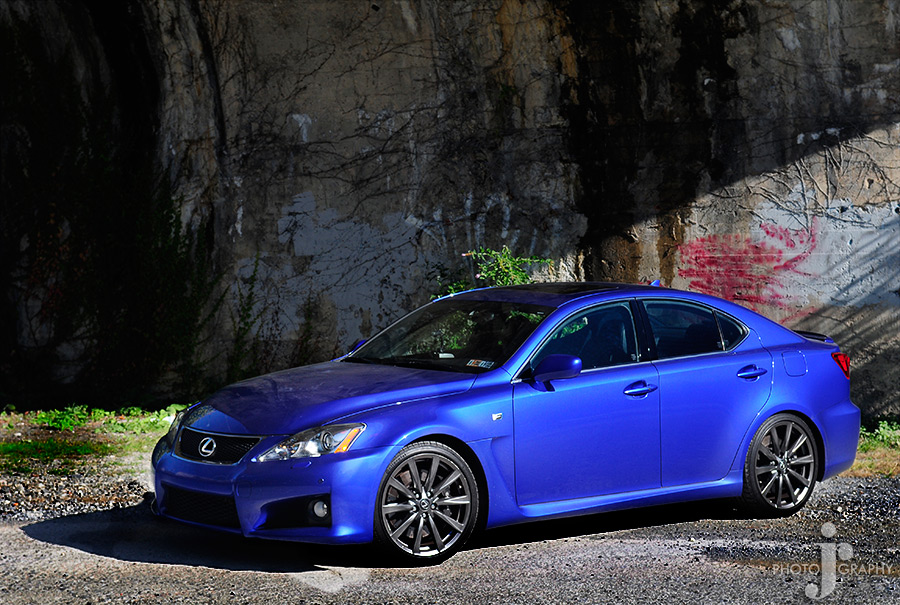
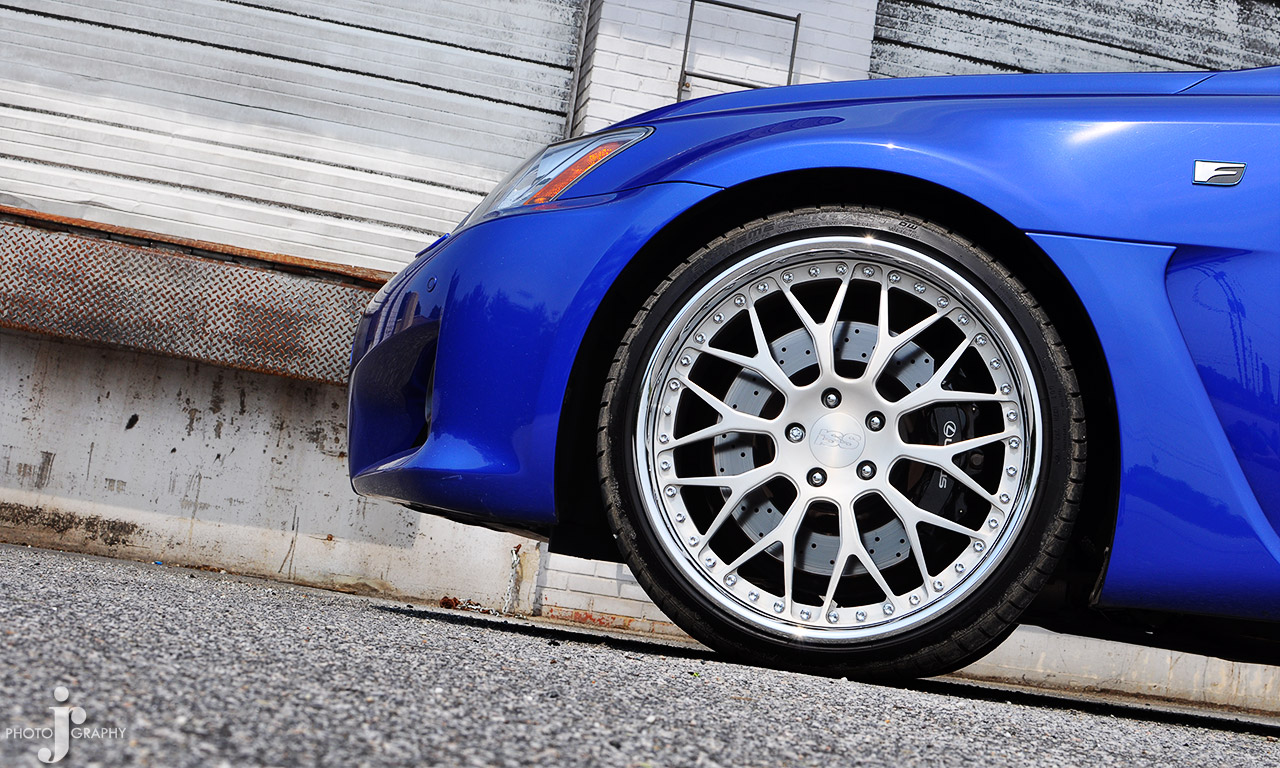
Ok well I have been trying to decide for a while now on what wheels to get and I am looking for opinions now as I still haven't been able to decide yet.
Trying to decide between the Spyder and RX-10. My favorite wheel originally on the IS-F was the Spyder when I saw them on Splats car for the first time in pictures. However I like the simplicity and slight weight advantage the RX-10 would have.
Wheel finish would be brushed aluminum with matte clear with Clear coated high polish lips. Possibly considering chrome lips as well which is what all pictured have but I have normally hated chrome. I have always wanted to run a brushed finish on a set of wheels on my other car but never have so decided for now I will start with that and later on if I want I can powder coat them whatever color I want but it would be harder to do it the other way around.
I gave up just trying to visualize the wheels on the IS-F as it was starting to annoy me so I went and did some chops of the wheels on the car. I have a few more angles to do but for now this makes it a bit easier at least.
I am glad ISS Forged has a lot of high quality pictures on there site of there wheels and also some IS-Fs as this would have been a lot hard if I didn't have those pictures available. I wish I had a picture of a car with a set of brushed RX-10 on it as well to chop but hey I can't be that picky. I also provided a shop of gunmetal on the Spyder since it was available to use as that is the color I would probably eventually powder coat the wheels. It does make me think though that USB best wheel color might be gunmetal like stock.
My goal is to give the car that high end luxury sport look rather than an all out sport look that might be achieved with a non lip wheel.
Please share your opinions both positive and negative. Thanks
Well here are the pictures.
Spyder - Matte Brushed Finish
Spyder - Gloss Gunmetal Finish

RX-10 - Matte Gunmetal
***Again this are all done in photoshop and I did not take the any of the pictures. I cropped the photos in tighter which ended up removing the ISS logo only to get a closer view on the car with the wheels.***
https://www.clublexus.com/forums/is-...wo-wheels.html
Ok well I have been trying to decide for a while now on what wheels to get and I am looking for opinions now as I still haven't been able to decide yet.
Trying to decide between the Spyder and RX-10. My favorite wheel originally on the IS-F was the Spyder when I saw them on Splats car for the first time in pictures. However I like the simplicity and slight weight advantage the RX-10 would have.
Wheel finish would be brushed aluminum with matte clear with Clear coated high polish lips. Possibly considering chrome lips as well which is what all pictured have but I have normally hated chrome. I have always wanted to run a brushed finish on a set of wheels on my other car but never have so decided for now I will start with that and later on if I want I can powder coat them whatever color I want but it would be harder to do it the other way around.
I gave up just trying to visualize the wheels on the IS-F as it was starting to annoy me so I went and did some chops of the wheels on the car. I have a few more angles to do but for now this makes it a bit easier at least.
I am glad ISS Forged has a lot of high quality pictures on there site of there wheels and also some IS-Fs as this would have been a lot hard if I didn't have those pictures available. I wish I had a picture of a car with a set of brushed RX-10 on it as well to chop but hey I can't be that picky. I also provided a shop of gunmetal on the Spyder since it was available to use as that is the color I would probably eventually powder coat the wheels. It does make me think though that USB best wheel color might be gunmetal like stock.
My goal is to give the car that high end luxury sport look rather than an all out sport look that might be achieved with a non lip wheel.
Please share your opinions both positive and negative. Thanks
Well here are the pictures.
Spyder - Matte Brushed Finish
Spyder - Gloss Gunmetal Finish
RX-10 - Matte Gunmetal
***Again this are all done in photoshop and I did not take the any of the pictures. I cropped the photos in tighter which ended up removing the ISS logo only to get a closer view on the car with the wheels.***
The following users liked this post:
BS ISF (06-14-23)
06-13-23, 11:02 AM
#5
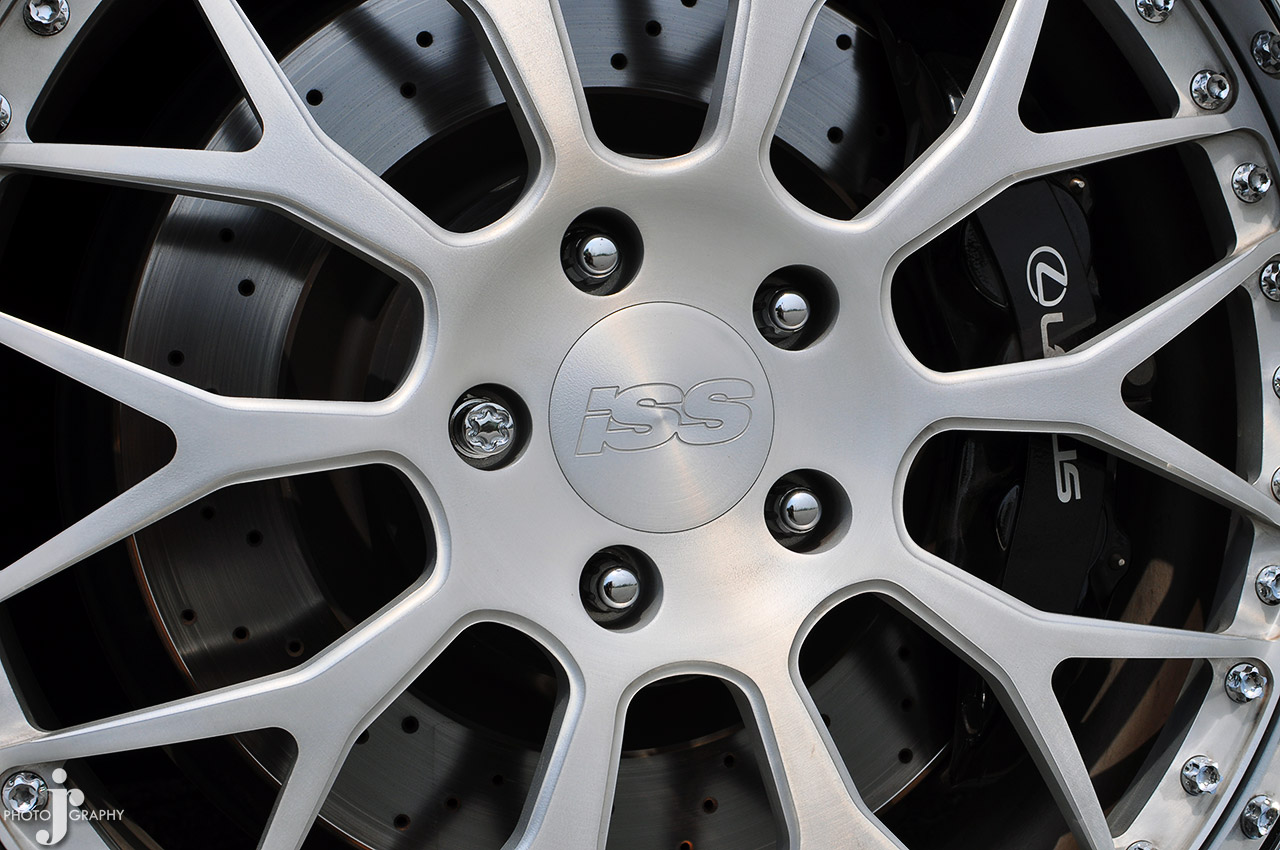
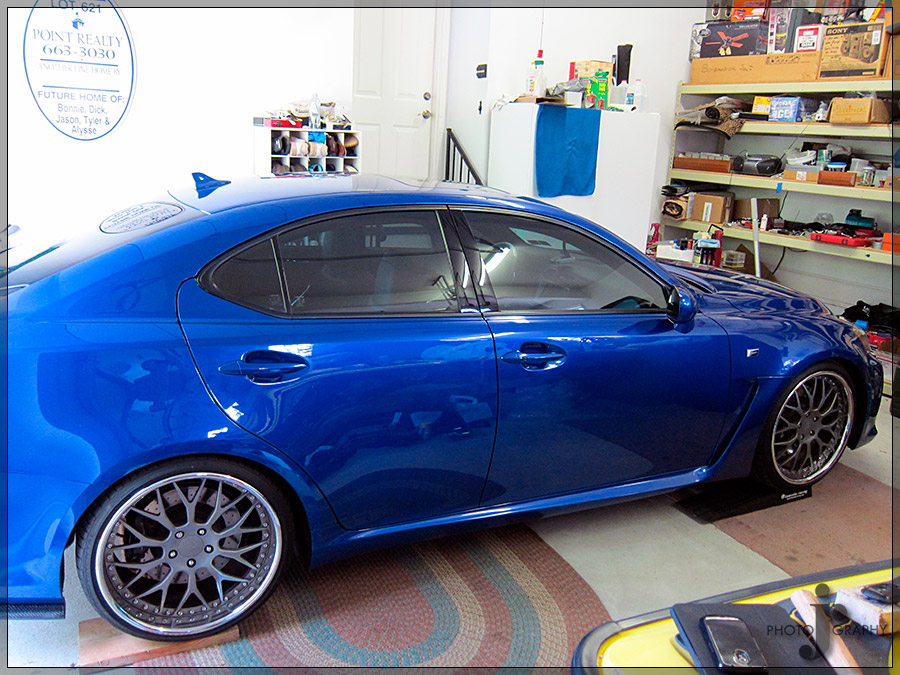
Original Post Date: July 13, 2011
https://www.clublexus.com/forums/is-...s-finally.html
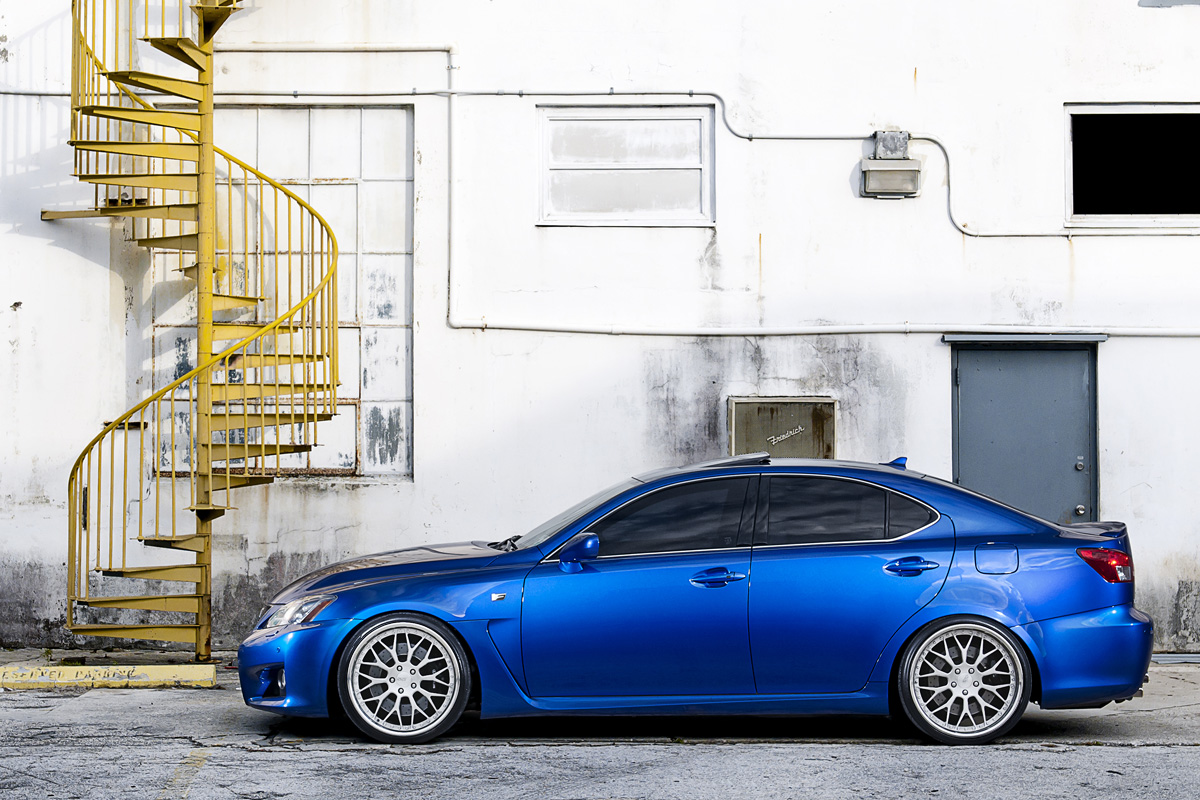
I got the wheels back in April and I did a shoot back in May of my new wheels on the car and just got around to editing them.
The wheels are ISSForged Spyders in 20x9 and 20x11. Tires are Continental ExtremeContact DW with 245/30/20 front and 295/25/20 rear. ISSForged has given me great customer service along the way with all the questions I had.
I already have changed my mind on color and sent the wheels back and I am having them refinished. I should have the wheels back this week or early next so hopefully pictures of those won't take as long.
No more type here are the pics.


https://www.clublexus.com/forums/is-...s-finally.html
I got the wheels back in April and I did a shoot back in May of my new wheels on the car and just got around to editing them.
The wheels are ISSForged Spyders in 20x9 and 20x11. Tires are Continental ExtremeContact DW with 245/30/20 front and 295/25/20 rear. ISSForged has given me great customer service along the way with all the questions I had.
I already have changed my mind on color and sent the wheels back and I am having them refinished. I should have the wheels back this week or early next so hopefully pictures of those won't take as long.
No more type here are the pics.
Last edited by CCColtsicehockey; 06-13-23 at 11:06 AM.
06-13-23, 11:04 AM
#6
Original Post Date: July 24, 2011
https://www.clublexus.com/forums/is-...auge-trim.html
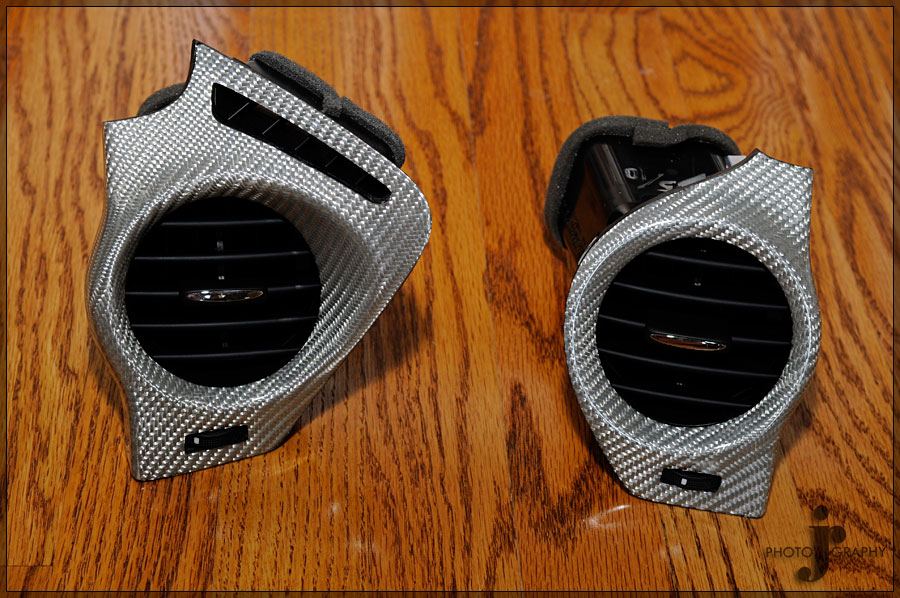
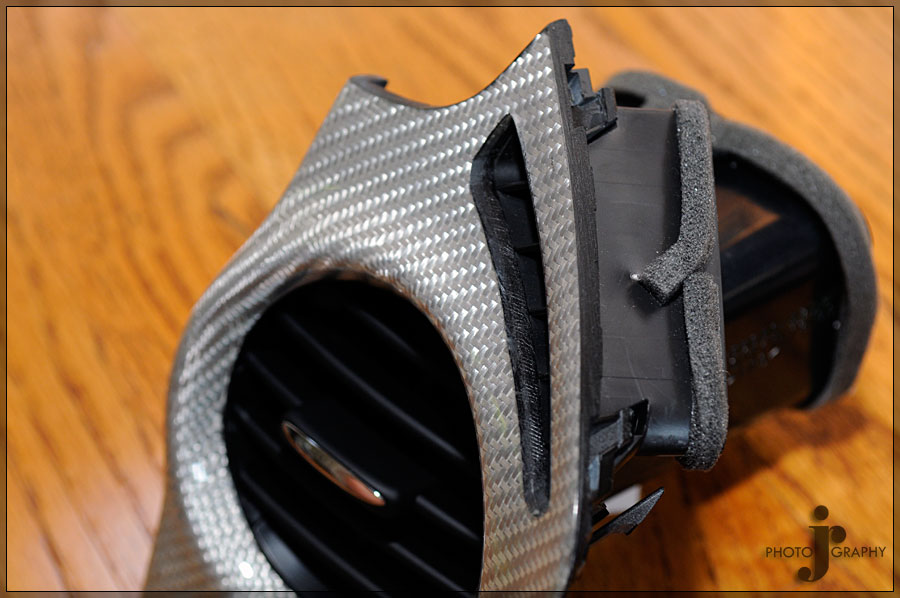
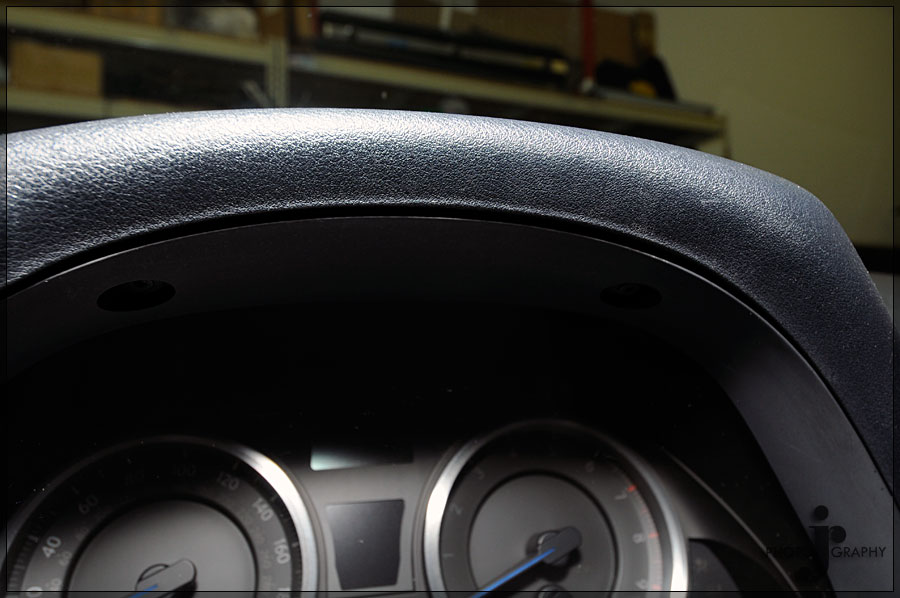
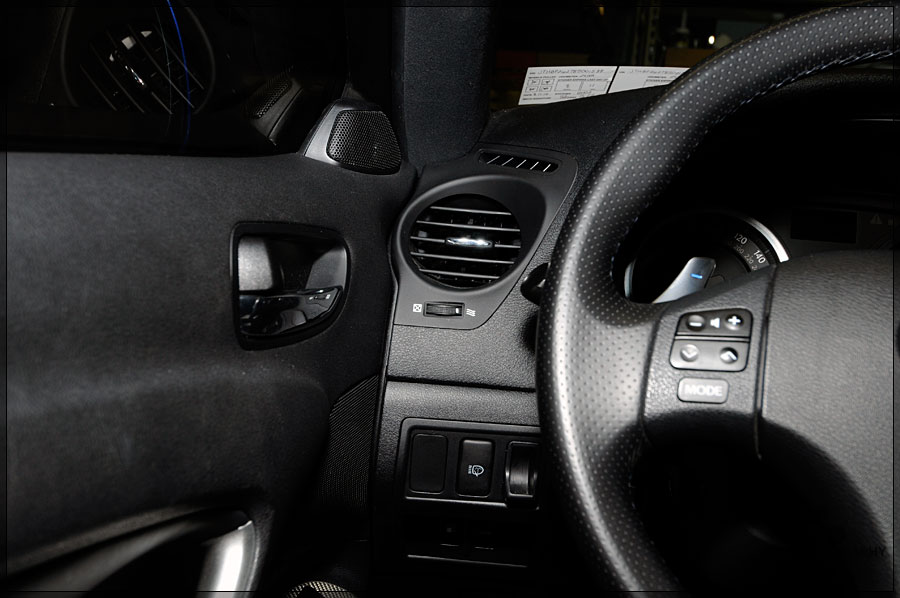
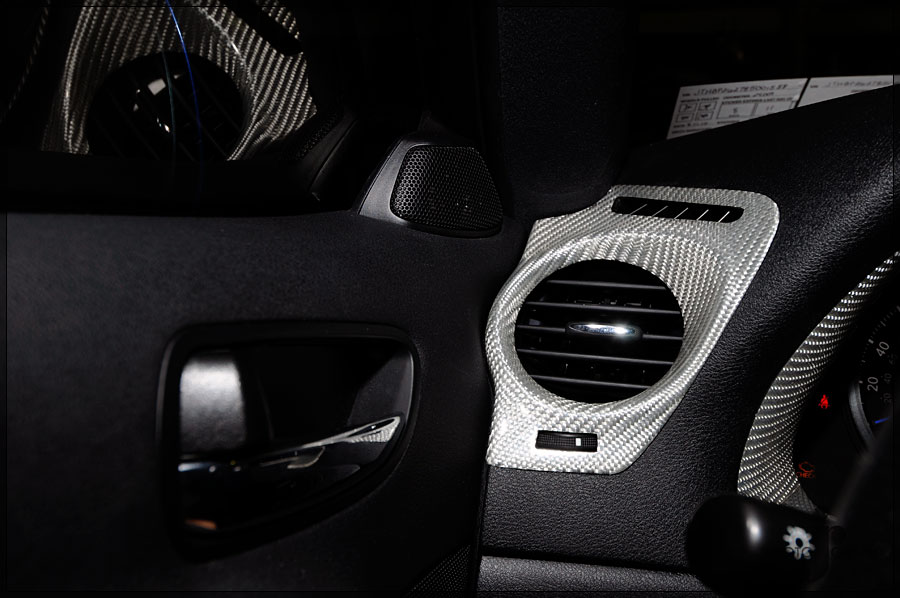
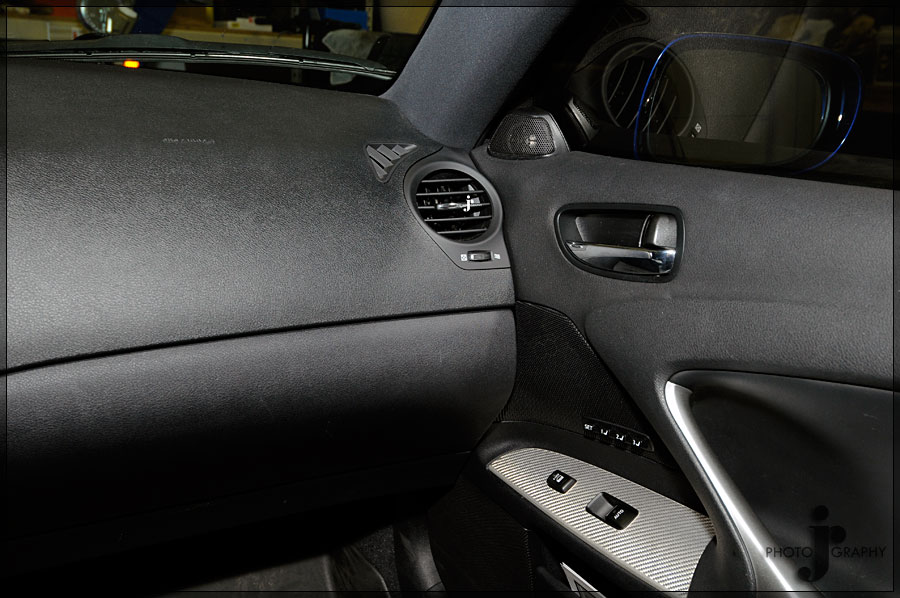
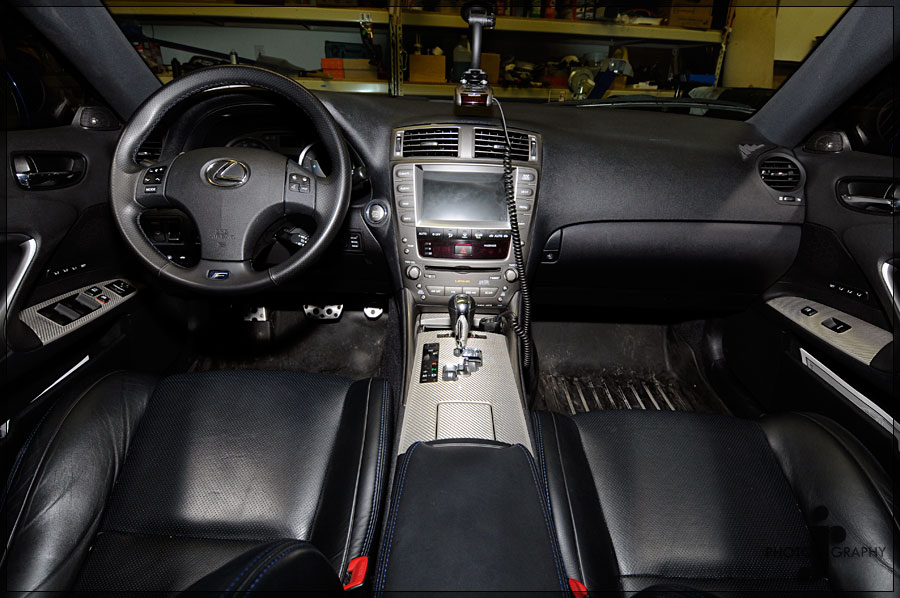
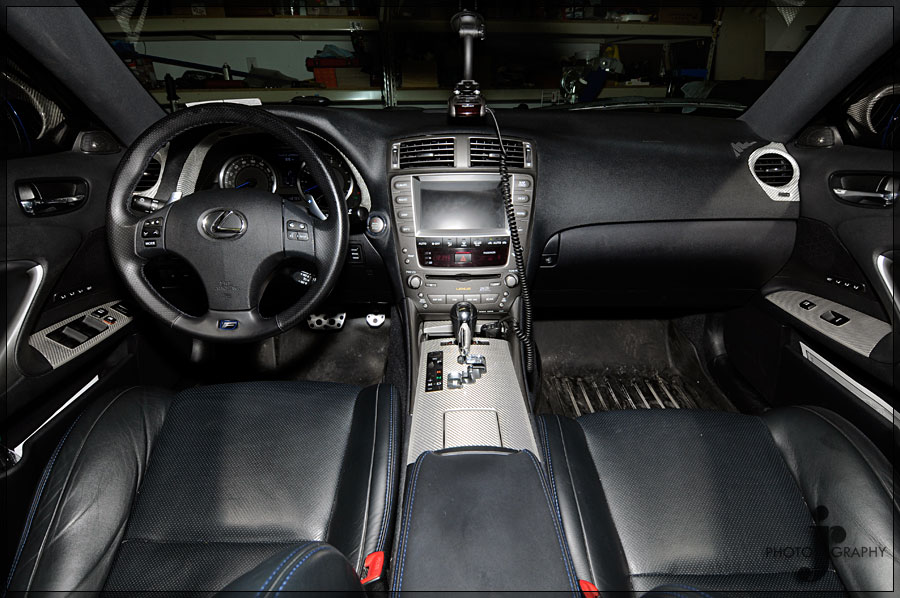
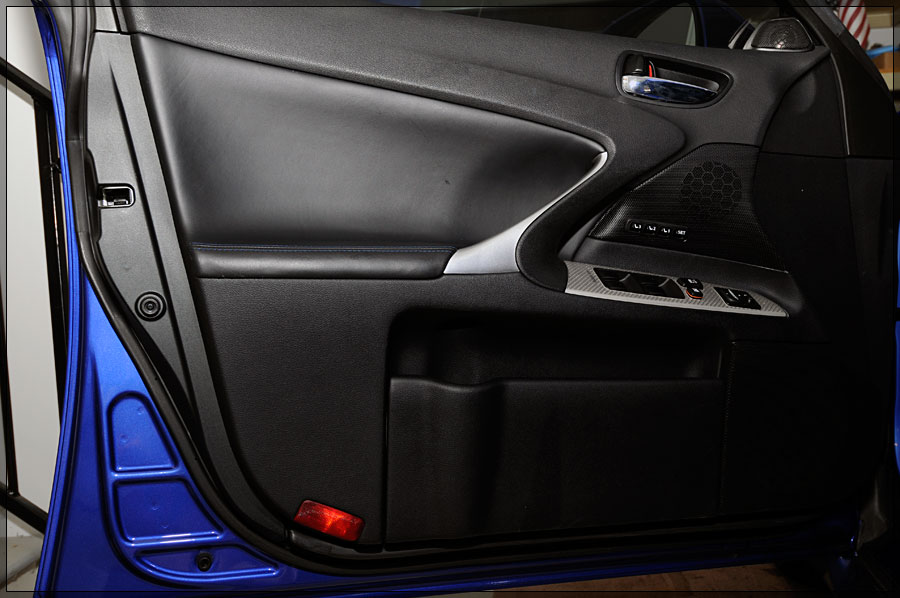
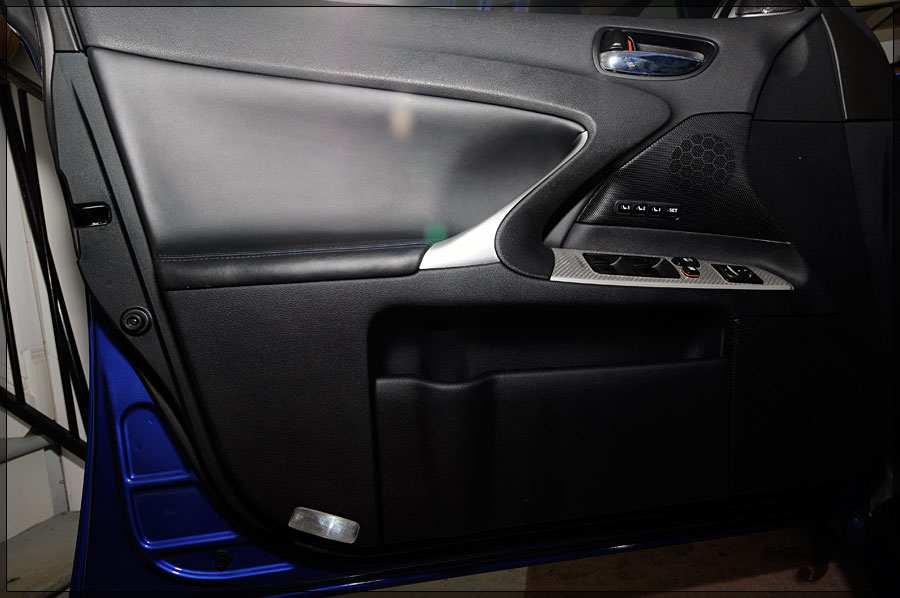
Thanks to mdsbrain and Isfast I was able to pick these up in the for sale section with no wait.
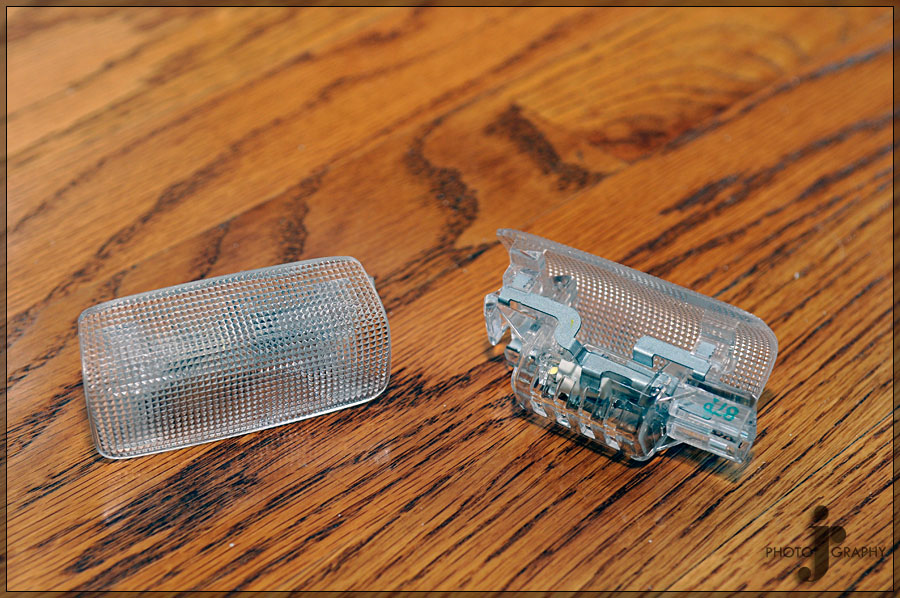
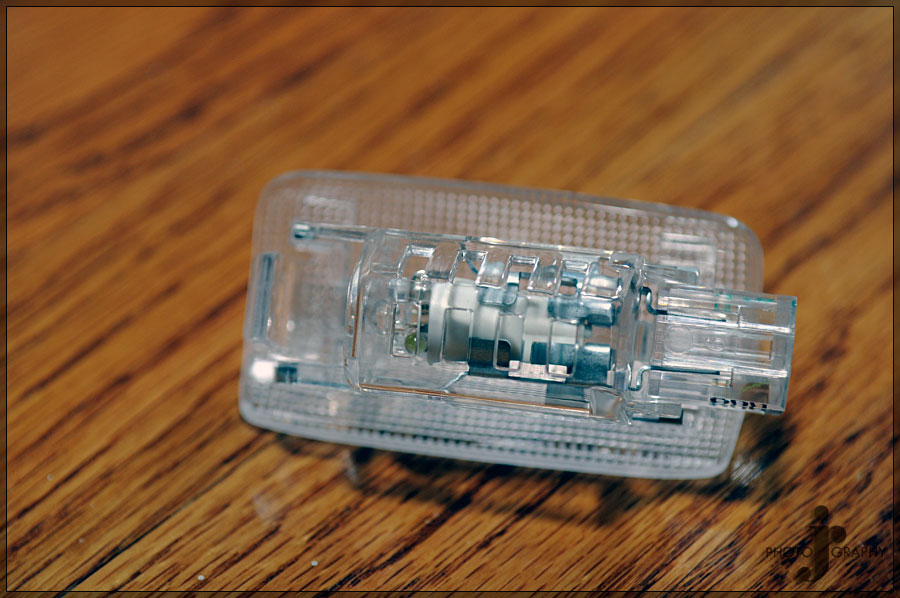
The ThinkDesign parts match the factory trim great. The weave size is slightly larger I believe but I could only just make it out when holding it right next to the center console area so you can't tell at all once they are installed. I also got some clear door lights as well to get rid of the red ones.
I included a quick install for the gauge trim. It isn't difficult but figured it might come in handy possibly. The vents are straight forward so and just pop out and the new ones clip right in.
I also picked up a Silver flat bottom wheel from Sewell but I am still waiting on that to arrive. Should have it in about 2 weeks time.
Now I just need to pickup the rear seat divider and maybe the latch to the armrest compartment in silver to finish off the interior.
Vents:

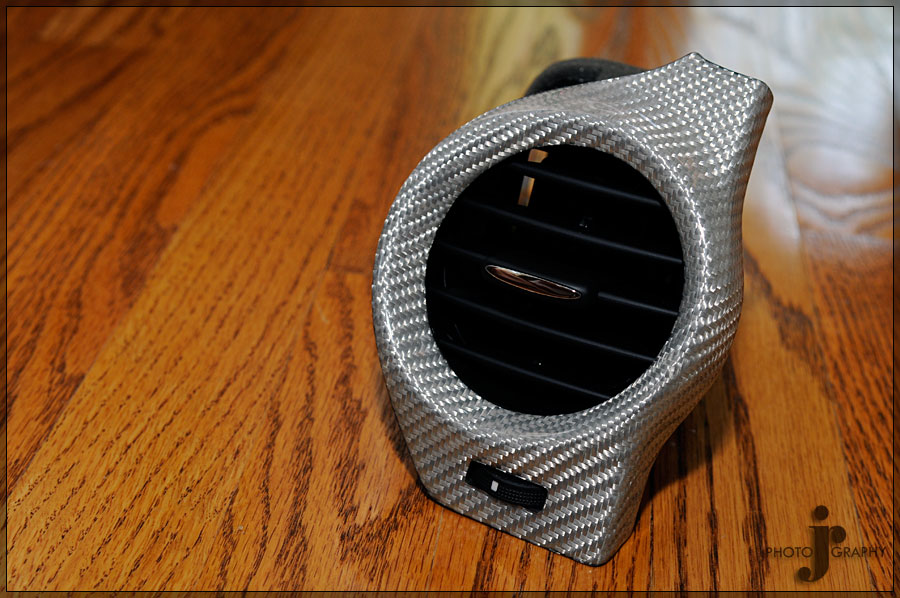
Great attention to detail in the construction
Gauge Trim:

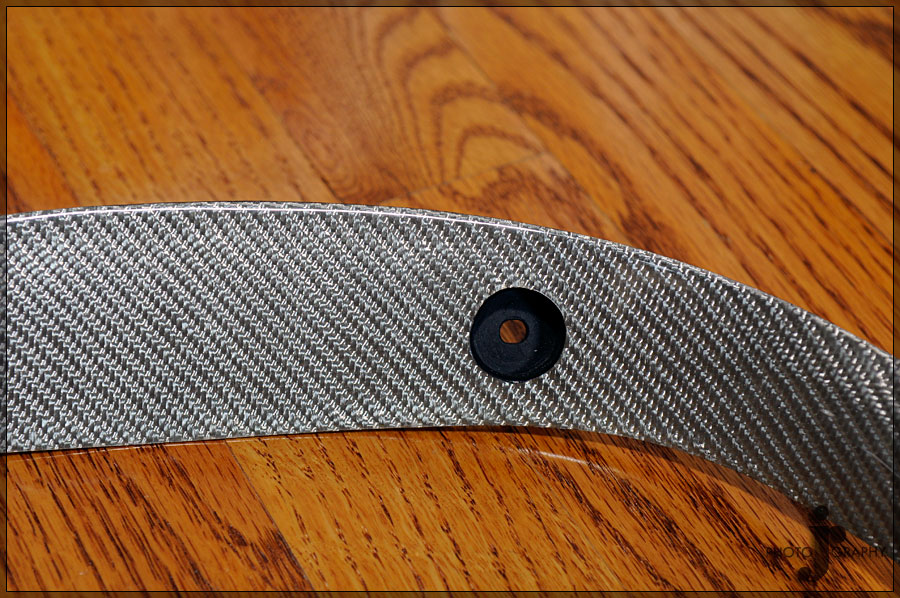
Together:
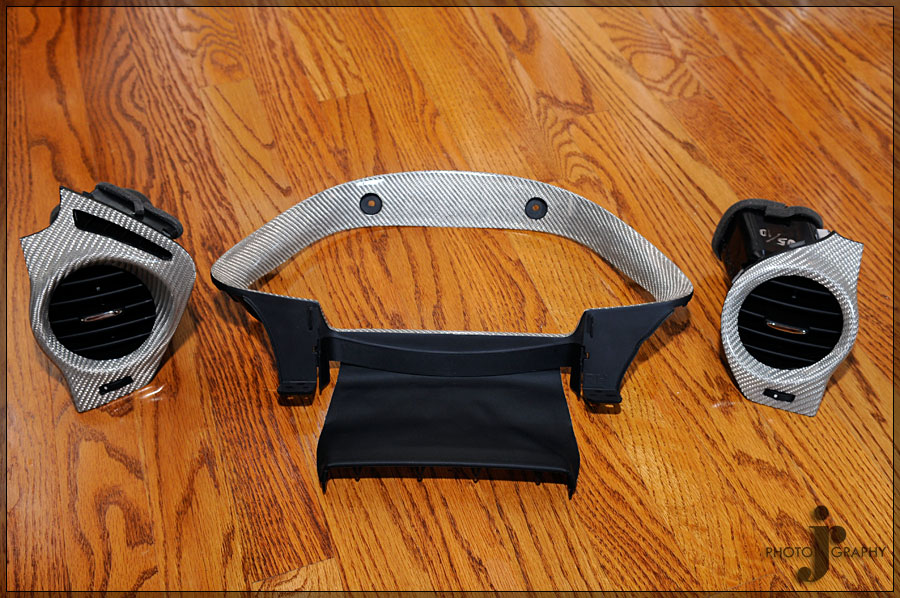
Install:
Remove this side panel first
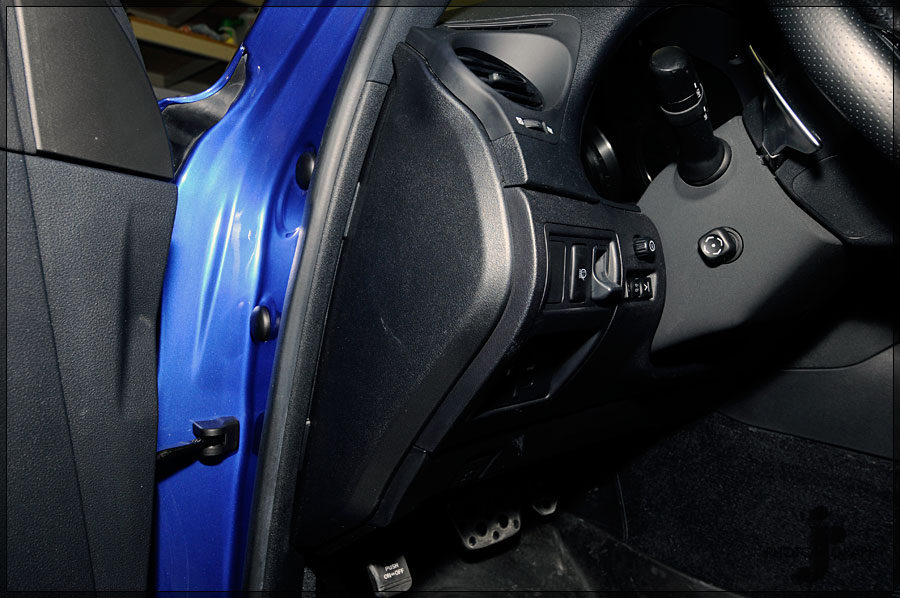
You can now pull down the lower trim around the steering wheel. You can remove it if you want but you don't have to.
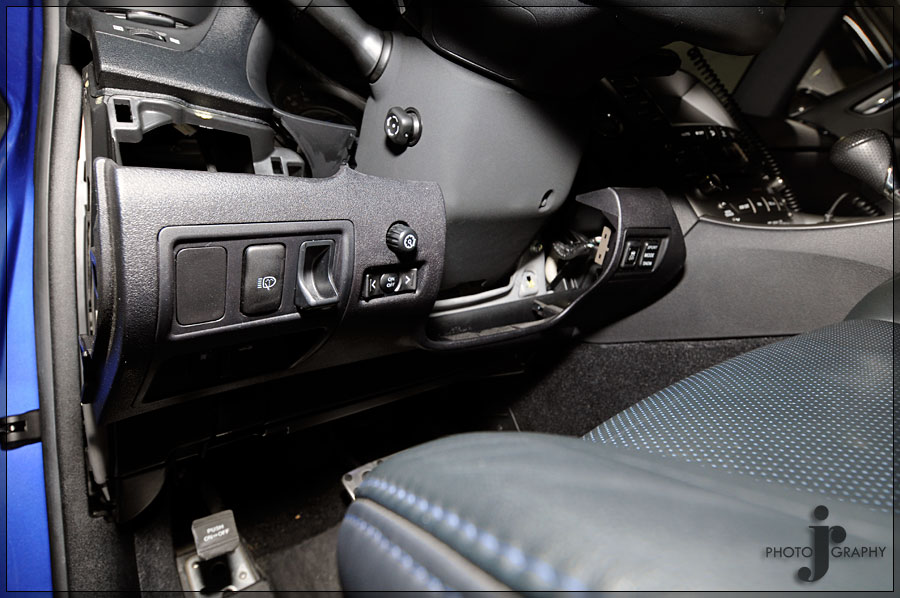
Remove the left screw to the gauge trim.
Remove the right screw to the gauge trim.

Pop up the clips that hold the leather trim in place.

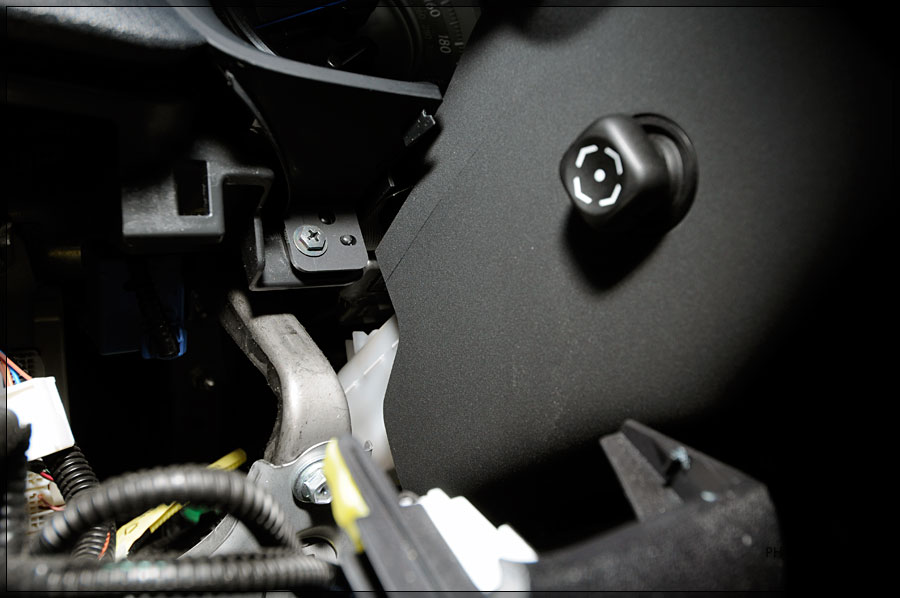
Remove two top plastic screw clips. After this you can wiggle the trim loose and out of the dash.
Reverse to install.

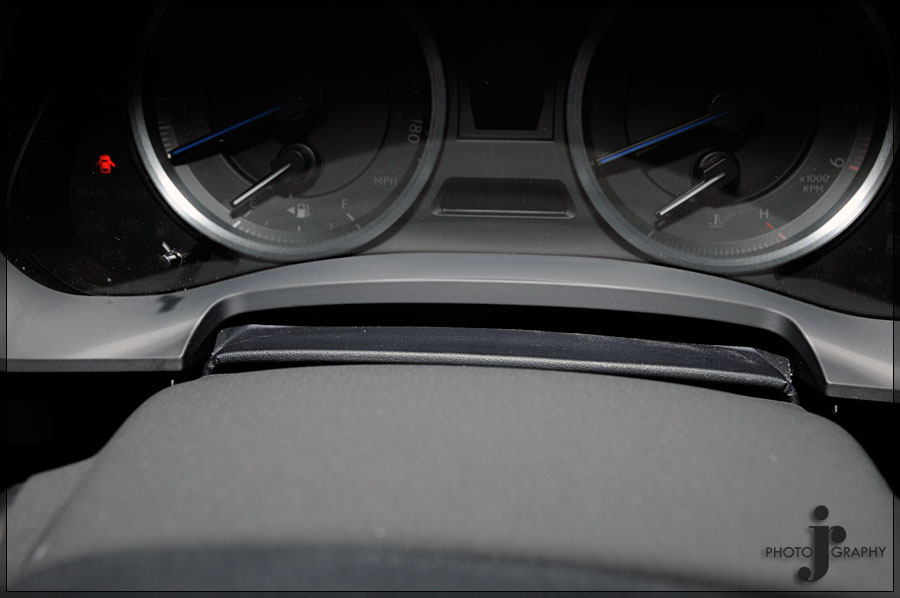
Before & After:

Clear Lights Before & After:
https://www.clublexus.com/forums/is-...auge-trim.html
Thanks to mdsbrain and Isfast I was able to pick these up in the for sale section with no wait.
The ThinkDesign parts match the factory trim great. The weave size is slightly larger I believe but I could only just make it out when holding it right next to the center console area so you can't tell at all once they are installed. I also got some clear door lights as well to get rid of the red ones.
I included a quick install for the gauge trim. It isn't difficult but figured it might come in handy possibly. The vents are straight forward so and just pop out and the new ones clip right in.
I also picked up a Silver flat bottom wheel from Sewell but I am still waiting on that to arrive. Should have it in about 2 weeks time.
Now I just need to pickup the rear seat divider and maybe the latch to the armrest compartment in silver to finish off the interior.
Vents:
Great attention to detail in the construction
Gauge Trim:
Together:
Install:
Remove this side panel first
You can now pull down the lower trim around the steering wheel. You can remove it if you want but you don't have to.
Remove the left screw to the gauge trim.
Remove the right screw to the gauge trim.
Pop up the clips that hold the leather trim in place.
Remove two top plastic screw clips. After this you can wiggle the trim loose and out of the dash.
Reverse to install.
Before & After:
Clear Lights Before & After:
Last edited by CCColtsicehockey; 06-13-23 at 11:07 AM.
06-13-23, 11:05 AM
#7
Original Post Date: March 12, 2012
https://www.clublexus.com/forums/is-...-complete.html
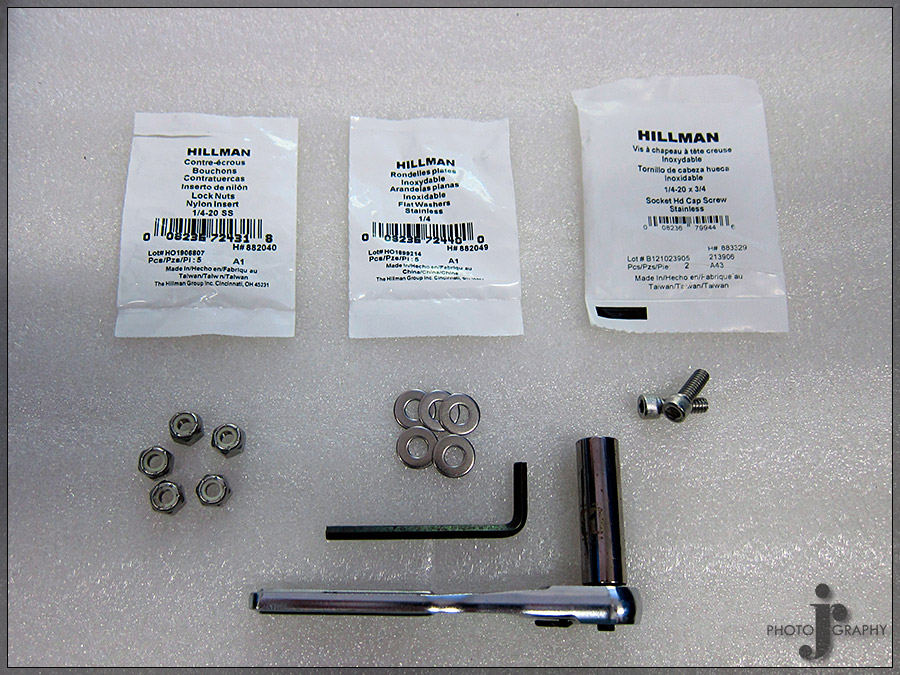
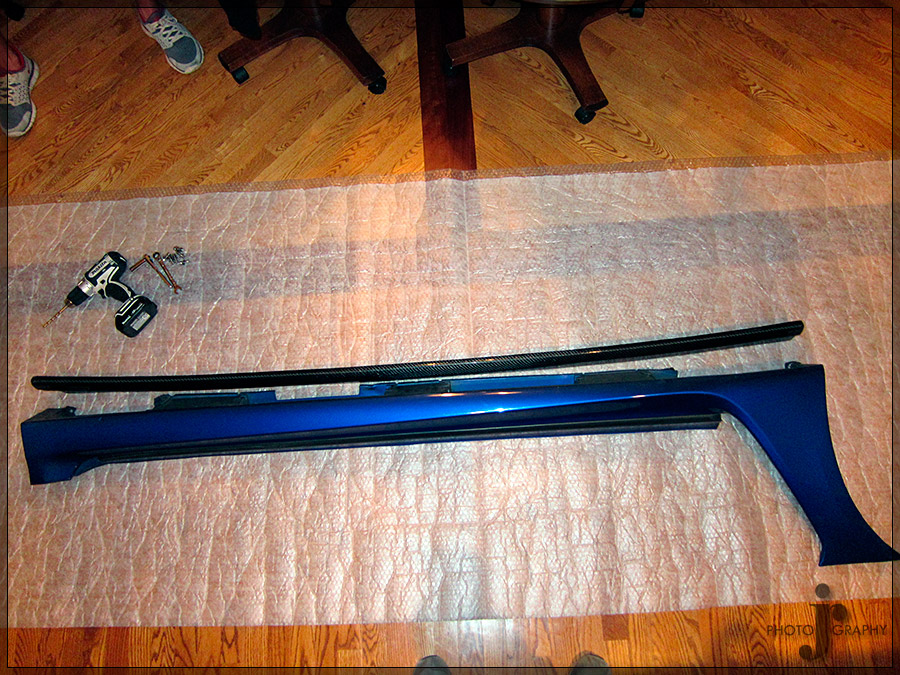
Part 1:
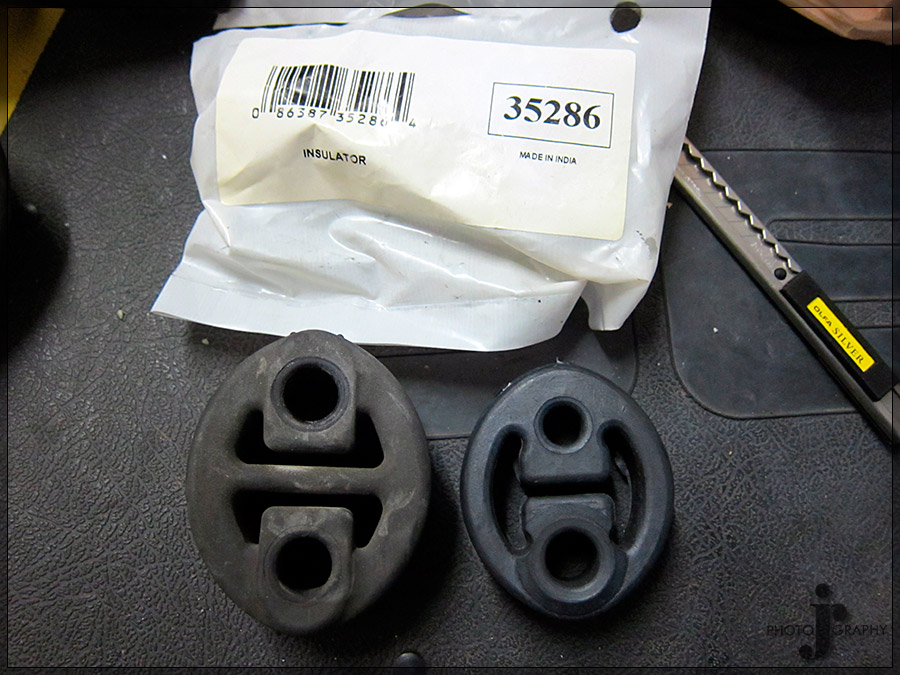
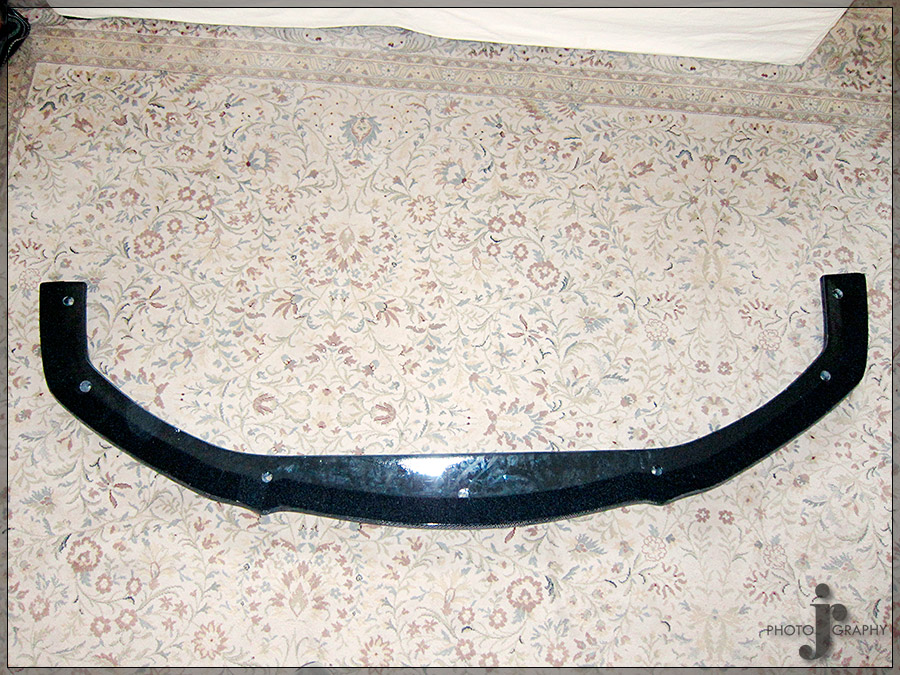
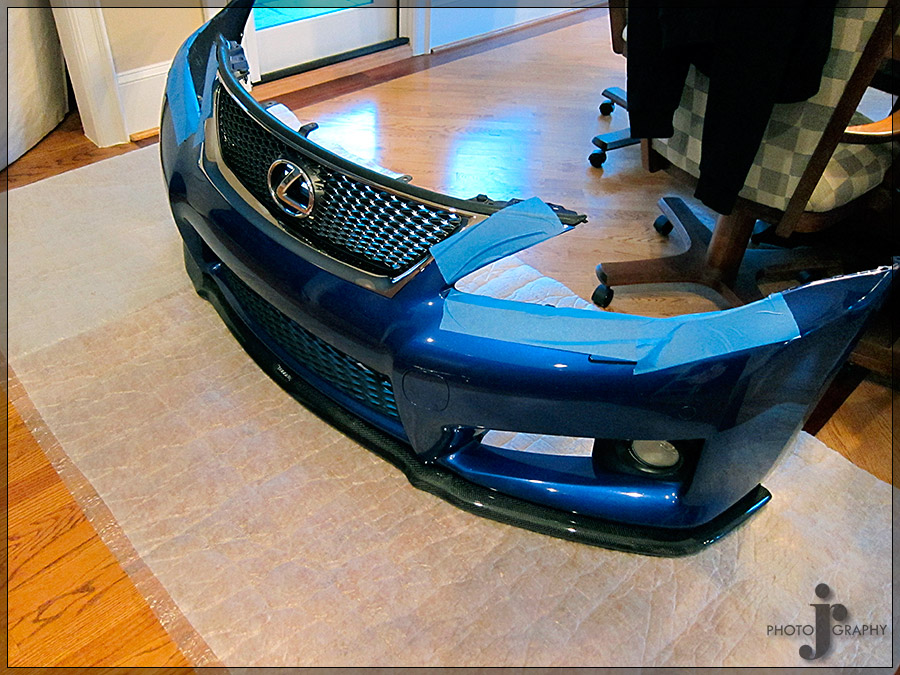
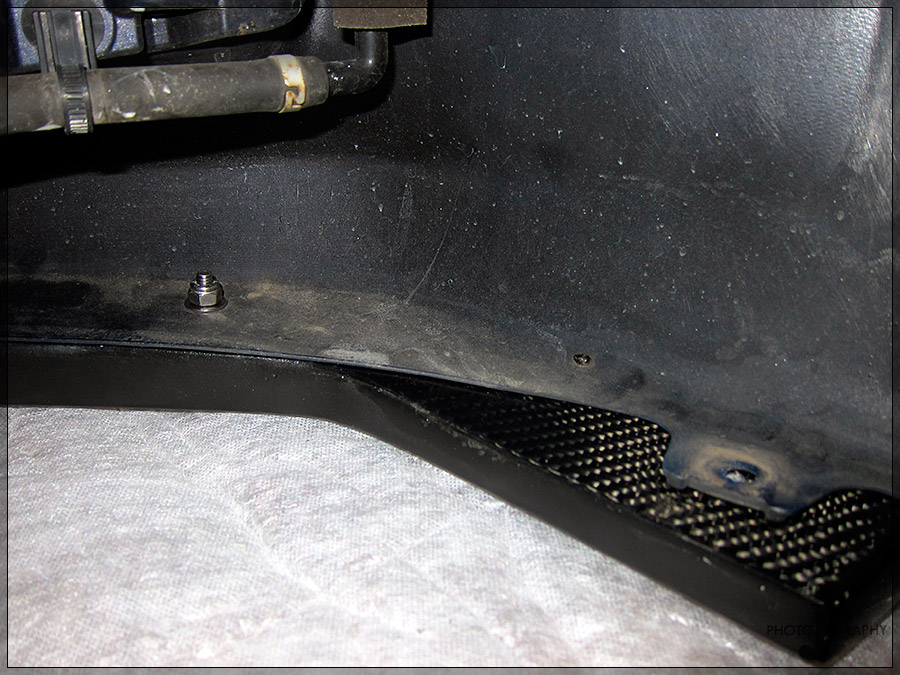
A while back I picked up the Branew lip kit CrazyMPG was selling. I finally was able to have time to install it this weekend. I documented some of the install as the only way to really correctly install it was to remove the front bumper and side skirts from the car since the kit doesn't use factory mounting points except at the end of the front and rear bumper.
The install wasn't terribly difficult just more so time consuming due to having to remove the front bumper and sides. The kit also is rather hard to fit with the ISSForged exhaust because it goes into the exhaust openings on the bumper and thus makes them a little smaller. I fixed this problem a little by switching out so some different size rubber exhaust hangers in order to move the exhaust around in the opening a bit.
I am still working on fitting the rear piece in a final position as the original install they used pop rivets that were hidden but I don't really want to drill those holes in the bumper because they would not be 100% hidden when I would eventually remove the kit.
Well onto the install and pics.
New slightly smaller rubber exhaust hangers.
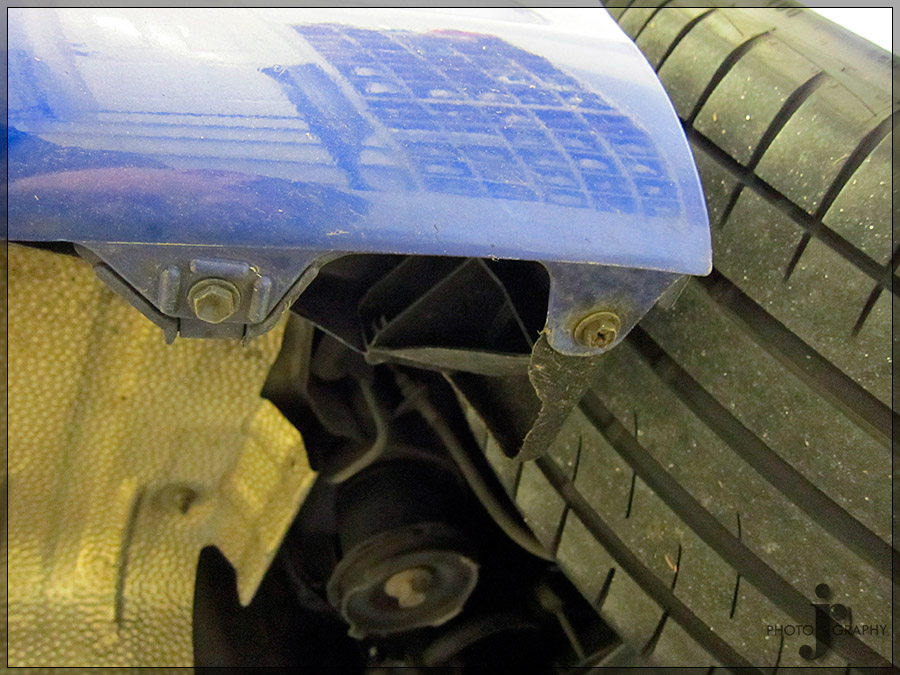
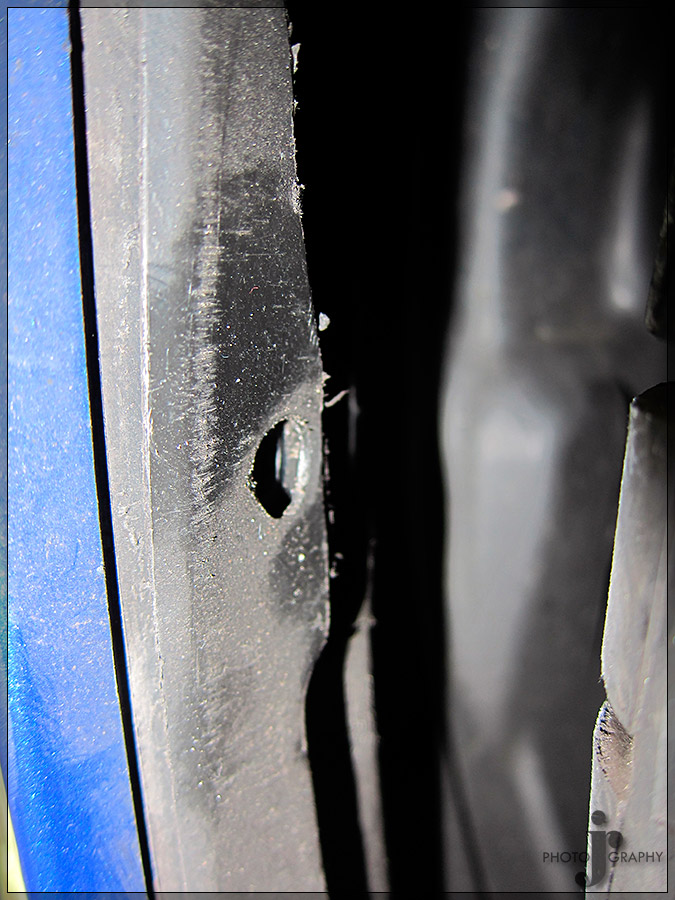
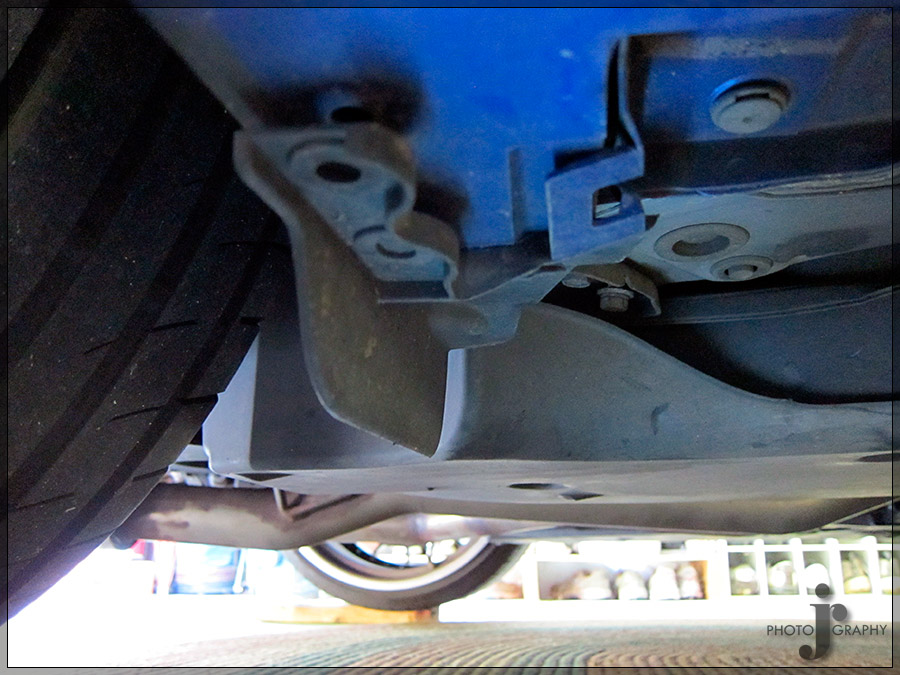
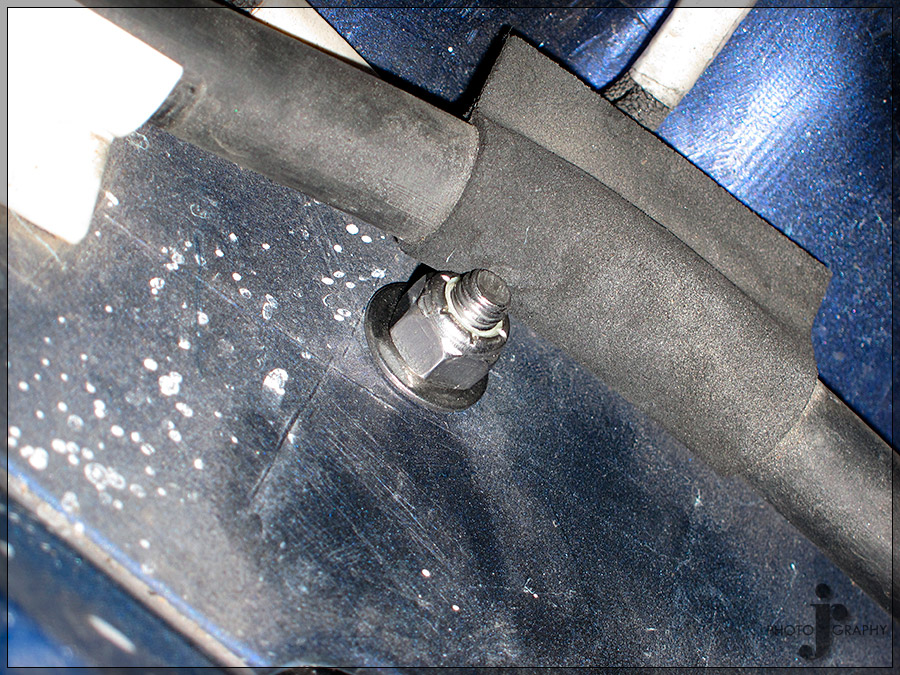
This spot on the rear lip mounts to the bolt right before the wheel arch in the picture below. Those bolts one on each side are technically the only thing holding the rear lip on. It does however fit tightly around the exhaust as well so it is pretty much permanently held on. Once I get a few more things figured out I will then attach it with 3m body tape as well. Hopefully till then it will stay on safely.

Rear lip on and car up on ramps and boards to give a slight increase in clearance to complete the rest of the install.
I chose all stainless steel hardware to bolt in on with. I got nylon locking nuts as to help prevent the need to ever have to retighten anything since I would have to remove it from the car first which would be a pain.
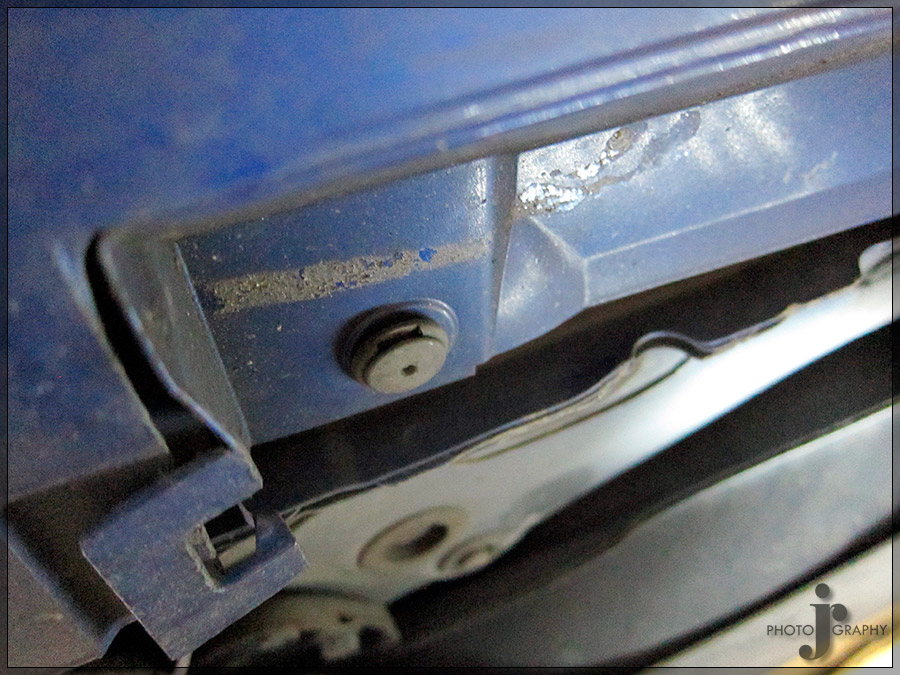
Front wheel arch remove top bolt
Remove 2 bolts and 1 clip here.
Rear wheel arch remove single bolt on side skirt
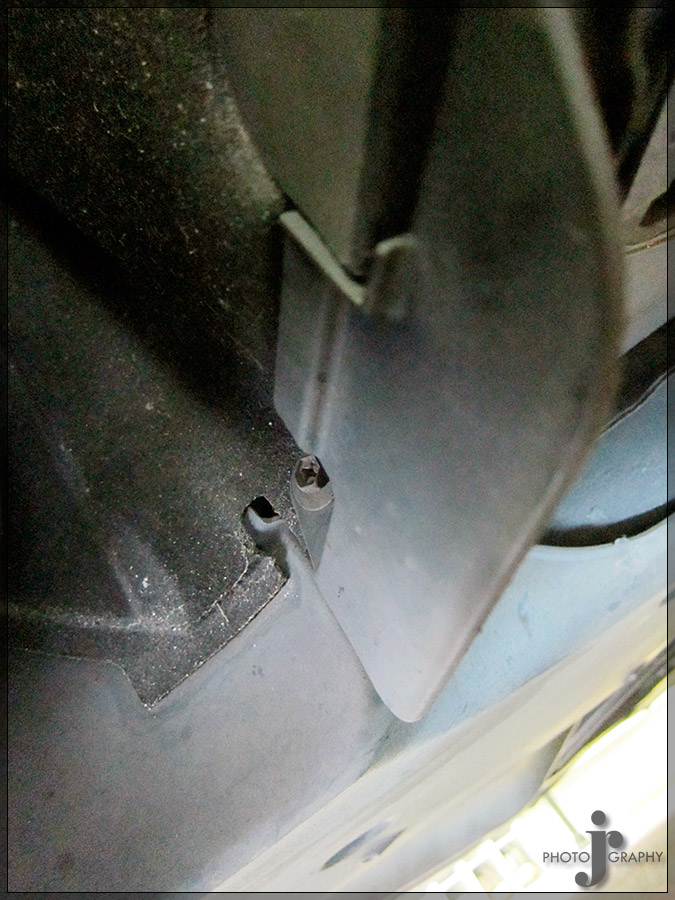
Remove clip from flap
Remove bolt from flap
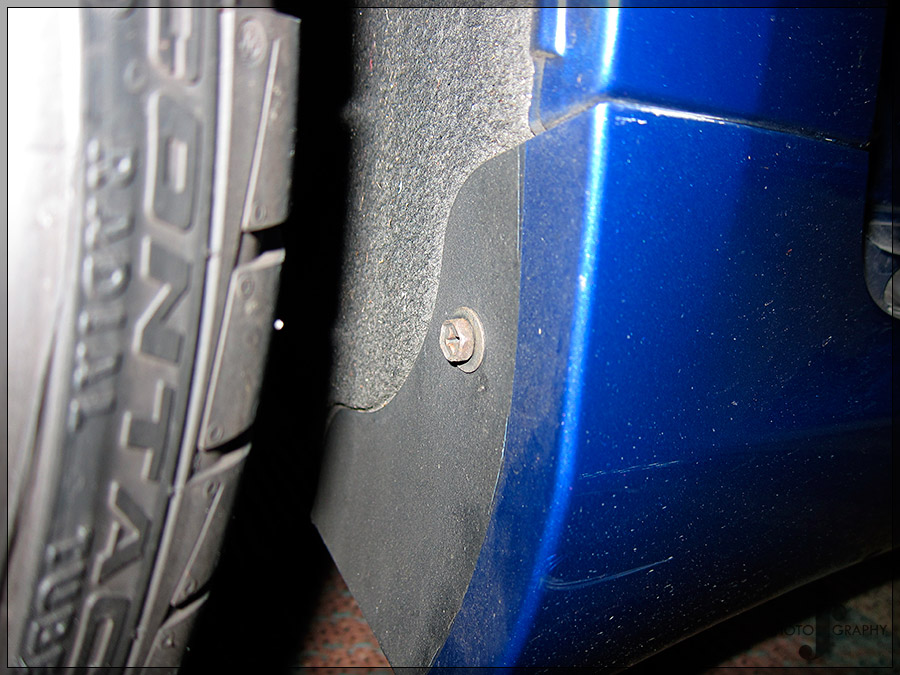
Remove 7 clips on underside of sideskirt
Remove 2 screws under weather stripping one at front and one at back. The front ones were rather a pain because I could not get in a position to be able to see into it so as to line up the screw driver.
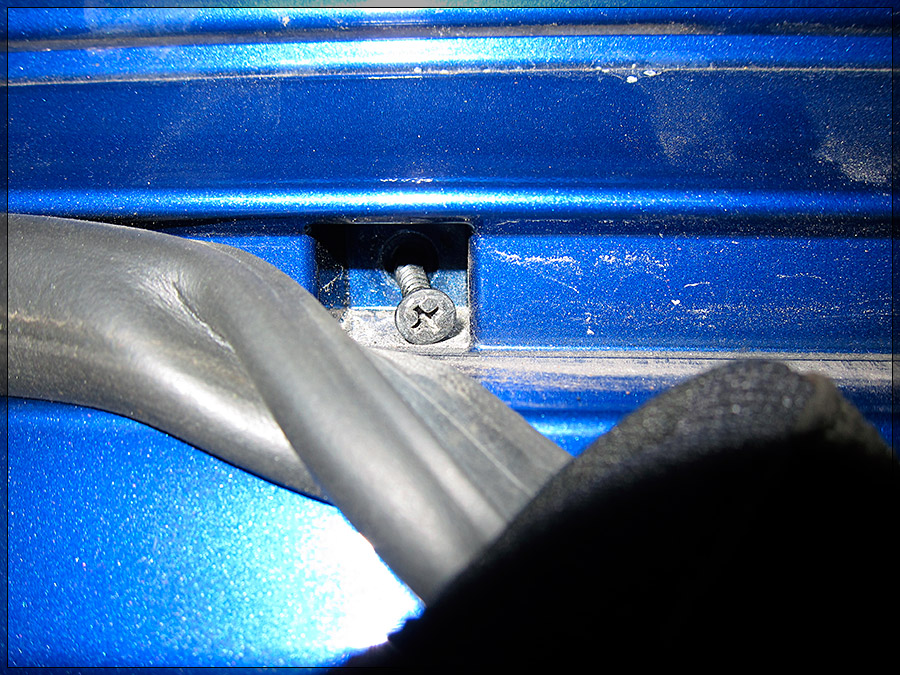
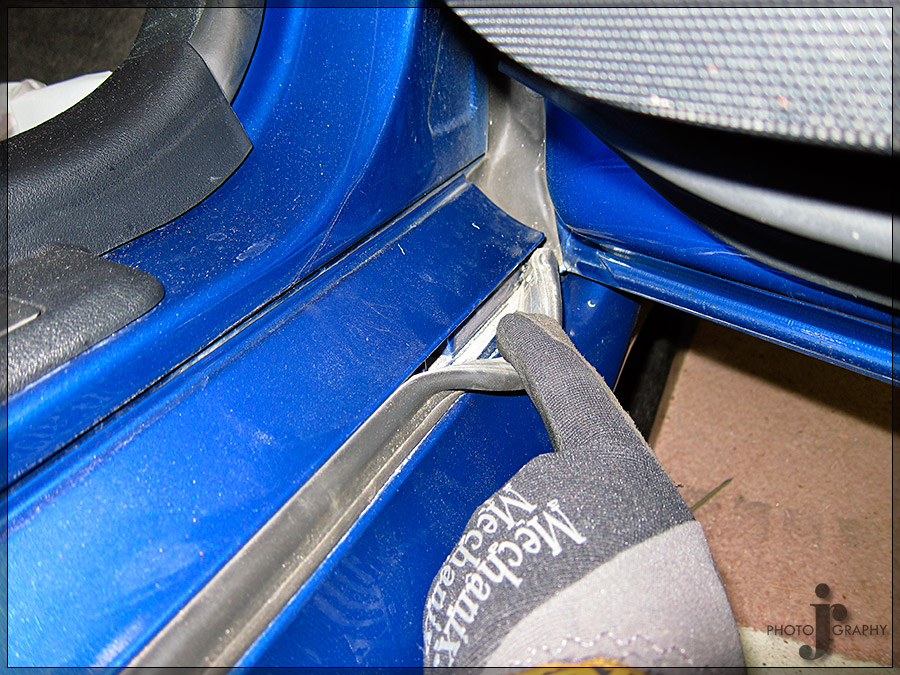
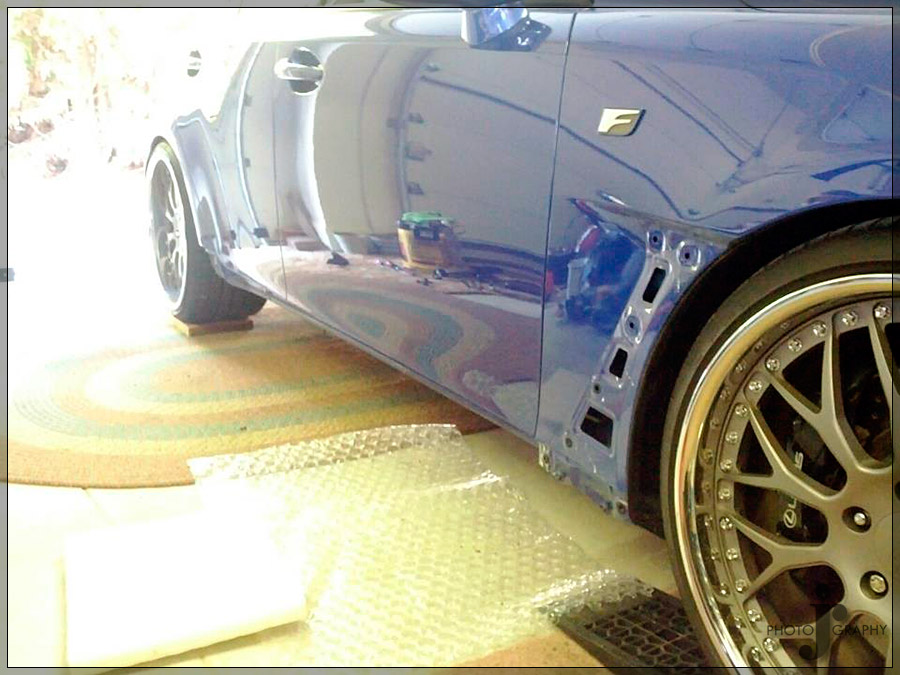
Side skirts finally off
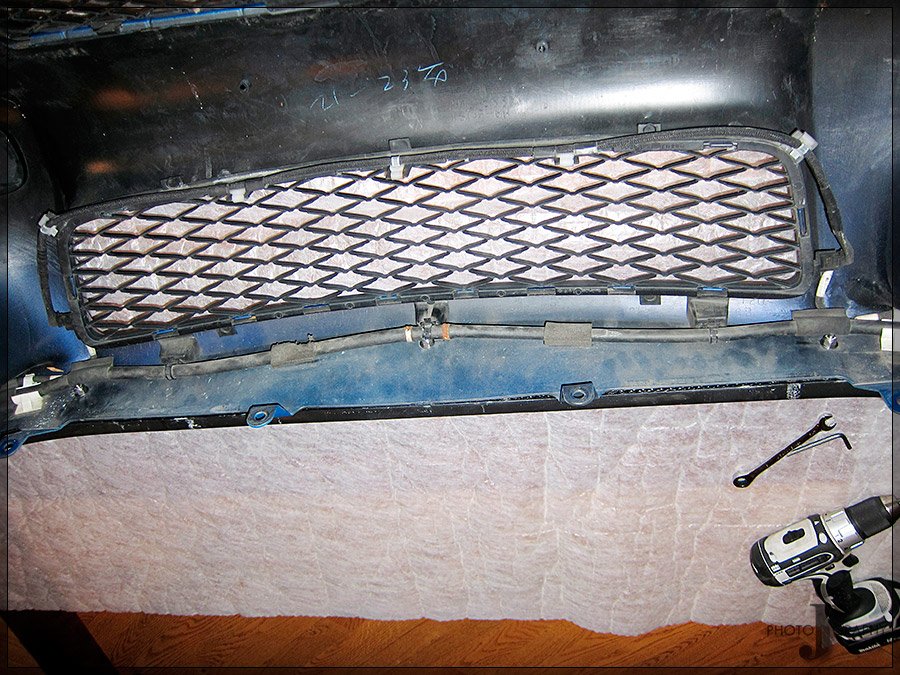
Now on to removing the front bumper. There are 9 clips on the top panel.
Below that there are 3 bolts. 1 on each side and one in the middle.
I forgot to grab pictures but there are two plastic clips inside each wheel arch and then one screw which you have to pry the fender liner out first to access at the top corner of the bumper. Then there are 8 bolts to be removed on the bottom side of the bumper. Once are of that is out carefully pull the bumper out of the clips underneath the side and inner corner of each headlight.
You will either need someone to hold the bumper or or lay it down at an angle and quickly disconnect the fog light wires so as not to put strain on them. Also need to disconnect the harness that is for the headlight washers and parking sensors.
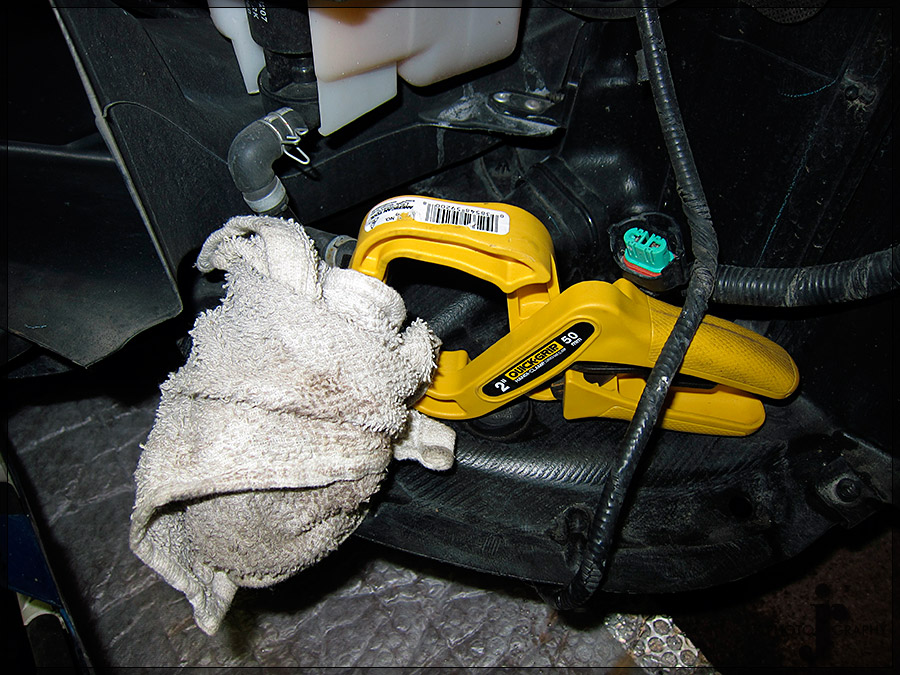
Lastly make sure you have something to clamp the hose from the washer fluid container or else you will end up with a mess like I did the first time. Not really sure what I thought was going to stop it from coming out all over the place.
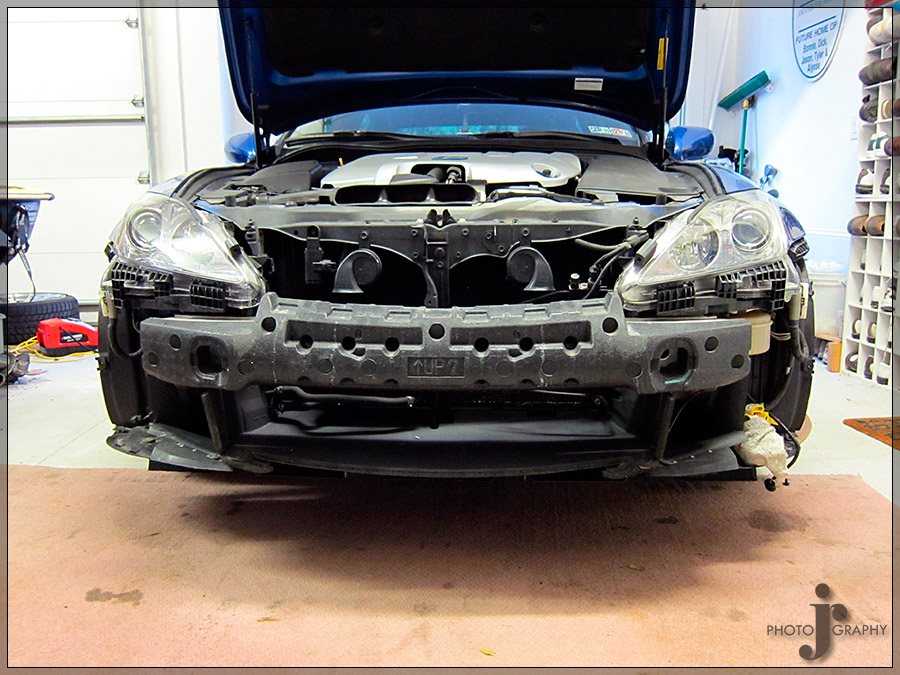
Bumper finally off
https://www.clublexus.com/forums/is-...-complete.html
Part 1:
A while back I picked up the Branew lip kit CrazyMPG was selling. I finally was able to have time to install it this weekend. I documented some of the install as the only way to really correctly install it was to remove the front bumper and side skirts from the car since the kit doesn't use factory mounting points except at the end of the front and rear bumper.
The install wasn't terribly difficult just more so time consuming due to having to remove the front bumper and sides. The kit also is rather hard to fit with the ISSForged exhaust because it goes into the exhaust openings on the bumper and thus makes them a little smaller. I fixed this problem a little by switching out so some different size rubber exhaust hangers in order to move the exhaust around in the opening a bit.
I am still working on fitting the rear piece in a final position as the original install they used pop rivets that were hidden but I don't really want to drill those holes in the bumper because they would not be 100% hidden when I would eventually remove the kit.
Well onto the install and pics.
New slightly smaller rubber exhaust hangers.
This spot on the rear lip mounts to the bolt right before the wheel arch in the picture below. Those bolts one on each side are technically the only thing holding the rear lip on. It does however fit tightly around the exhaust as well so it is pretty much permanently held on. Once I get a few more things figured out I will then attach it with 3m body tape as well. Hopefully till then it will stay on safely.
Rear lip on and car up on ramps and boards to give a slight increase in clearance to complete the rest of the install.
I chose all stainless steel hardware to bolt in on with. I got nylon locking nuts as to help prevent the need to ever have to retighten anything since I would have to remove it from the car first which would be a pain.
Front wheel arch remove top bolt
Remove 2 bolts and 1 clip here.
Rear wheel arch remove single bolt on side skirt
Remove clip from flap
Remove bolt from flap
Remove 7 clips on underside of sideskirt
Remove 2 screws under weather stripping one at front and one at back. The front ones were rather a pain because I could not get in a position to be able to see into it so as to line up the screw driver.
Side skirts finally off
Now on to removing the front bumper. There are 9 clips on the top panel.
Below that there are 3 bolts. 1 on each side and one in the middle.
I forgot to grab pictures but there are two plastic clips inside each wheel arch and then one screw which you have to pry the fender liner out first to access at the top corner of the bumper. Then there are 8 bolts to be removed on the bottom side of the bumper. Once are of that is out carefully pull the bumper out of the clips underneath the side and inner corner of each headlight.
You will either need someone to hold the bumper or or lay it down at an angle and quickly disconnect the fog light wires so as not to put strain on them. Also need to disconnect the harness that is for the headlight washers and parking sensors.
Lastly make sure you have something to clamp the hose from the washer fluid container or else you will end up with a mess like I did the first time. Not really sure what I thought was going to stop it from coming out all over the place.
Bumper finally off
Last edited by CCColtsicehockey; 06-13-23 at 11:09 AM.
Trending Topics
06-13-23, 11:05 AM
#8
Original Post Date: March 18, 2012
Part 2:
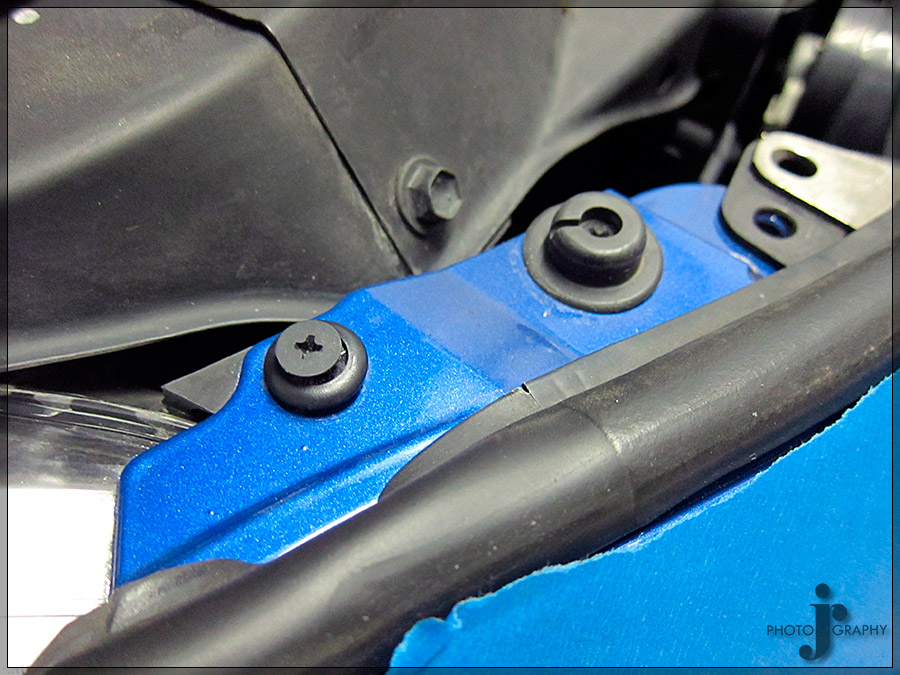
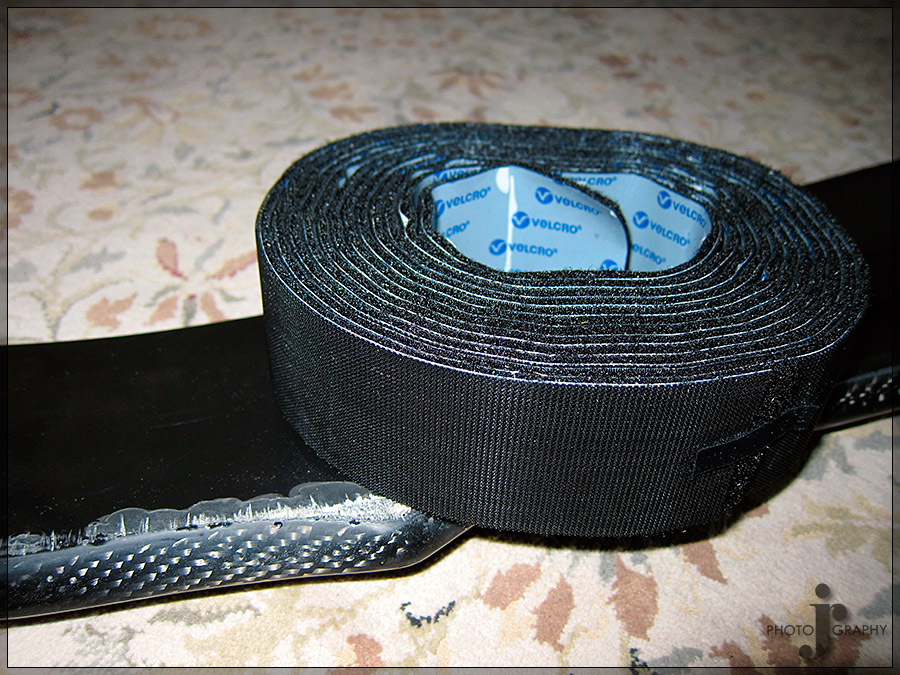
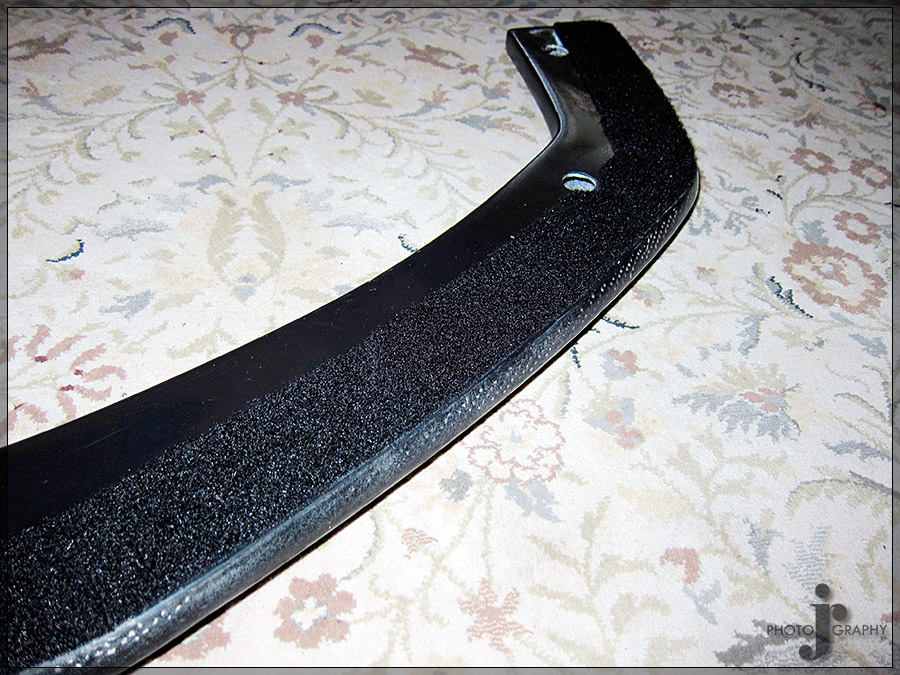
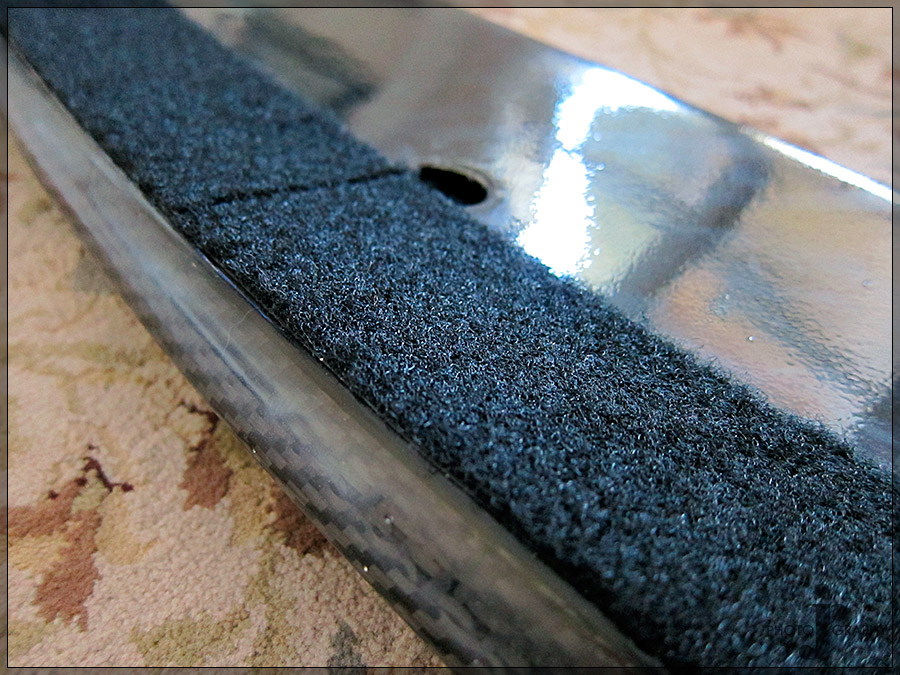
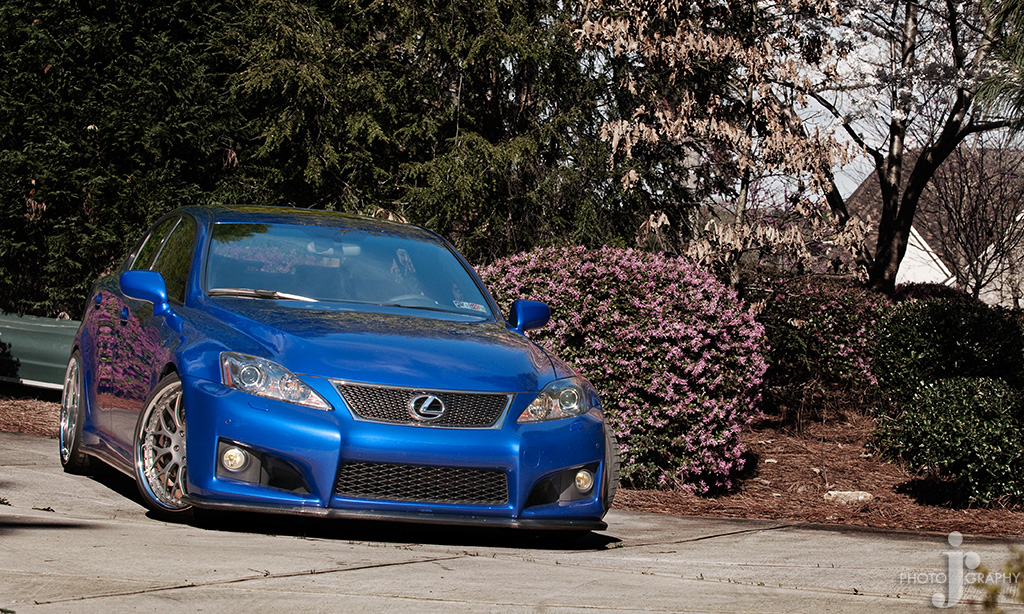
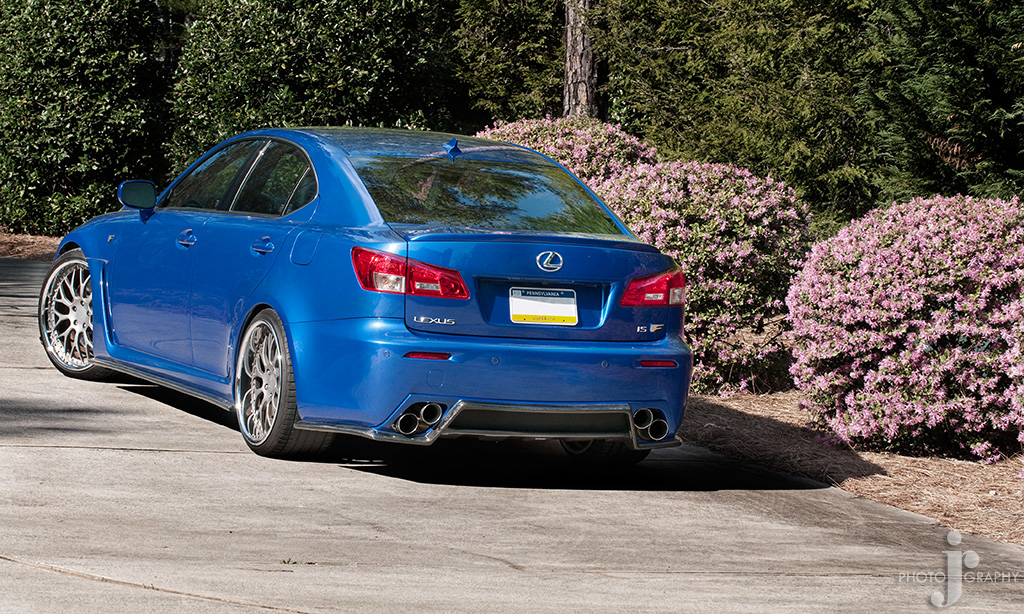
So I was worried about scrapping the front lip and since it was carbon and I didn't want to damage it I did a little research and found two solutions. One using industrial Velcro and the other a 3M product used on airplane front ends and helicopter blades that seems pretty indestructible. The 3M product is extremely expensive and I was unable to figure out if you needed a special adhesive to apply it so I went with the easier solution that I could pickup at Lowes.
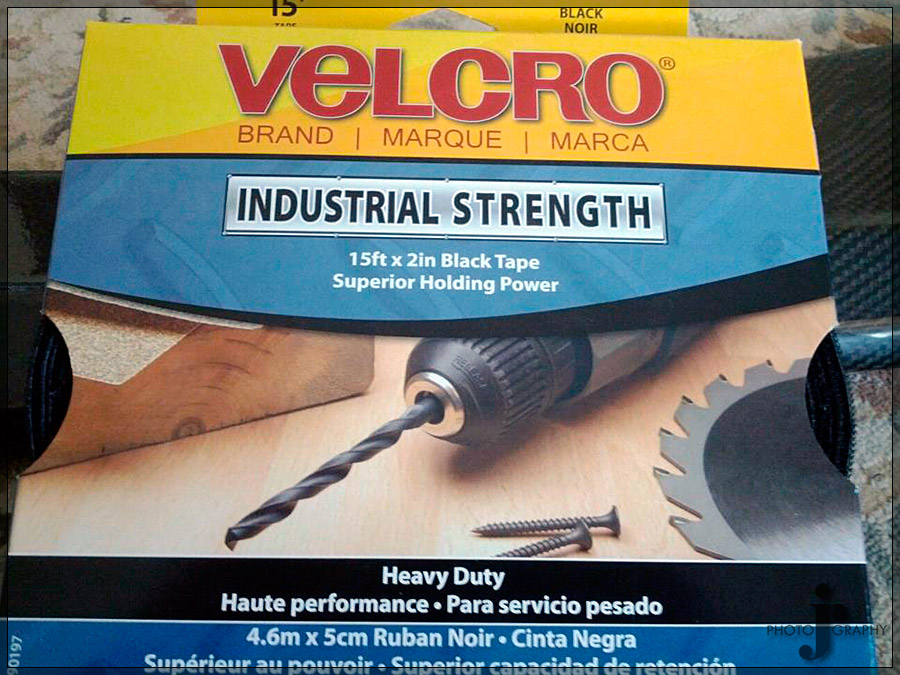
You don't use the hard plastic stuff but rather the softer thicker part of the Velcro.
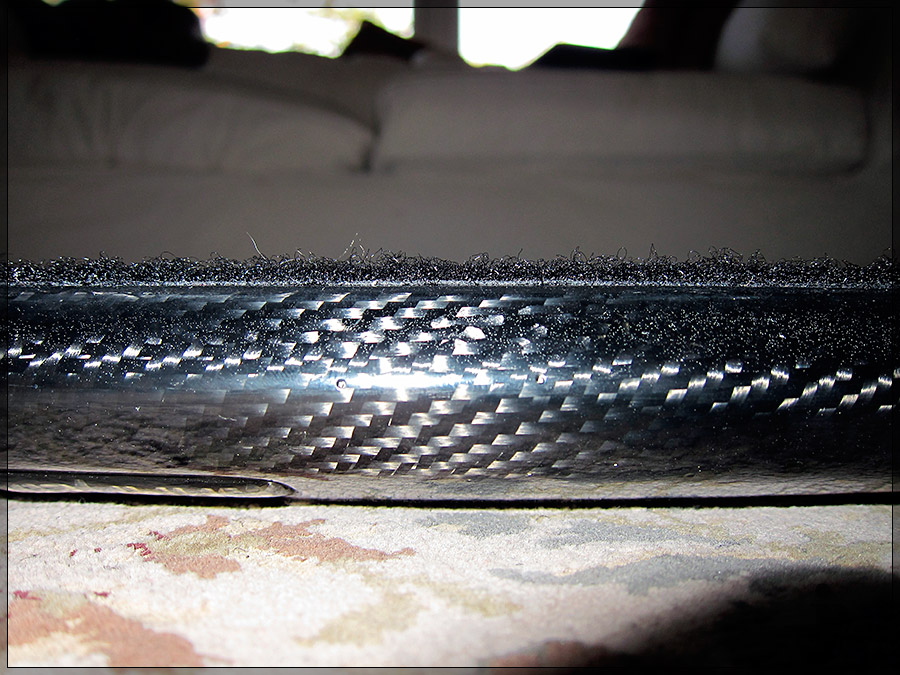
Lip finally installed on the bumper
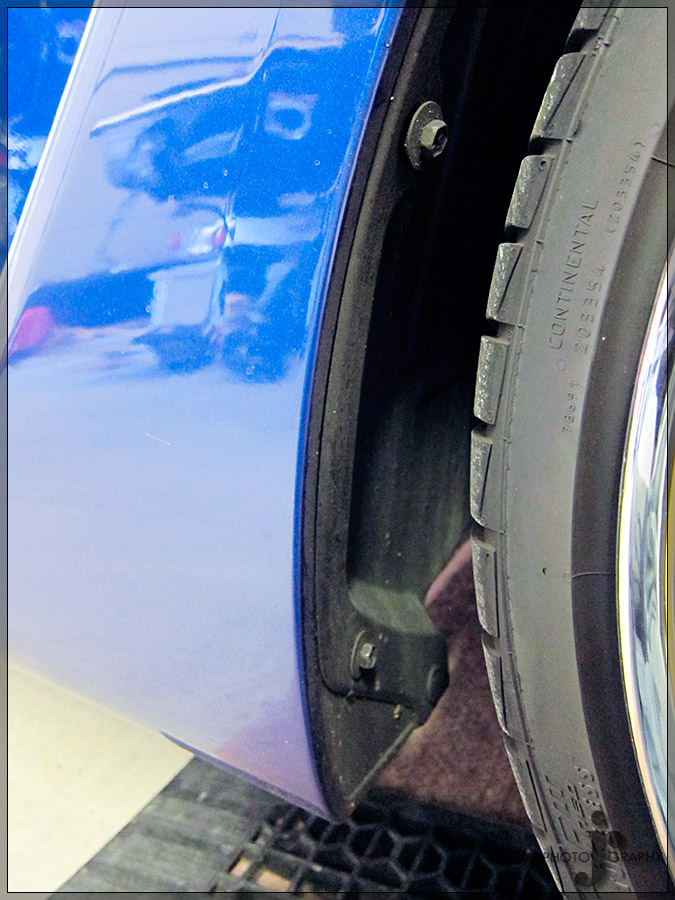
Couple shots of the hardware installed and at the end of the bumper you can see how the last mounting location uses the factory hardware. I chose to use the factory holes to start with to bolt the lip on to align it to the bumper before drilling the holes in the bumper to install the other bolts.
Shot before installing the side skirts.
The side skirts didn't have a factory bolt hole to use to help align so a buddy of mine came over to help me hold it in place after I lined up each end before drilling the outer holes. I forgot to take any pics of the rest of the side skirt install cause I was getting tired at this point. Also no pics of the re-install but just pretty much do the reverse of taking it apart.
Only able to get 3 shots of it today as it rained for most of the day unforunately. The sun did come out though so I could at least get these.

Part 2:
So I was worried about scrapping the front lip and since it was carbon and I didn't want to damage it I did a little research and found two solutions. One using industrial Velcro and the other a 3M product used on airplane front ends and helicopter blades that seems pretty indestructible. The 3M product is extremely expensive and I was unable to figure out if you needed a special adhesive to apply it so I went with the easier solution that I could pickup at Lowes.
You don't use the hard plastic stuff but rather the softer thicker part of the Velcro.
Lip finally installed on the bumper
Couple shots of the hardware installed and at the end of the bumper you can see how the last mounting location uses the factory hardware. I chose to use the factory holes to start with to bolt the lip on to align it to the bumper before drilling the holes in the bumper to install the other bolts.
Shot before installing the side skirts.
The side skirts didn't have a factory bolt hole to use to help align so a buddy of mine came over to help me hold it in place after I lined up each end before drilling the outer holes. I forgot to take any pics of the rest of the side skirt install cause I was getting tired at this point. Also no pics of the re-install but just pretty much do the reverse of taking it apart.
Only able to get 3 shots of it today as it rained for most of the day unforunately. The sun did come out though so I could at least get these.
Last edited by CCColtsicehockey; 06-13-23 at 11:10 AM.
06-13-23, 11:06 AM
#9
So catching up. This is really back from March 2022.
My CTSV Wagon had an issue n the middle of January. I left my neighborhood and made it maybe a mile down the road and started heading a terrible noise. It is really only over 1700-2000rpm that you can hear it. It sounds like a baseball card in bicycle spokes on the deceleration of the engine.
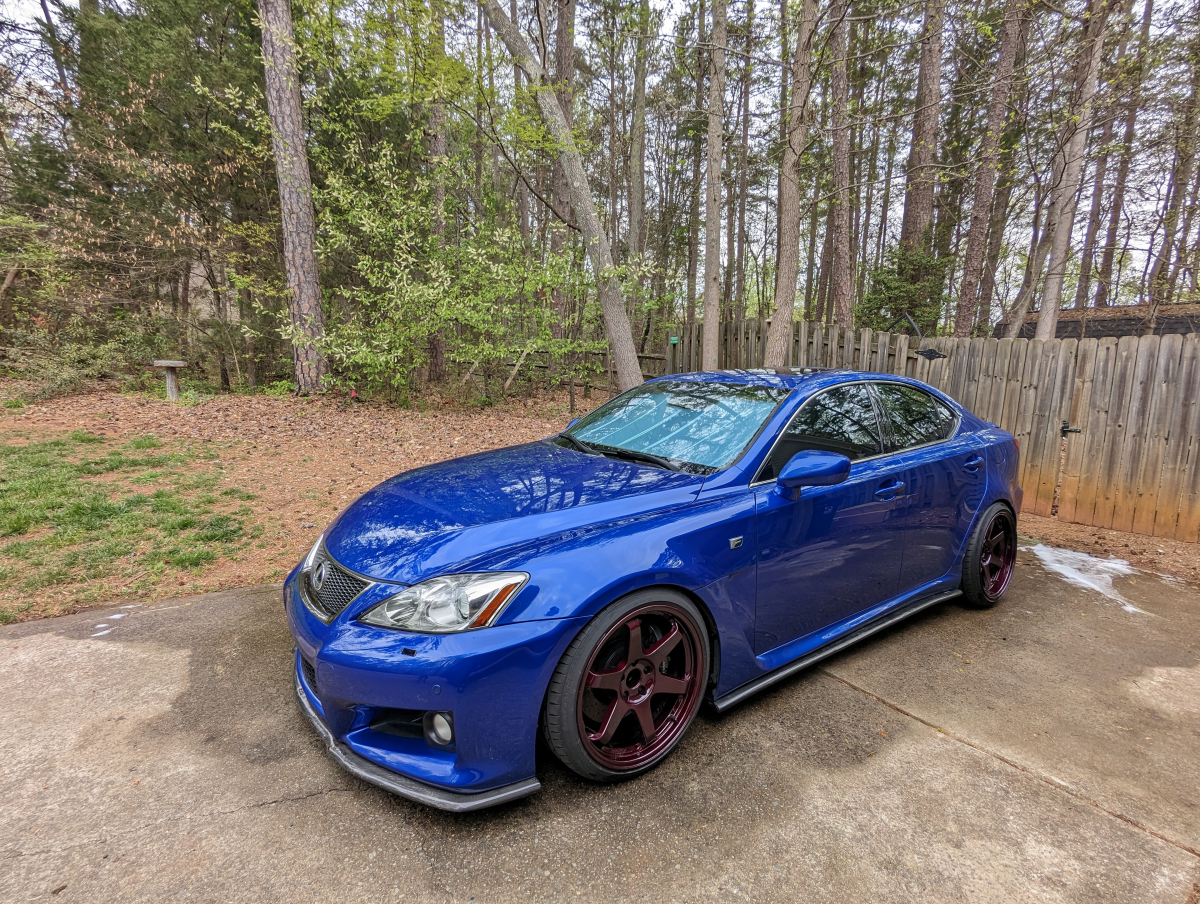
About 2 weeks after the problem showed up my buddy that I sold the Lexus ISF to called me up and he was ready to move on to something new. When I sold it to him I asked him if he decided to sell to call me and let me have the first right of refusal. I have known him forever and he is like family and he kept his word. This car has been a car I have really missed since I sold it. Just the combination of power, handling, and comfort is great. So many newer cars these days keep getting heavier all the time. The exhaust note it has to me is just magical as well. We discussed a price over the coming days. Came to a deal and had some other things that needed worked out as well before I could go pick it up. The wheels he had on it were painted when he bought them so chose to refinish them. It also needed new rotors, pads, and tires. Had those shipped up and put on so I could fly up and drive it home. All of that took a little time. A little over a month and a half to get it all figured out maybe two.
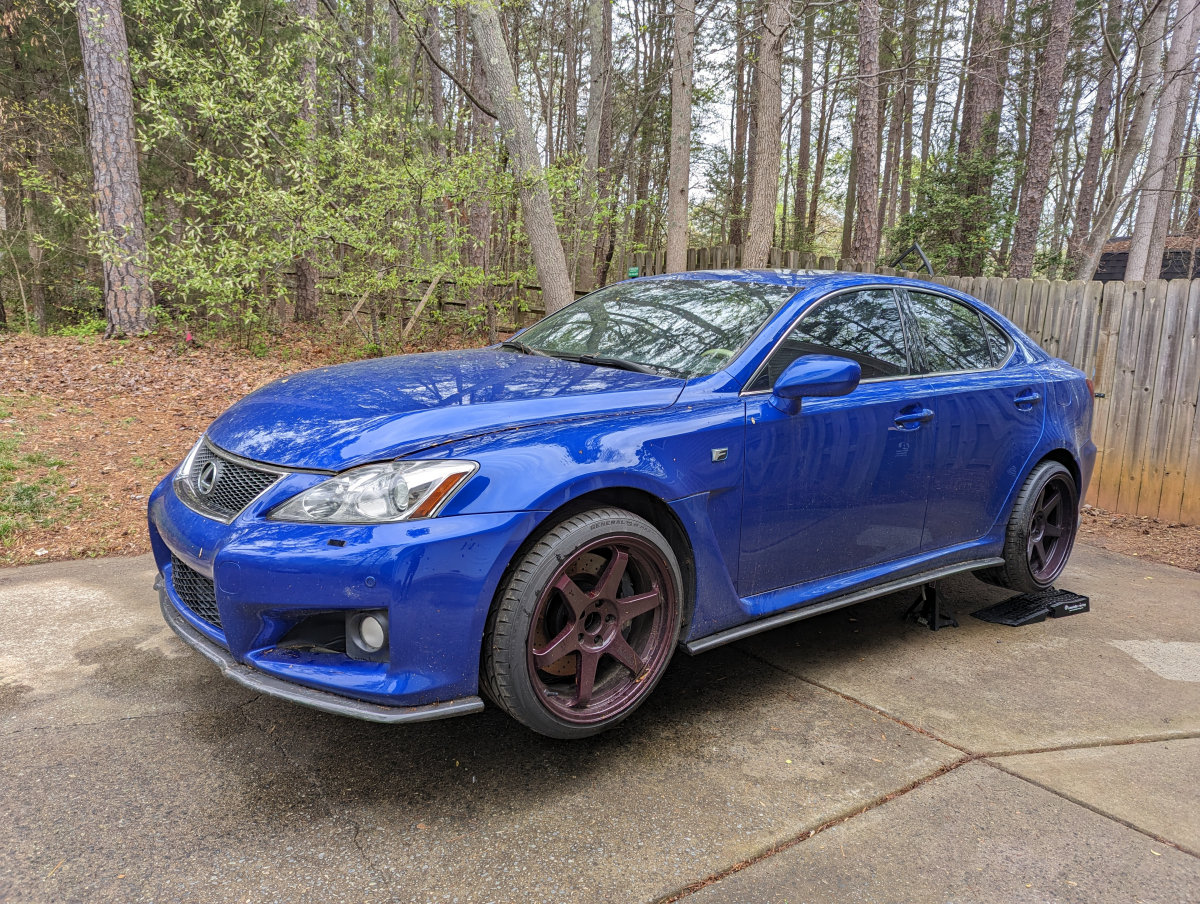
I then flew up to Pittsburgh first thing in the morning to pick it up. I have always done crazy color wheels on my TSX over the years. Everything I own right now is bland. White, dark gunmetal, and black. I have purple wheels on my NSX. I wanted something crazy again so I figured why not on these. They look so different all the time with the changing light which is awesome. At dusk and at night from more than like 10ft away they even look black. They basically ended up something between the past wheel on my TSX and the purple wheels on my NSX.

Time to get on the road. Don't mind all the lights. It needs TPMS replaced.


It needs plenty of TLC on little cosmetic things and some rubber suspension bits. However, for being 14 years old and 147k miles it is in great condition as a drivers car. It's certainly not in collector car condition but I don't want that. I'm going to keep driving the **** out of the same as I did before I sold it. It's barely was driven more than a weekend car by my buddy. He put just under 9k miles on it 6.5 years.
I will give it a good refresh over the coming years but it will be fully taking over daily duties while the V is down and then they will split daily duties. I have some other plans besides just a refresh for it as well but those will have to wait a little bit.
My CTSV Wagon had an issue n the middle of January. I left my neighborhood and made it maybe a mile down the road and started heading a terrible noise. It is really only over 1700-2000rpm that you can hear it. It sounds like a baseball card in bicycle spokes on the deceleration of the engine.
About 2 weeks after the problem showed up my buddy that I sold the Lexus ISF to called me up and he was ready to move on to something new. When I sold it to him I asked him if he decided to sell to call me and let me have the first right of refusal. I have known him forever and he is like family and he kept his word. This car has been a car I have really missed since I sold it. Just the combination of power, handling, and comfort is great. So many newer cars these days keep getting heavier all the time. The exhaust note it has to me is just magical as well. We discussed a price over the coming days. Came to a deal and had some other things that needed worked out as well before I could go pick it up. The wheels he had on it were painted when he bought them so chose to refinish them. It also needed new rotors, pads, and tires. Had those shipped up and put on so I could fly up and drive it home. All of that took a little time. A little over a month and a half to get it all figured out maybe two.
I then flew up to Pittsburgh first thing in the morning to pick it up. I have always done crazy color wheels on my TSX over the years. Everything I own right now is bland. White, dark gunmetal, and black. I have purple wheels on my NSX. I wanted something crazy again so I figured why not on these. They look so different all the time with the changing light which is awesome. At dusk and at night from more than like 10ft away they even look black. They basically ended up something between the past wheel on my TSX and the purple wheels on my NSX.
Time to get on the road. Don't mind all the lights. It needs TPMS replaced.
It needs plenty of TLC on little cosmetic things and some rubber suspension bits. However, for being 14 years old and 147k miles it is in great condition as a drivers car. It's certainly not in collector car condition but I don't want that. I'm going to keep driving the **** out of the same as I did before I sold it. It's barely was driven more than a weekend car by my buddy. He put just under 9k miles on it 6.5 years.
I will give it a good refresh over the coming years but it will be fully taking over daily duties while the V is down and then they will split daily duties. I have some other plans besides just a refresh for it as well but those will have to wait a little bit.
Last edited by CCColtsicehockey; 06-13-23 at 11:16 AM.
The following 3 users liked this post by CCColtsicehockey:
06-13-23, 12:23 PM
#10
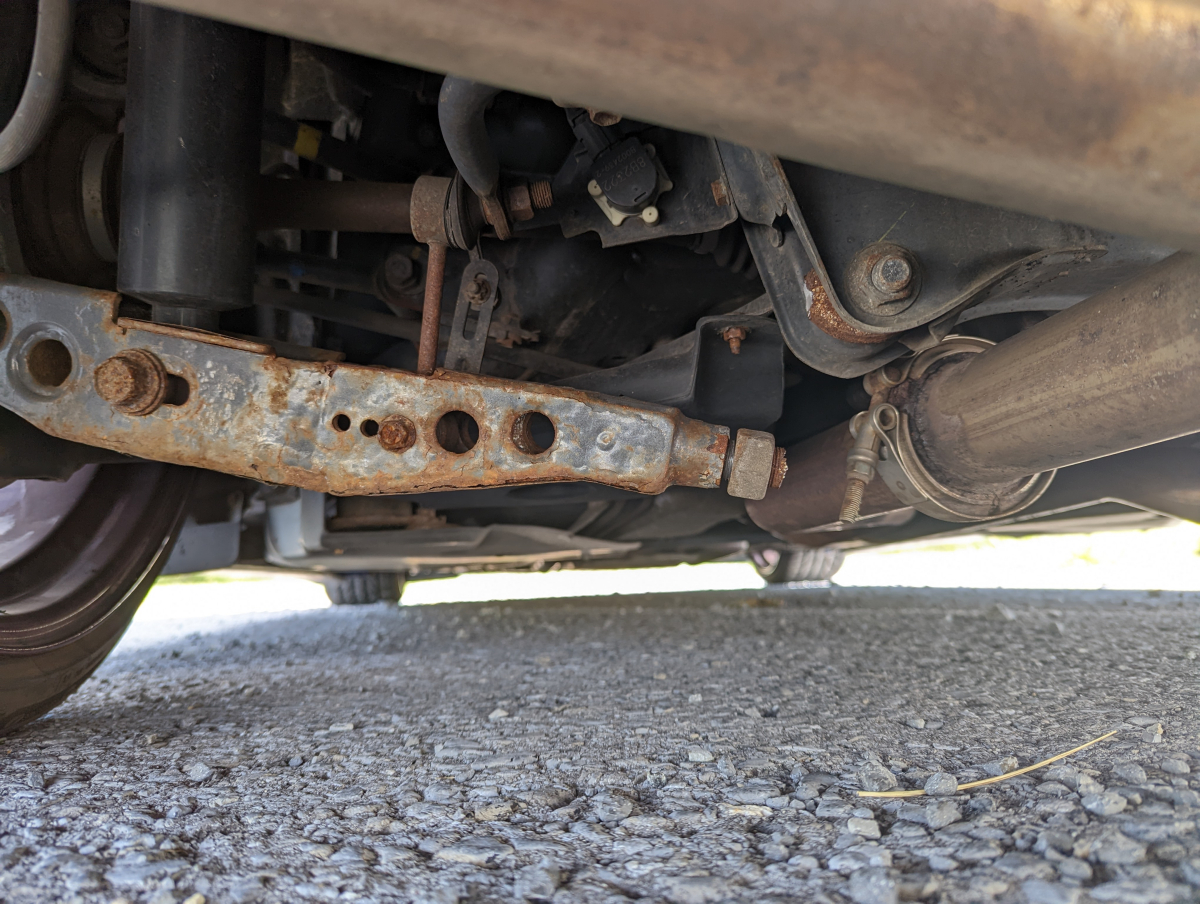
Last October I was heading from NC to PA. I was traveling through a backcountry part of Virginia at the time when all of a sudden felt something give out at the rear of the car and I could immediately feel the tire rubbing the fender. I was doing roughly 65-70 at the time of this. I managed to slow down and slowly find a safe place to pull over.
I keep the car really low but this is way lower than it is supposed to sit. The tire is actually sitting on the fender at this point.
I crawl under the car and find this. I will be honest these failing when my buddy had only had them on the car less miles than he even had the car for never occurred to me. I guess Pittsburgh salt even in the air can do some damage and seize spherical bushings.
The sense of slight panic that goes through you with such a lowered car breaking 5hrs from home and 2.5hrs from your destination is not something that is ever fun. Breaking down in the location I did turned out to literally be one of the best places I could ever have broken down. Using Google Maps I located several places about 30-45min win away and started calling them. No one had the size I needed but one gave me another shop to call that I didn't find in Google Maps. A dirt track race car builder about 45min away. Called him, and he not only had the parts I needed but he was also open and offered to come get me and the car.
The place I pulled over which looked like an abandoned gas station where people dumped pallets at apparently also had a property further back someone lived in. They came home while I was waiting for the gentleman from the race shop. Asked him if he minded if I tore apart some of the pallets which he didn't care about since he just burned them anyways. Lucky for me since without them I don't know how we get the car on the rollback.

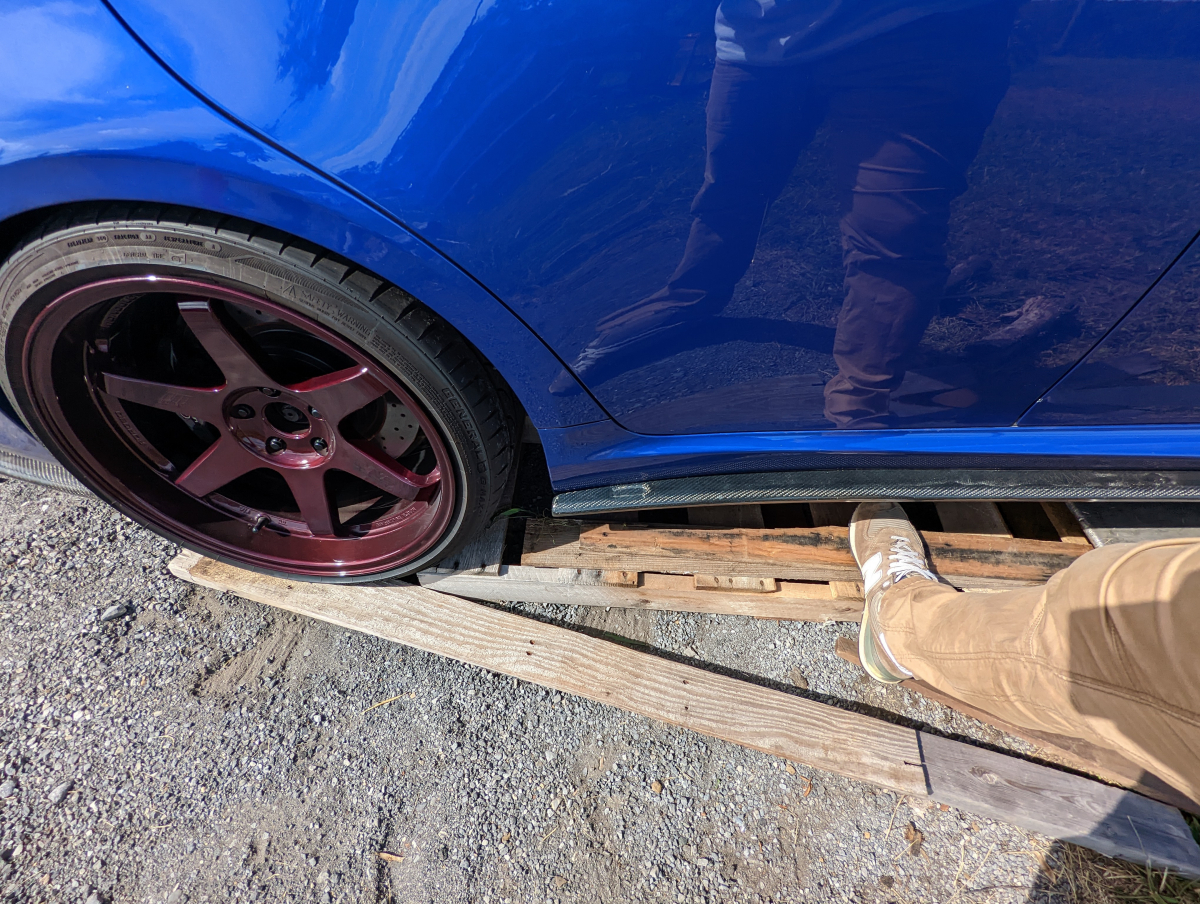
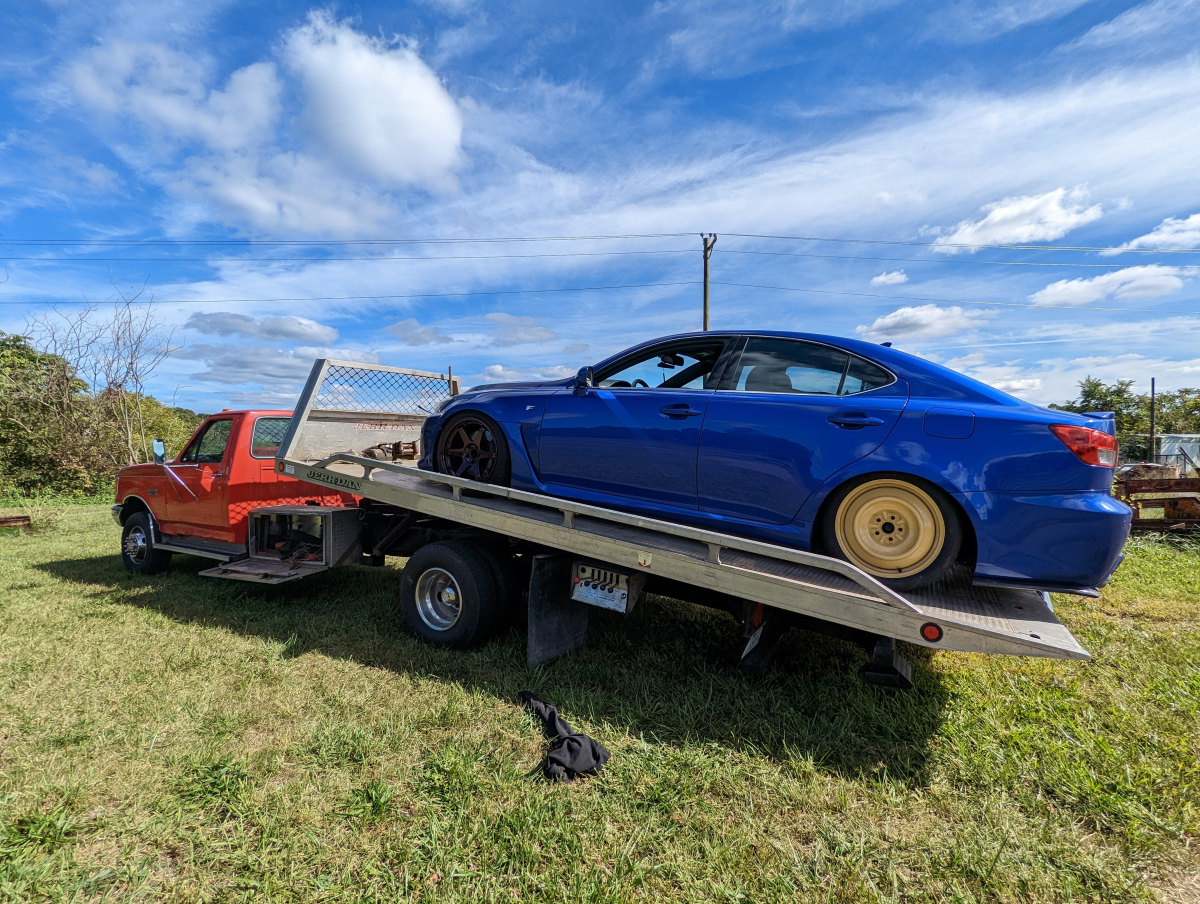
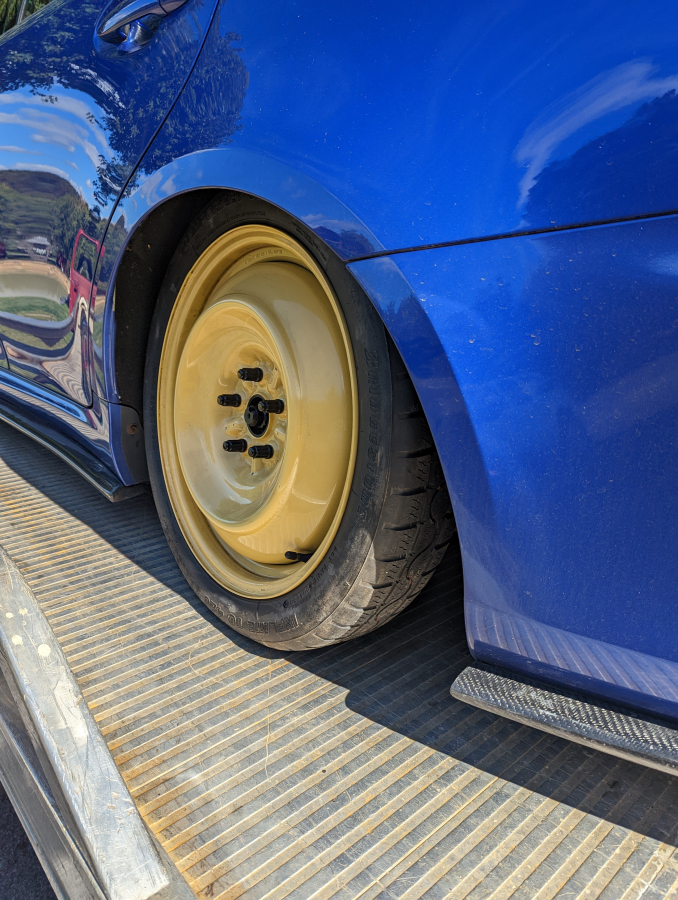
Thankfully I was able to put the spare on the car so that the car would roll and not have the tire rubbing on the fender. Only slight issue is it basically put the car also on the ground.
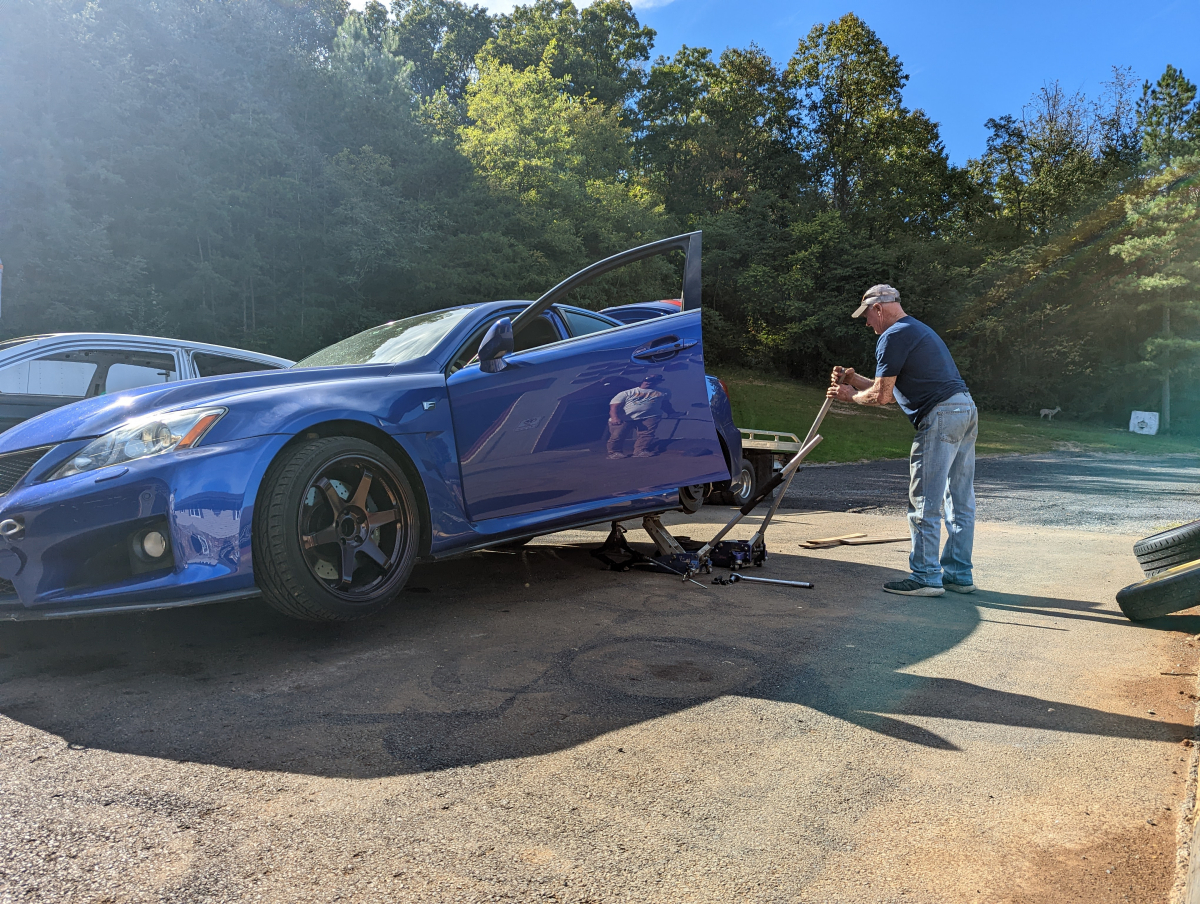
One side off
They asked if I wanted to do the other side just in case. I said yes. I think they might have regretted that after offering. Breaking out a torch and then a sawzall to finally get it off.

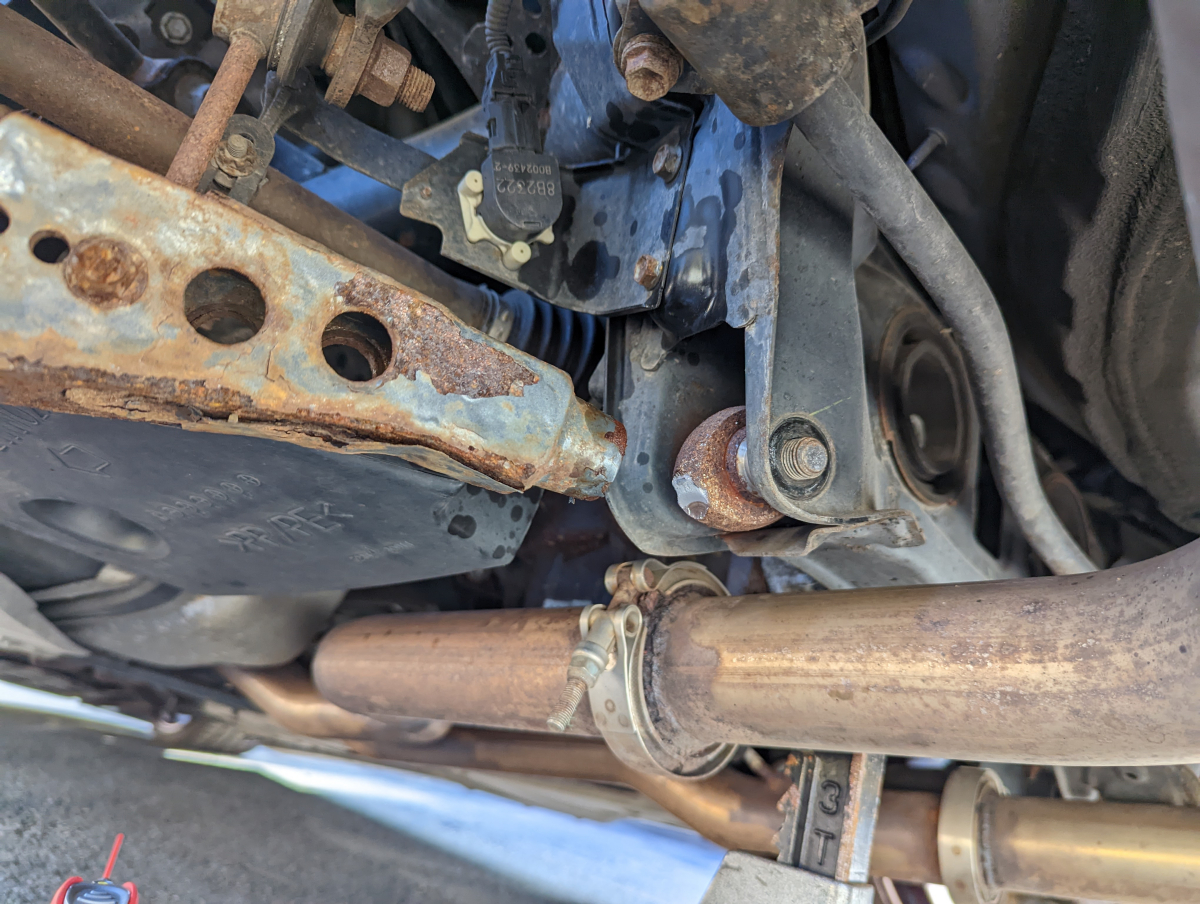
Close up of the side that snapped.
I don't have any pictures of it back together but you bet I check the spherical bushings every month now. It is on the list to pull the entire arms off the car at some point this year and have them media blasted and powder coated again. It is crazy that the powder coating aged that poorly.
I keep the car really low but this is way lower than it is supposed to sit. The tire is actually sitting on the fender at this point.
I crawl under the car and find this. I will be honest these failing when my buddy had only had them on the car less miles than he even had the car for never occurred to me. I guess Pittsburgh salt even in the air can do some damage and seize spherical bushings.
The sense of slight panic that goes through you with such a lowered car breaking 5hrs from home and 2.5hrs from your destination is not something that is ever fun. Breaking down in the location I did turned out to literally be one of the best places I could ever have broken down. Using Google Maps I located several places about 30-45min win away and started calling them. No one had the size I needed but one gave me another shop to call that I didn't find in Google Maps. A dirt track race car builder about 45min away. Called him, and he not only had the parts I needed but he was also open and offered to come get me and the car.
The place I pulled over which looked like an abandoned gas station where people dumped pallets at apparently also had a property further back someone lived in. They came home while I was waiting for the gentleman from the race shop. Asked him if he minded if I tore apart some of the pallets which he didn't care about since he just burned them anyways. Lucky for me since without them I don't know how we get the car on the rollback.
Thankfully I was able to put the spare on the car so that the car would roll and not have the tire rubbing on the fender. Only slight issue is it basically put the car also on the ground.
One side off
They asked if I wanted to do the other side just in case. I said yes. I think they might have regretted that after offering. Breaking out a torch and then a sawzall to finally get it off.
Close up of the side that snapped.
I don't have any pictures of it back together but you bet I check the spherical bushings every month now. It is on the list to pull the entire arms off the car at some point this year and have them media blasted and powder coated again. It is crazy that the powder coating aged that poorly.
06-13-23, 12:35 PM
#11
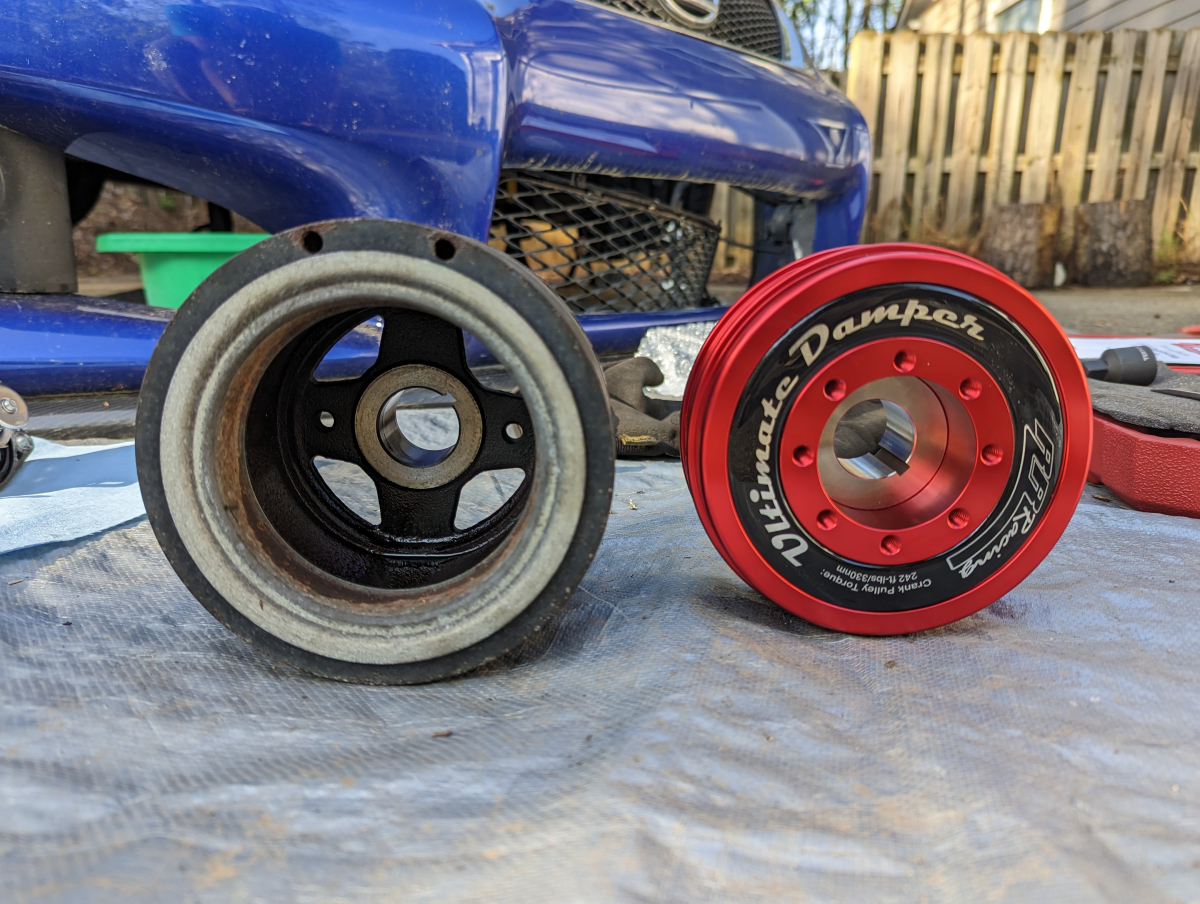
My buddy never decided to put headers on the car so it has had a CEL for the headers and O2 since I sold it to him. Fun fact if you drive in manual shift mode all the time the check engine light doesn't show up. I decided during the holiday sale that RR-Racing had to order the full bolt on package they sell with equal length PPE headers. Also picked up engine mounts, oil catch, and lightweight crank pulley.
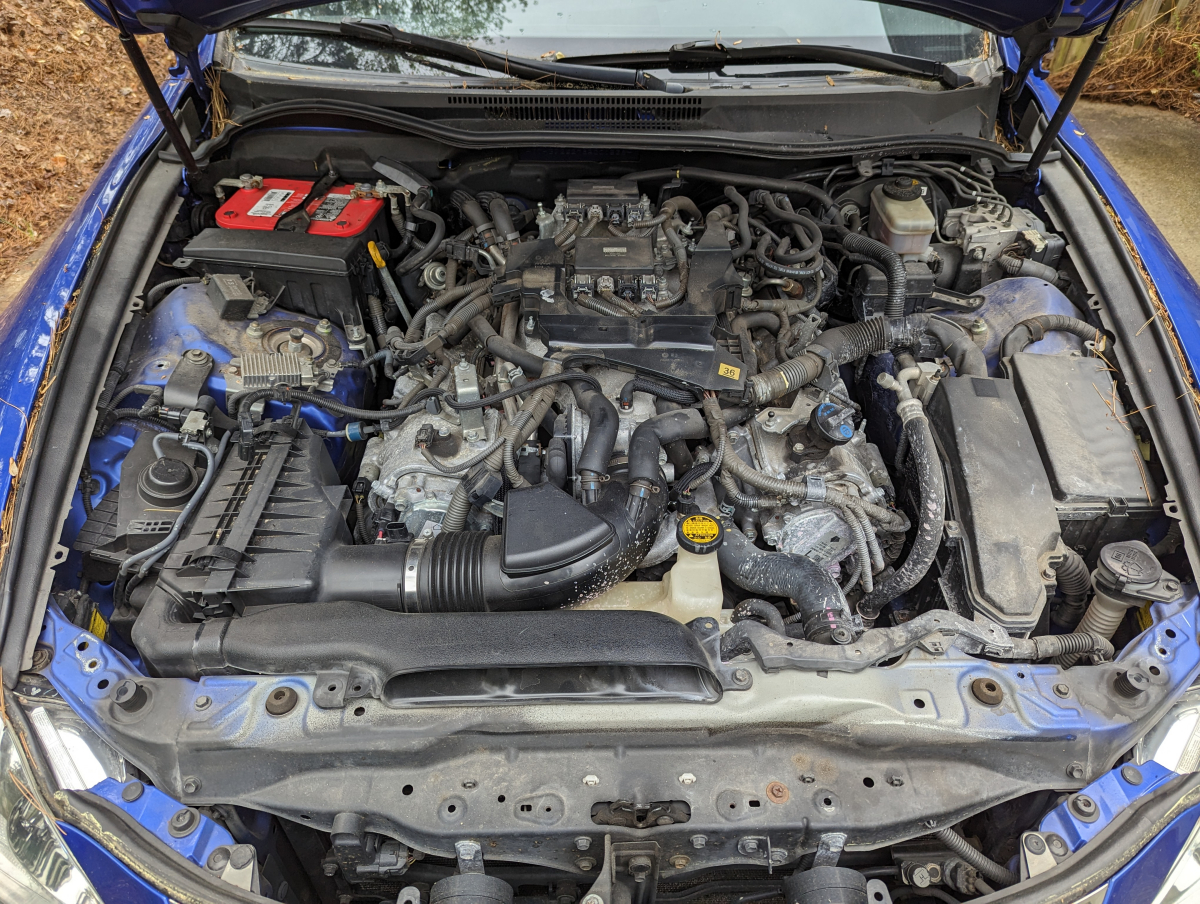
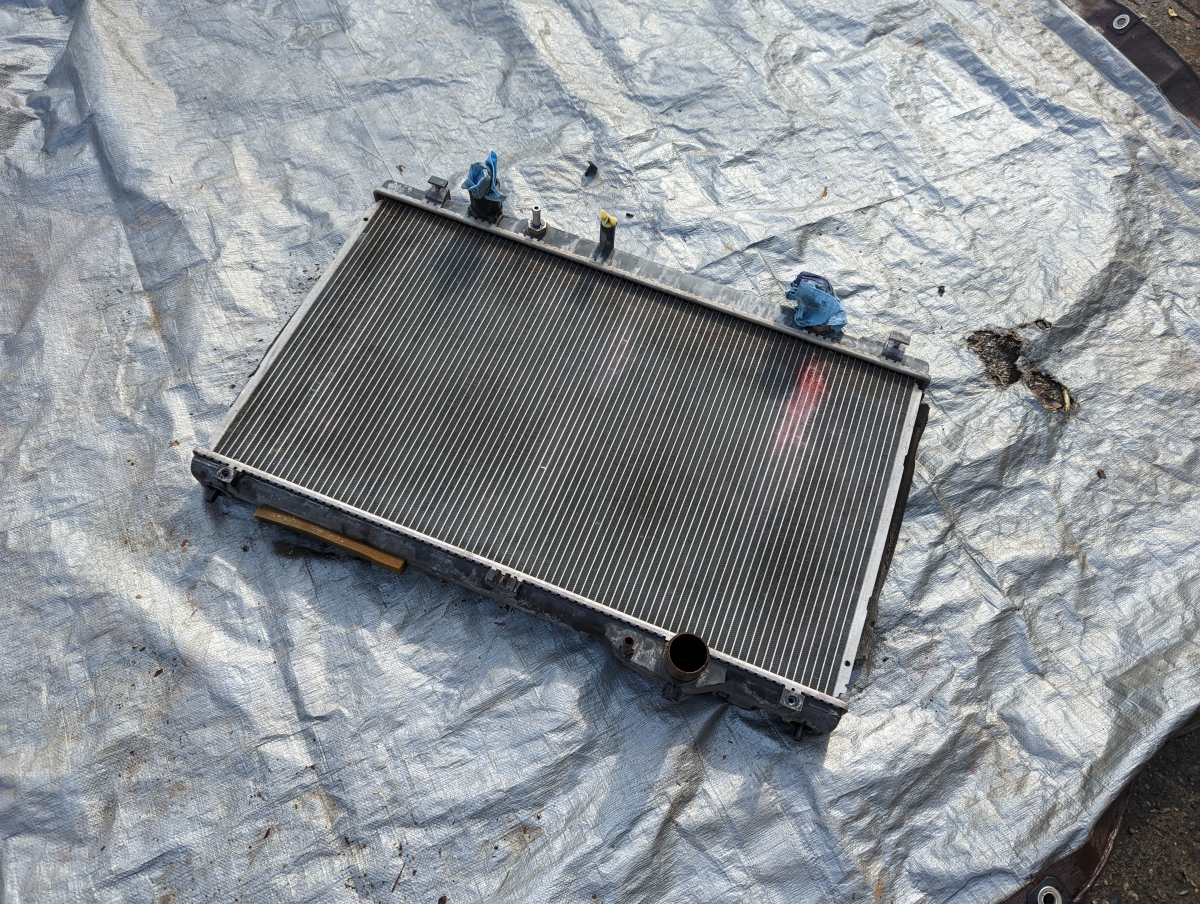
Apparently, my car decided I didn't have enough on PA trip that it wanted to welcome me into the new year with a blown top seal on the radiator on January 2nd.
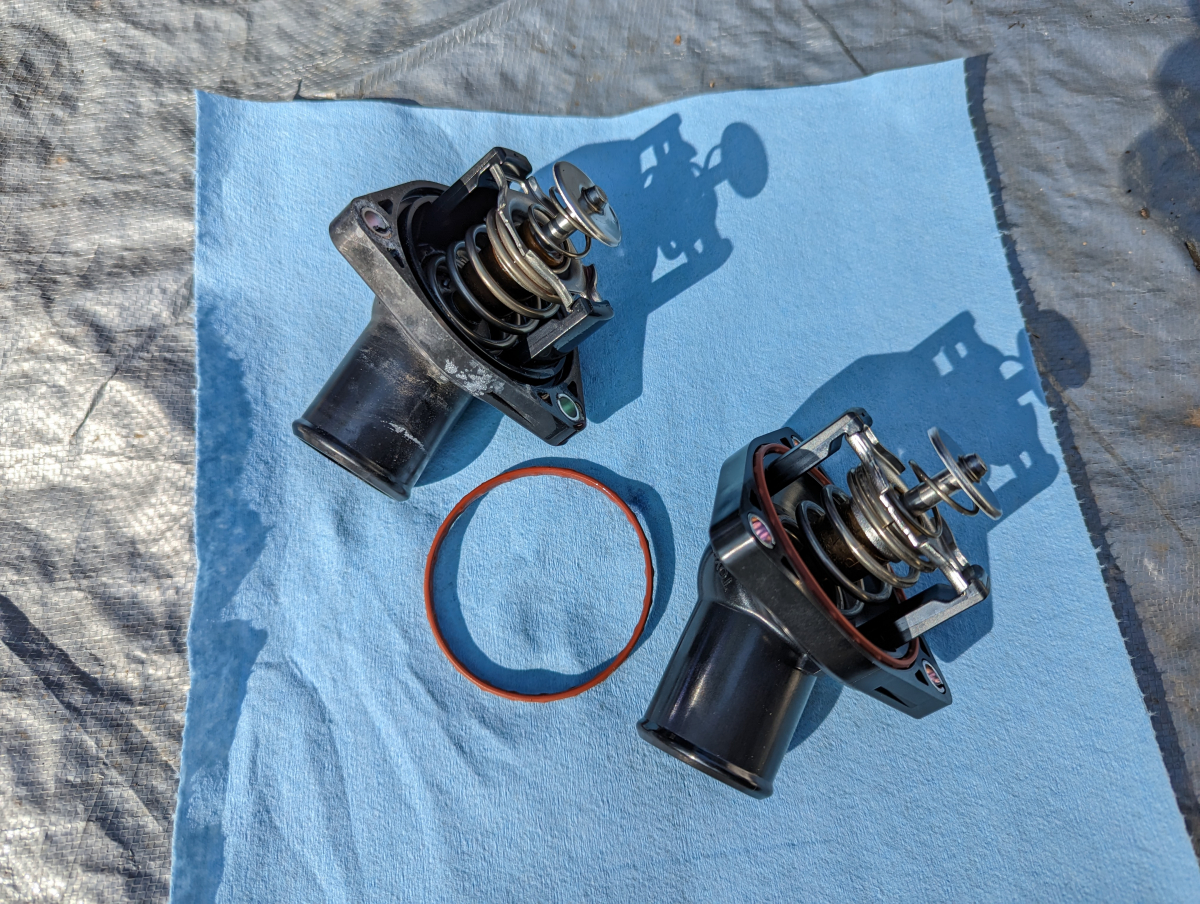
Searched around for the best deal on parts and then decided to also replace the hoses and thermostat as well since the car was over 150k miles at this point. I chose not to do the water pump as it was 8 years old at this point but only 25k miles since it was replaced at 50/50 split between the dealer and I before I sold the car since it had started leaking for the 3rd time in my ownership.
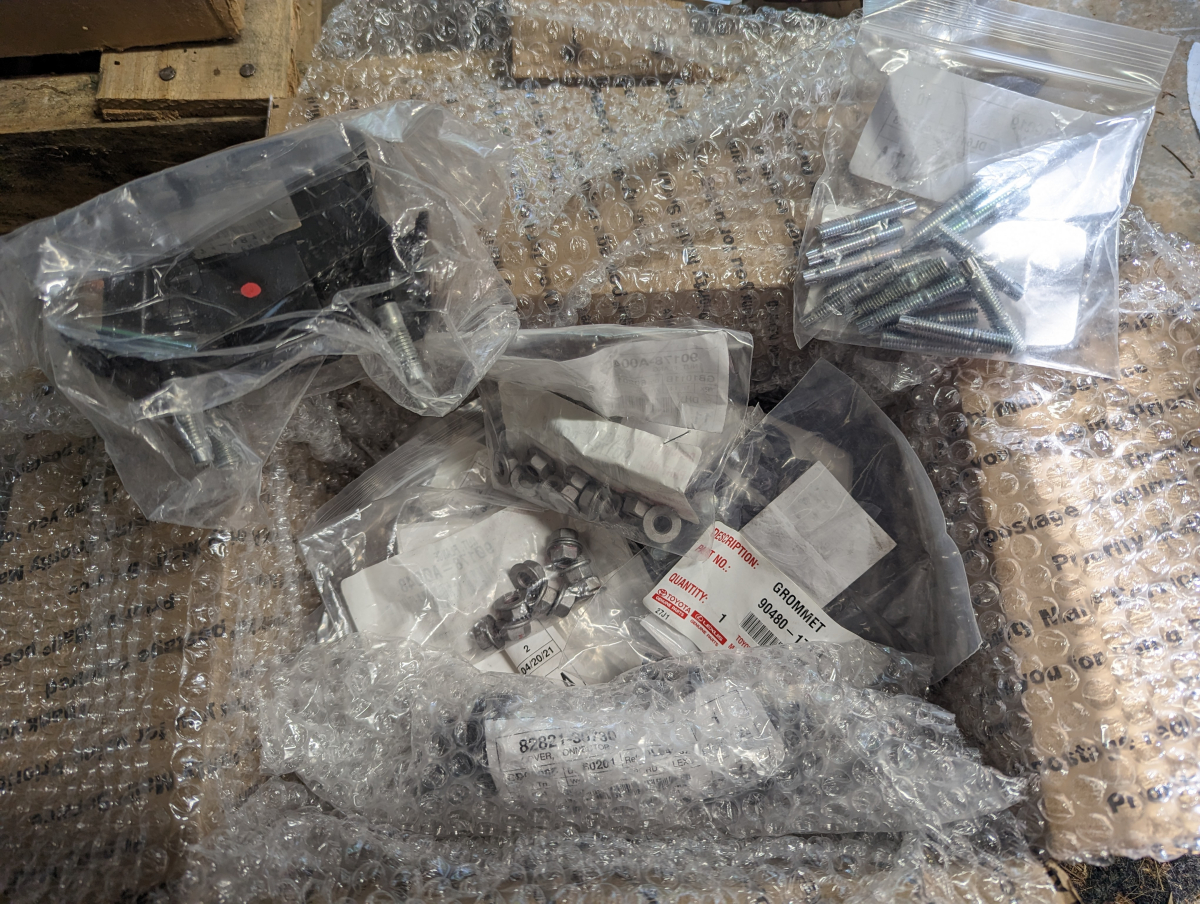
Parts arrived with and interested party wanting to know if it was for them.


The parts from RR Racing took a while longer to show up and I wanted to do the crank pulley at the same time.

Ceramic coated
Apparently, my car decided I didn't have enough on PA trip that it wanted to welcome me into the new year with a blown top seal on the radiator on January 2nd.
Searched around for the best deal on parts and then decided to also replace the hoses and thermostat as well since the car was over 150k miles at this point. I chose not to do the water pump as it was 8 years old at this point but only 25k miles since it was replaced at 50/50 split between the dealer and I before I sold the car since it had started leaking for the 3rd time in my ownership.
Parts arrived with and interested party wanting to know if it was for them.
The parts from RR Racing took a while longer to show up and I wanted to do the crank pulley at the same time.
Ceramic coated
06-13-23, 12:51 PM
#12
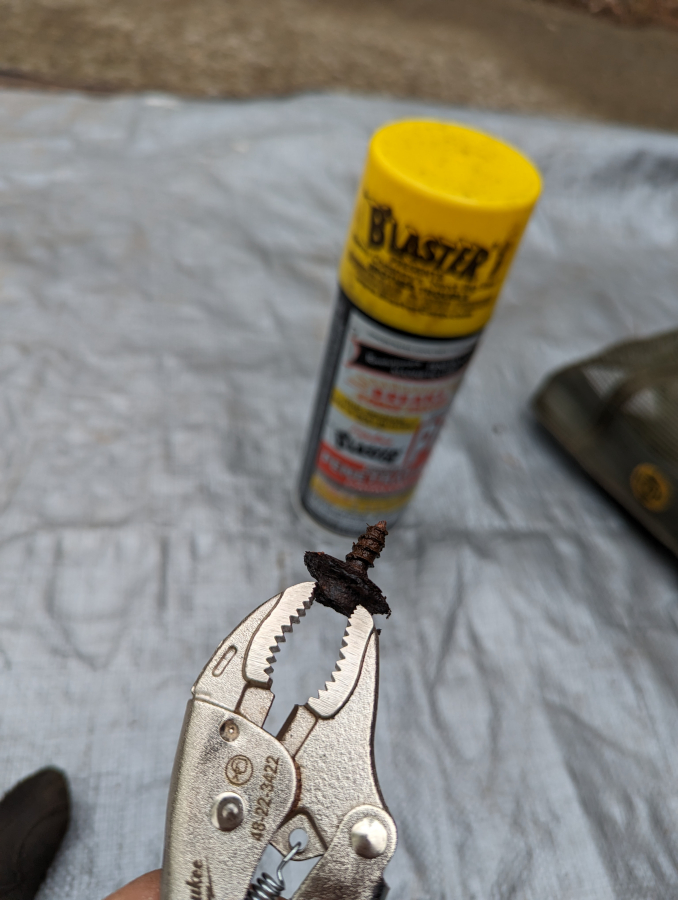
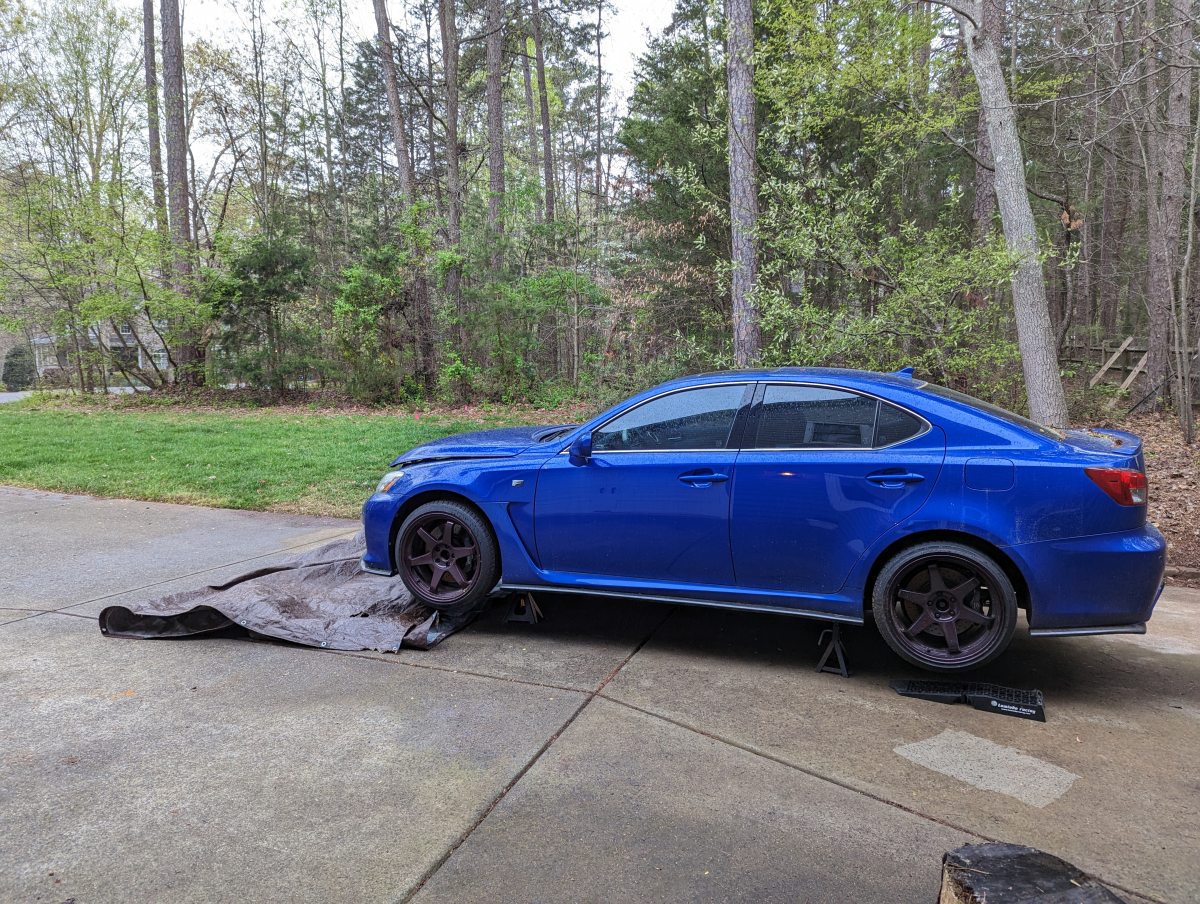
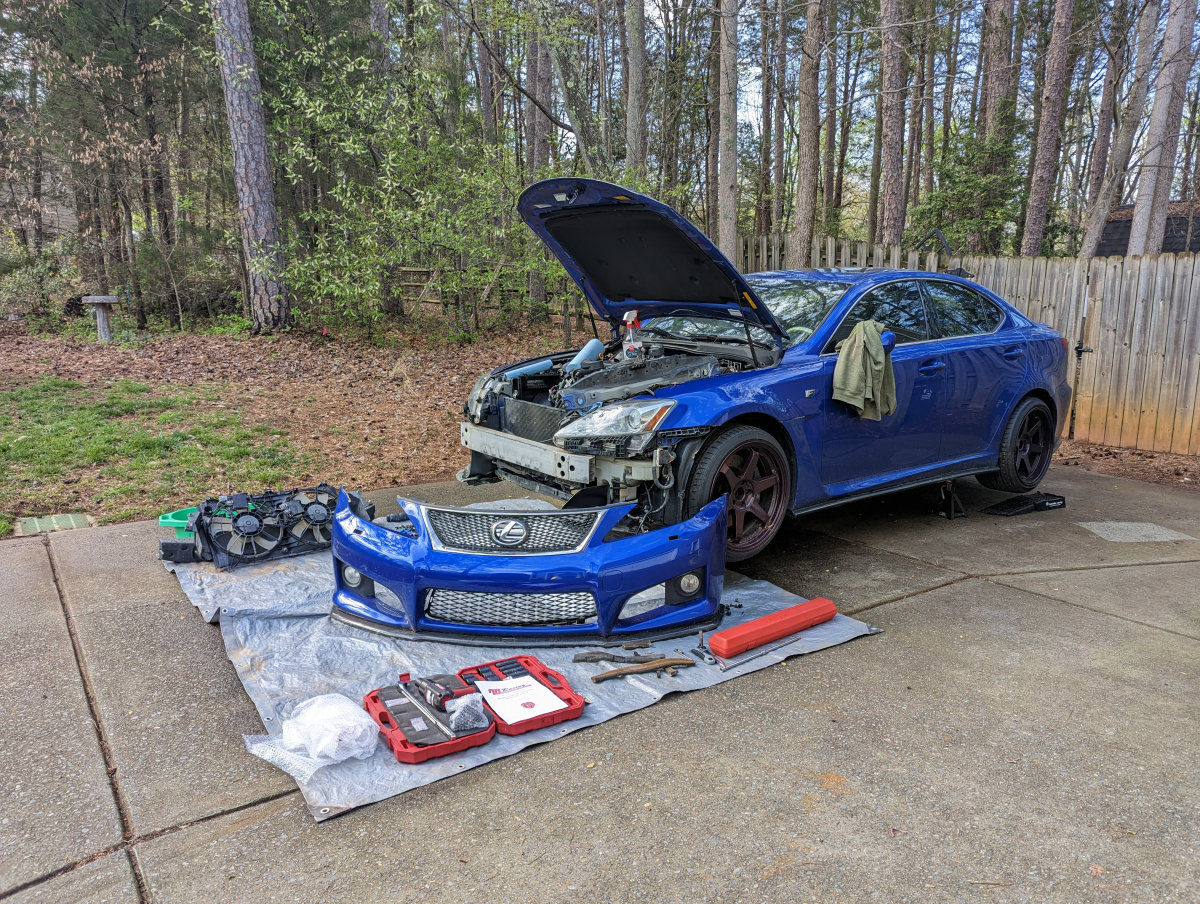
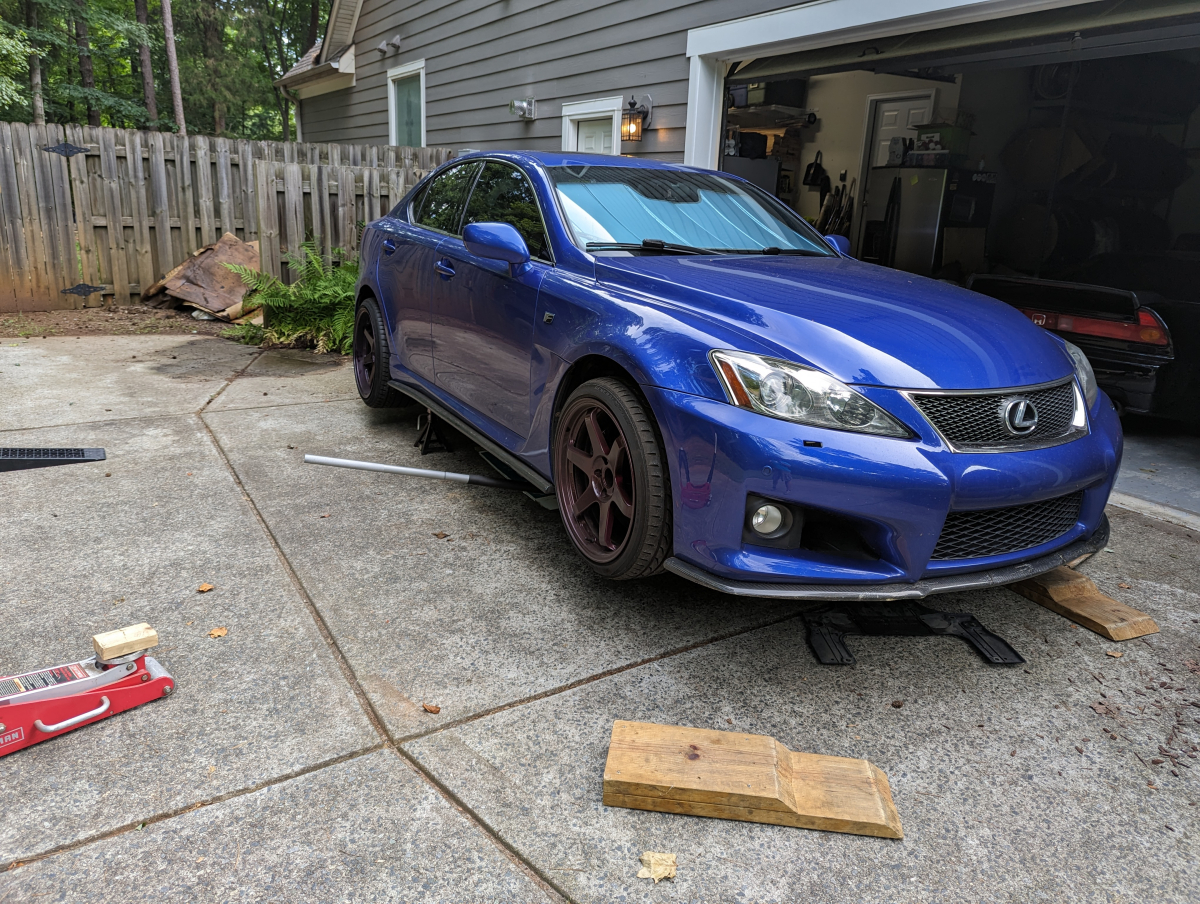
The last 12 months have not gone much in my favor with all sorts of things breaking. I ended up doing my radiator replacement and pulley install in my driveway because the spring on my garage door failed.
Hello Pittsburgh
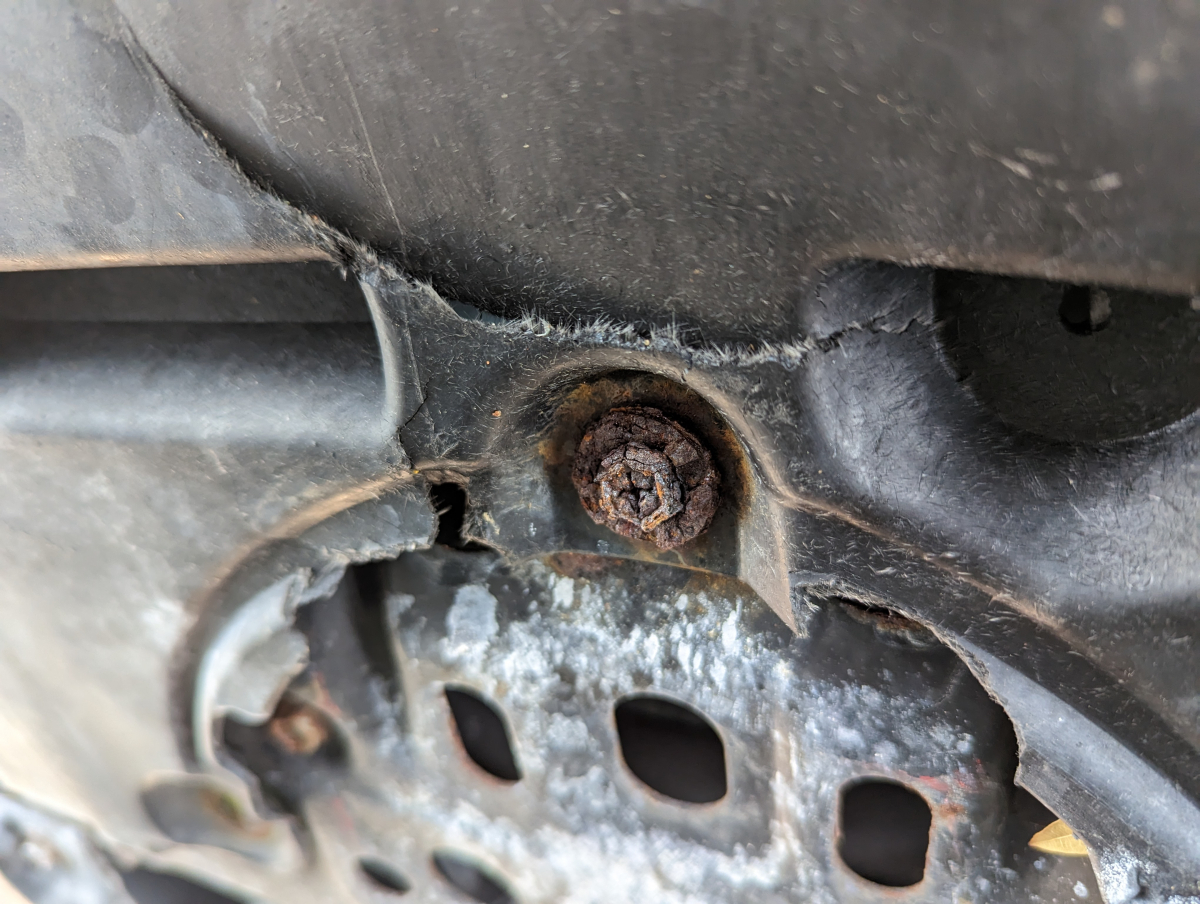
Several repeated soakings of PB Blaster and it is out and off to the trash.
It was not long after I had removed the splash shield from the bottom that it started to rain. Hopefully it will just be a quick light shower.
Well maybe not

Rain finally let up, put a fresh tarp down and got the radiator out
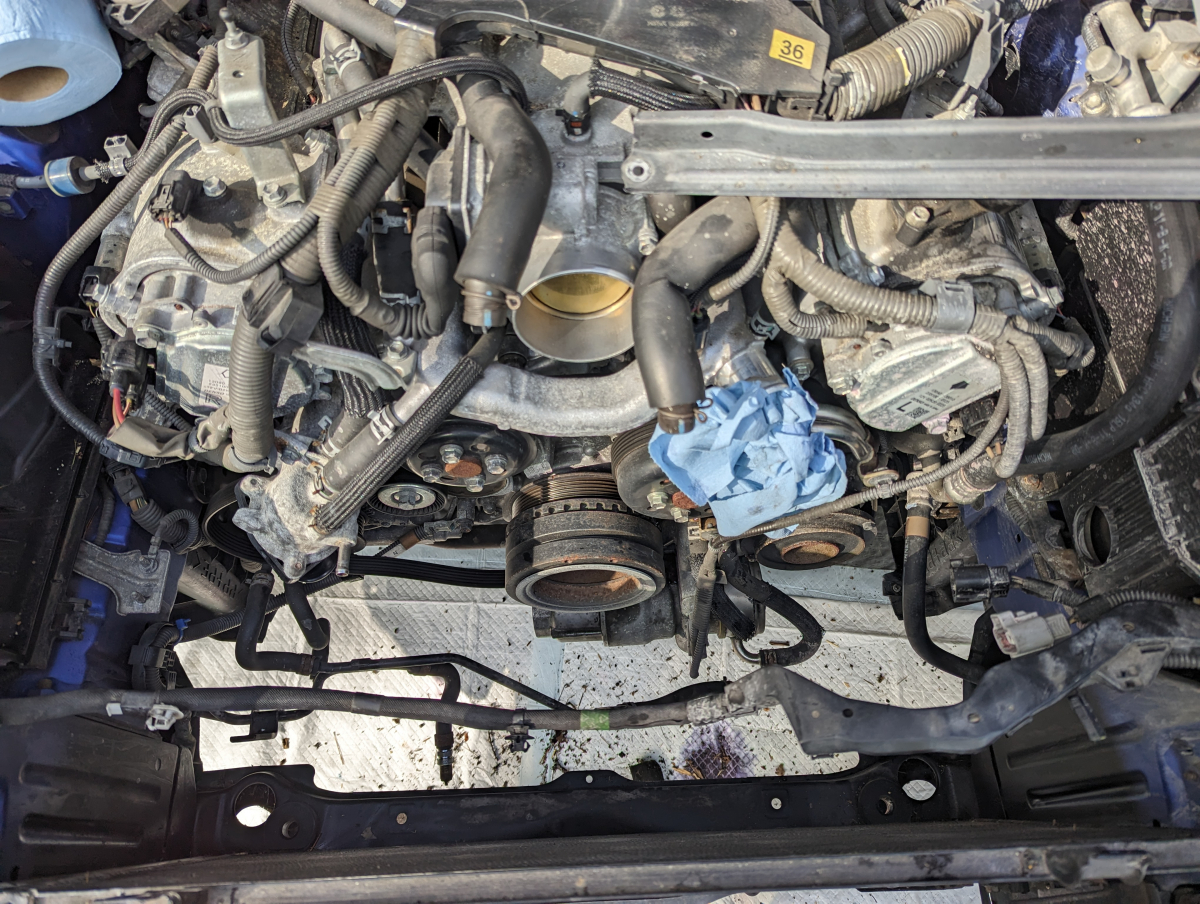
Time to start on the pulley
As bad as some of the other parts on the car looked this didn't look bad at all.
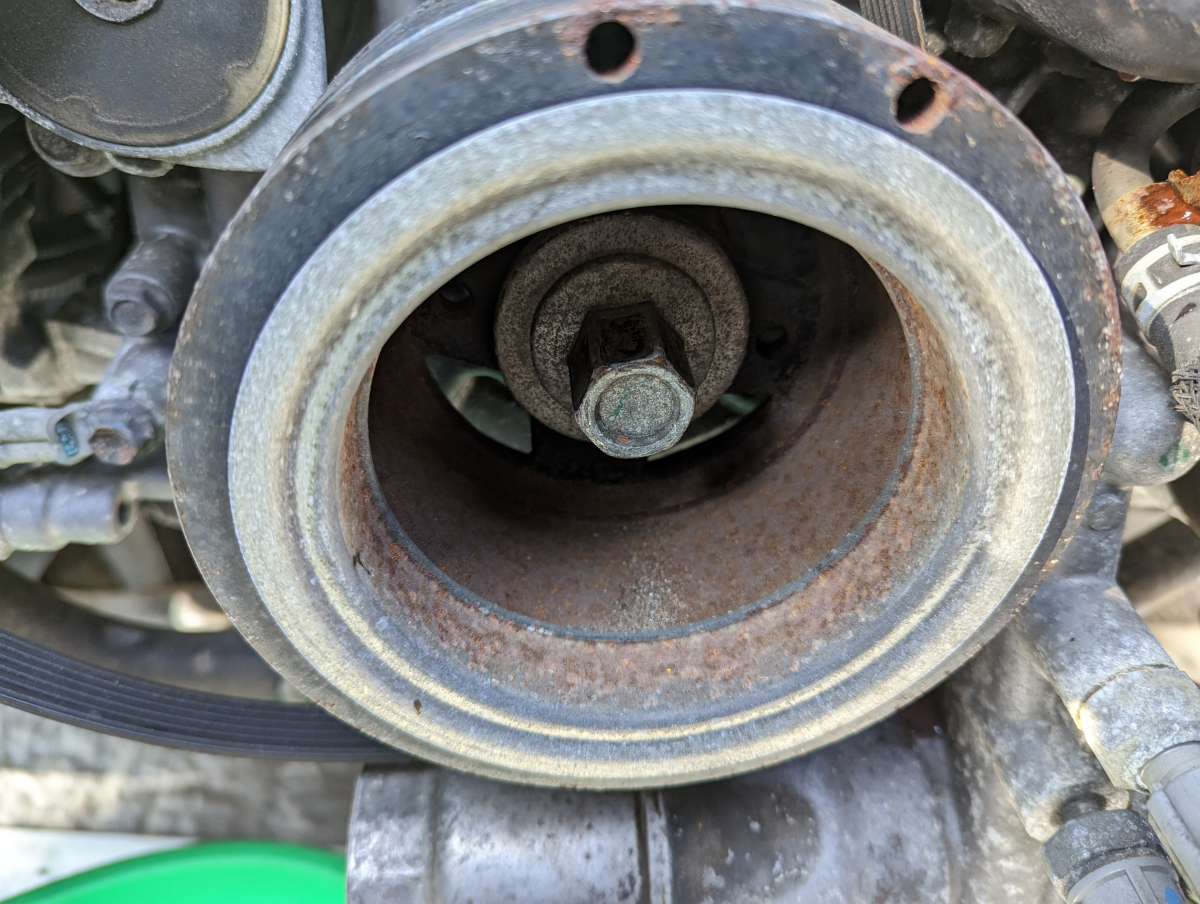
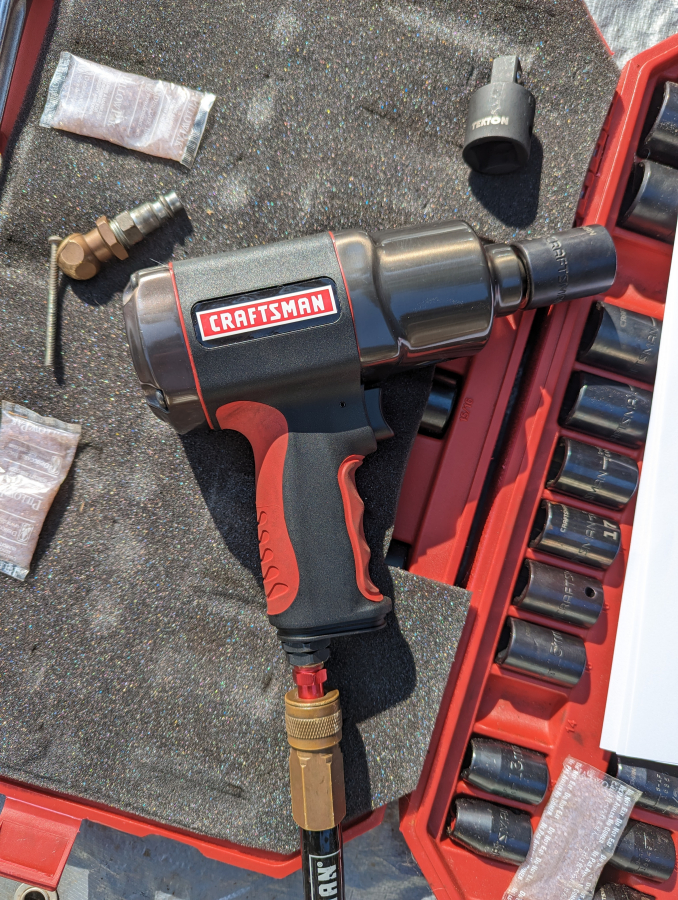
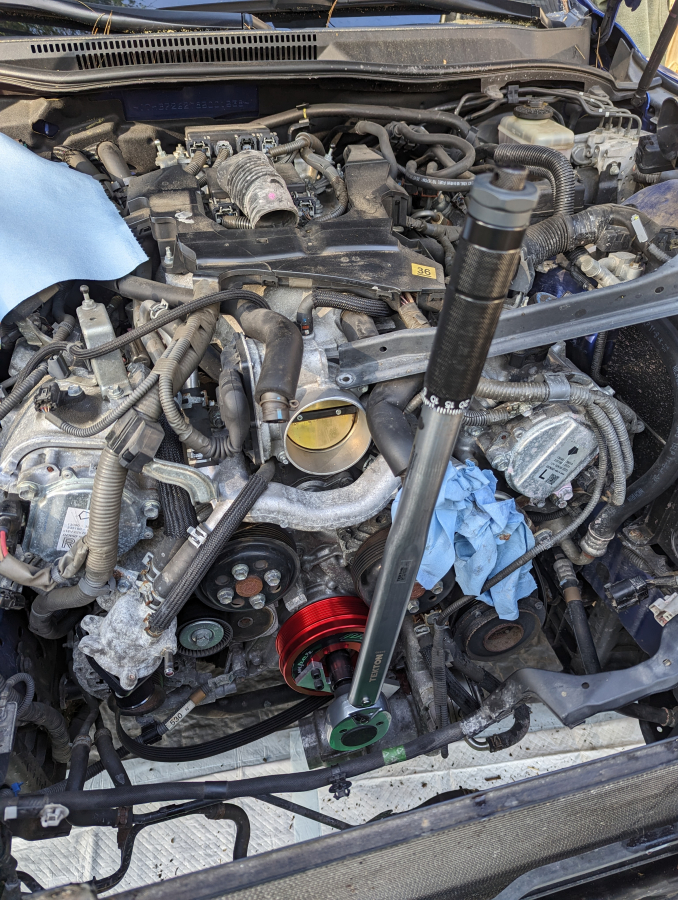
500ftlb impact gun should make easy work of this right? Wrong
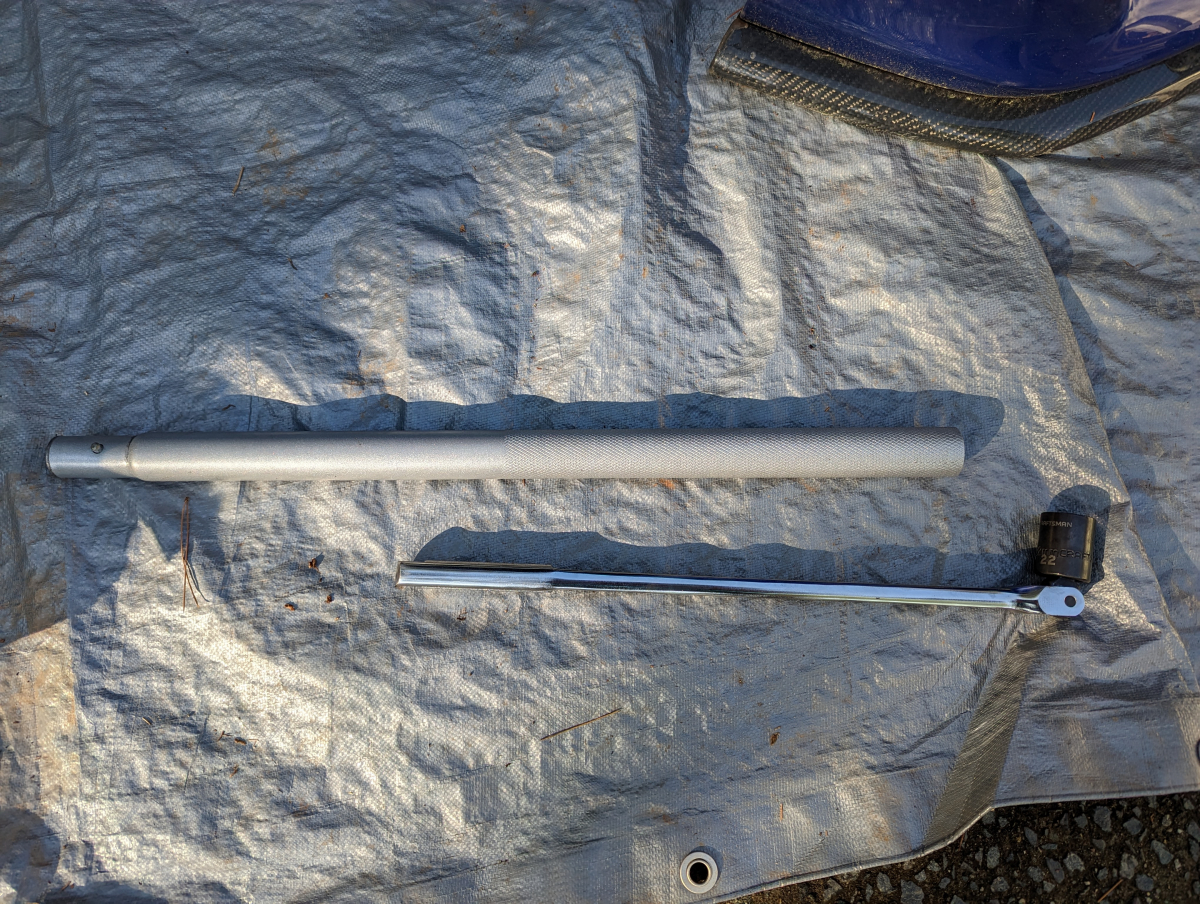
However, the a break bar plus 3ft helper tube from my jack handle did make easy work of it.
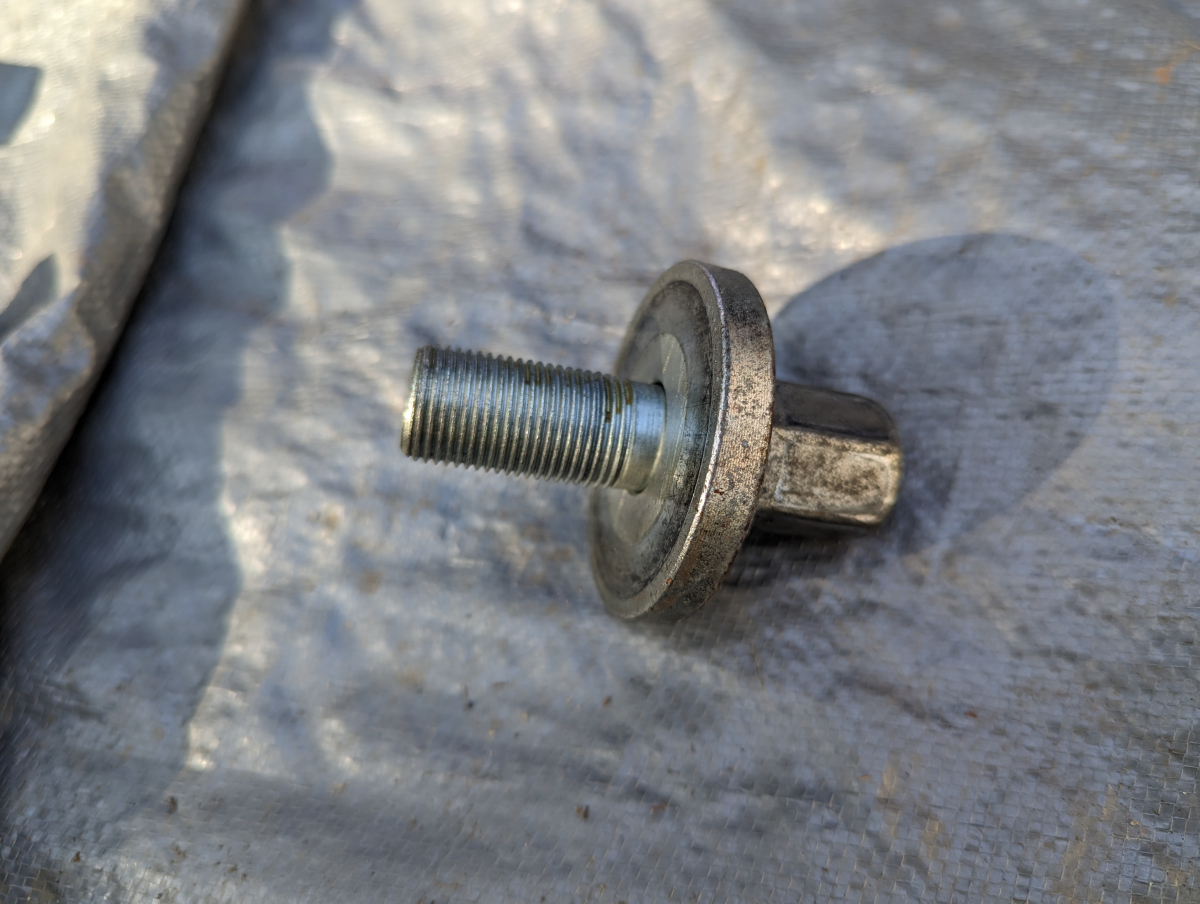
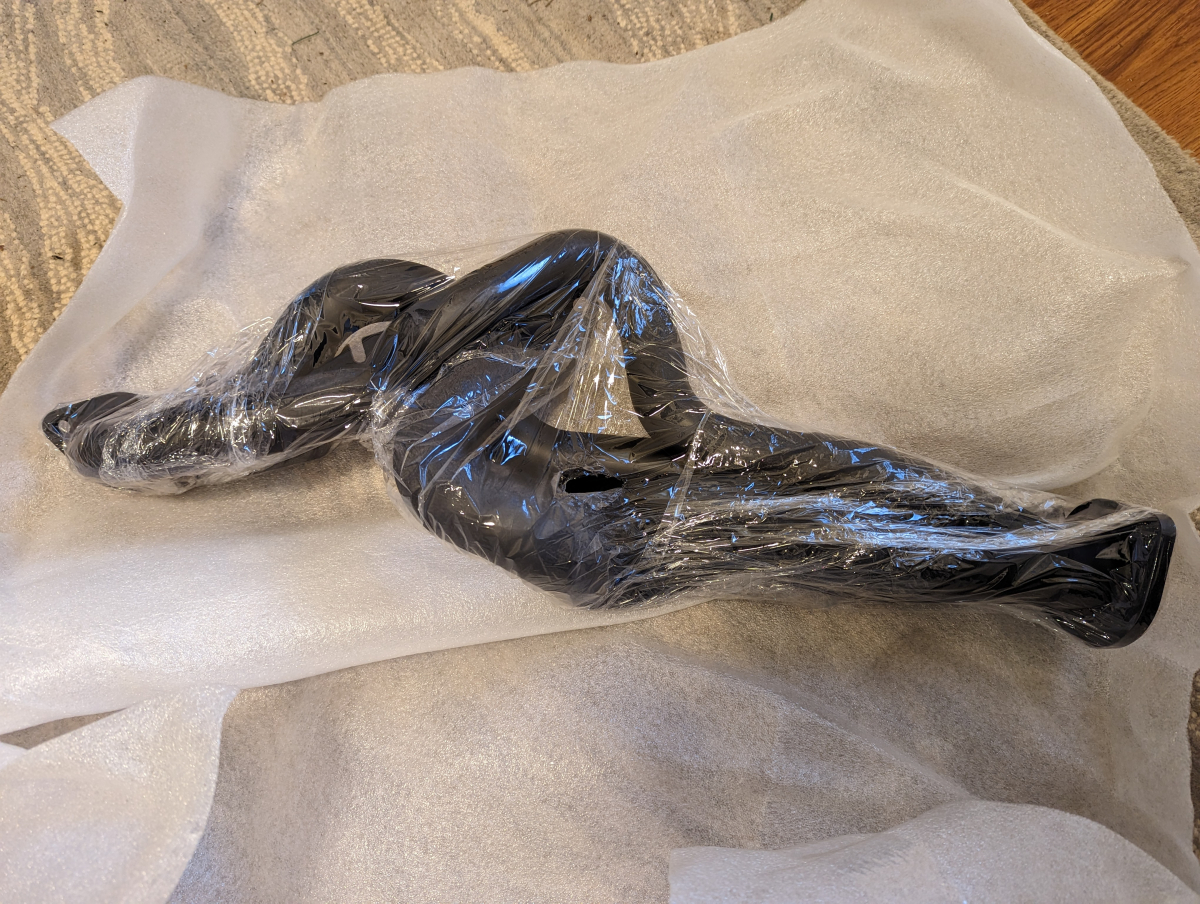
Old vs New, almost a 50% weight savings
Make sure the key is in place

New pulley on ready to be torqued with the nice tool RR-Racing includes.
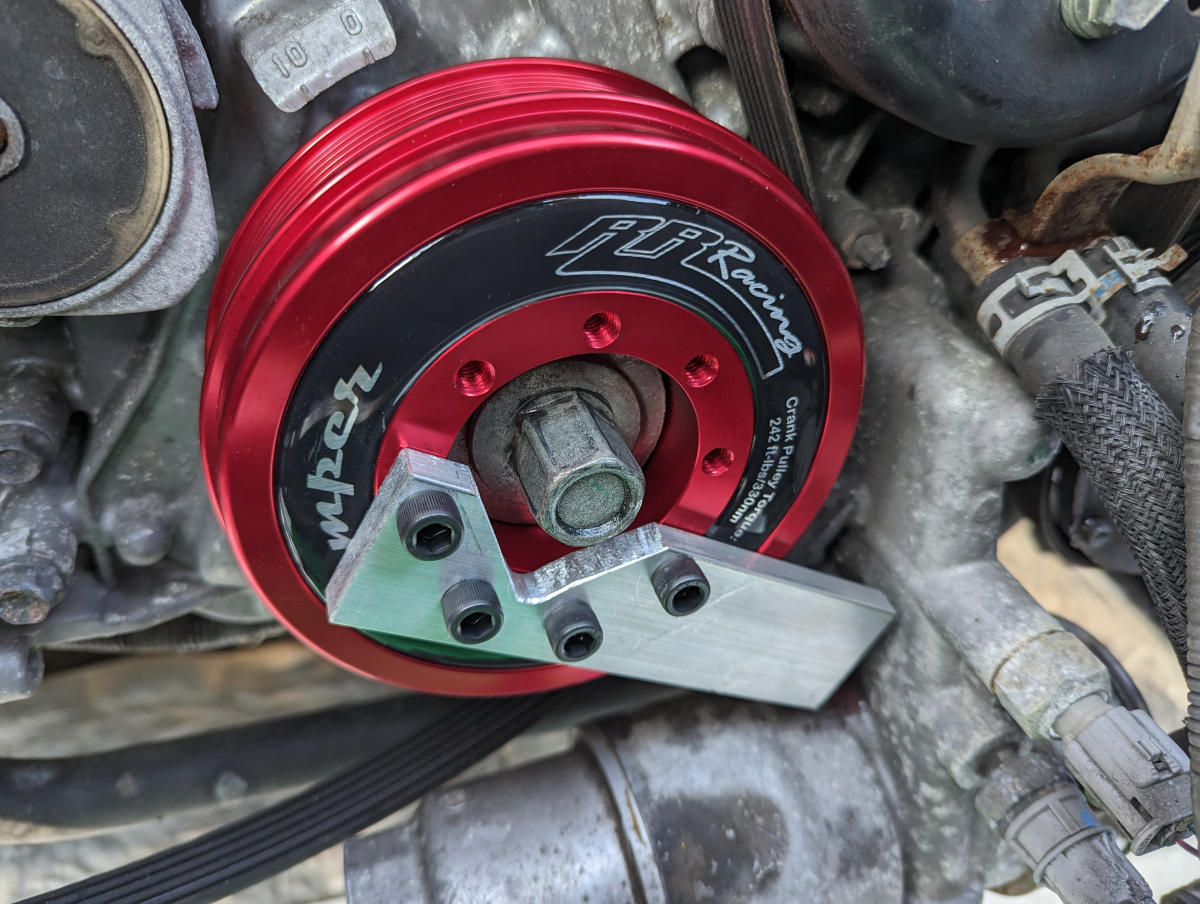
Ended up buying a new torque wrench for this due to the high torque spec it needed.
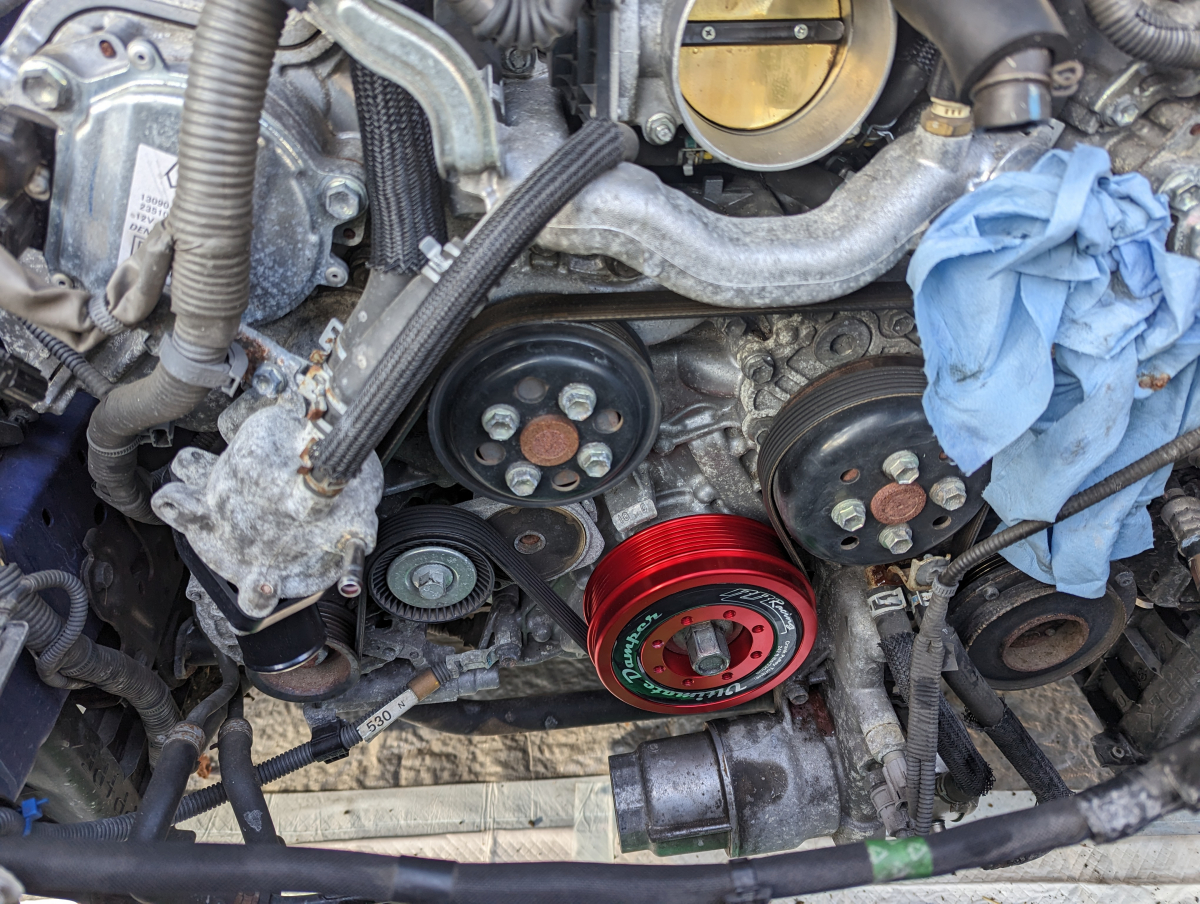
All back together
Hello Pittsburgh
Several repeated soakings of PB Blaster and it is out and off to the trash.
It was not long after I had removed the splash shield from the bottom that it started to rain. Hopefully it will just be a quick light shower.
Well maybe not
Rain finally let up, put a fresh tarp down and got the radiator out
Time to start on the pulley
As bad as some of the other parts on the car looked this didn't look bad at all.
500ftlb impact gun should make easy work of this right? Wrong
However, the a break bar plus 3ft helper tube from my jack handle did make easy work of it.
Old vs New, almost a 50% weight savings
Make sure the key is in place
New pulley on ready to be torqued with the nice tool RR-Racing includes.
Ended up buying a new torque wrench for this due to the high torque spec it needed.
All back together
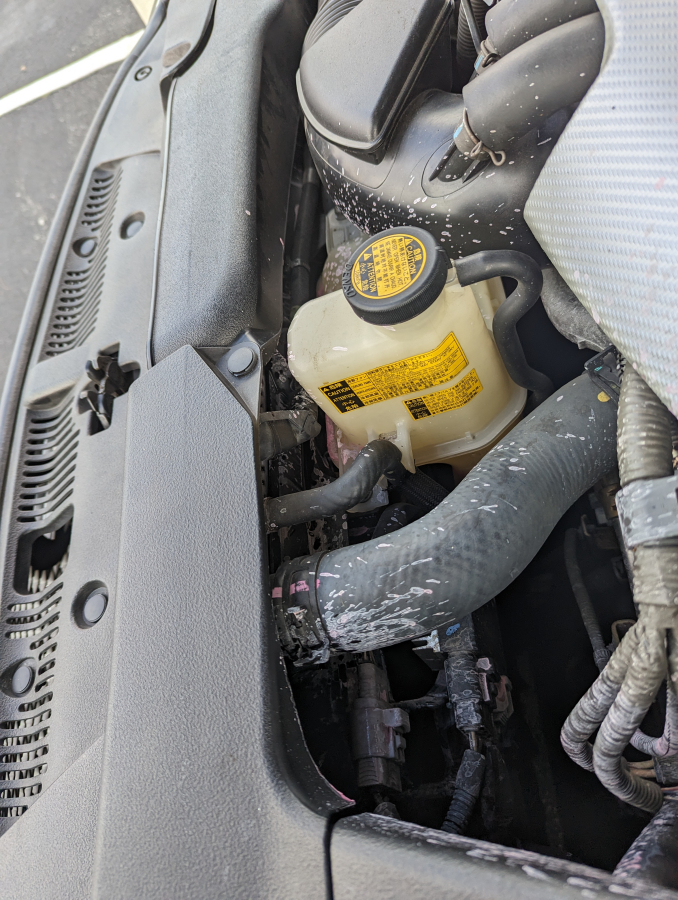
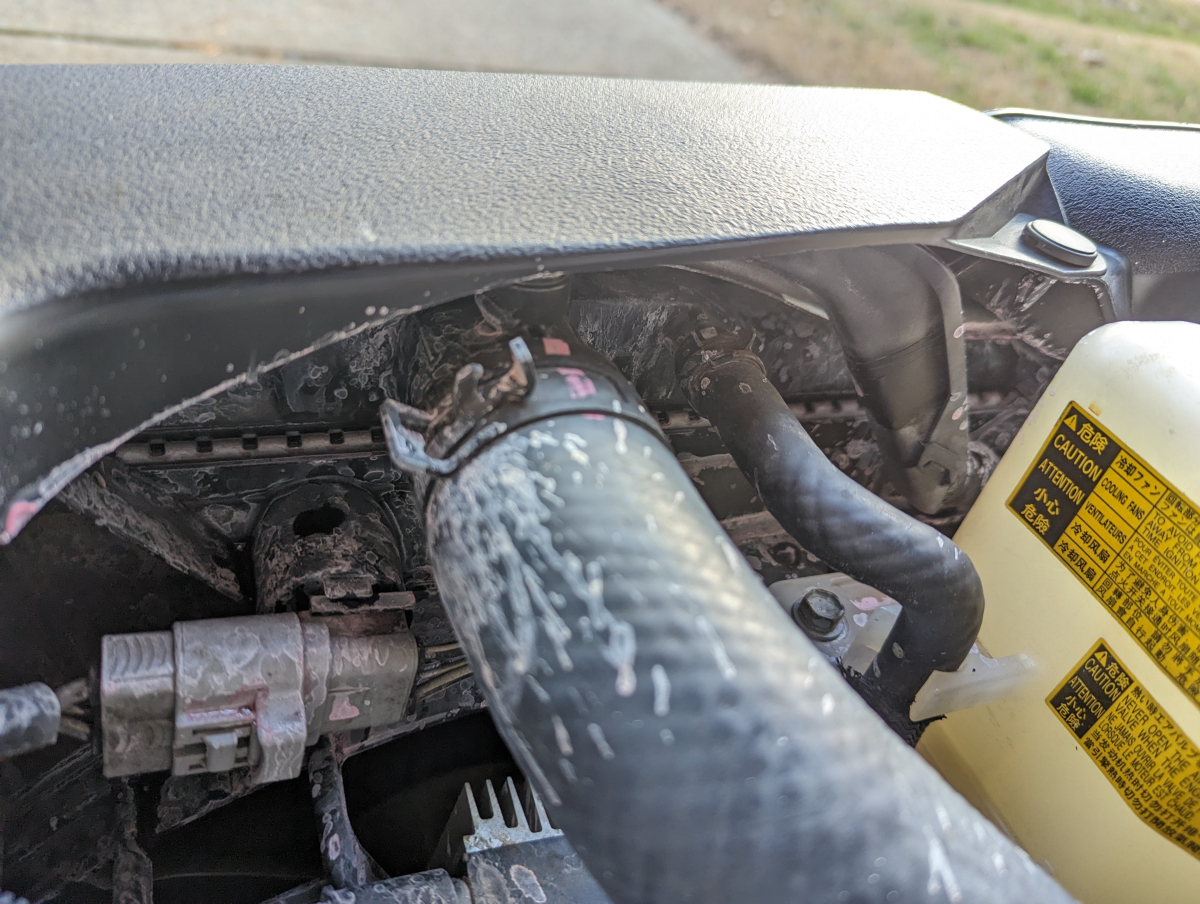
06-13-23, 12:53 PM
#13
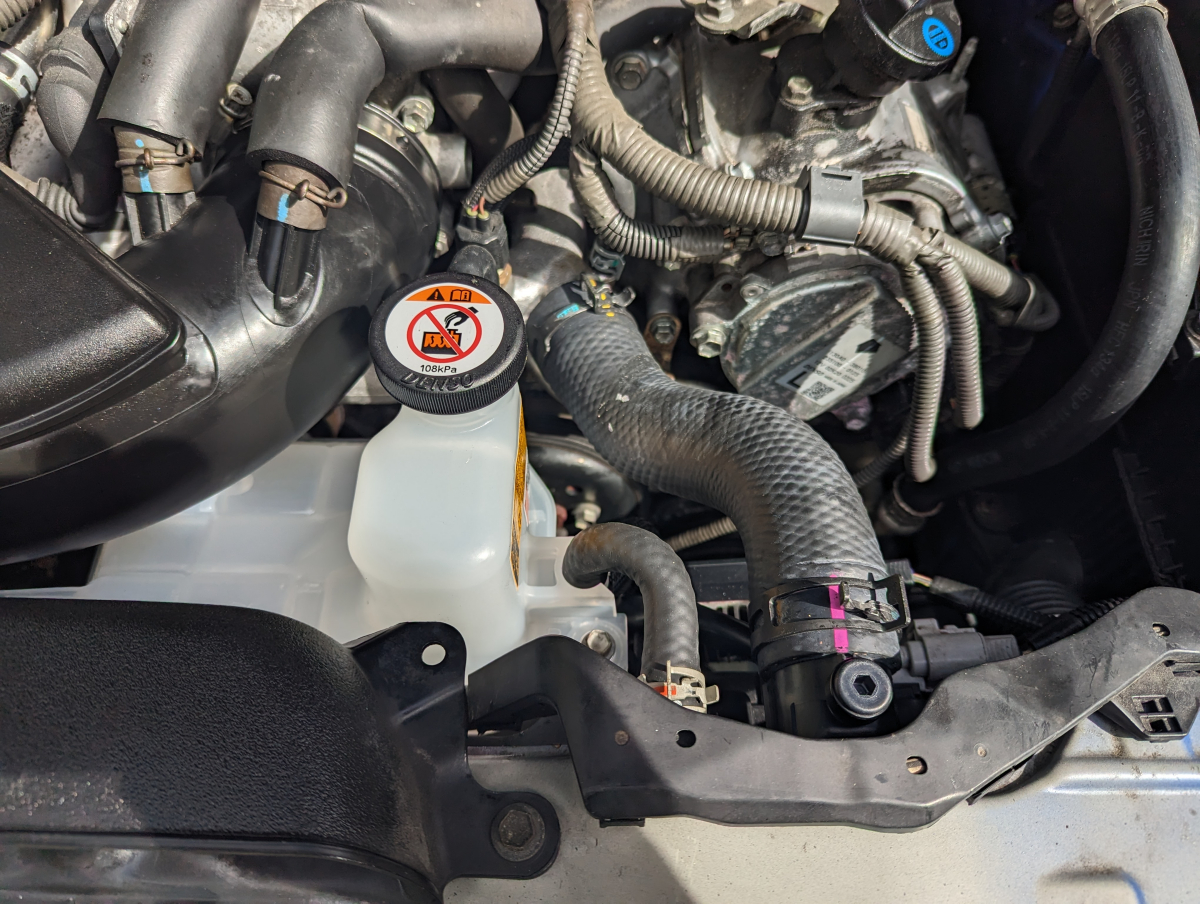
New T-Stat installed
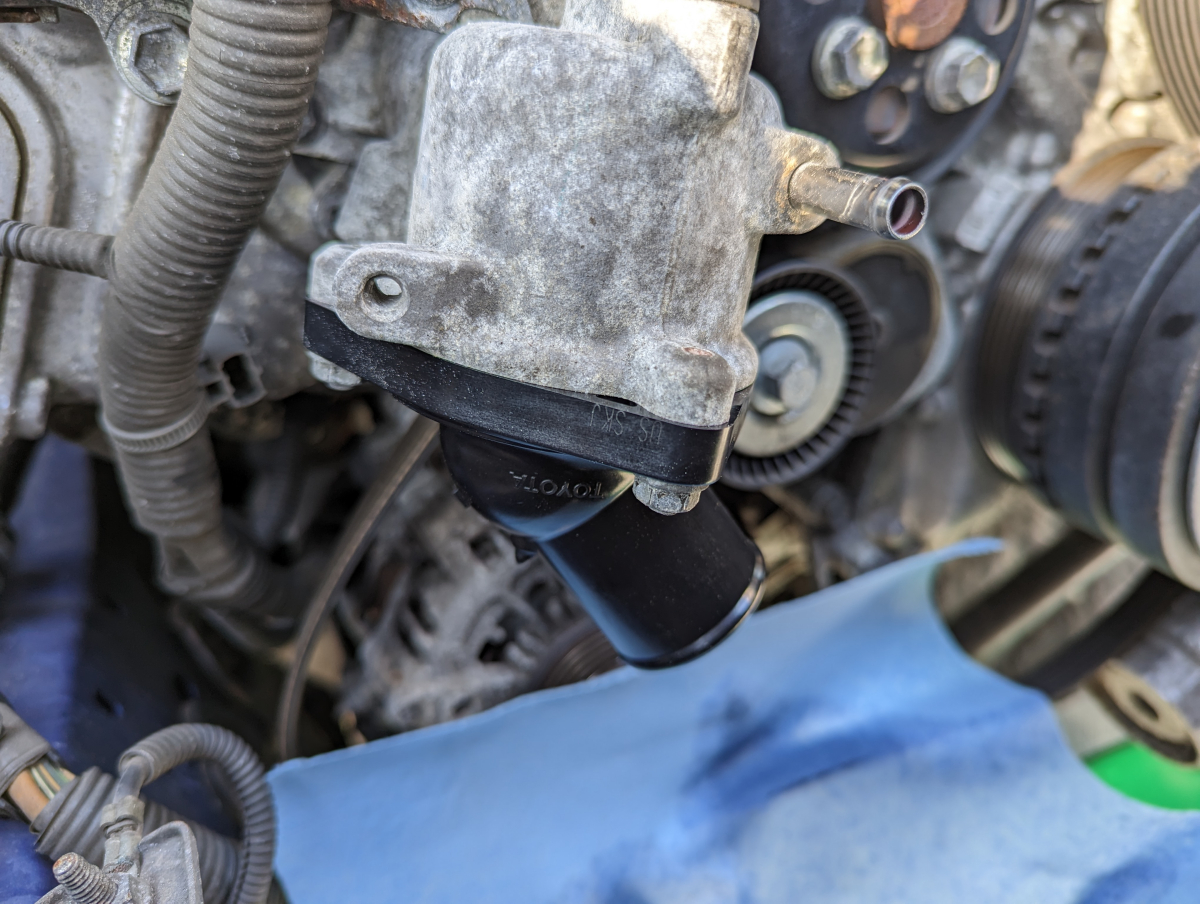
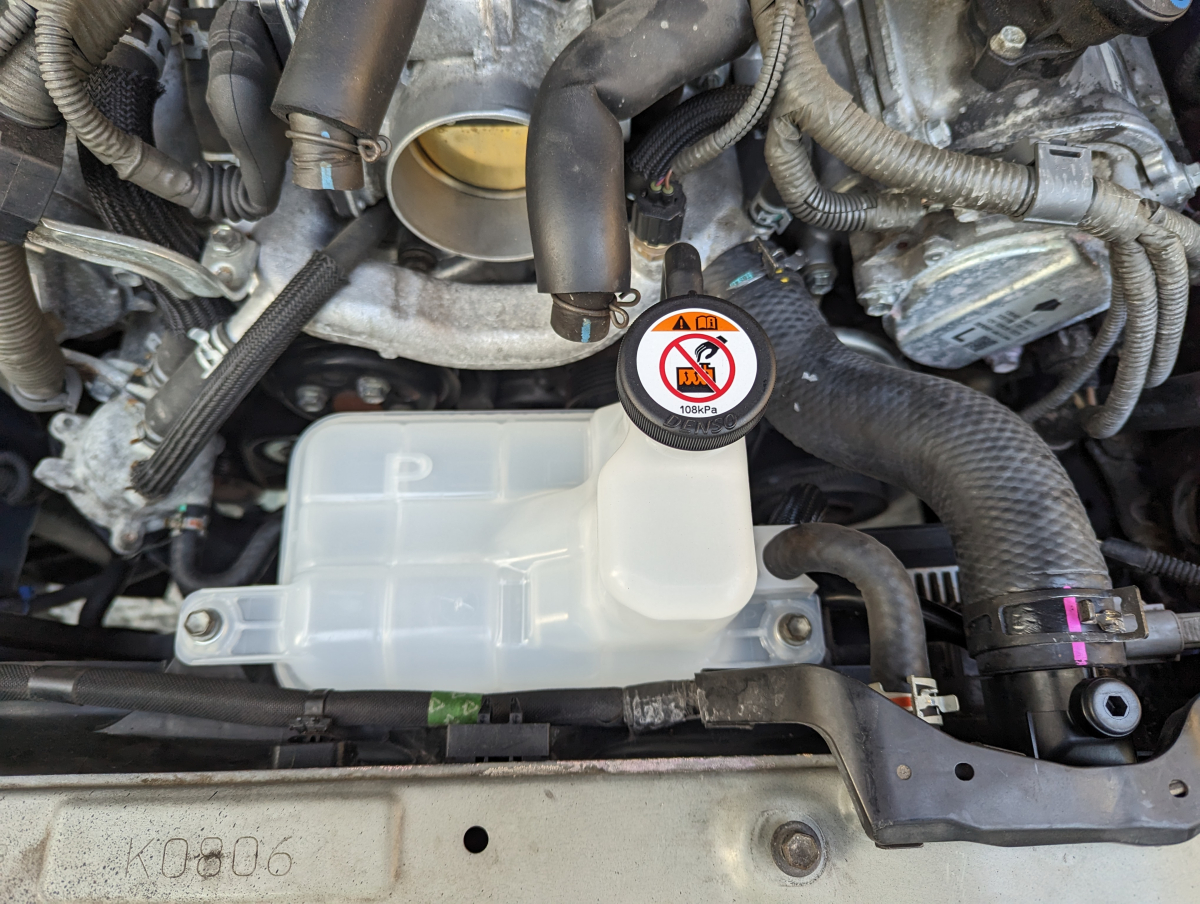
New radiator in

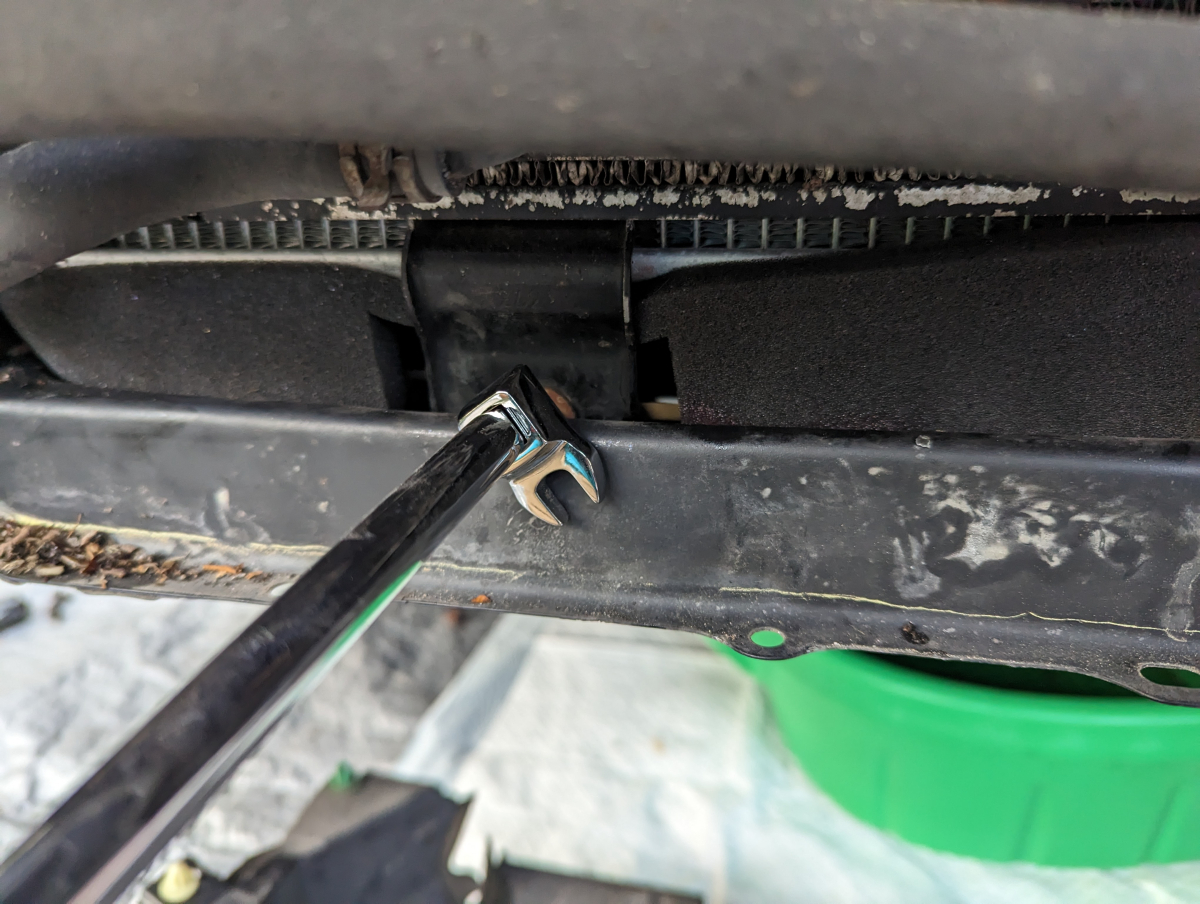
I have only used these crows feet on projects like 3-4 times and have had them for like 18-20 years. However, every time I have used them they have been like the only tool easy enough to get where you need to with them.
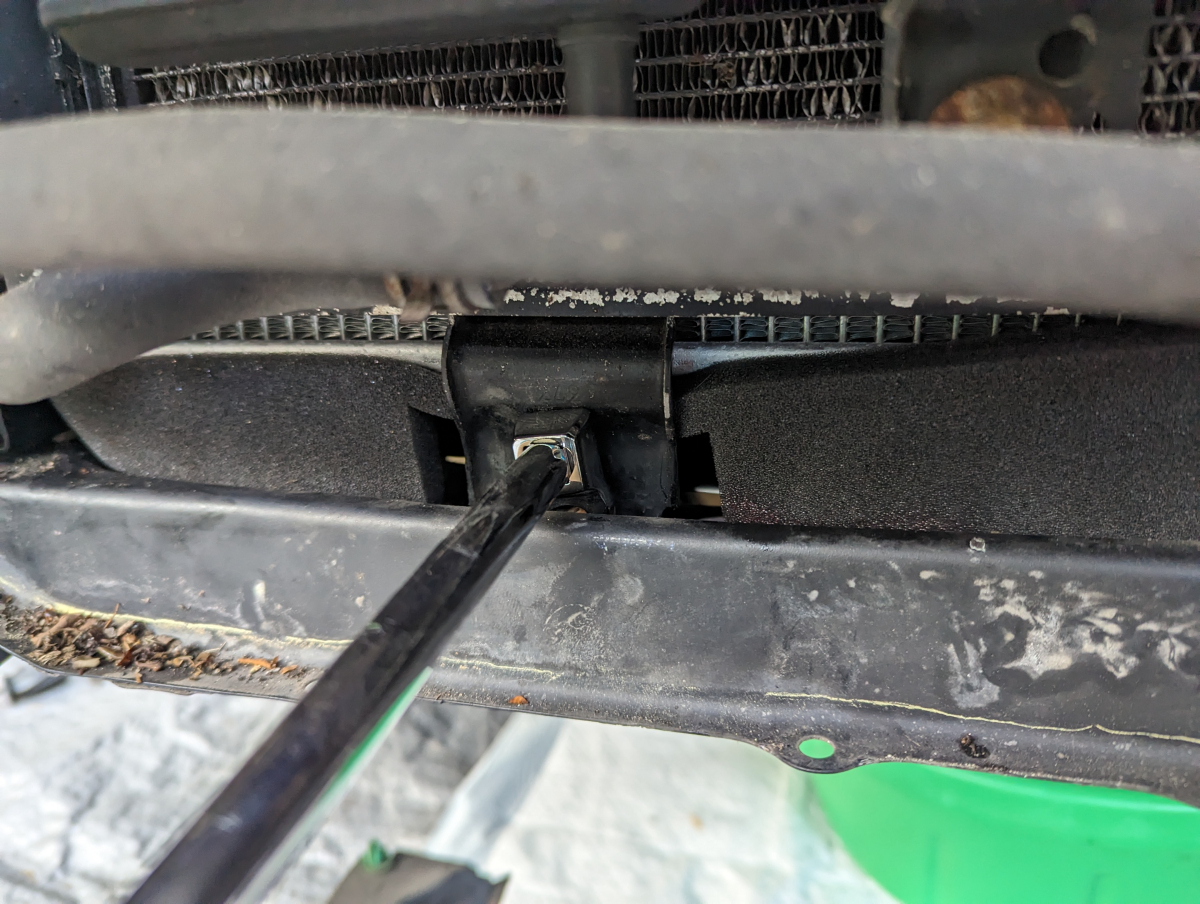
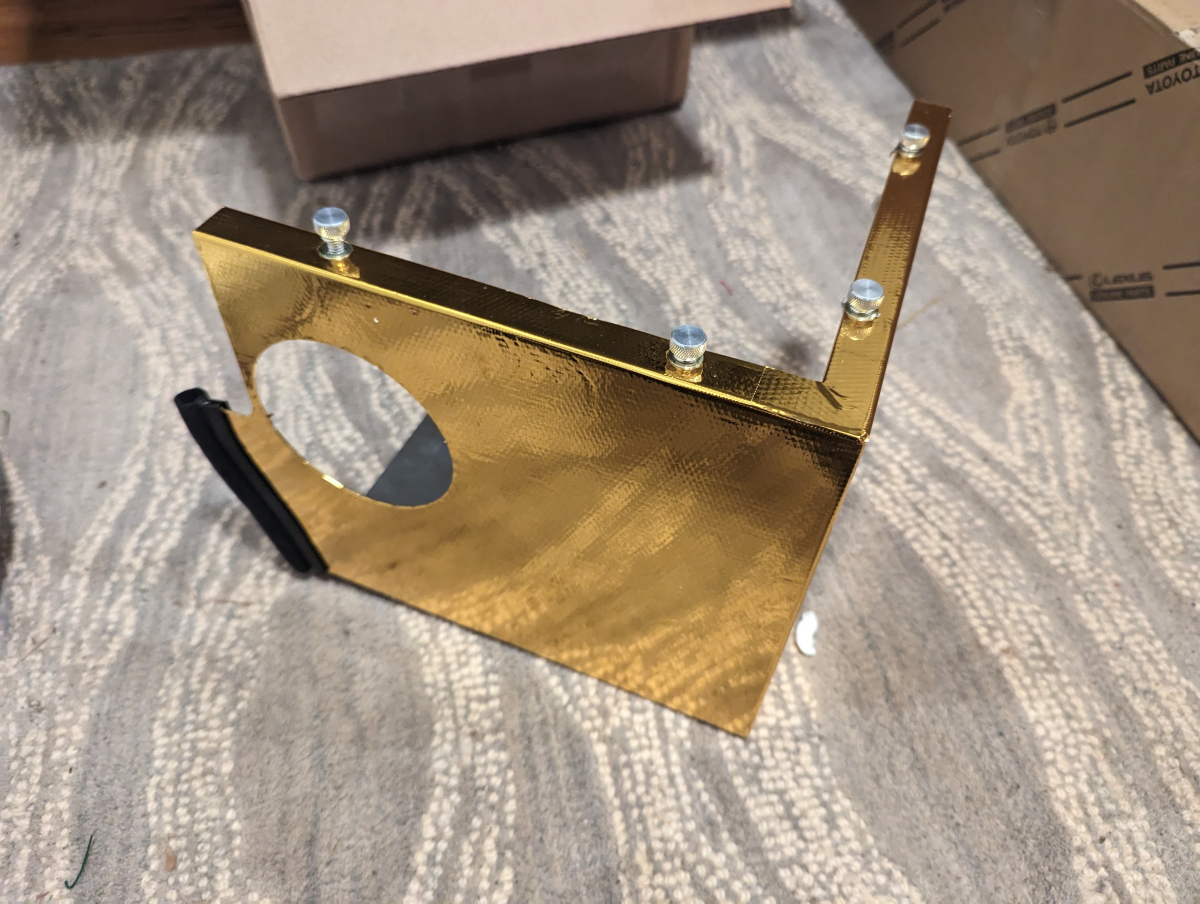
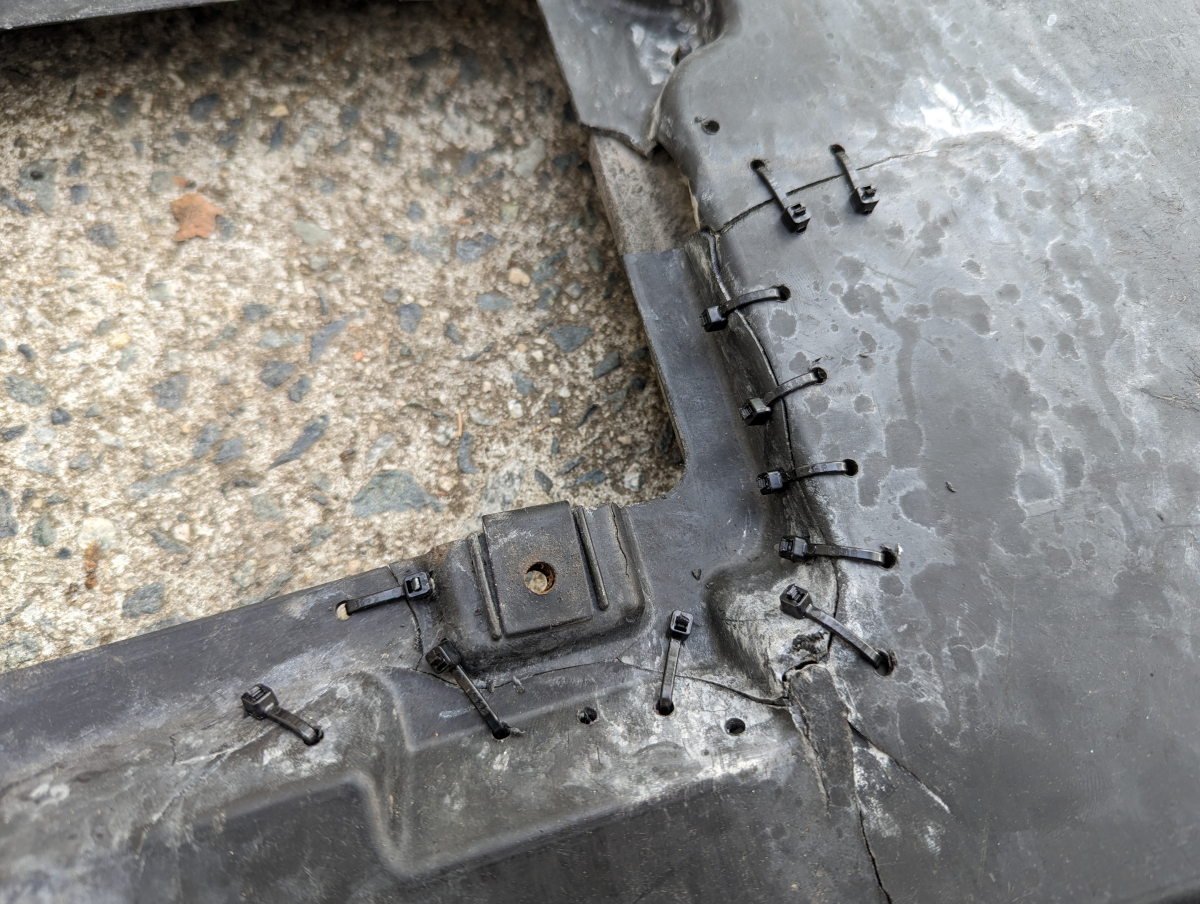
With the car being so low and seen so many miles the splash shield has seen better days. Lexus wants a boat load for a new one though. I took the time instead to do a little stitching on the existing one instead.
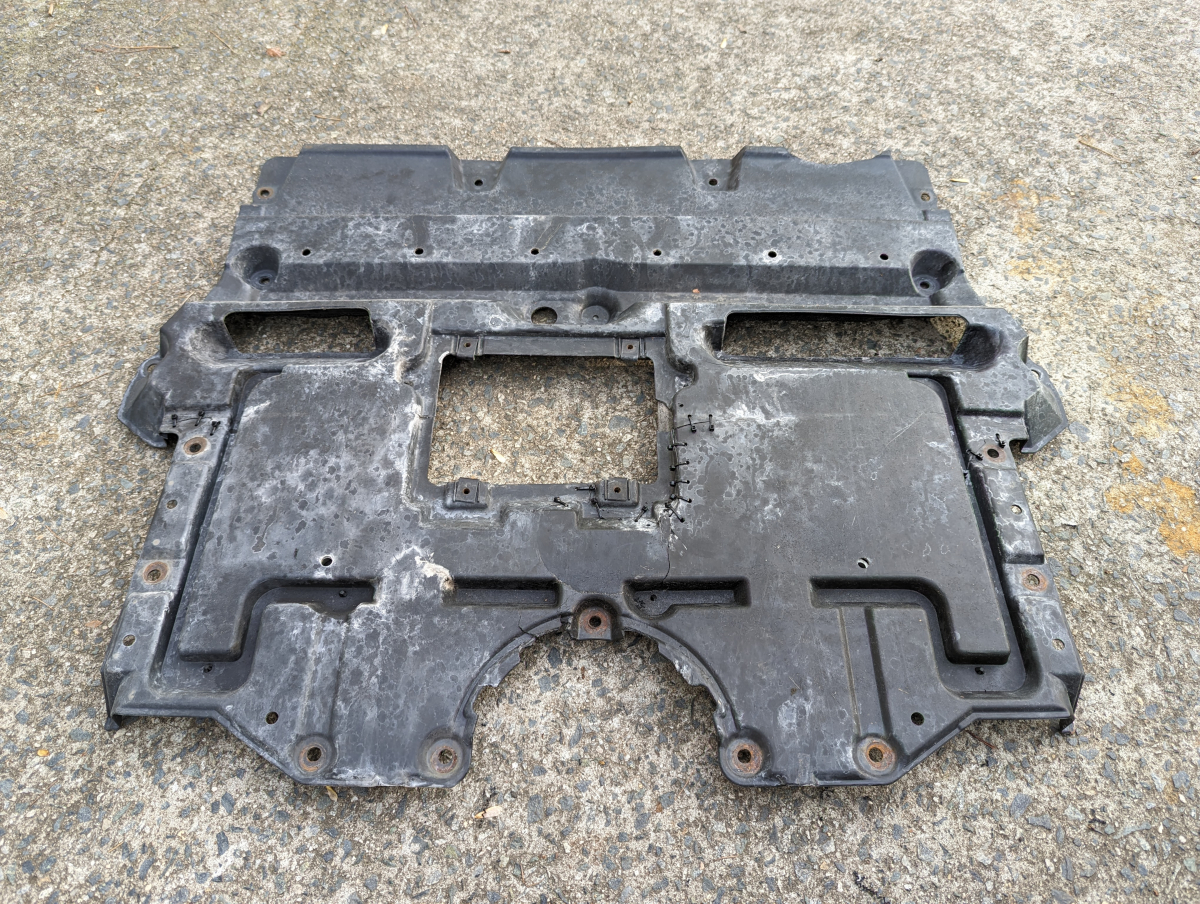
Cleaned up the plastic panels
Then gave her a bath
New radiator in
I have only used these crows feet on projects like 3-4 times and have had them for like 18-20 years. However, every time I have used them they have been like the only tool easy enough to get where you need to with them.
With the car being so low and seen so many miles the splash shield has seen better days. Lexus wants a boat load for a new one though. I took the time instead to do a little stitching on the existing one instead.
Cleaned up the plastic panels
Then gave her a bath
The following 2 users liked this post by CCColtsicehockey:
BS ISF (06-14-23),
lobuxracer (06-13-23)
06-13-23, 01:43 PM
#14
Tech Info Resource

iTrader: (2)
You would not believe how rust free my cars are...
The following 2 users liked this post by lobuxracer:
CCColtsicehockey (06-13-23),
inovashn (06-16-23)
08-17-23, 08:14 AM
#15
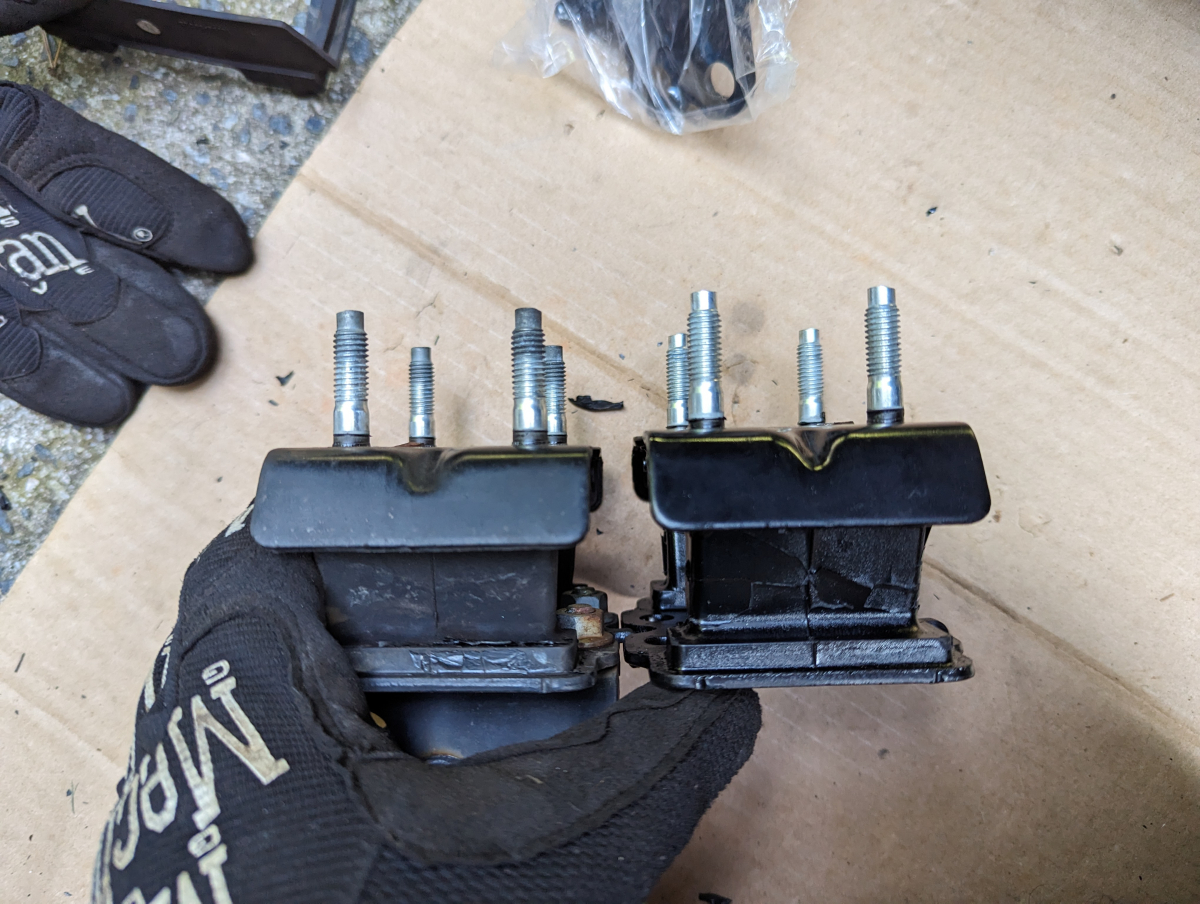
Been tackling some smaller things lately even though I still have some bigger stuff lying around just haven't had the time.
I had ordered the new trans mount since I had what sound like the wheel of fortune noise everyone described with that issue.
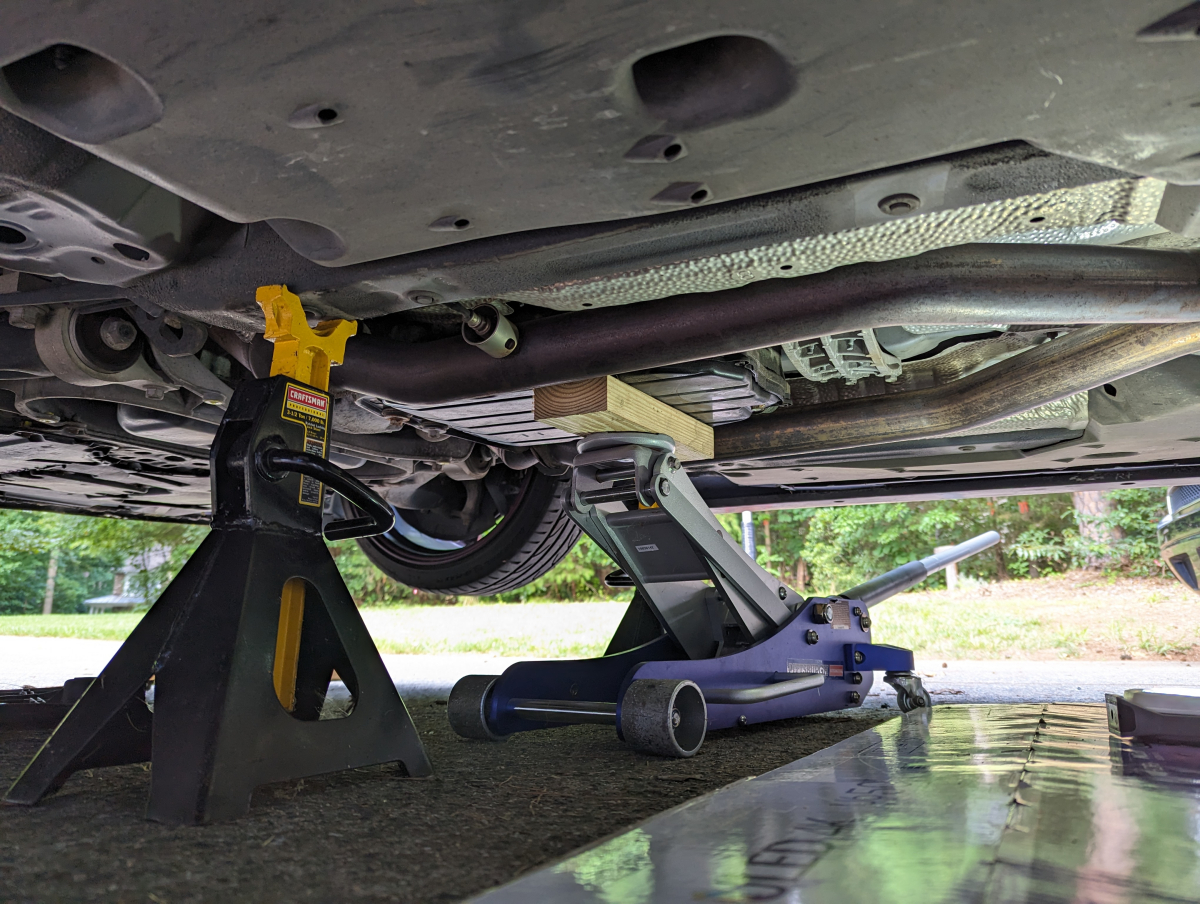
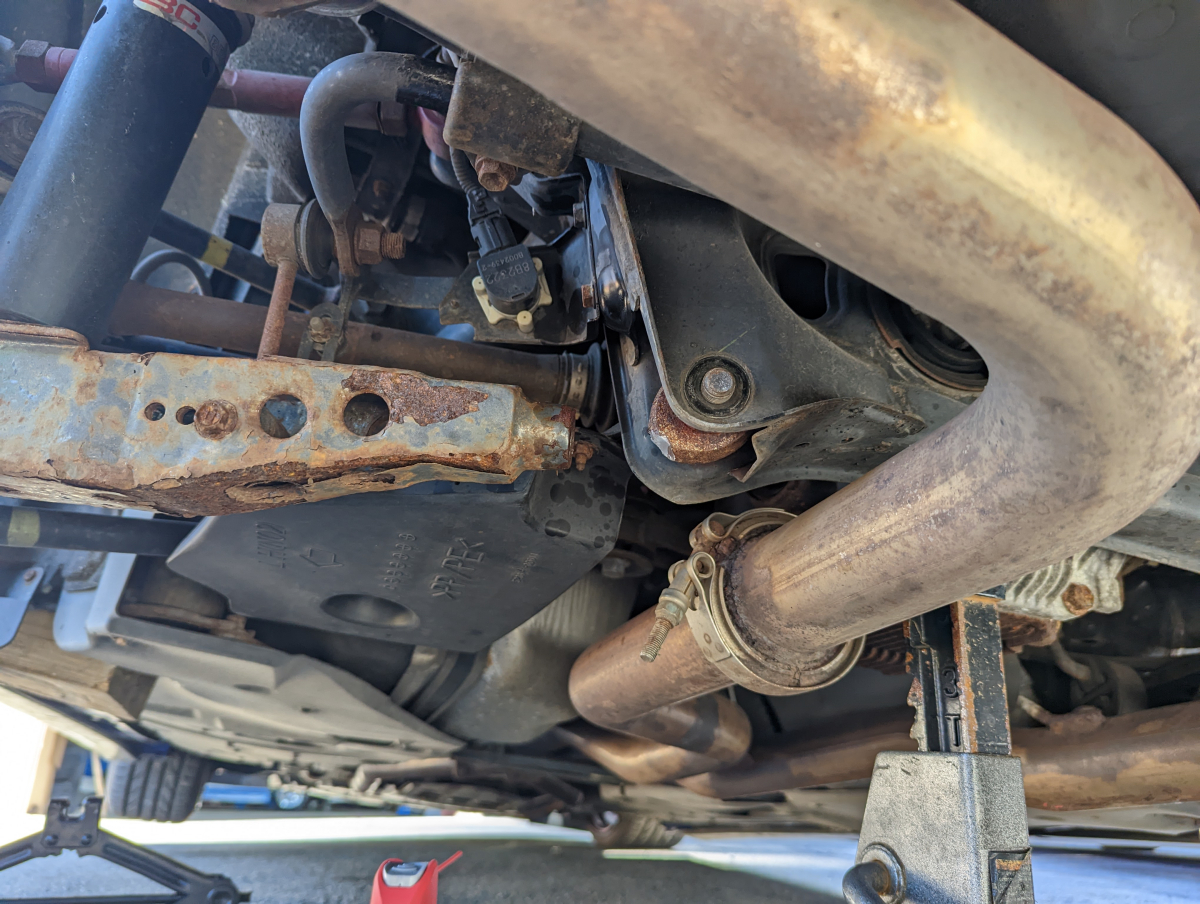
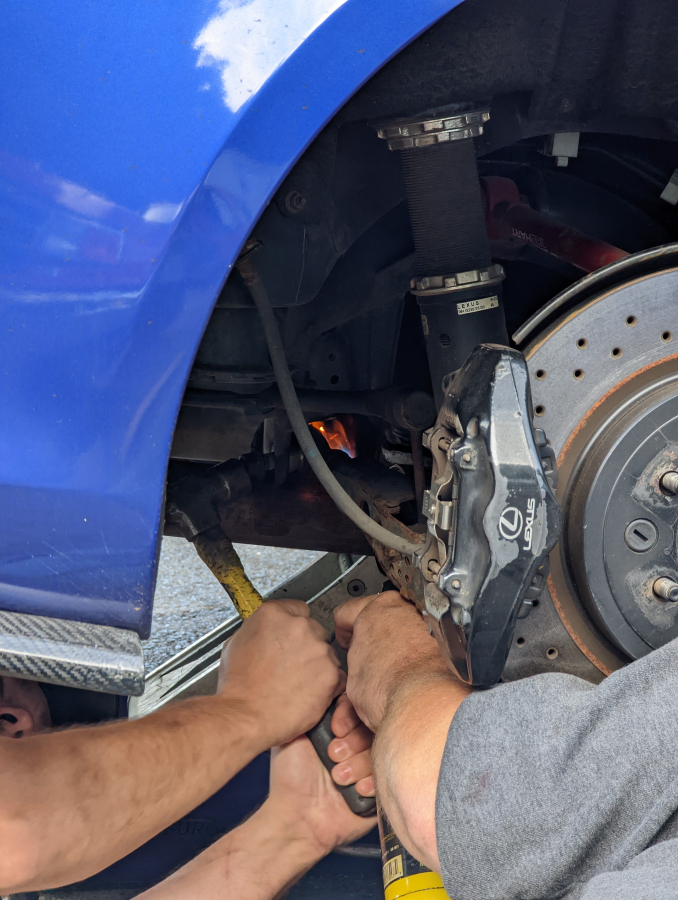
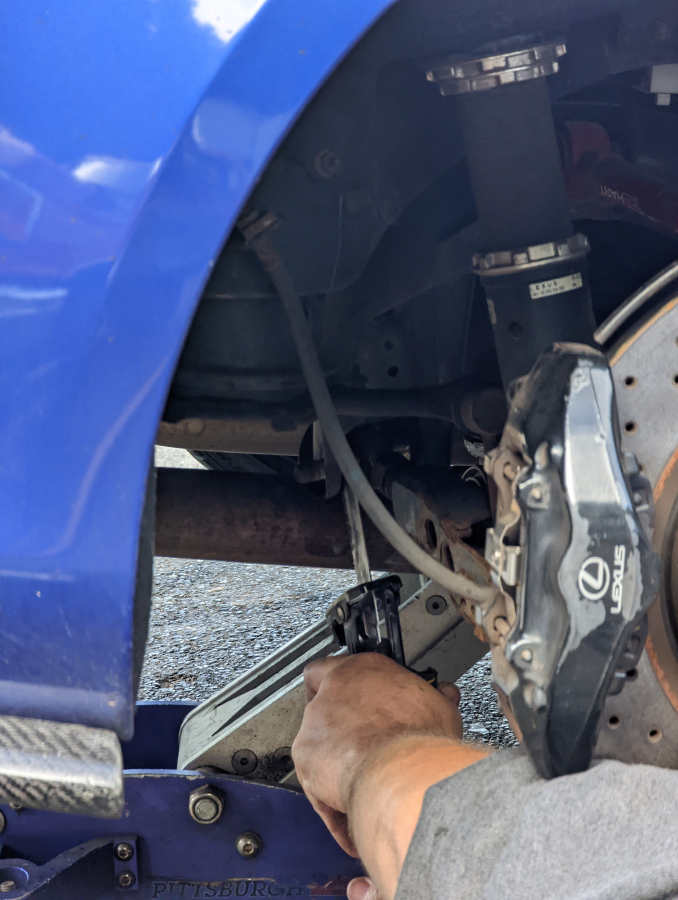
I have seen some people have posted on here that have looked much worse than this. It was pretty easy to squeeze it though. It was definitely degraded by the slight decrease in height compared to the new one I am sure. However, with the suspension noise I am dealing with right now I can't even tell if the noise is now gone since the suspension noise is so loud.

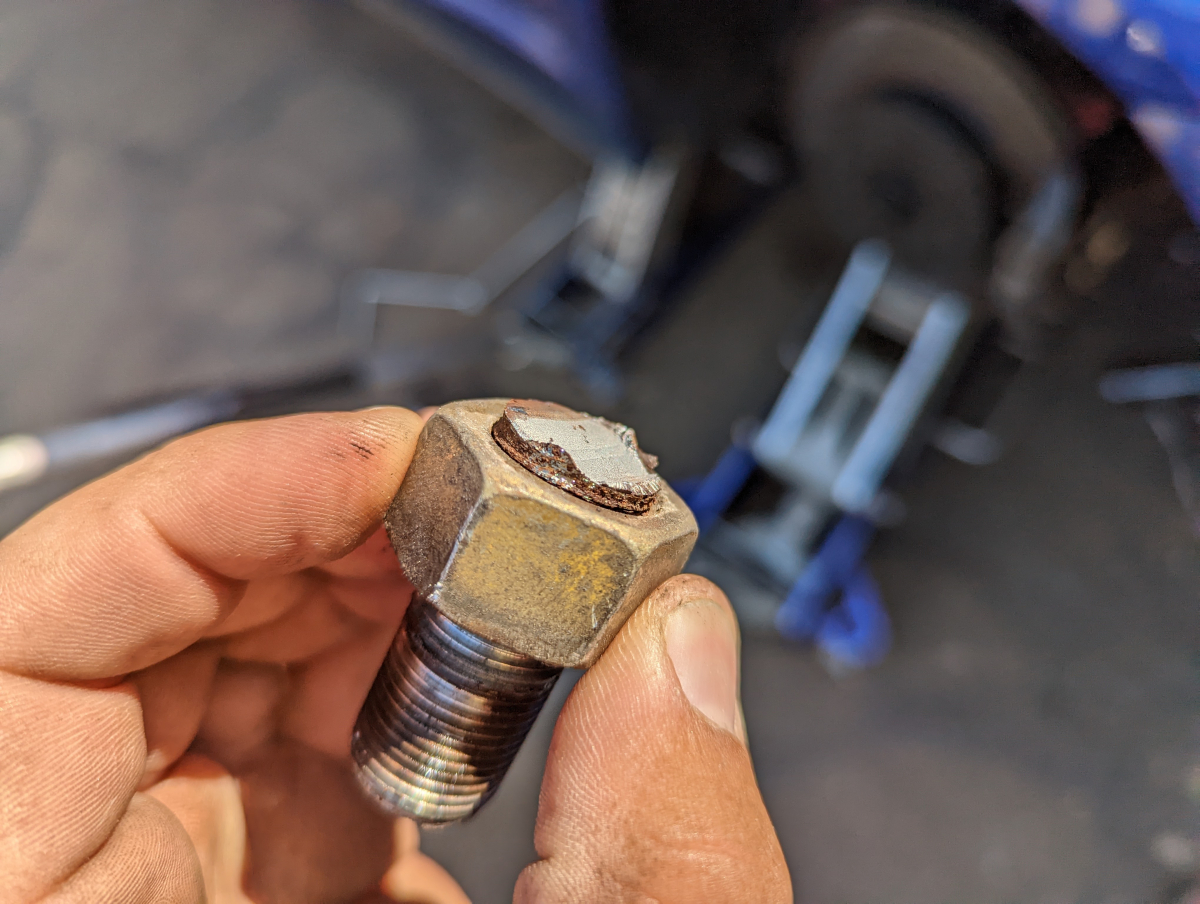
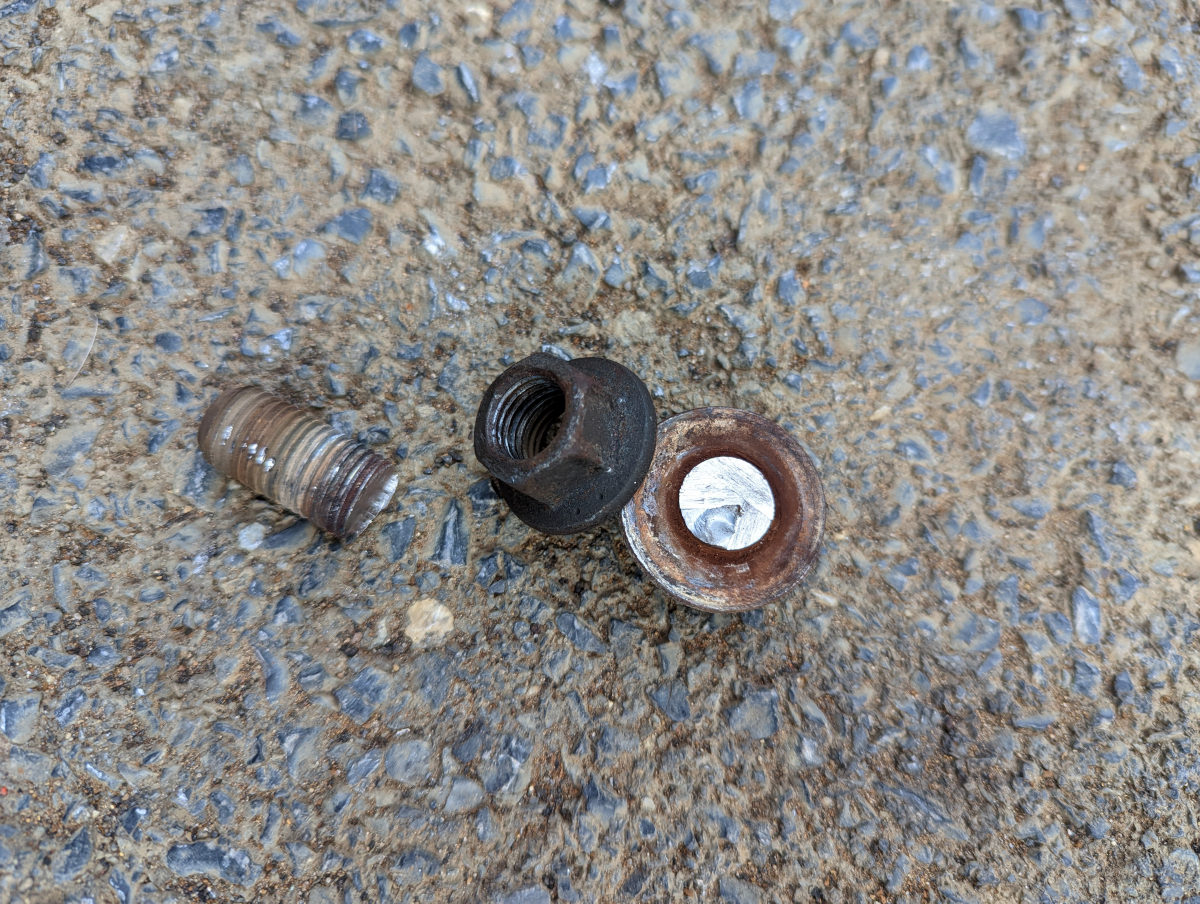
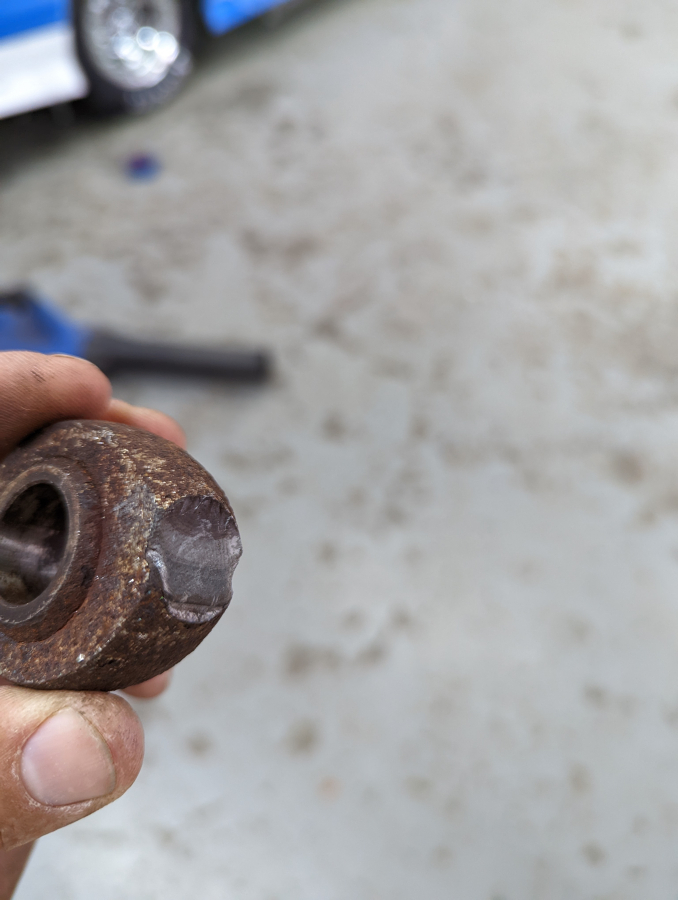
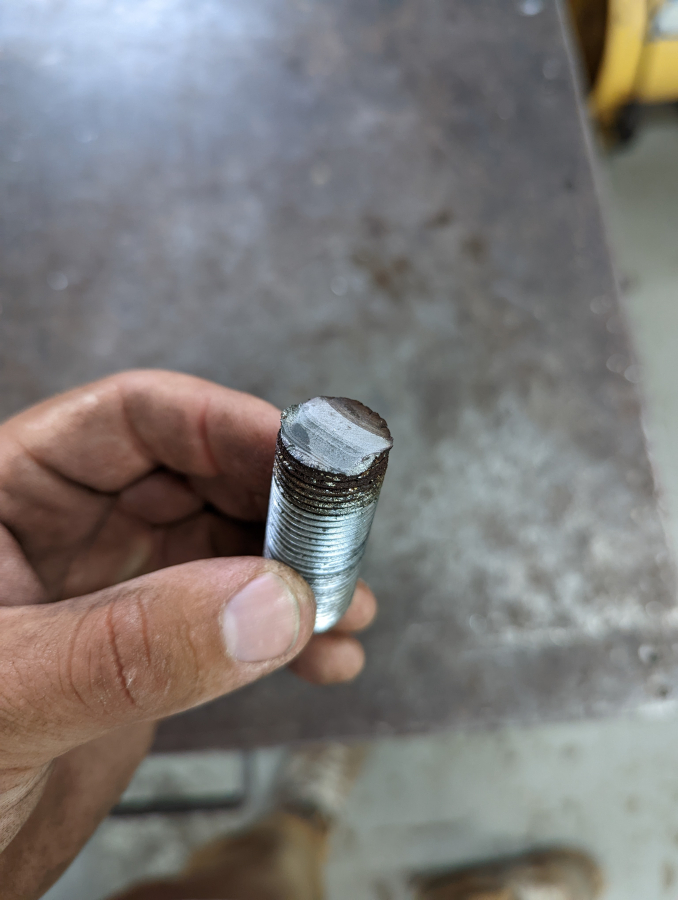
While I had the car up I tried to tighten everything I could in the rear suspension to see if something was loose at all causing the noise I have. Well the lower endlink bolt on one side was no longer even up to handling the factory tq spec even and promptly snapped.
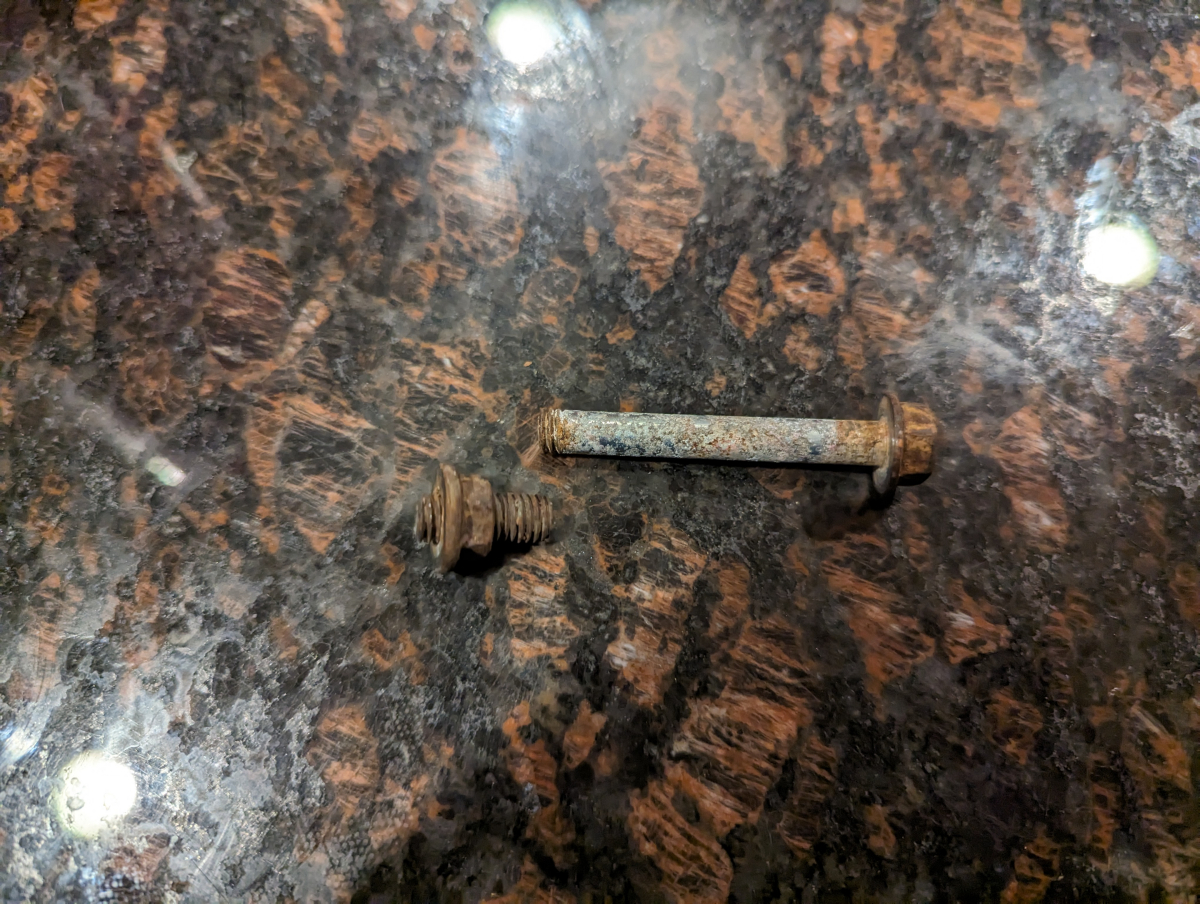
Replaced them with some grade 8 from Lowe's while I wait for new factory bolts.
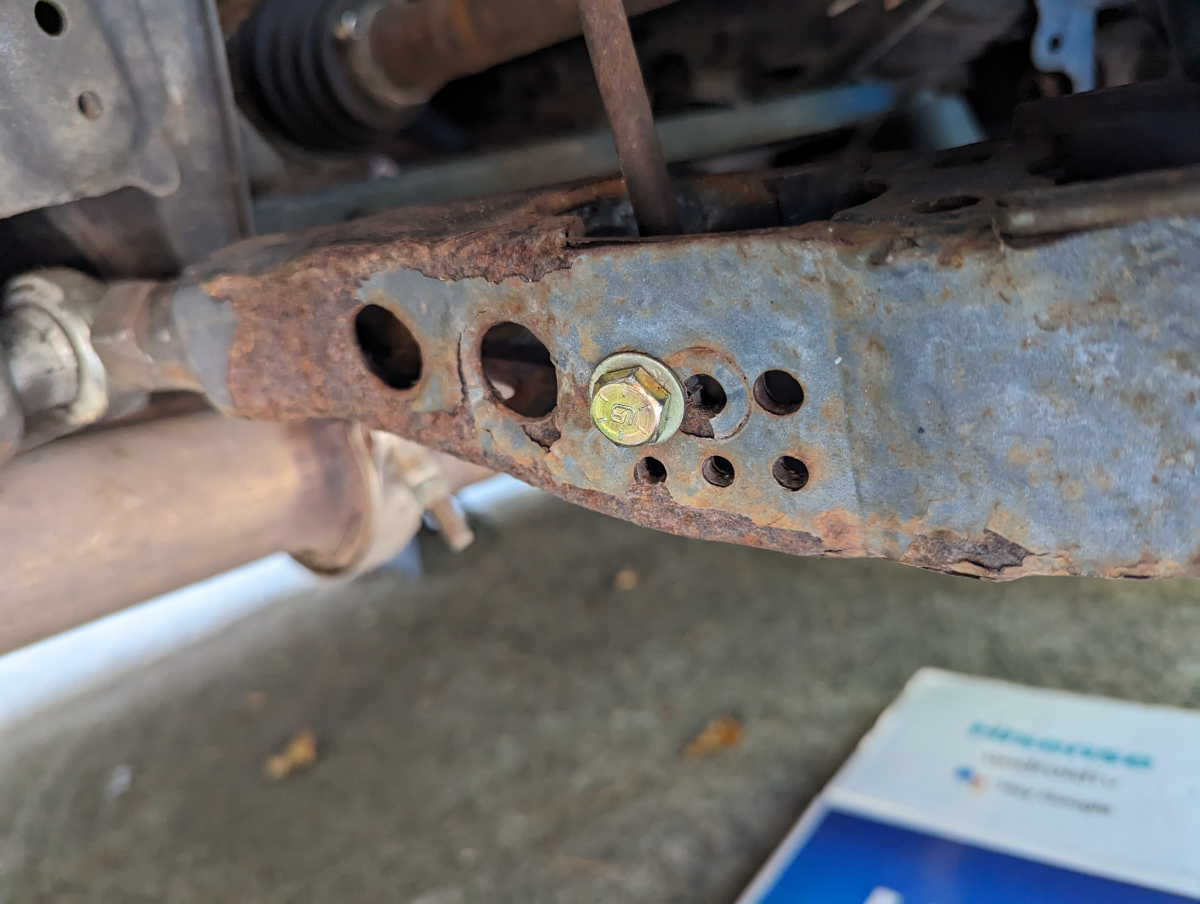
Also noticed the boot on the endlink on the side I have the noise from had ruptured so maybe that is my issue.

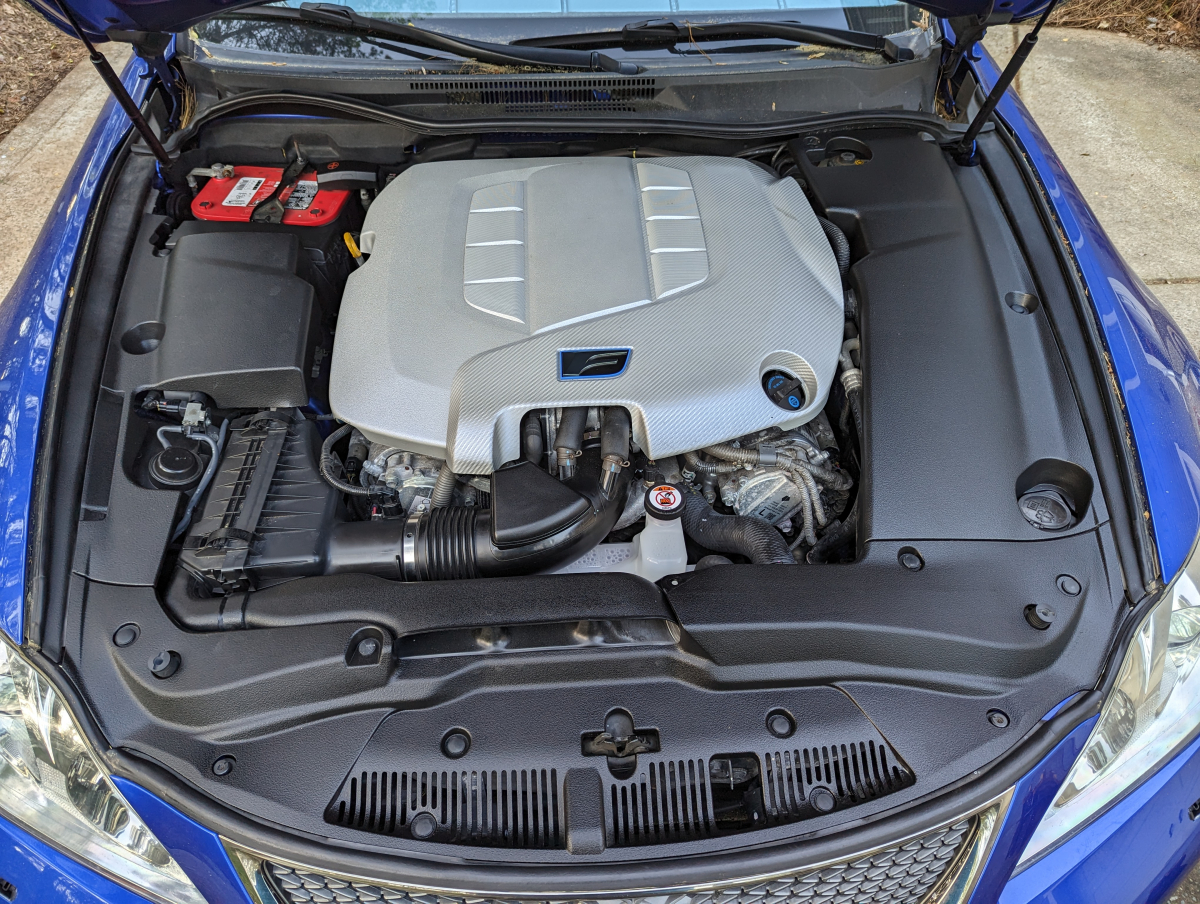
The battery has been on the way out for a while. Seems for some reason Group 24 batteries are becoming harder and harder to find. I know a bunch on here have liked the AntiGravity batteries but I couldn't bring myself to spend that on a battery right now with everything else I am tackling on the car.
I decided to go with an X2 Power which has a 4 year warranty and is made in the same factory as the Odyssey batteries but can be had for less usually if you can catch a sale at Batteries Plus which I did.
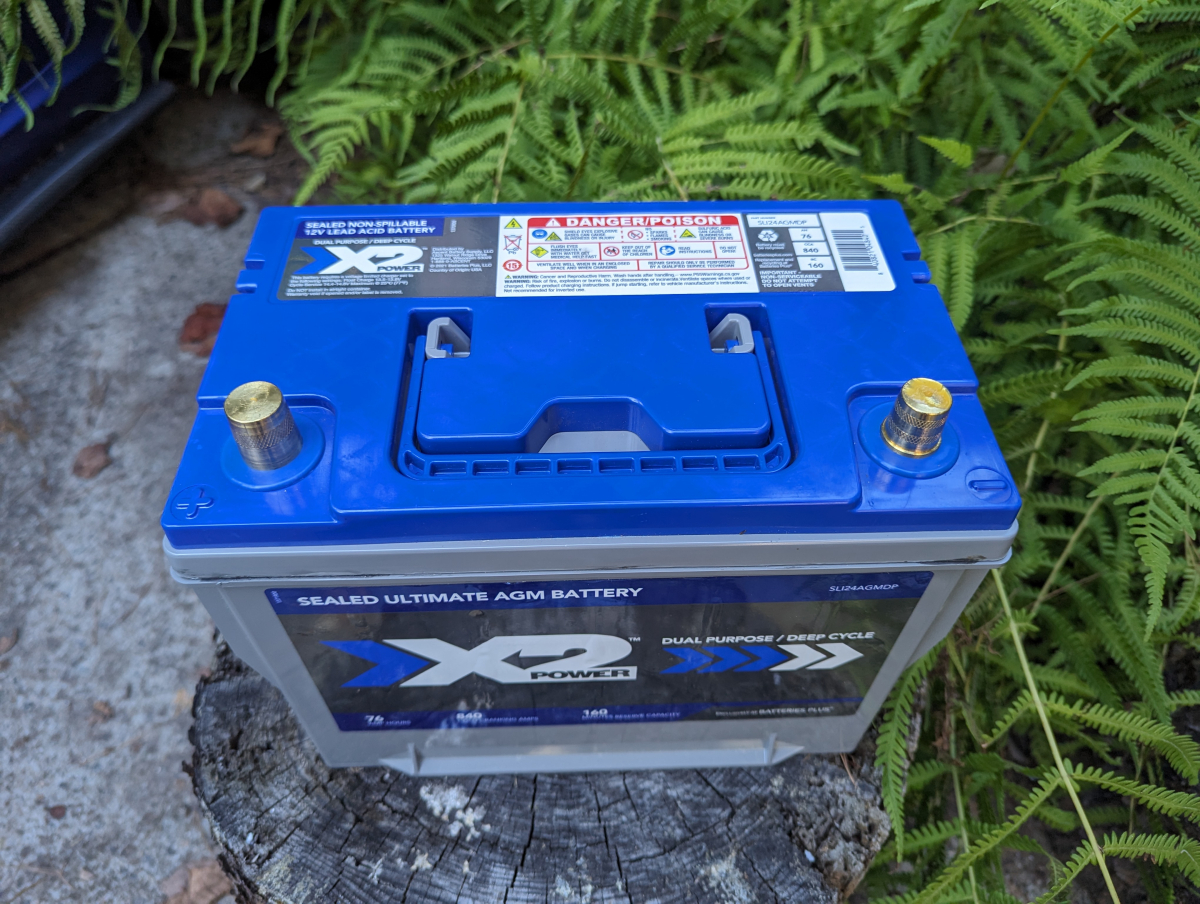
Gave me a chance to play with a recent new tool pickup as well.

Doesn't hurt that it matches the car either.

I had ordered the new trans mount since I had what sound like the wheel of fortune noise everyone described with that issue.
I have seen some people have posted on here that have looked much worse than this. It was pretty easy to squeeze it though. It was definitely degraded by the slight decrease in height compared to the new one I am sure. However, with the suspension noise I am dealing with right now I can't even tell if the noise is now gone since the suspension noise is so loud.
While I had the car up I tried to tighten everything I could in the rear suspension to see if something was loose at all causing the noise I have. Well the lower endlink bolt on one side was no longer even up to handling the factory tq spec even and promptly snapped.
Replaced them with some grade 8 from Lowe's while I wait for new factory bolts.
Also noticed the boot on the endlink on the side I have the noise from had ruptured so maybe that is my issue.
The battery has been on the way out for a while. Seems for some reason Group 24 batteries are becoming harder and harder to find. I know a bunch on here have liked the AntiGravity batteries but I couldn't bring myself to spend that on a battery right now with everything else I am tackling on the car.
I decided to go with an X2 Power which has a 4 year warranty and is made in the same factory as the Odyssey batteries but can be had for less usually if you can catch a sale at Batteries Plus which I did.
Gave me a chance to play with a recent new tool pickup as well.
Doesn't hurt that it matches the car either.