
"Raine's SC300 (KEIRA 2.0) From the Beginning to End."
 08-02-12, 01:56 PM
#91
05.17.12
Corse
- Once in awhile I go to the local car meet with some friends, and one day the topic of conversation was aftermarket steering wheels. This got me thinking, and with the upper edge of my OEM steering wheel peeling, I thought �why not?� and swapped out the stock wheel for a Momo Devil 350mm steering wheel in �black� finish, which looks a lot more like a tinted silver. I didn�t go cheap with the hub either, opting for a genuine Momo hub.
 08-02-12, 02:01 PM
#92
05.21.12
Readable
- When I first bought the car in �06, the HVAC LCD screen was fine. Over the years HVAC LCD screen started fading, and eventually it got to the point that if it was super hot outside, the screen was readable, but any time else (especially when it was cold) it would just be an all black blob. Like many SC owners I eventually memorized the icon order, and finally I got around to buying a new HVAC LCD. My brother (who just so happens to be an Electrical Engineer) took care of the LCD swap for me.
08-02-12, 02:19 PM
#93
05.23.12
Shine, Part 1
- Finally, Ken at Shine Auto Project (who also happens to be a really nice guy) called and told me that my Spec-A front bumper was ready for pickup. Since I live 15 minutes from them, I went there right away. On the way back I also picked up 3 quarts of my new color selection.
Back at home I removed the OEM front bumper and installed the Spec-A bumper to check the fitment. I was amazed at how good the fitment was; the only other body panels I’ve seen fit this good were genuine Vertex and of course – OEM body panels. The only thing I had to do was drill mounting holes for the front grille, fog lamps, and side markers – but there were dimple marks where the holes were to be made, so it was easy.
If you’re wondering why I only bought the front bumper, it was because the original plan/experiment was to combine a Shine A-Spec front with Origin Lab sides and rear. The body shop would handle getting the Origin parts (so they said) so all I had to do was bring the car, paint, and Shine front bumper.
Last edited by raine; 08-02-12 at 02:25 PM.


 08-02-12, 05:13 PM
#95
07.07.12
Not Fresh
- Finally got to pick up the car, and it was good and bad.
The good stuff:
1. All main body dents and dings fixed
2. Hood smoothed out and repainted
3. Both front fenders fixed
4. Key marks on passenger-side are gone
5. Shine front bumper painted
The bad stuff:
1. Many of the rubber window seals have overspray from a not so careful masking job.
2. Door seals on both doors (rear and lower seals) also have overspray.
3. Moonroof seal is painted. WTF.
4. OEM headlamps have overspray. Good thing I'm not using them anymore.
5. Both windows (outside), high beam lenses, and tail lamp lenses have a lot of polish residue.
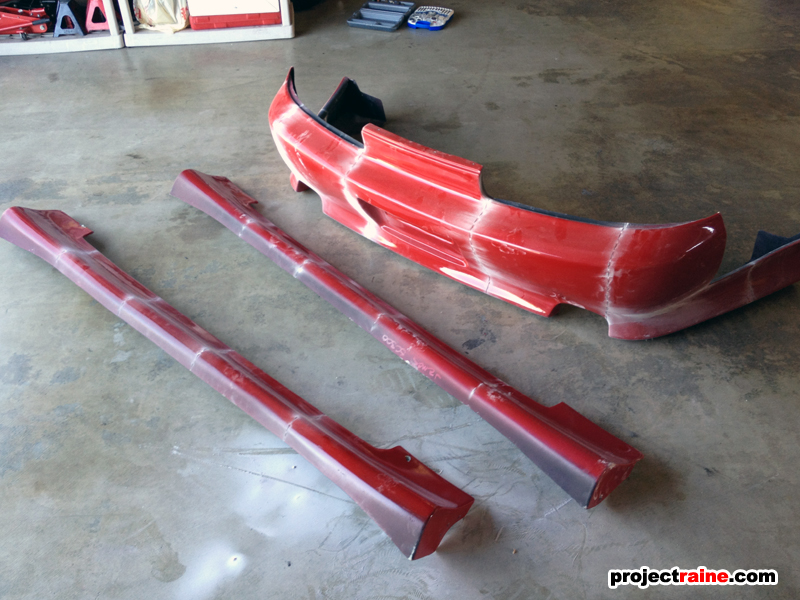
6. Extreme Dimensions side skirts and rear bumper hang approx. 1.5" lower than front bumper.
Here's some fitment (or lack thereof) photos:

Front end of left side skirt. Right side was similar.

Rear end of left side skirt. Fitment was very off.

Left side of rear bumper. Note how the are where bumper meets fender is off, and the tail light opening doesn't line up at all.
Obviously I didn't like it (would you?), so I took the Extreme Dimensions side skirts and rear bumper off. Since it's Saturday late afternoon already (and most auto businesses are closed Sundays) I now have to wait until Monday to implement a solution.
UPDATE: A month afterward I went a head and contacted Extreme Dimensions, they were pretty cool with handling the situation. They sent me a form to fill out describing the issues and requested photos for their reference. After they received my reply, they offered a full refund if I "destroyed the parts and sent them a photo" (since the parts were already painted) so I did as instructed.

The Extreme Dimensions rear bumper and side skirts.
Score marks cut into parts.
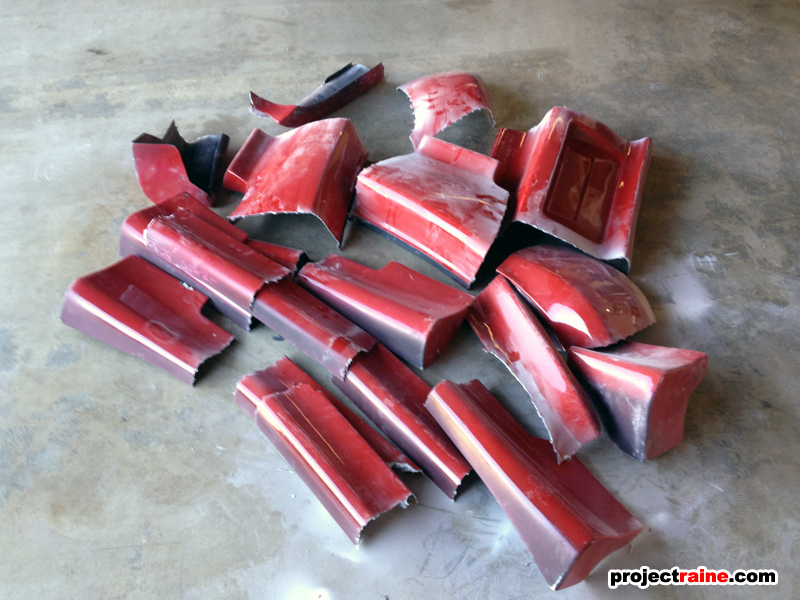
And done.
Not Fresh
- Finally got to pick up the car, and it was good and bad.
The good stuff:
1. All main body dents and dings fixed
2. Hood smoothed out and repainted
3. Both front fenders fixed
4. Key marks on passenger-side are gone
5. Shine front bumper painted
The bad stuff:
1. Many of the rubber window seals have overspray from a not so careful masking job.
2. Door seals on both doors (rear and lower seals) also have overspray.
3. Moonroof seal is painted. WTF.
4. OEM headlamps have overspray. Good thing I'm not using them anymore.
5. Both windows (outside), high beam lenses, and tail lamp lenses have a lot of polish residue.
6. Extreme Dimensions side skirts and rear bumper hang approx. 1.5" lower than front bumper.
Here's some fitment (or lack thereof) photos:
Front end of left side skirt. Right side was similar.
Rear end of left side skirt. Fitment was very off.
Left side of rear bumper. Note how the are where bumper meets fender is off, and the tail light opening doesn't line up at all.
Obviously I didn't like it (would you?), so I took the Extreme Dimensions side skirts and rear bumper off. Since it's Saturday late afternoon already (and most auto businesses are closed Sundays) I now have to wait until Monday to implement a solution.
UPDATE: A month afterward I went a head and contacted Extreme Dimensions, they were pretty cool with handling the situation. They sent me a form to fill out describing the issues and requested photos for their reference. After they received my reply, they offered a full refund if I "destroyed the parts and sent them a photo" (since the parts were already painted) so I did as instructed.
The Extreme Dimensions rear bumper and side skirts.
Score marks cut into parts.
And done.
Last edited by raine; 08-08-12 at 10:41 PM.
08-02-12, 05:23 PM
#96
07.09.12
The Solution
- The Monday after I picked up the car (which was a Saturday) and did not like how the Extreme Dimensions side skirts/rear bumper turned out, I gave Ken at Shine Auto Project a call once more, and within 30 minutes I was there at their warehouse picking up a new Spec-A rear bumper and a pair of Spec-A side skirts. Obviously this would solve my “matching body kit” issue since I was basically going full Spec-A, and I expected the fitment to be much better as well judging from how the front bumper practically bolted on. I brought the parts home and did a test fit to see what I was going to work with, and just like the Spec-A front bumper, the Spec-A rear bumper fit really, really nice! Everything was bolt-on with the exception of the license plate light clusters (addressed in this post). The side skirts also fit up to the car very nice, so knowing that all three components fit well and lined up well I saved the actual drilling and mounting until after paint. The next morning I dropped off the skirts and rear bumper to get painted the same shade of red as the rest of the car.

The Shine Auto Project Spec-A parts fit very nice!
The Solution
- The Monday after I picked up the car (which was a Saturday) and did not like how the Extreme Dimensions side skirts/rear bumper turned out, I gave Ken at Shine Auto Project a call once more, and within 30 minutes I was there at their warehouse picking up a new Spec-A rear bumper and a pair of Spec-A side skirts. Obviously this would solve my “matching body kit” issue since I was basically going full Spec-A, and I expected the fitment to be much better as well judging from how the front bumper practically bolted on. I brought the parts home and did a test fit to see what I was going to work with, and just like the Spec-A front bumper, the Spec-A rear bumper fit really, really nice! Everything was bolt-on with the exception of the license plate light clusters (addressed in this post). The side skirts also fit up to the car very nice, so knowing that all three components fit well and lined up well I saved the actual drilling and mounting until after paint. The next morning I dropped off the skirts and rear bumper to get painted the same shade of red as the rest of the car.
The Shine Auto Project Spec-A parts fit very nice!
Last edited by raine; 08-08-12 at 10:46 PM.
08-02-12, 05:28 PM
#97
07.12.12
Side Markers
- So now the car was back in the garage waiting for a pair of side skirts and a rear bumper. I randomed a pair of brand new JDM side markers for the front bumper on eBay for a total auction winning, no tax, free shipping included price of…$18. (photo taken after I put the wheels back on)
Last edited by raine; 08-08-12 at 10:47 PM.
08-02-12, 05:37 PM
#98
07.14.12
Supermade
- Thanks to Claire (my�parts scout� in Japan) again, not sure where or how she found them but she scored me a rare pair of OEM Headlamps that had actual Supermade lenses already installed. I had her ship them out to me right away, and I also elected to upgrade the front end to a full HID setup: 4300k low beam, 4300k high beam, and 3000k fog.

Clear Supermade lenses after a light clean and polish.

So many ballasts on this pirate ship (that's just on the left side!)
Supermade
- Thanks to Claire (my�parts scout� in Japan) again, not sure where or how she found them but she scored me a rare pair of OEM Headlamps that had actual Supermade lenses already installed. I had her ship them out to me right away, and I also elected to upgrade the front end to a full HID setup: 4300k low beam, 4300k high beam, and 3000k fog.
Clear Supermade lenses after a light clean and polish.
So many ballasts on this pirate ship (that's just on the left side!)
Last edited by raine; 10-26-12 at 10:44 AM.
08-02-12, 05:44 PM
#99
07.14.12
Knight Rider
- With the Spec-A bumper in place, I now had the center grill on my car. Feeling 80’s I decided to have some fun and install a Knight Rider scanner light behind the grill. I didn’t get the thin “million color/million mode” LED lights that are all over eBay – I went full 80’s with the larger, big-rig side marker style scanner light. The best part of it? The control box is actually labeled “Knight Rider” so it’s REAL lol

Made a custom bracket to position the light fixture at the correct height.

I told you! It’s the KNIGHT RIDER hahaha

System check is complete, Michael. Wait - who’s Michael?

day pic, it's brighter at night.
Quick vid, it's the afternoon but at night it's a lot brighter.
(continued on post #110)
Knight Rider
- With the Spec-A bumper in place, I now had the center grill on my car. Feeling 80’s I decided to have some fun and install a Knight Rider scanner light behind the grill. I didn’t get the thin “million color/million mode” LED lights that are all over eBay – I went full 80’s with the larger, big-rig side marker style scanner light. The best part of it? The control box is actually labeled “Knight Rider” so it’s REAL lol
Made a custom bracket to position the light fixture at the correct height.
I told you! It’s the KNIGHT RIDER hahaha
System check is complete, Michael. Wait - who’s Michael?
day pic, it's brighter at night.
(continued on post #110)
Last edited by raine; 08-03-12 at 06:10 PM.


