Project AARP Casino Cruiser - LS400 5spd drift car build
 03-11-13, 05:26 PM
#91
Driver
Thread Starter

Thanks timmy. Only reason I'm concerned about the loudness is because I'm running a single after the Y. I am considering 2 24" Cherry bombs, and a muffler at the back a buddy donated. Trying to make it as straight as possible so I might even hammer in the spare tire well. Everyone said for a single run a 2.75-3 so i'll probably run a 2.75 just to keep the noise down.
 03-11-13, 08:21 PM
#92
185 pounds? Damn! When I did my tranny swap on my 87 Cressida, you actually could pick up the A340E and carry it by yourself. Goes to show how much more heavy duty the LS400's are!
 03-11-13, 08:56 PM
#94
They do have differences, especially when it comes to weight. Because my A340E was DEFINITELY not 185 pounds, as a bucket *** kid like myself wouldn't of been able to pick up and move a transmission that weighed 15 pounds more than I did
Its probably like comparing the GM 4L60E and 4L65E. Very very similar but one is significantly stronger than the other with heavier components.
Its probably like comparing the GM 4L60E and 4L65E. Very very similar but one is significantly stronger than the other with heavier components.
03-27-13, 07:52 PM
#95
Driver
Thread Starter
Need some help with the proportioning valve.

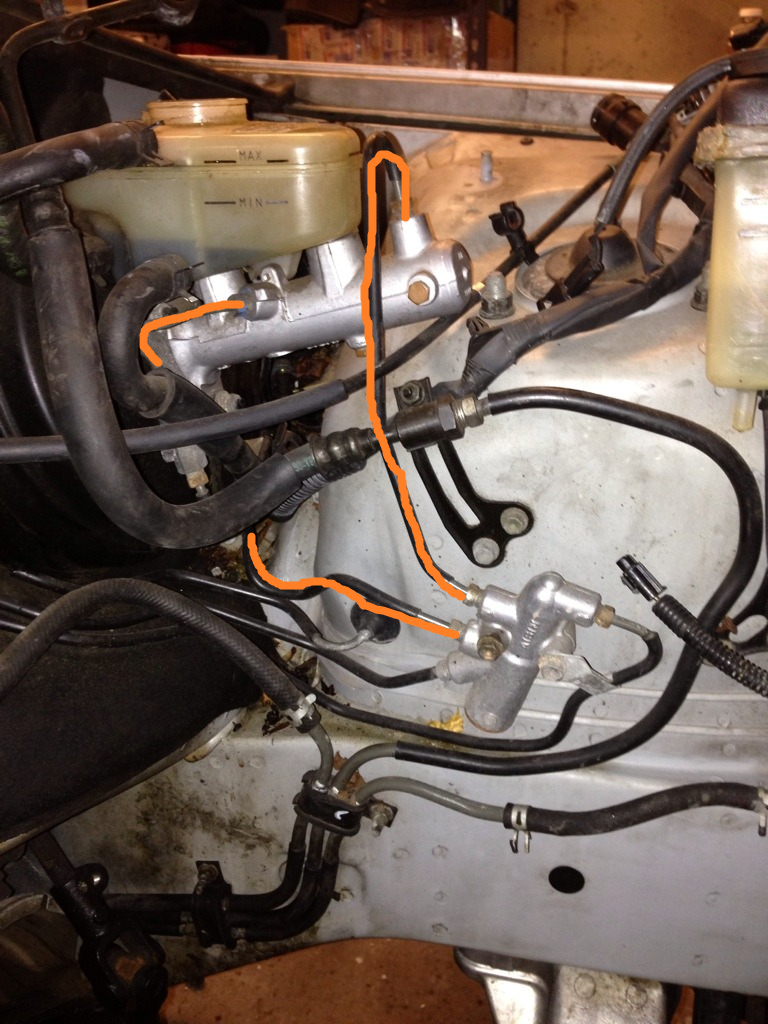
The Top line with the arrow pointing in is for the rear brakes according to what Mike told me. Is the one near it with the arrow pointing out for the rear brakes as well? And then the bottom 2 are for the fronts?!
The Top line with the arrow pointing in is for the rear brakes according to what Mike told me. Is the one near it with the arrow pointing out for the rear brakes as well? And then the bottom 2 are for the fronts?!
 03-27-13, 08:40 PM
#97
Driver
Thread Starter
03-28-13, 02:17 PM
#98
Pictures from mine won't help. The proportioning and bypass valve is built into my brake master cylinder. It's external on your's. The repair manual should have a section in TRAC showing the hydraulic system diagram. It should help you figure it out.
The diagram shows two lines connecting the proportioning and bypass valve to the brake master cylinder, one line connecting the valve to the ABS, and one line connecting the valve to TRAC. There's two lines connected the the brake master cylinder reservoir, going to TRAC components.
I can see one line connecting the master cylinder and the valve, and think I can see another also connecting the master cylinder and valve. Those two don't need to be touched. The other two, trace to ABS and TRAC Tee the one from ABS to your front wheels, and tee the one from TRAC to the rear wheels. The two rubber hoses connected to the master cylinder reservoir, you can either cap them off or loop them together.
If you already moved ABS and TRAC actuators, you might want to trace and mark all four lines coming off each caliper. So then you'll have two unmarked lines left, each coming off the proportioning and bypass valve. The ABS actuator was larger, and mounted closer to the front of the car. So you can try and guess by where the lines are, which one went to which actuator. Now when you do start up the car, make sure you drive very slow, and test the brakes. If the rear wheels lock up, no big deal, just switch the tee fittings.
Here's how I see the lines connecting the master cylinder and valve. It's a guess with the one line, I can't tell at the angle.
03-28-13, 05:40 PM
#99
Driver
Thread Starter
Pictures from mine won't help. The proportioning and bypass valve is built into my brake master cylinder. It's external on your's. The repair manual should have a section in TRAC showing the hydraulic system diagram. It should help you figure it out.
The diagram shows two lines connecting the proportioning and bypass valve to the brake master cylinder, one line connecting the valve to the ABS, and one line connecting the valve to TRAC. There's two lines connected the the brake master cylinder reservoir, going to TRAC components.
I can see one line connecting the master cylinder and the valve, and think I can see another also connecting the master cylinder and valve. Those two don't need to be touched. The other two, trace to ABS and TRAC Tee the one from ABS to your front wheels, and tee the one from TRAC to the rear wheels. The two rubber hoses connected to the master cylinder reservoir, you can either cap them off or loop them together.
If you already moved ABS and TRAC actuators, you might want to trace and mark all four lines coming off each caliper. So then you'll have two unmarked lines left, each coming off the proportioning and bypass valve. The ABS actuator was larger, and mounted closer to the front of the car. So you can try and guess by where the lines are, which one went to which actuator. Now when you do start up the car, make sure you drive very slow, and test the brakes. If the rear wheels lock up, no big deal, just switch the tee fittings.
Here's how I see the lines connecting the master cylinder and valve. It's a guess with the one line, I can't tell at the angle.
The diagram shows two lines connecting the proportioning and bypass valve to the brake master cylinder, one line connecting the valve to the ABS, and one line connecting the valve to TRAC. There's two lines connected the the brake master cylinder reservoir, going to TRAC components.
I can see one line connecting the master cylinder and the valve, and think I can see another also connecting the master cylinder and valve. Those two don't need to be touched. The other two, trace to ABS and TRAC Tee the one from ABS to your front wheels, and tee the one from TRAC to the rear wheels. The two rubber hoses connected to the master cylinder reservoir, you can either cap them off or loop them together.
If you already moved ABS and TRAC actuators, you might want to trace and mark all four lines coming off each caliper. So then you'll have two unmarked lines left, each coming off the proportioning and bypass valve. The ABS actuator was larger, and mounted closer to the front of the car. So you can try and guess by where the lines are, which one went to which actuator. Now when you do start up the car, make sure you drive very slow, and test the brakes. If the rear wheels lock up, no big deal, just switch the tee fittings.
Here's how I see the lines connecting the master cylinder and valve. It's a guess with the one line, I can't tell at the angle.
As for the lines, the 2 rears come up and both go into separate unions which are mounted on the frame rail on the passenger frame rail. I was going to T them together right at that spot and go to the hydraulic emergency brake in the car, and from the hydro brake to the proportioning valve, and then for the fronts T them together and send them to the other spot much like you said. The lines coming off the block though are all roughly the same size. The fatter line you're talking about I already removed. It went from one of the accumulator blocks near the intake to the TRAC system right next to the brake booster. I will check the service manual and see what it is that I need to do, but thank you for clearing that up. Definitely makes sense now.
One more quick q, since I'm not running the ABS/TRAC anymore, should I just bypass and remove this proportioning valve all together? Is it possible that my master too has a built in proportioning valve and this is just the solution to the ABS/TRAC system on pre 93 cars?
03-29-13, 06:29 PM
#100
Okay, I think we both are on the same wavelength now. I think removing the proportioning and bypass valve is a bad idea. The 93-94 brake master cylinder looks different. I'll try and take a better shot tomorrow, if this isn't good enough. It definitely looks like that weird external thing is your bypass and proportioning valve. On the plus side, if you wanted to adjust the bias, you could remove that and replace it with an adjustable one.
Not a good picture, but it's the only picture I can find on my phone with the brake master cylinder. Should show enough to show the difference.
Not a good picture, but it's the only picture I can find on my phone with the brake master cylinder. Should show enough to show the difference.
03-31-13, 02:58 PM
#101
Driver
Thread Starter
Okay, I think we both are on the same wavelength now. I think removing the proportioning and bypass valve is a bad idea. The 93-94 brake master cylinder looks different. I'll try and take a better shot tomorrow, if this isn't good enough. It definitely looks like that weird external thing is your bypass and proportioning valve. On the plus side, if you wanted to adjust the bias, you could remove that and replace it with an adjustable one.
Not a good picture, but it's the only picture I can find on my phone with the brake master cylinder. Should show enough to show the difference.
Not a good picture, but it's the only picture I can find on my phone with the brake master cylinder. Should show enough to show the difference.

 .
05-12-13, 01:29 PM
.
05-12-13, 01:29 PM
#103
Driver
Thread Starter
Update #14 5/12/13
Well, let's just say that slaving away at a job with a terrible 50hr week schedule, coupled with the inability to weld, and my brother also having a ****ty scheduled job = Rod can't learn how to weld. Between that, and having almost no motivation or energy left after getting out of work the progress has crawled to a minimum on the Lexus. Good news, I quit my job! haha. I'm going back to working part time at my parents business until I finish the car, and I also may be pursuing a job opportunity in Miami so this car NEEDS to get done. I have registered for a drift event at Lime Rock on June 22nd. Time to go ***** to the wall!
So since the last update, next to nothing has really been done on the car. All I have so far is I did in fact get around to making EGR delete block off plates on Wednesday. Also sort of solved my parking brake situation. Purchased an SC3/400 handle, and cables. Found a somewhat easy way to use half the parking cable from the SC, and the handle with the LS stock parking brake cables. Hopefully it works out.
Said block off plates, don't hate I've never really fabricated anything before, and the table grinder kind of sucked.

Now I had questions. Hoping the tech savvy people could chime in.
My intake manifold is disgusting. It has a solid layer of grime inside the upper plenum that I can see. Am I better of just taking it to a shop to get hot tanked, instead of investing the time to clean the individual runners? Should I even bother cleaning it, and just Seafoam the car instead?!
As for the differential/subframe bushings, no one makes any poly inserts, or replacements. I checked and the diff bushings are open style bushings to allow for flex. I am assuming the subframe's are as well. I have filled motor mounts before with windowweld with great results, I imagine that doing the same would only benefit the car to help the rear end not slop around everywhere? The only other option is to lathe hockey pucks to size and use them, but I don't have a lathe :/.
Well, let's just say that slaving away at a job with a terrible 50hr week schedule, coupled with the inability to weld, and my brother also having a ****ty scheduled job = Rod can't learn how to weld. Between that, and having almost no motivation or energy left after getting out of work the progress has crawled to a minimum on the Lexus. Good news, I quit my job! haha. I'm going back to working part time at my parents business until I finish the car, and I also may be pursuing a job opportunity in Miami so this car NEEDS to get done. I have registered for a drift event at Lime Rock on June 22nd. Time to go ***** to the wall!
So since the last update, next to nothing has really been done on the car. All I have so far is I did in fact get around to making EGR delete block off plates on Wednesday. Also sort of solved my parking brake situation. Purchased an SC3/400 handle, and cables. Found a somewhat easy way to use half the parking cable from the SC, and the handle with the LS stock parking brake cables. Hopefully it works out
. Said block off plates, don't hate I've never really fabricated anything before, and the table grinder kind of sucked.

Now I had questions. Hoping the tech savvy people could chime in.
My intake manifold is disgusting. It has a solid layer of grime inside the upper plenum that I can see. Am I better of just taking it to a shop to get hot tanked, instead of investing the time to clean the individual runners? Should I even bother cleaning it, and just Seafoam the car instead?!
As for the differential/subframe bushings, no one makes any poly inserts, or replacements. I checked and the diff bushings are open style bushings to allow for flex. I am assuming the subframe's are as well. I have filled motor mounts before with windowweld with great results, I imagine that doing the same would only benefit the car to help the rear end not slop around everywhere? The only other option is to lathe hockey pucks to size and use them, but I don't have a lathe :/.
05-12-13, 02:08 PM
#104
if you're going all out you may as well just go solid spacer for the subframe in my opinion. plus it'll be easier for you to fab up. Look up what 240 guys do to make theirs, similar setup should work for you.
hot-tanking should be cheap and easy since you can just strip the sensor off it and do it that way. otherwise you can strip the sensors off and just drop the whole shebang into a 5gallon bucket of degreaser/brake cleaner, butg make sure you have extra intermediate gaskets either way.
good luck.
hot-tanking should be cheap and easy since you can just strip the sensor off it and do it that way. otherwise you can strip the sensors off and just drop the whole shebang into a 5gallon bucket of degreaser/brake cleaner, butg make sure you have extra intermediate gaskets either way.
good luck.
05-12-13, 02:25 PM
#105
Driver
Thread Starter
if you're going all out you may as well just go solid spacer for the subframe in my opinion. plus it'll be easier for you to fab up. Look up what 240 guys do to make theirs, similar setup should work for you.
hot-tanking should be cheap and easy since you can just strip the sensor off it and do it that way. otherwise you can strip the sensors off and just drop the whole shebang into a 5gallon bucket of degreaser/brake cleaner, butg make sure you have extra intermediate gaskets either way.
good luck.
hot-tanking should be cheap and easy since you can just strip the sensor off it and do it that way. otherwise you can strip the sensors off and just drop the whole shebang into a 5gallon bucket of degreaser/brake cleaner, butg make sure you have extra intermediate gaskets either way.
good luck.
! As for the intermediate gaskets, are you referring to the one between the upper and lower plenum?