
My 13 Year OCD Build in the pursuit of perfection - GS300
 01-13-15, 07:06 AM
#136
Lexus Champion
Thread Starter

Picked up a bunch of polyolefin tube - I was going to do all Raychem DR25 but quickly realized that it would be $3-400 to do everything. I may revisit this later...

These are a tiny bit out of order since I started wiring the same day I made the plate for the firewall.... work with me here
Started running wires to the sensors and mocking everything up


These are a tiny bit out of order since I started wiring the same day I made the plate for the firewall.... work with me here
Started running wires to the sensors and mocking everything up
 01-15-15, 01:38 PM
#137
Lexus Champion
Thread Starter
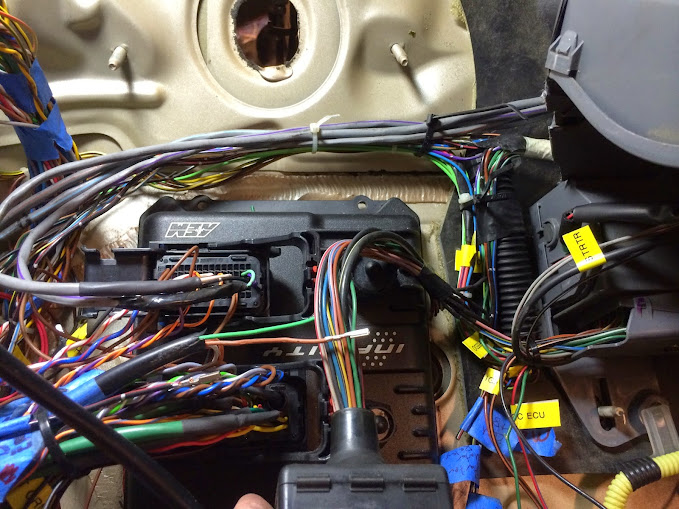
In this fantastic photo, you can see the label maker and also the wholesome goodness of a delicious billet 6466 twin scroll :run:

I've been into this whole labeling thing this past year. Its AWESOME, and dirt cheap. Everyone that works on a car should own one of these. You can get some of the basic ones for under $30.00 at Target, staples etc.
I labeled all of the wires as im working with them during a harness build, but also labeled the connectors. Not that they fit in more than one location, but its a professional look and feel that i'm after. The devils in the details guys

Here's a sealed crimp type weather tite electrical connector for the bosch Map/AIT combo

A little heat shrink to really seal it up a step beyond that...

I've been into this whole labeling thing this past year. Its AWESOME, and dirt cheap. Everyone that works on a car should own one of these. You can get some of the basic ones for under $30.00 at Target, staples etc.
I labeled all of the wires as im working with them during a harness build, but also labeled the connectors. Not that they fit in more than one location, but its a professional look and feel that i'm after. The devils in the details guys
Here's a sealed crimp type weather tite electrical connector for the bosch Map/AIT combo
A little heat shrink to really seal it up a step beyond that...
01-15-15, 01:39 PM
#138
Lexus Champion
Thread Starter
Had some 0ga around from my car audio days. Ran that from the battery up front, and to a marine junction block.
From here, it goes out to (2) 4ga for the starter and alternator. And I think I may run one 8ga for a small 4 gang fuse box for some relays.


Started wiring the infinity

Lets get this party started

I love wiring actually. Someday I would like to become better and to a lace up style layover with all the epoxys and kapton tape.


From here, it goes out to (2) 4ga for the starter and alternator. And I think I may run one 8ga for a small 4 gang fuse box for some relays.
Started wiring the infinity
Lets get this party started
I love wiring actually. Someday I would like to become better and to a lace up style layover with all the epoxys and kapton tape.
01-19-15, 09:32 AM
#139
Lexus Champion
Thread Starter
Starting to clean up some of the wires
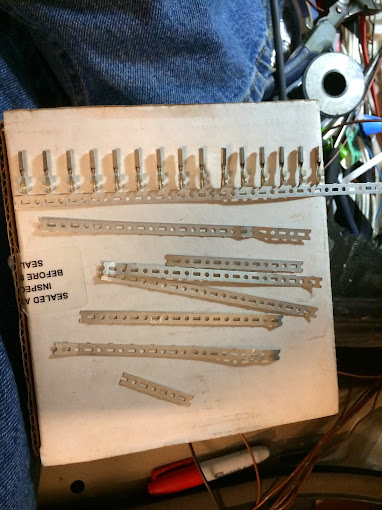
Getting down there on the last pins left for the AEM molex connectors
Got all the wiring in the door sill pocket tidy and made some straps to hold it out of the way so theres no lumps in the carpet


Got the AEM fired up and registered

Started capturing live data off sensors (without the motor)

Getting down there on the last pins left for the AEM molex connectors
Got all the wiring in the door sill pocket tidy and made some straps to hold it out of the way so theres no lumps in the carpet
Got the AEM fired up and registered
Started capturing live data off sensors (without the motor)
01-19-15, 09:34 AM
#140
Lexus Champion
Thread Starter
I did a grip of house cleaning this past weekend and have been doing some much needed, deferred maintenance done on the DD's the last few weekends.
Shaving the spark plug cover -
Started masking it off to limit the area of work, and cut it into two halves


The letters come off fairly easy


Heres the cover in the first stage after sanding,

This is a thin layer of primer to fill the imperfections before wet sanding and scuffing to seal and paint it

Shaving the spark plug cover -
Started masking it off to limit the area of work, and cut it into two halves
The letters come off fairly easy
Heres the cover in the first stage after sanding,
This is a thin layer of primer to fill the imperfections before wet sanding and scuffing to seal and paint it
01-26-15, 08:43 AM
#141
Lexus Champion
Thread Starter
Alright. So on one hand I don't want to post personal information but I thought, why not - you've already seen my car right...
I finished some upgrades to the garage that have been instrumental in being able to work on the car this year.
I have a great deal of respect for guys who work on cars outside, cold driveways, mud, rain, car ports etc.
No way I could do that anymore. Been there, done that; and got the proverbial t-shirt.
Now, though I've worked my a$$ off getting where i'm at; I feel spoiled having a garage that i'm able to stay dry in.
The bedroom is directly over the garage and gets hot as sin in the summer. A few friends have insulated their garage doors in the last few years and raved about doing it. So I got on the band wagon and let me tell you, it was the best $105.00 I've spend on a house. The garage used to get so hot it was muggy
and since it faces west, if you open the garage door the sun beats down on you.
A few sheets of 2" insulation with a bunch of time carving it to shape and having white foam pellets all over the place.
The battleship grey garage door gets hot as ***** - 120*F with 85*F ambient temp

Inside at the thickest part of the door, 2" away from the face it was still 90.5*F

After insulation - only 75*F and nice to work in. AMAZING. Not only more comfortable in the garage, but manageable in the upper floor of the house

I finished some upgrades to the garage that have been instrumental in being able to work on the car this year.
I have a great deal of respect for guys who work on cars outside, cold driveways, mud, rain, car ports etc.
No way I could do that anymore. Been there, done that; and got the proverbial t-shirt.
Now, though I've worked my a$$ off getting where i'm at; I feel spoiled having a garage that i'm able to stay dry in.
The bedroom is directly over the garage and gets hot as sin in the summer. A few friends have insulated their garage doors in the last few years and raved about doing it. So I got on the band wagon and let me tell you, it was the best $105.00 I've spend on a house. The garage used to get so hot it was muggy
and since it faces west, if you open the garage door the sun beats down on you.
A few sheets of 2" insulation with a bunch of time carving it to shape and having white foam pellets all over the place.
The battleship grey garage door gets hot as ***** - 120*F with 85*F ambient temp
Inside at the thickest part of the door, 2" away from the face it was still 90.5*F
After insulation - only 75*F and nice to work in. AMAZING. Not only more comfortable in the garage, but manageable in the upper floor of the house
Last edited by twojayzee; 01-27-15 at 07:11 AM.
01-26-15, 10:17 AM
#142
Lexus Champion
Thread Starter
That kept me content for a while... then I decided to bring back my woodworking skills from a few decades ago and finish the cabinet doors.
My friends were giving me greif for making it "too nice, it looks like a kitchen"
Got this kreg pocket hole jig for $40bux
and picked up some select pine for the face frames and cabinet doors, and peg board for the centers.


Some very basic tools were used. A miter saw, a drill, a selection of clamps and a router.

Routed out the backside for the peg board


Sprayed a little of this on the doors and face frames


Voila !

My friends were giving me greif for making it "too nice, it looks like a kitchen"
Got this kreg pocket hole jig for $40bux
and picked up some select pine for the face frames and cabinet doors, and peg board for the centers.
Some very basic tools were used. A miter saw, a drill, a selection of clamps and a router.
Routed out the backside for the peg board
Sprayed a little of this on the doors and face frames
Voila !
 01-27-15, 07:15 AM
#144
Lexus Champion
Thread Starter
Thanks Jeepy.
Few more things that were helpful this summer -
Finally cleaned up the 26 year bolt and hardware collection

Also cleaned up the fire taped gwb joints - and finish taped and skimed everything. Added lights, outlets and painted the walls and ceilings.
Built a drip leg manifold for the air lines before it goes to the plasma table. Used scotchbrite and lacquer on the copper to keep it looking nice.


Prior to that - I had cleaned up the old vice to make it operate smooth again

Cleaned out a few decades of rust buildup


Added an extension for the air compressor so I dont have to reach under it to drain the tank


Few more things that were helpful this summer -
Finally cleaned up the 26 year bolt and hardware collection
Also cleaned up the fire taped gwb joints - and finish taped and skimed everything. Added lights, outlets and painted the walls and ceilings.
Built a drip leg manifold for the air lines before it goes to the plasma table. Used scotchbrite and lacquer on the copper to keep it looking nice.
Prior to that - I had cleaned up the old vice to make it operate smooth again
Cleaned out a few decades of rust buildup
Added an extension for the air compressor so I dont have to reach under it to drain the tank
01-30-15, 08:02 AM
#145
Lexus Champion
Thread Starter
I worked on the transmission install fitment a bit and this is where I've left off. Hopefully more this weekend
Got rid of the old oil soaked, spongy mount.


I'm realizing that if I want the trans to fit correct, and not rub and vibrate under acceleration and deceleration.
I plan to do some cutting this weekend.
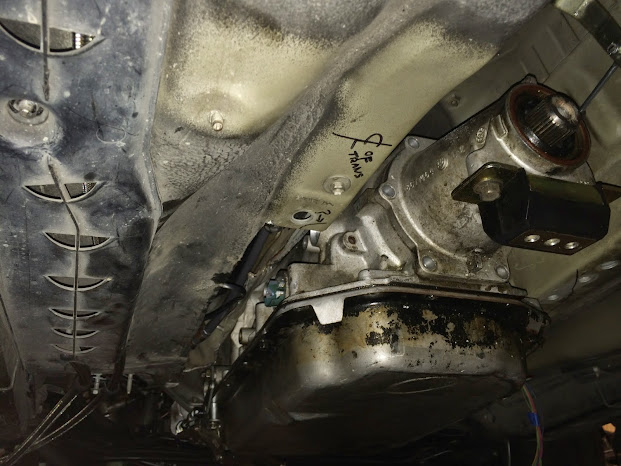
Need to raise up the whole kit-n-kaboodle

Got rid of the old oil soaked, spongy mount.
I'm realizing that if I want the trans to fit correct, and not rub and vibrate under acceleration and deceleration.
I plan to do some cutting this weekend.
Need to raise up the whole kit-n-kaboodle
01-30-15, 08:03 AM
#146
Lexus Champion
Thread Starter

Here's a pre-made, purchased bracket that is going to be for sale once I fab my own since this one doesn't work how I want it to.


I picked up a gated automatic shifter out of a newer GS and modified it to work with the 4l80e. I'm going to fab up a new gate on the plasma table.
But it works now.


Here she is in action - not sure if embedded video will work ?
<iframe width="420" height="315" src="https://www.youtube.com/embed/tPWV4-HCLNA" frameborder="0" allowfullscreen></iframe>
Getting excited to get this stuff installed and using it


Last edited by twojayzee; 01-30-15 at 08:06 AM.
01-30-15, 08:18 AM
#147
Lexus Champion
Thread Starter
Worked on the transmission and engine oil cooler mounts this past weekend.
The sandwich adapter is a permacool piece and is cast. There is flashing and some casting marks that need to get smoothed out aka ported.


The sandwich adapter is a permacool piece and is cast. There is flashing and some casting marks that need to get smoothed out aka ported.
01-30-15, 08:20 AM
#148
Lexus Champion
Thread Starter
I removed the factory water cooled portion of the oil filter housing.
The threads on the main filter bolt aren't long enough so I purchased this VW oil cooler rod and cut it down.
The ford part number that folks used to purchase, isn't available (I haven't found one anyway)


I tapped the side of the housing for a pressure sensor, since I want to keep the factory sender for the idiot light

The threads on the main filter bolt aren't long enough so I purchased this VW oil cooler rod and cut it down.
The ford part number that folks used to purchase, isn't available (I haven't found one anyway)
I tapped the side of the housing for a pressure sensor, since I want to keep the factory sender for the idiot light
01-30-15, 08:23 AM
#149
Lexus Champion
Thread Starter
Spring loaded center punch is extremely handy

I created some brackets to hold the coolers in front of the AC condenser and tapped the holes for short bolts

After cutting down some flat bar, I realized it would be nice to have some angle to rest the coolers against; and for some added rigidity from flexing into the condenser.

I haven't welded this up yet, but here's what the finished product will look like.

Trimmed a few areas for clearance of braces and AC lines


There is enough room for a fan in there, and I test fit an old 10" spal fan to see how much room I have - trying to decide if ill run one or not. Any input on this ?


I created some brackets to hold the coolers in front of the AC condenser and tapped the holes for short bolts
After cutting down some flat bar, I realized it would be nice to have some angle to rest the coolers against; and for some added rigidity from flexing into the condenser.
I haven't welded this up yet, but here's what the finished product will look like.
Trimmed a few areas for clearance of braces and AC lines
There is enough room for a fan in there, and I test fit an old 10" spal fan to see how much room I have - trying to decide if ill run one or not. Any input on this ?
01-30-15, 09:19 AM
#150
Lexus Test Driver
Your brackets for your coolers look great. I am working on an e-fan set up too. I am actually going to be using a Ford Taurus fan (3500 to 3800 cfm and 2 speed) and DCC fan controller. I am going to build a shroud out of aluminum. My only problem with the controller is that it gets its temp. signal from a push in style temp. sensor so I am working on a way to get a temp. sensor to go into the stock location for a signal.