When you click on links to various merchants on this site and make a purchase, this can result in this site earning a commission. Affiliate programs and affiliations include, but are not limited to, the eBay Partner Network.
Enjoy the car and you guys have a Merry Christmas and Prosperous New Year !
Thanks Gerry!! Good to have it back on the road. The clutch is very nice to use and it makes the car drive very smoothly now. No more car projects for me through the holiday season If you do plan to get an R154 Tripod for your E46 convertible 2JZGTE project I think you might like this particular clutch (600-620 ft-lbs of torque power holding according to OS Giken and of course they have clutches rated for much higher torque in twins and triples).
Thank you and early Merry Christmas and Happy New Year to you and the family!
OP, do you recall the ID size of the brake booster hose (that goes from the hardline to the intake manifold)?
For that hose I believe what I did was take some of my old OEM SC300 brake booster vacuum hose around to several auto parts stores until someone finally sold me the same inner diameter in inch measurement. I thought I had that sizing written down but I don't see it in any of my notes unless I posted it somewhere in this thread when I connected the brake booster. When it was matched I bought... I dunno.... maybe 2 feet of it? I cut it to length from there, accounting for the check valve.
I'll have to pop my hood to check that hose to see what is written on it. It was either a common size that any auto parts store will have or else I was able to get it matched with some other equivalent new hose from my local Toyota dealer. I'll take a look.
Offhand I do know that the x4 OEM clamps needed are 96133-41500 and the one-way metal check valve is 44730-24020 (though it *should* be the same as the one from an SC I think?)
Edit: I haven't gone to the car to look yet but I pulled out my spare good hose ends to look over and I *think* it is common 3/8" (9.52mm) vacuum hose. The end I have also says it is SAE-30R7. No branding.
Update Edit: I checked my car. It's two different sizes. From the JZ engine's intake manifold to one side of the one-way metal check valve it is 3/8"(9.52mm) vacuum hose. From the other side of the metal one-way check valve to the SC300's brake vacuum booster it is 5/16" (7.93mm). I believe the four OEM clamps fit the same for both ID vacuum hose.
Awesome! This helps me tremendously as my dumbass threw away the brake booster hose on my VVTi x90 by mistake and put a thin silicone vacuum hose instead which obviously doesn't do the job. Thanks so much!
Also, even with the clamps on, are they supposed to slide out of the port with force?
Awesome! This helps me tremendously as my dumbass threw away the brake booster hose on my VVTi x90 by mistake and put a thin silicone vacuum hose instead which obviously doesn't do the job. Thanks so much!
Also, even with the clamps on, are they supposed to slide out of the port with force?
You're welcome! Yeah a silicone vacuum hose is not right for any brake booster. Traditional style hose only. I hope the JZX90 brake booster has the same diameter vacuum pipe/port coming off it though. My measurement for one of the hoses was for my early model year SC300 brake vacuum booster's pipe/port.
No, you are not supposed to be able to slide these hoses off the brake booster port with the clamps on. That means the ID of the hose is too big for the port/pipe and that you don't have a solid seal to maintain vacuum. Just how much force are you giving the hose when pulling on it? The connections should be firm either with the OEM clamp sizes or with aftermarket worm-screw clamps.
If one of the hose ID sizes I stated doesn't fit correctly on the brake booster side for your JZX90 then that means you'll need to step down an ID hose size until you get a normal fit on there before pulling the clamps over into place (if using OEM style clamps)
Further, it may also mean that at least for the JZX90's booster you may need a size smaller OEM hose clamp. I'd just look up the exploded parts diagram on Partsouq for your model year range JZX90 Mark II / Chaser / etc. and get the part number for it there. Or just get an appropriately sized worm gear hose clamp from an auto parts store. Personally I like to use OEM clamps for the intended specific application whenever I can but both will work.
The hose has to be the right ID size first though.
You're welcome! Yeah a silicone vacuum hose is not right for any brake booster. Traditional style hose only. I hope the JZX90 brake booster has the same diameter vacuum pipe/port coming off it though. My measurement for one of the hoses was for my early model year SC300 brake vacuum booster's pipe/port.
I learned that the hard way, but better late than never.
It's a JZ Toyota so they all will be the same (unless there's differences with SC300's based on mid-cycle refresh).
No, you are not supposed to be able to slide these hoses off the brake booster port with the clamps on. That means the ID of the hose is too big for the port/pipe and that you don't have a solid seal to maintain vacuum. Just how much force are you giving the hose when pulling on it? The connections should be firm either with the OEM clamp sizes or with aftermarket worm-screw clamps.
Looks like I'll need new OEM clamps if that's the case, or worm-screw clamps.
I should clarify that the hose I'm referencing is the one that connects to the intake manifold, not the brake booster hose. Apologies for lack of clarity. I do pull it with considerable force to test the clamping power.
If one of the hose ID sizes I stated doesn't fit correctly on the brake booster side for your JZX90 then that means you'll need to step down an ID hose size until you get a normal fit on there before pulling the clamps over into place (if using OEM style clamps)
For sure.
Further, it may also mean that at least for the JZX90's booster you may need a size smaller OEM hose clamp. I'd just look up the exploded parts diagram on Partsouq for your model year range JZX90 Mark II / Chaser / etc. and get the part number for it there. Or just get an appropriately sized worm gear hose clamp from an auto parts store. Personally I like to use OEM clamps for the intended specific application whenever I can but both will work.
I am with you on OEM hose clamps for the most part (with the exception of those stupid cotter pin clamps on heater hoses).
The hose has to be the right ID size first though.
Very true. I sometimes lose my mind when I'm trying to find out the correct ID size for hoses to ensure I don't have to go back and forth. I like to get things right correctly the first time and the only time.
One more thing: do you happen to know if the black protector casing for the main engine wiring harness can be purchased separately? It looks like you have retained yours unless I missed something, but I would definitely love to get a new cover as mine is brittle and easily broken when unhooking the clamps.
One more thing: do you happen to know if the black protector casing for the main engine wiring harness can be purchased separately? It looks like you have retained yours unless I missed something, but I would definitely love to get a new cover as mine is brittle and easily broken when unhooking the clamps.
I do not know if they sell those plastic protectors separately or not. Some of them do have valid Toyota part numbers but if you have, say, a JZX90 engine harness you will have to look up the part number on it in partsouq and check availability through Amayama. It would not show up as a valid U.S. part number at a Toyota dealer. I have long suspected that unlike replacement connectors those parts are considered part of the wiring harnesses themselves and might not be sold separately.
What I did in my case was begin with an OEM Supra TT USDM wiring harness, convert it for use in my SC with as many modifications needed and yes, I was able to re-use most of the original plastic cladding and rubber sections from it while replacing the majority of the electrical tape wrapping with Scotch Super 33+ electrical tape (Toyota officially recommends Tessa #51036 harness tape which has more give to it and I think in hindsight they're mostly right).
I also bought an intact 1997 SC300 Automatic engine harness that I used to cannibalize many wires, SC body plug connectors, extra protector coverings, extra rubber, etc. as needed. It's a torn up spare parts mess now but I do still have all the plastic cladding from it. I'm not sure if any of that would be compatible with your 1JZ-GTE VVT-i engine or JZX90 chassis though.
I do not know if they sell those plastic protectors separately or not. Some of them do have valid Toyota part numbers but if you have, say, a JZX90 engine harness you will have to look up the part number on it in partsouq and check availability through Amayama. It would not show up as a valid U.S. part number at a Toyota dealer. I have long suspected that unlike replacement connectors those parts are considered part of the wiring harnesses themselves and might not be sold separately.
Yeah, I spent a lot of time looking at parts diagrams for both JZX90 and JZX100's, in addition to JZA80 and other JZ-equipped vehicles, and it does look like to my dismay that the black protector is part of the wiring harness Looks like I'll just reuse it and secure it with zip ties for now.
What I did in my case was begin with an OEM Supra TT USDM wiring harness, convert it for use in my SC with as many modifications needed and yes, I was able to re-use most of the original plastic cladding and rubber sections from it while replacing the majority of the electrical tape wrapping with Scotch Super 33+ electrical tape (Toyota officially recommends Tessa #51036 harness tape which has more give to it and I think in hindsight they're mostly right).
That's what I'm doing, by removing a lot of the old tape that has lost its adhesive and replacing it with Tesa #51036 in addition to new corrugated tubing. I honestly don't want to replace the wiring harness as it works just fine; just want to make it look nice and pretty again.
I also bought an intact 1997 SC300 Automatic engine harness that I used to cannibalize many wires, SC body plug connectors, extra protector coverings, extra rubber, etc. as needed. It's a torn up spare parts mess now but I do still have all the plastic cladding from it. I'm not sure if any of that would be compatible with your 1JZ-GTE VVT-i engine or JZX90 chassis though.
I've been looking into doing that as well, but damn even on eBay all of the VVTi-equipped GS300/IS300 engine wiring harnesses (no use in getting non-VVTi engine wiring harnesses since mine is VVTI swapped after all) still go for decent coin ($100+). If I could find one for super-cheap with everything intact domestically, I'll definitely consider it. Although my ideal one is a JZX100 harness, but they still go for more than $200.
�Prosport electric 52mm boost gauge
�Prosport waterproof boost sender with 9ft harness
�VDO Vision Black Oil Temp 52mm gauge (installed in my Autoextrude side vent gauge pod as pictured)
�VDO 323-057 300F scale temperature sender in 1/8�-27 NPT threading,
�Mishimoto oil filter sandwich plate
�cheap external 8-18V LED voltmeter
I�m still figuring out how to install the AutoExtrude A/C vent gauge but I�ll do it somehow.
Little electrical harnesses for all of these have to be built first.
Next week I�m getting my oil pan replaced to stop a leak that the old one has been giving me.
And I finally discovered the full reason I haven�t been able to get full power from my engine above 3800rpm: my 2nd turbo sequential transition just wasn�t working.
The first part of the problem early on was due to an inadequate clutch. I solved that with the OS Giken STR2CD twin disc.
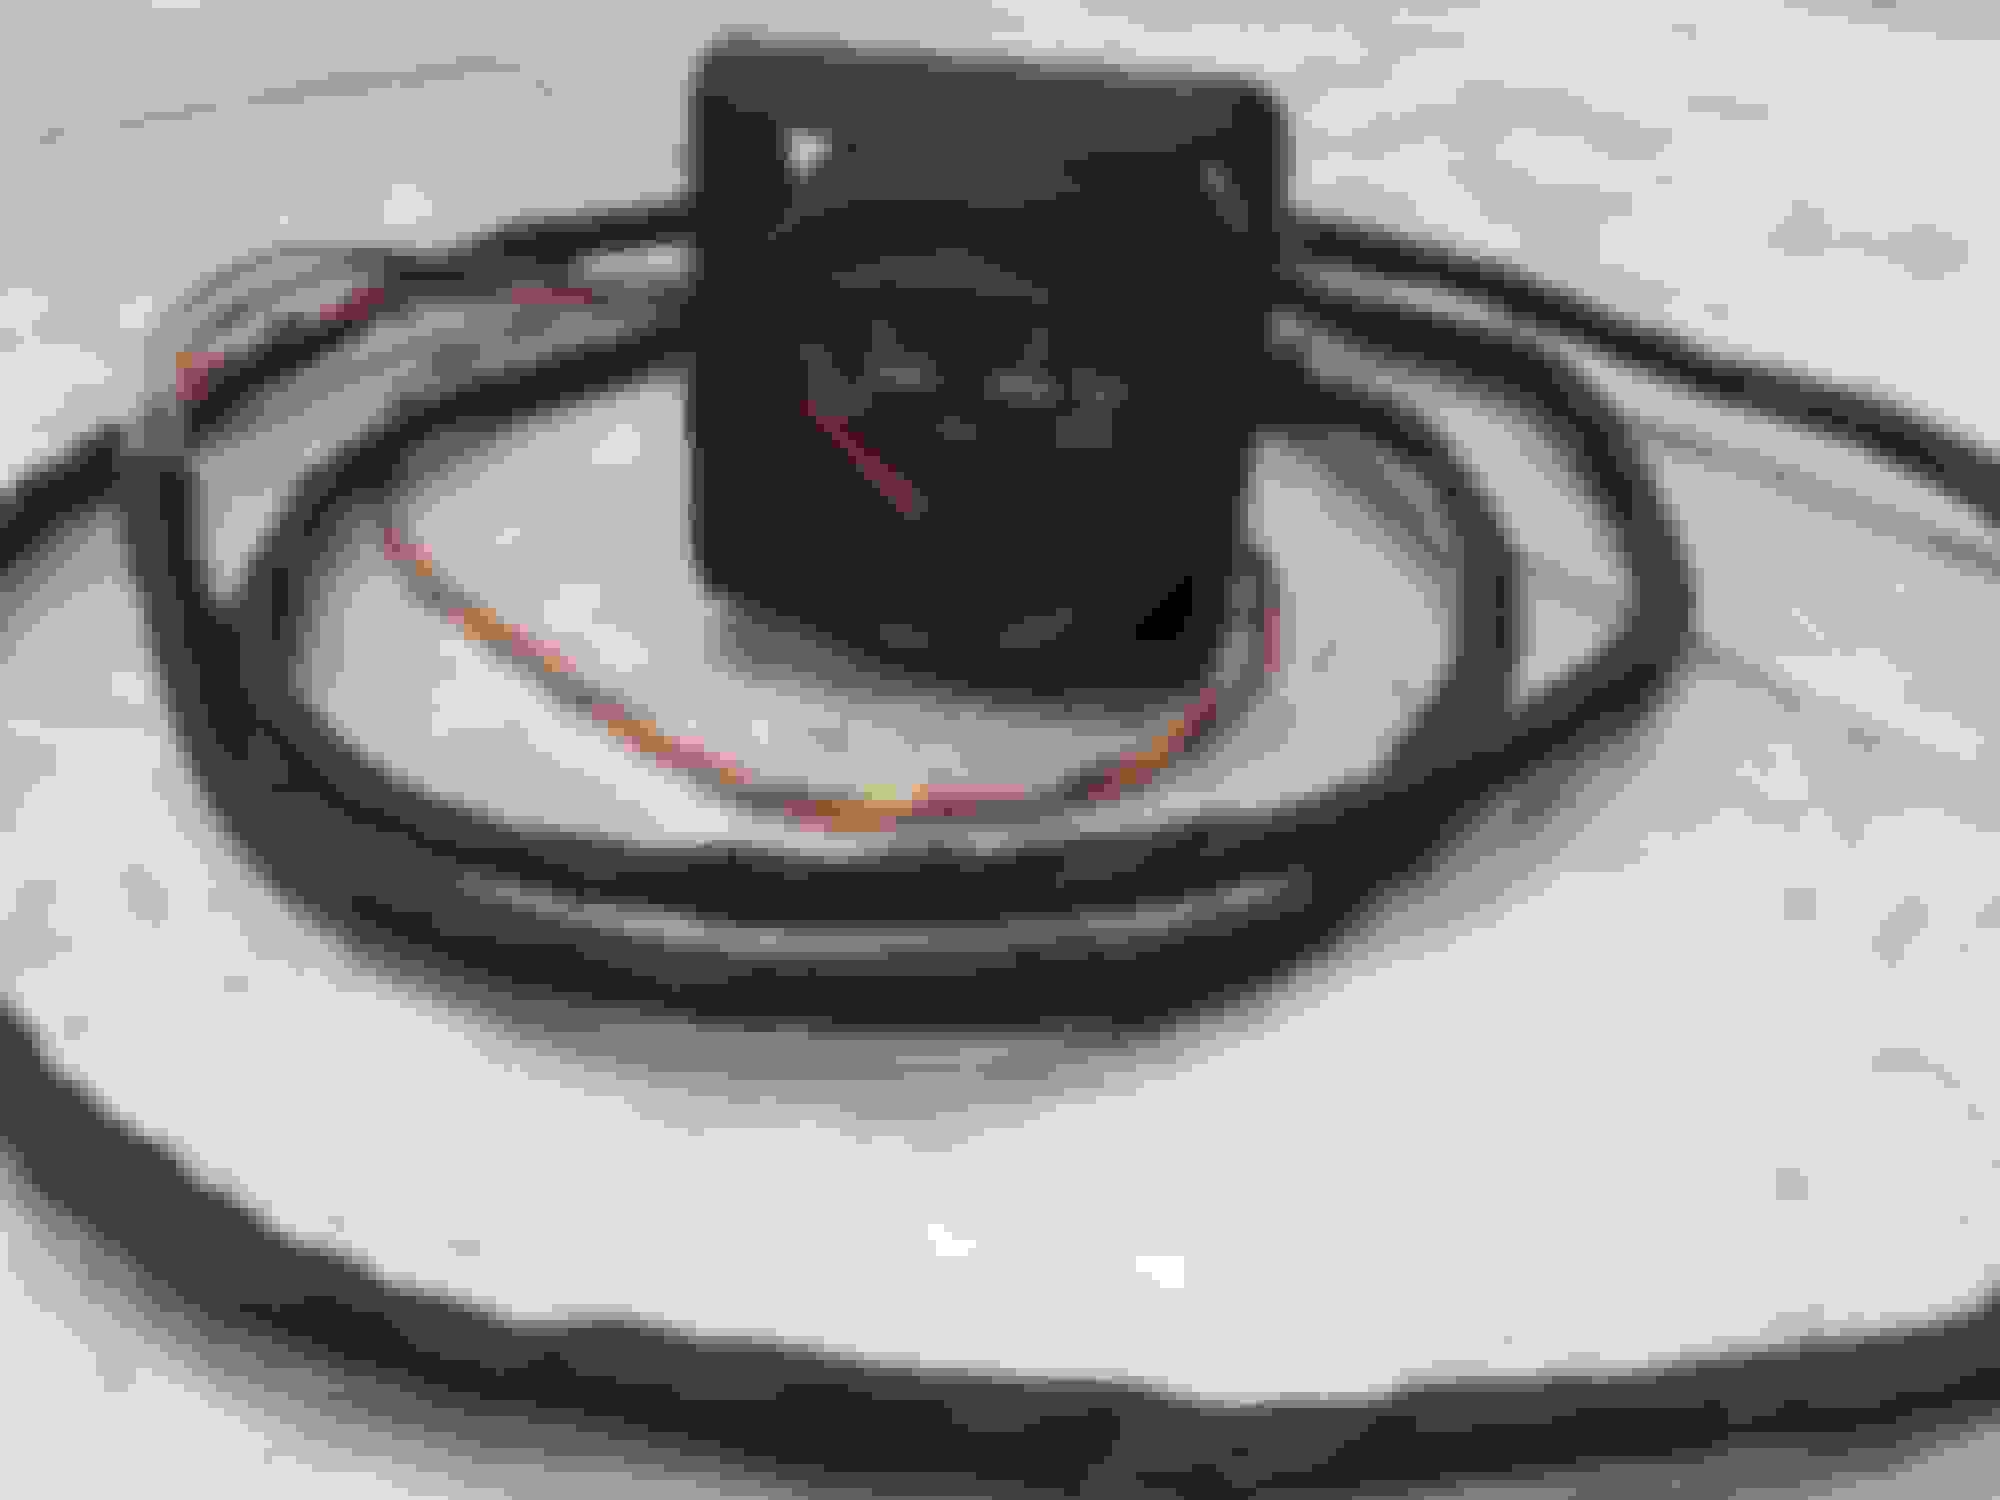
But the rest of the issue has at least partly been due to my 2nd turbo�s intake air control valve actuator not working or holding pressure:
Using a MityVac and following Stu Hagen�s (97supraturbo.com) instructions here I found that actuator was at fault:
Of course you can�t buy just the actuator separately but luckily Toyota still has the whole assembly for sale and so I got one on order to remedy the issue.
For those who don�t know, on the 2JZ-GTE�s sequential twin system only the first turbo has its own fixed wastegate. Turbo #2 uses this part above and other control valves in order to both pre-spool and regulate the boost coming from it and all of those components are operated by the ECU dependent solely on engine RPM.
All my turbo VSVs and hoses are new so that made narrowing down the potential culprit much easier on this very complicated turbo system.
I also replaced the hose on my Wastegate VSV with an even tighter one that I had laying around. I think I will need to use a sample piece of it that I cut off to locate a fuel line grade vacuum hose that has the exact same inner diameter... since that location gets very hot.
I really like the way those gauges look. Did you get the oil plate just to add the sensor for oil pressure or does it have cooling lines as well? I think I missed it but are you running the stock cooler or an external air to oil?
I really like the way those gauges look. Did you get the oil plate just to add the sensor for oil pressure or does it have cooling lines as well? I think I missed it but are you running the stock cooler or an external air to oil?
Thanks! I have been going for an OEM-like or period 90's OEM-like look all along
I bought the Mishimoto oil filter sandwich plate specifically in order to install a 1/8"-27 NPT oil temperature sender. That location is the best place to put it for an accurate reading (the very best place being on the block itself at the OEM oil pressure switch location using a sender/sensor block and adapters... see what Stu Hagen on SF did with this... but that's too involved for me).
You can install an oil pressure sender/sensor on the same sandwich plate as well but I already have my oil pressure sender installed into the OEM IS300 Union Bolt that holds in the oil filter assembly (using a BSPT to 1/8" NPT Earls adapter). For oil pressure you can use either location. For oil temperature it needs to be where oil is flowing by the oil temp sender/sensor all the time and that leaves only the oil filter area and the block's OEM oil pressure switch location for the ECU.
No extra cooling lines for the Mishimoto oil filter sandwich plate. It just extends the oil filter mounting area a bit in order to allow extra sensors/senders to be installed. There are also oil filter relocation plates that have lines running to those and also oil filter sandwich plates that support external oil coolers via lines running to those little radiators but that's not what I'm doing here. That's for dedicated track cars... or monster street SC's (like one of Gerrb's )
I'm not sure what you means by "air to oil". You mean an external oil cooler-radiator? No, I'm not doing that.
My engine is using an OEM 2JZGTE oil cooler which circulates coolant through the metal of that housing to reduce oil temperatures.
Alternatively if you were referring to the intercooler I am running stock 2JZ-GTE hoses and stock routing to a 91-95 Soarer 1JZ side mount which I had re-cored for better flow of around 400cfm (estimated) by Bell Intercoolers (Texas). That SMIC has metal end tanks from the factory which makes it very rebuildable. It out-flows a brand new (if you could get them brand new any longer) Supra TT SMIC by nearly 100cfm. I slightly modified a 96-00 JDM Soarer 1JZ VVT-i intercooler shroud to fit it and my 97-00 front bumper. For big power builds it wouldn't be adequate but for my mild power level it's well more than enough with modern intercooler core technology. And my radiator has no obstruction in front of it.
(For anyone curious about the emissions passibility of this side mount intercooler versus a front mount, this is one of the very few aspects of my build where I could have gone either way for California BAR compliance. I just wanted to use the efficient <for lower power levels with stock twin turbos> factory side mount configuration and the Soarer SMIC intercoolers just fit the SC chassis perfectly and also connect to the stock MKIV TT intercooler piping perfectly so long as you use an OEM Soarer plastic under-radiator intercooler pipe).
I love the side mount Intercooler you went with. I would have gone the same route if my parts car hadn�t come with a front mount already. Thankfully it tucks in nicely behind the front bumper.
Gauges are very trick, and glad to hear you got the sequential operation figured out! I bet having both turbos sure feels nice.
I love the side mount Intercooler you went with. I would have gone the same route if my parts car hadn’t come with a front mount already. Thankfully it tucks in nicely behind the front bumper.
Gauges are very trick, and glad to hear you got the sequential operation figured out! I bet having both turbos sure feels nice.
Thanks Rudy! For right now the sequential operation is still the same as it was the other day. I've still got the faulty Intake Air Control Valve assembly (for the turbo #2 transition) on order and will install that when it comes in. Thankfully it's on top of the engine and doesn't require all that much to be taken off to replace it!
The OEM side mount intercooler is a good option if you plan to stay in a stock tune or at no more than "BPU" but it depends on the condition of the one you get... unless you get one re-cored or made from scratch using an OEM one as your template (FYI for MKIV owners-- Garage Whifbitz in the UK makes their own all-aluminum SMIC that fits the MKIV just like the original).
I think your car will do very well with the front mount intercooler and that uprated radiator and the high flowing stock mechanical fan. Technically any front mount intercooler is supposed to be some degree of obstruction to your radiator's cooling capability since it's getting the air first. That's one major reason Toyota mounted their dense little IC's off to the side on their GTE cars.
However an auxiliary electric cooling fan may help you out with this also but that's mostly for keeping the A/C condenser cool under the most common operating conditions. Although on very hot summer days an extra cooling fan with a coolant temperature sensor trigger on the controller can only help to keep the engine that much cooler. Front mount intercoolers on SC's and Supras are so common and uprated radiators, the stock mechanical cooling fan and maybe a little helper fan tend to cover all bases. It's pretty rare for someone to keep a stock side mount intercooler regardless of it being stock or re-cored.
I like the gauges too! I've just got to figure out how that Autoextrude vent gauge goes in otherwise I'll have to put a hole saw through the trim panel below it to fit one of them. Still no word back yet from the company or from jimmymac30 on that.
I completed the VDO electric oil temperature gauge harness (minus end connectors) and mini voltmeter harness.
For this I used generic store bought spade connectors and heat shrink tuning over a few OEM wires of different gauges cannibalized from a junk spare SC300 engine wiring harness.
The wrapping is Tesa #51036 automotive wiring loom tape. It has better �give� built into its fabric than standard electrical tape will give you which should make routing it through the dash that much easier.
Next I�ll have to redo the connector arrangement coming off my main engine bay accessory wire loom (this is separate from the main engine harness in my car) and signal big connector (currently a Weatherpak connector running several additional accessory function wires).
It will also clean up my OK wiring job from a couple of years back and get it neat and clean like an OEM harness.
For that I�ll be using a Delphi GT-280 8-Pin automotive style connector with weather sealing gaskets to replace the WeatherPak 6-Pin weather sealed flat connector.

 12-22-19, 03:05 AM
 If you do plan to get an R154 Tripod for your E46 convertible 2JZGTE project I think you might like this particular clutch (600-620 ft-lbs of torque power holding according to OS Giken and of course they have clutches rated for much higher torque in twins and triples).


 Looks like I'll just reuse it and secure it with zip ties for now.


 )
)