
LS460 New owner, intro and build thread
 09-17-20, 06:27 AM
#31

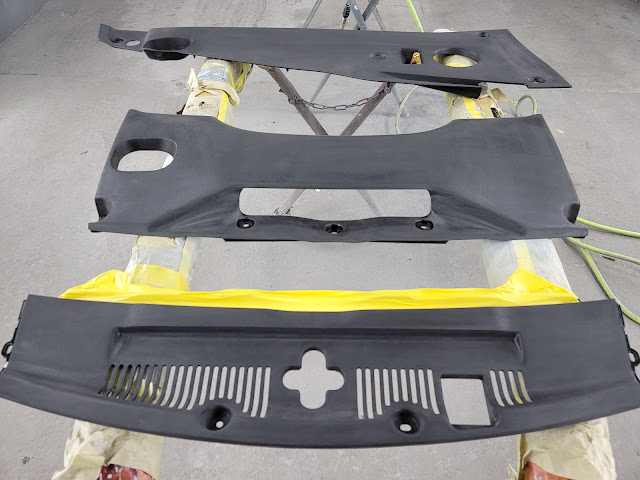
With all the plastics in the engine bay I wanted to add a personal touch to the engine bay. All the black side and front pieces are very grainy and I wanted a glossy finish to them. Every single pieces was sanded starting at 180 grit and made my way up to 400 grit incrementally. A thorough cleaning of the parts followed ensuring all wax, residues etc are stripped. Prep is key to good adhesion and the outcome of the paint job.
Pictures after the pieces were sanded and prepped.

To prime the parts I used SEM High-Build Primer Surfacer. This is a flexible acrylic coating for priming steel, aluminum, urethane, fiberglass and plastics. It features superior adhesion and filling properties. When you are shooting this you can almost see strings of glue flying out. Product is awesome, it says it is easy to sand which to me was far from the truth!! WOW! What a pain in the ***. I don't know if I was doing something wrong but it just wouldn't sand after the first 5 minutes of sanding. It would just clog the paper up and seems like the surface hardens and does not want to sand. Everything else about this was awesome, very flexible and fills in because it is a high build primer.
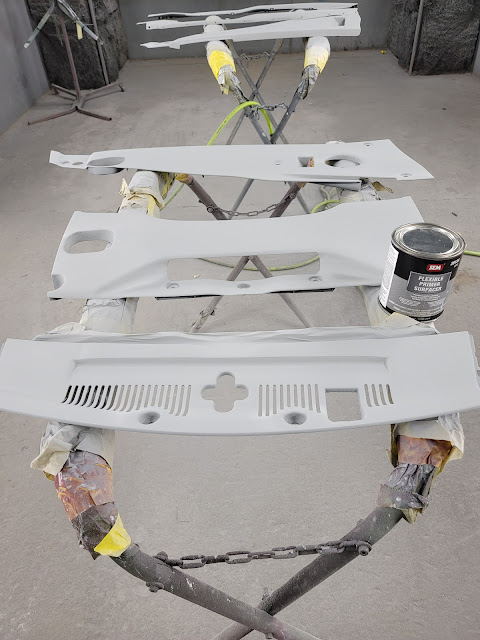

After an hour of trying to sand it with a block and 360 grit sand paper, I was getting no where. What I ended up doing was using 180 grit sand paper on a DA and using that to flatten everything smooth. My thought process was to sand it with 180 grit and put a nice smooth thin coat of regular primer on top. Below are pics of what the panels looked like after 180 grit and prepped again for a coat of primer.
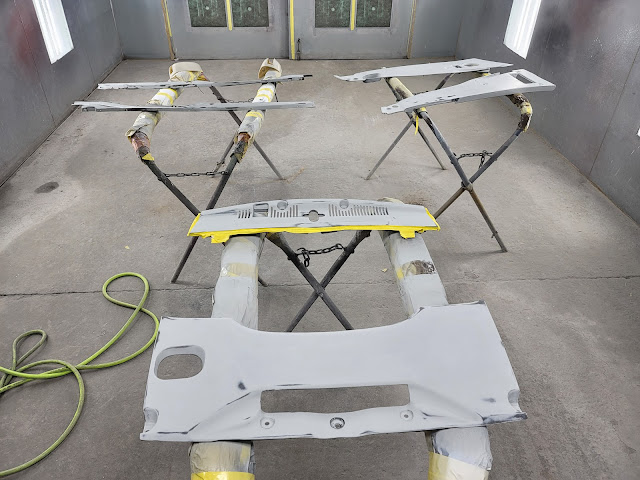
Smooth and flat and after a coat of primer!!


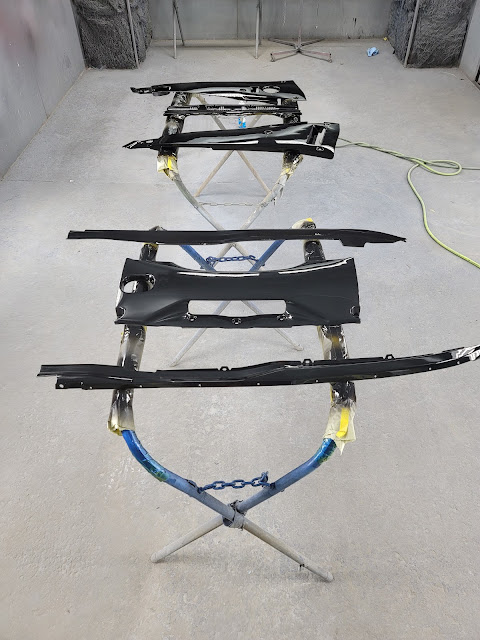
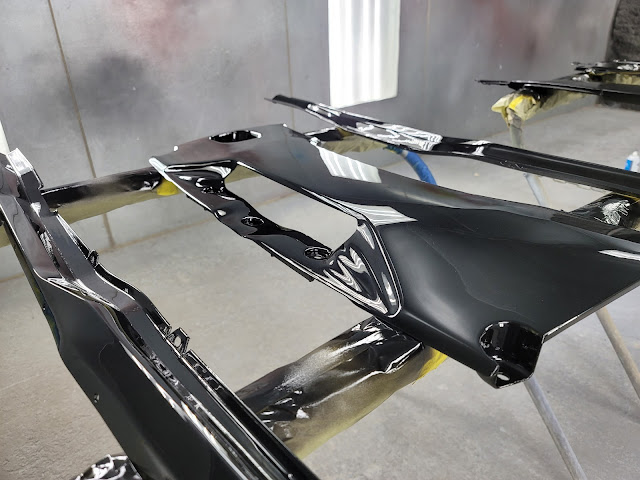
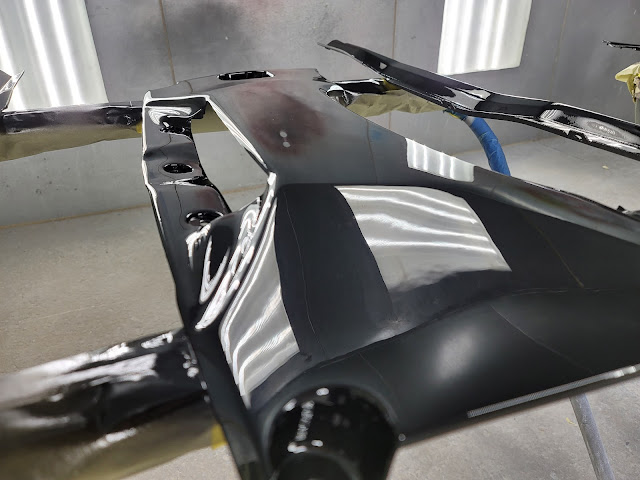
A quick wet sand and Jeremy laid some paint on it. I picked a Toyota color called Attitude Black, it is black but has a slight green, blue and purple pearls in it and it is very subtle, the light has to be hitting it at the right angle to actually see the effect. After the base coat, Jeremy used some 600 grit to level off a couple of areas that weren't as smooth, dusted more color on till everything looked smooth and level.
Panels after base coat.


Panels after clear.

At night with the panels on.

You can see the effect when light hits it.

Mostly looks black otherwise.

Engine cover the silver looked a little bland so another Toyota color just to change things up a little.


Some of that pearl popping in the sun.

Pretty happy with how things look for now.
Full write up and larger pictures: Flawless Fitment
Pictures after the pieces were sanded and prepped.
To prime the parts I used SEM High-Build Primer Surfacer. This is a flexible acrylic coating for priming steel, aluminum, urethane, fiberglass and plastics. It features superior adhesion and filling properties. When you are shooting this you can almost see strings of glue flying out. Product is awesome, it says it is easy to sand which to me was far from the truth!! WOW! What a pain in the ***. I don't know if I was doing something wrong but it just wouldn't sand after the first 5 minutes of sanding. It would just clog the paper up and seems like the surface hardens and does not want to sand. Everything else about this was awesome, very flexible and fills in because it is a high build primer.
After an hour of trying to sand it with a block and 360 grit sand paper, I was getting no where. What I ended up doing was using 180 grit sand paper on a DA and using that to flatten everything smooth. My thought process was to sand it with 180 grit and put a nice smooth thin coat of regular primer on top. Below are pics of what the panels looked like after 180 grit and prepped again for a coat of primer.
Smooth and flat and after a coat of primer!!
A quick wet sand and Jeremy laid some paint on it. I picked a Toyota color called Attitude Black, it is black but has a slight green, blue and purple pearls in it and it is very subtle, the light has to be hitting it at the right angle to actually see the effect. After the base coat, Jeremy used some 600 grit to level off a couple of areas that weren't as smooth, dusted more color on till everything looked smooth and level.
Panels after base coat.
Panels after clear.
At night with the panels on.
You can see the effect when light hits it.
Mostly looks black otherwise.
Engine cover the silver looked a little bland so another Toyota color just to change things up a little.
Some of that pearl popping in the sun.
Pretty happy with how things look for now.
Full write up and larger pictures: Flawless Fitment
Last edited by kuWuPt; 09-17-20 at 06:33 AM.
 09-17-20, 09:47 AM
#32
Lexus Fanatic
I�ve thought about doing that too, that looks great!
09-17-20, 06:37 PM
#33
Damn i wish there was a love tab!
10-18-20, 04:31 AM
#35
Pit Crew

@kuWuPt
First of all WOW!! Absolutely incredible work and as someone mentioned above I admire and can appreciate your attention to detail and how much work you're willing to put in to bringing your creativity to life no matter how "small" said details may be overall. I have a 2011 AWD with Radar Cruise and one thing that's driven me absolutely crazy since day one is how cloudy the front grille emblem is and the small pucks in it. (Mine unfortunately also had a small crack in it as well so I'll be replacing it completely to start) but was hoping you've had time to use your RC since you took the emblems finish down and recoated it - just wanted to make sure you haven't experienced any issues with the functionality at all? I was considering applying a protective clear to the new one when it arrives and would of course attempt to remove as close to what I replace as you did. Thanks!
First of all WOW!! Absolutely incredible work and as someone mentioned above I admire and can appreciate your attention to detail and how much work you're willing to put in to bringing your creativity to life no matter how "small" said details may be overall. I have a 2011 AWD with Radar Cruise and one thing that's driven me absolutely crazy since day one is how cloudy the front grille emblem is and the small pucks in it. (Mine unfortunately also had a small crack in it as well so I'll be replacing it completely to start) but was hoping you've had time to use your RC since you took the emblems finish down and recoated it - just wanted to make sure you haven't experienced any issues with the functionality at all? I was considering applying a protective clear to the new one when it arrives and would of course attempt to remove as close to what I replace as you did. Thanks!
10-18-20, 06:19 AM
#36
@kuWuPt
First of all WOW!! Absolutely incredible work and as someone mentioned above I admire and can appreciate your attention to detail and how much work you're willing to put in to bringing your creativity to life no matter how "small" said details may be overall. I have a 2011 AWD with Radar Cruise and one thing that's driven me absolutely crazy since day one is how cloudy the front grille emblem is and the small pucks in it. (Mine unfortunately also had a small crack in it as well so I'll be replacing it completely to start) but was hoping you've had time to use your RC since you took the emblems finish down and recoated it - just wanted to make sure you haven't experienced any issues with the functionality at all? I was considering applying a protective clear to the new one when it arrives and would of course attempt to remove as close to what I replace as you did. Thanks!
First of all WOW!! Absolutely incredible work and as someone mentioned above I admire and can appreciate your attention to detail and how much work you're willing to put in to bringing your creativity to life no matter how "small" said details may be overall. I have a 2011 AWD with Radar Cruise and one thing that's driven me absolutely crazy since day one is how cloudy the front grille emblem is and the small pucks in it. (Mine unfortunately also had a small crack in it as well so I'll be replacing it completely to start) but was hoping you've had time to use your RC since you took the emblems finish down and recoated it - just wanted to make sure you haven't experienced any issues with the functionality at all? I was considering applying a protective clear to the new one when it arrives and would of course attempt to remove as close to what I replace as you did. Thanks!
10-18-20, 03:35 PM
#37
Pit Crew
Awesome I'll give it a go. Thanks for your help and I hope you continue to enjoy that beauty!
Thanks man, appreciate it. Not had any issues with radar cruise after recoating. I think there shouldn't be a problem if some PPF was used on the emblem. I would do it on mine but the hassle if the clear coat peals off if it doesn't work out deters me from doing it. On a new emblem you don't run the risk of anything pealing off so I would try it on a new emblem.
11-19-20, 07:40 AM
#38
Driver School Candidate

A Very Happy Lexus Owner:
I have been looking for a well-maintained 2011 Lexus LS460 AWD (wanted one before the latest grille shape that I am not a fan of) and I hit the jackpot, I believe. I bought the Lexus from a non-Lexus Toyota dealership and it is an established and respected high-end name dealership. I love the color too as it is my wife's favorite automobile color - mercury metallic.
I was able to find and buy a SUPER well-maintained Lexus LS460 AWD where the owner took the car to Lexus dealership for service every 5,000 miles throughout the 130,000 miles and then it was taken by the dealer to the nearby Lexus dealer by the non-Lexus dealer that I bought it from for the last oil change at 134,000 miles. The owner had to be fanatic about service because he/she took the car on the mileage dot of the Lexus dealer service so if the service was at 75,000 miles, he/she took it at 75,001 miles (give or take 5 - 10 mile spread) throughout the car's service history.
I got a great deal because the interior door panels were cracked and it was not selling on the dealer lot. I overlooked it and bought it anyway.
After I bought the car, I started researching to learn more about the car and how I could fix the front door driver door panel or repair it at least and found about the Lexus campaign to replace the door trims. But alas, everyone reported that it was taking Lexus anywhere from 6 months to a year to get those parts in and the warranty enhancement is only good till March 2021 and I would surely miss it.
Not losing hope - I thought how was it possible that the previous owner spend thousands of dollars at the Lexus service and not bring up the cracking of door panel and the glove box. I called the nearest Lexus dealer who got the VIN number and told me to bring the car and he would take pictures and then send it to corporate and there would be substantial wait.
So I called the Lexus dealer that the owner had taken it to for its entire life - that dealership is around 80 miles away but I got that dealership information through the vehicle's CarFax (as the non-Lexus dealer where I bought the car gave that information to me and also that info is on drivers.lexus.com) and the service rep recognized the car right away by the VIN number and did say the previous owner pampered the car well. I inquired about the panels and she stated it would take sometime. I asked how come the previous owner had asked for replacement. She put me on hold to talk to the parts and lo behold, she said that not only the parts were here but they were trying to contact the owner (who had sold the car and probably had moved away). We made the next available appointment which was earlier this week.
In less than a week of purchasing of not only an extremely well maintained Lexus by the owner and serviced every 5,000 miles at the Lexus service dealer, I was able to get the door panels and glove box replaced. WOOOHOOO.....
Service Maintenance question beyond 150,000 miles:
I am going to do best to maintain it well at the 140,000 miles (as it recently had oil filter and engine oil replaced), at 145,000 and 150,000 which are minmial service maintenance in terms of oil fiter, engine oil, tire rotations and cabin air filter. However, the manual does not state anything after 150k? For those of you who have maintained the car well above 150k miles, what do you all recommend to follow?
Any words of wisdom:
This is my gasoline car after a very long time. I currently own a Tesla and have owned Nissan Leaf, Chevy Volt and Chevy Spark EV for the last 8 years. I did own a 2001 Lexus LS430 prior to that and it was a nice car. I feel that LS460 is more noisier and requires a substantial acceleration to move as well but that could just be me being spoiled for the last 8 years not to run any car for gasoline mode.
1) Any words of wisdom in maintaining this car in cold weather? I am in Maryland and find that the car has to be started for at least 2-3 minutes on a cold start to give a good driving experience.
2) How often do you all have to replace the tires? New tires were put in the dealer at its 105,000 miles, balanced and it has been rotated on its maintenance schedule. I probably will need all season tires. Anyone has luck with Nexum tires? I do want tires that has the least road noise. I did pump the tires on my Leaf, Volt, Spark EV and especially in Tesla and the tires lasted longer. What is the sweet tire pressure (psi) you found for the Lexus LS460 for both comfort and tires' longevity. Right now, i am running them a tad higher at 36 psi cold.
3) Is there a preference to run the Lexus LS460 at eco mode?. I know there is an option to do but does it really save that much gasoline and take away the driving pleasure and cabin heat and cooling? In my very short analysis of just one week driving, I am getting about 17.8 mpg in the slow traffic region and getting a solid 20 mpg on the 80% highway-20% city traffic region. I am not a fan of putting in fuel additives.
4) Any thing else?
Thank you.
Raza
03-04-22, 01:20 PM
#39
I've been putting a transmission off for a long time almost a year really. I kept using the minimal miles I put on it as an excuse. Well a couple of days ago I felt a slight shudder between 1300 and 1500 rpm. Well needless to say that gave me enough motivation to do a flush.
I have a binder full of maintenance records for the car which was completely serviced at Lexus by the previous owner and there were no mention of anything to do with transmission fluids. This would mean at just over 170k miles the fluid is still the original fluid.
I've been prepping for this, these are the parts I had ordered:
- Amsoil Signature Series Automatic Transmission Fluid (ATL) 16qt x 17.5
- Seafoam TT16 - transmission
- Toyota Transmission Filter - 35330-50030
- Transmission Pan Gasket - 35168-50010
- Transmission filter O'ring - 90301-31014My process in the past has been:
- Drain transmission pan
- Drop transmission pan
- Remove filter
- Clean transmission pan
- Refill the transmission with the fluid that was drained.
- Flush fluid
For the fluid flush in the past I had access to a fluid flush machine but now I don't. If I disconnect the transmission return line from the radiator and switch the car on it would start circulating the ATF and start dumping fluid out of the line. I just needed something to pump fluid back in. This is where I found an oil change pump extractor. My thought process was that I can just put all the new ATF in a container, drop a hose into it and connect that to the suction side of the pump and then connect the the dispensing side of the pump to a hose which would connect to the transmission return line. I would also connect the return line from the transmission cooler into another container to collect the old fluid that was being pumped out. I connected the pump to test it out and it moved the ATF pretty quickly. Just wasn't sure if it would match the speed at which the old ATF was coming out. I obviously did not want the transmission to run dry I figured the thresh hold I did not want to go under was 80% fill rate. Which means if 1qt is dumped out I do not want to be below 0.8qts being filled at the same time. I figured the transmission is not under any load so 80% would be safe.
For my setup I ended up with a chemical resistant 5 gallon garden sprayer that I modified slightly to accommodate for the connectivity of the hoses to the electric pump. To catch the fluid that was being dumped out I ended up using a 5 gallon water dispenser container. I marked both containers to show quart levels to see how close the rates of dispensing to fill were.
This was how I planned and finally did connect everything. Excuse the rough sketch up.

Enough of theory, onto the process. I clearly didn't have much time to document everything but stuck to my tried and true method previously outlined. Not going into detail about this because it is well documented.
I made sure I had no issues taking the fill bolt out, please do this first. If you cannot fill through this method you would have to pump 4qts of fluid using the electric pump as outlined above without the car being turned on so it doesn't dump fluid out. Taking the fill bolt out should not be an issue, if it is I suspect you have bigger issues that might need to be addressed.
Drained the fluid from the pan and then undid all the screws for the pan except for two towards the front of the car. There is still oil in the pan so if you just pry it off you are going to have a huge mess (my past mistake). Pry the pan side towards the back of the car and slowly detach it from the transmission but still hold onto that side with your hand so it doesn't fall. once you slowly pry the pan off the proceeded to now loosen the two screws that weren't fully undone. Slowly tilt the pan and the fluid in the pan will start draining. I collected all this in a container and there was very minimal fluid loss on the ground. Don't put away that catch container yet, still have to remove the filter. There is a gush of fluid that will come out when you drop the filter (past mistake again). I had just about 4 quarts collected.
 Before I put in the new filter I sprayed down everything with seafoam transmission cleaner. There was almost a thin film that almost looked like soot and the seafoam cleaned all that right off. Make sure the old o-ring from the old filter is out. Also make sure there is a new o-ring on the new filter. The filter does not come with the o-ring and will have to be ordered separately.

Once all that is done and the pan and magnets are cleaned put everything back. Torque for the transmission pan bolts are 9ft./lbs. I filled 4 quarts of Valvoline Maxlife ATF to fill the transmission up with ATF that was drained. I used Valvoline because it was cheaper than Amsoil ATF. This was getting drained out anyway but just wanted something to crank the car up bring it to temperature and shift through all the gears safely. The transmission holds 12qts in total and 4 being drained out and refilled will also give it a higher percentage of fresh fluid in the transmission, ,my thoughts on it anyway.
With the transmission filled, cranked the car up and slowly shifted through the gears. Turned the car off and then connected the hoses as outlined above. A friend of mine was doing most of the grunt work really so he was under the car while I turned it off and on etc. (thanks Matt). With everything hooked up turned the car on again and started the electric pump almost immediately. The fill rate was almost equivalent to the dispensing rate so we just ran the car and the pump till we saw clean red fluid coming out. This was around the 10 quart mark, proceeded to flush another quart through to be safe and then turned the car off. After the car was off we pumped in another quart of fluid so there is more than enough in the transmission. We are going to drain the excess after the transmission fluid reaches temperature. Hooked up the OBD2 scanner to show live data and then cranked up the car again after everything was buttoned up. To properly check fluid the transmission fluid should be between 95 and 108 degrees Celsius. Crank the car up and shift through the gears slowly. Once the temperature reached about 105 degrees Celsius in my case I pulled the fill level plug. Once the stream of ATF slows down to almost a gurgle put the plug back in and button everything up. You are done at this point.
Just some pictures of my contraption.


 I bear no responsibility for anything going wrong here guys.. do so at your own risk. This is just a guide to what I did.
-AJ Abraham
Follow me on Instagram:
@flawless_fitment
@aj_ls460
@aj_lx470
@aj_sc430
I have a binder full of maintenance records for the car which was completely serviced at Lexus by the previous owner and there were no mention of anything to do with transmission fluids. This would mean at just over 170k miles the fluid is still the original fluid.
I've been prepping for this, these are the parts I had ordered:
- Amsoil Signature Series Automatic Transmission Fluid (ATL) 16qt x 17.5
- Seafoam TT16 - transmission
- Toyota Transmission Filter - 35330-50030
- Transmission Pan Gasket - 35168-50010
- Transmission filter O'ring - 90301-31014My process in the past has been:
- Drain transmission pan
- Drop transmission pan
- Remove filter
- Clean transmission pan
- Refill the transmission with the fluid that was drained.
- Flush fluid
For the fluid flush in the past I had access to a fluid flush machine but now I don't. If I disconnect the transmission return line from the radiator and switch the car on it would start circulating the ATF and start dumping fluid out of the line. I just needed something to pump fluid back in. This is where I found an oil change pump extractor. My thought process was that I can just put all the new ATF in a container, drop a hose into it and connect that to the suction side of the pump and then connect the the dispensing side of the pump to a hose which would connect to the transmission return line. I would also connect the return line from the transmission cooler into another container to collect the old fluid that was being pumped out. I connected the pump to test it out and it moved the ATF pretty quickly. Just wasn't sure if it would match the speed at which the old ATF was coming out. I obviously did not want the transmission to run dry I figured the thresh hold I did not want to go under was 80% fill rate. Which means if 1qt is dumped out I do not want to be below 0.8qts being filled at the same time. I figured the transmission is not under any load so 80% would be safe.
For my setup I ended up with a chemical resistant 5 gallon garden sprayer that I modified slightly to accommodate for the connectivity of the hoses to the electric pump. To catch the fluid that was being dumped out I ended up using a 5 gallon water dispenser container. I marked both containers to show quart levels to see how close the rates of dispensing to fill were.
This was how I planned and finally did connect everything. Excuse the rough sketch up.
Enough of theory, onto the process. I clearly didn't have much time to document everything but stuck to my tried and true method previously outlined. Not going into detail about this because it is well documented.
I made sure I had no issues taking the fill bolt out, please do this first. If you cannot fill through this method you would have to pump 4qts of fluid using the electric pump as outlined above without the car being turned on so it doesn't dump fluid out. Taking the fill bolt out should not be an issue, if it is I suspect you have bigger issues that might need to be addressed.
Drained the fluid from the pan and then undid all the screws for the pan except for two towards the front of the car. There is still oil in the pan so if you just pry it off you are going to have a huge mess (my past mistake). Pry the pan side towards the back of the car and slowly detach it from the transmission but still hold onto that side with your hand so it doesn't fall. once you slowly pry the pan off the proceeded to now loosen the two screws that weren't fully undone. Slowly tilt the pan and the fluid in the pan will start draining. I collected all this in a container and there was very minimal fluid loss on the ground. Don't put away that catch container yet, still have to remove the filter. There is a gush of fluid that will come out when you drop the filter (past mistake again). I had just about 4 quarts collected.
Before I put in the new filter I sprayed down everything with seafoam transmission cleaner. There was almost a thin film that almost looked like soot and the seafoam cleaned all that right off. Make sure the old o-ring from the old filter is out. Also make sure there is a new o-ring on the new filter. The filter does not come with the o-ring and will have to be ordered separately.Once all that is done and the pan and magnets are cleaned put everything back. Torque for the transmission pan bolts are 9ft./lbs. I filled 4 quarts of Valvoline Maxlife ATF to fill the transmission up with ATF that was drained. I used Valvoline because it was cheaper than Amsoil ATF. This was getting drained out anyway but just wanted something to crank the car up bring it to temperature and shift through all the gears safely. The transmission holds 12qts in total and 4 being drained out and refilled will also give it a higher percentage of fresh fluid in the transmission, ,my thoughts on it anyway.
With the transmission filled, cranked the car up and slowly shifted through the gears. Turned the car off and then connected the hoses as outlined above. A friend of mine was doing most of the grunt work really so he was under the car while I turned it off and on etc. (thanks Matt). With everything hooked up turned the car on again and started the electric pump almost immediately. The fill rate was almost equivalent to the dispensing rate so we just ran the car and the pump till we saw clean red fluid coming out. This was around the 10 quart mark, proceeded to flush another quart through to be safe and then turned the car off. After the car was off we pumped in another quart of fluid so there is more than enough in the transmission. We are going to drain the excess after the transmission fluid reaches temperature. Hooked up the OBD2 scanner to show live data and then cranked up the car again after everything was buttoned up. To properly check fluid the transmission fluid should be between 95 and 108 degrees Celsius. Crank the car up and shift through the gears slowly. Once the temperature reached about 105 degrees Celsius in my case I pulled the fill level plug. Once the stream of ATF slows down to almost a gurgle put the plug back in and button everything up. You are done at this point.
Just some pictures of my contraption.
I bear no responsibility for anything going wrong here guys.. do so at your own risk. This is just a guide to what I did.-AJ Abraham
Follow me on Instagram:
@flawless_fitment
@aj_ls460
@aj_lx470
@aj_sc430

Thread
Thread Starter
Forum
Replies
Last Post