When you click on links to various merchants on this site and make a purchase, this can result in this site earning a commission. Affiliate programs and affiliations include, but are not limited to, the eBay Partner Network.
Balancing function and form - '01 LS430 UL - NotMill
Decided to start a build thread for my '01 UL. Was already documenting the work done to the car so might as well have it in a place that's visible and helpful to others in the community. Bought my car about a year ago looking for a nice, reliable daily that would fly under the radar nicely. Settled on an '01 UL with 74k on the clock. Paint was (and still is) kinda rough but the rest of the car was mechanically sound.
First things first. Threw a roof rack on, leveled out the stock air suspension with the rods, and threw on new tires. Went from a 6 year old Michelin primacy that had looked like they'd been thru hell and back to some pilot AS3+ which made quite the difference in ride and handling. At this point, I was thinking of just doing a datasystems controller and some wheels, but after taking it on a few weekend trips through the mountains, I realized that it would drive half decent with a few tweaks to the platform and decided to go a slightly different direction.
First big dive into working on the car was the timing belt. Aside from the fact that all the hoses were cemented to their fittings, it went pretty smoothly. For my first go at tearing into the engine on my own without any in-person guidance, I'm surprised that it even started when all the parts had been put back on. New parts quieted down the engine due to a worn serpentine belt and idler bearings. A new thermostat also helped with warm up as the temp gauge on the dash had previously taken forever to get up to temp from cold. 4 days under the car and about 300 bucks in parts for another 100k miles. Not bad I suppose.
Quarantine rolled around and traffic in my area disappeared overnight so took the new wheels to a well known refinishing place a couple of cities over. They came back looking as they would out of the box. Rite way wire and wheel in Walnut Creek for those that are in the area.
Carlsson 1/6 evo II, 19x8.5 +40 on all four corners, wrapped with Pilot 4s' in 245/40/19. Gobs more grip, gobs more road noise. Still plenty comfortable though.
Poly bushings, coilovers, control arms, and various handling improvements in the works. I'll update as those come in and get installed.
Been doing quite a bit of work under the hood these past few days. Finished poly steering rack bushings and brake pads towards the end of last week. Haven't had a whole lot of time on the car since, but doing a little driving around town, it certainly makes a difference. Old brake pads were completely shot. With the new ones in place, I've also realized there aren't any remotely colorful bits on the entire car.
While I was down there, I took a look at the LCA bushings and they're completely shot. Going to order OE parts 48076-24050 and 48075-24080. These are the GS-F/RC-F bushings with additional caster which should help turn-in response a little.
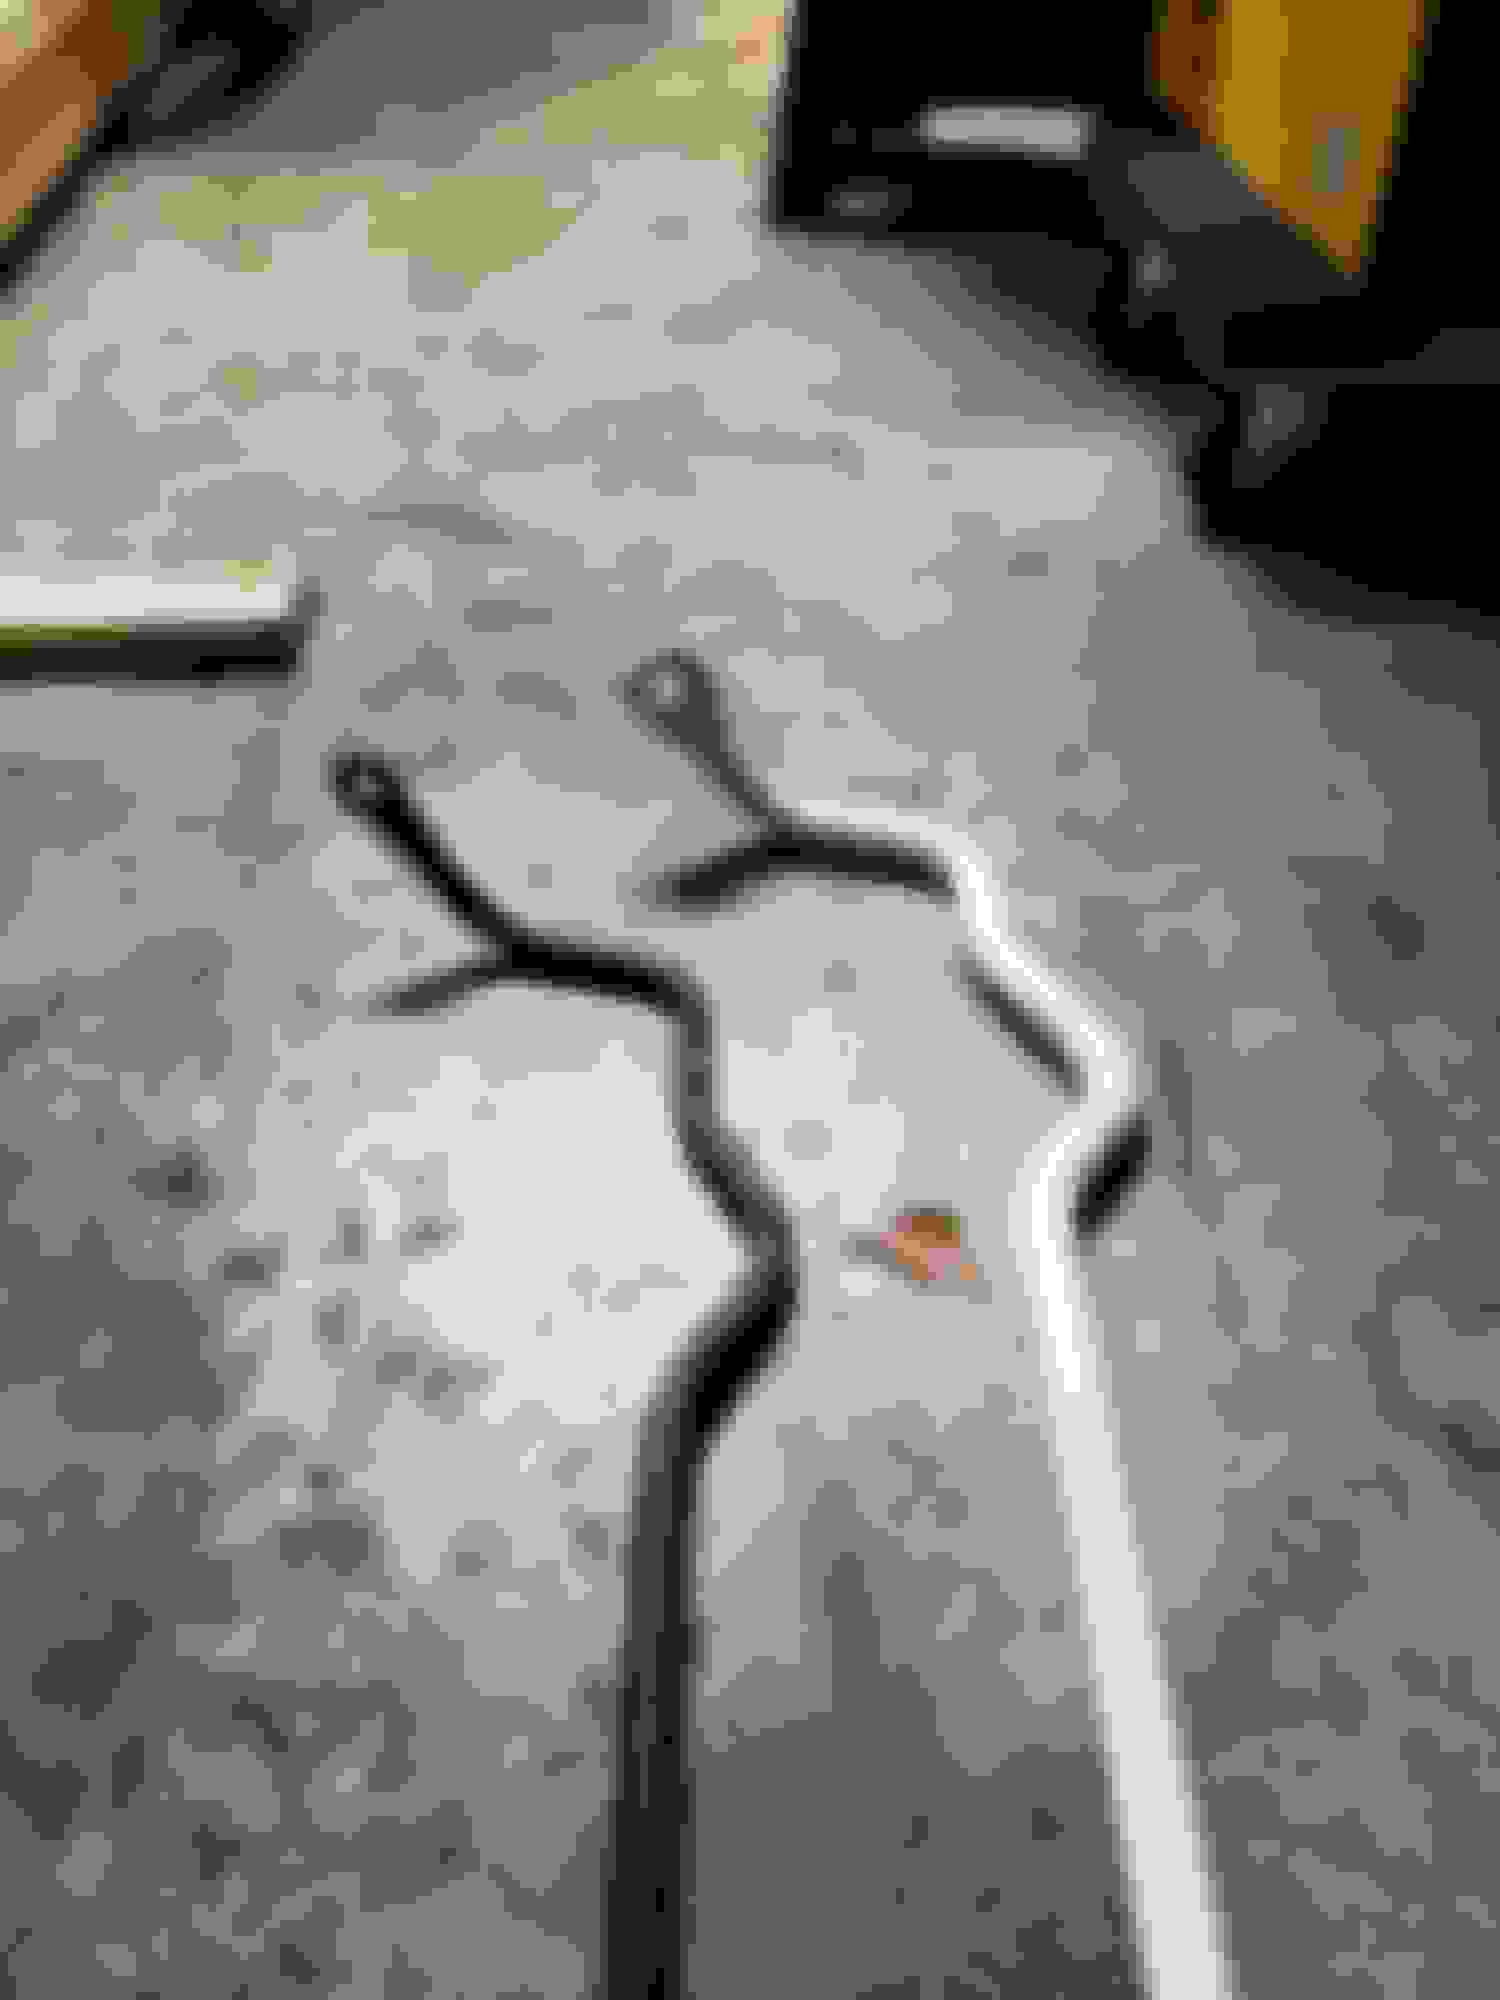
Installed my ultra racing rear anti-roll bar today. The 19mm solid replaces the 13mm stock one that comes with the '01 UL which was about as rigid as a wet noodle. You could basically flex the damn thing with your hand while it was bolted under the car.
Also bedded in the pads today after 50 miles of in-city driving. Saw the edge-to-edge contact on the insides and outsides and decided it was good enough. EBC reccomends 200+ miles but ain't nobody got time for that. Smoked them with a couple of 80-20 stops and drove around for a few minutes to cool them off. From the looks of the rotors, I might give it another go as the material deposit band doesn't go edge-to-edge.
Coupled with the poly steering rack bushings, it's a night and day difference from what I was driving before. If I were going for a build with a big priority on comfort, I think that I would keep the OEM tire/wheel size and toss in the rear sway as well as poly steering rack bushes and stop there.
Nice one, we have very similar cars and very similar priorities, I daily mine also and am trying to find a balance between a nice ride but a bit customised.
I have the exact same comment as you on Michelin Pilot sport 4 tyres, I run 245 18's and they are much noisier than the generic 225's that were on there before but I can hear the gravel and stones being picked up in car parks because they are sticky! next set I will look for something quieter.
I think it's the width that makes these loud, but the tire construction probably also has a role. I still have my stock 17s for the winter when it gets cold. I have the AS3+ in 225/55/17 on those and they're a lot quieter compared to the PS4S. The PS4S is rated down to around 40 degrees Fahrenheit I believe so I'll be swapping them out when winter hits..
The PS4S are pretty damn sticky at normal temp. Once you get them warmed up, they're amazing. Corners like its on rails.
Did another round of brake bed-in and got the band going across most the rotor. Went for a 60 mile drive through some windy roads and was really able to get a feel for the new anti roll bar and brakes. Safe to say that the new anti roll bar and poly steering rack bushings have made a huge difference. Turn-in response is greatly improved and it doesn't feel like it's trying to plow through corners anymore.
New brake pads are also insanely dusty. Pedal feel is improved. The OEM pads felt like you were trying to use wooden blocks in the place of brake pads when they got real hot. These resist that heat fade a lot better. They perform a tad worse from the cold, but with typical in-city driving, they feel about as good as OEM after a couple of lights. For those longer descents through windy roads, they really shine. Monstrous levels of bite and fantastic brake feel once they're really warmed up. Performance doesn't drop off drastically as they get really hot.
Also might've found the culprit of that brake pulsation towards the bottom of descents. Rear rotors expand quite a bit when heated. Looks like the areas that have vanes don't expand as much since they don't have the extra material behind them. Only really a problem when you're going ham on the brakes though. Once they cool down, the pulsation goes away.
Where did you procure the UR rear bar from? Checked a few places, but finding difficulty tracking it down.
Grabbed it from ebay from a seller in MY where they're made. Shipping was really quick through aramex/ups. Took exactly a week to show up at my doorstep.
Any advice/DIY on installing the poly steering rack bushings and UR rear bar? Didn't find much info on installing them, but I'm planning on ordering them. I installed the GS-F/RC-F bushings and there's a noticeable difference in steering, but slightly less comfortable. Great build so far!
Any advice/DIY on installing the poly steering rack bushings and UR rear bar? Didn't find much info on installing them, but I'm planning on ordering them. I installed the GS-F/RC-F bushings and there's a noticeable difference in steering, but slightly less comfortable. Great build so far!
The steering rack bushing was pretty straightforward. Roll the cars onto ramps, unbolt the steering rack, and pull the old rubber bushings out. The most difficult part is probably removing the old bushings. I took a pipe wrench (channel lock, knipex cobra, etc) and pulled on the steel flanges for the front ones, then took a socket and hammered the rear ones out. The driver's side rear bushing does get stuck between the subframe and the rack since you have limited range of motion as the rack is connected to the steering column. The trick is to turn the steering wheel a bit while the rack is unbolted which should give for a little more clearance. When installing the new one, grease everything liberally. When installing, the bushing will be difficult to press in due to limited clearance. Push both the front and back pair in as far as they'll go, then, using the stud with the fixing nut screwed on, feed and install it into the front subframe. This should act as a press of sorts. once both the bushings are seated, back the fixing nut off and reinstall as usual, bottoming out the stud and then tightening the fixing nut.
UR bar is a super quick and easy job. Jack the car up by the rear diff, remove both wheels, remove the brackets and the endlinks. Reinstall. Took me about 45 minutes. So far the best $300/45 mins I've spent on this car.
For the GSF/RCF LCA bushings, did you order the ones with zero offset? I'm curious as to if it's the stiffer compound, or the added caster from the offset that helps improve steering feel. I'm now thinking that the slightly softer IS-F bushings with offset for additional caster may also be a good option to minimize additional NVH when coming from the stock unit.
Went for a drive yesterday to play around with tire pressures. Settled on 35psi front and 38psi rear for the time being. Makes quite a difference from the 34psi all around I was using before.
Thanks for the info! That was very helpful.
I ordered the following part numbers for the LCA bushings: 48075-24010 and 48076-24010. I got them both for around $123 I believe. I'm not really sure about the offset, but I know these have stiffer rubber. My OEM bushings were cracked like yours as well. I had these bushings installed on my IS350 and they made a difference too, but I mainly installed them to solve inner tire wear and unstable steering. My first impressions on the LS430 are heavier steering, but slight increase in NVH (nothing excessive though). I think I can hear more rattles in the cabin after install, so it may be a good idea to try the IS-F bushings, but I personally have not tried them. Overall it was worth it to install, the steering is definitely better. Also, I had to use a pry bar to get the bushings bolts to align up. I might try that tire pressure as well, I'm currently at 35psi all around with stock 17" OEM.
Last edited by marsmango; 07-15-20 at 01:20 PM.
Reason: added additional info
I ordered the following part numbers for the LCA bushings: 48075-24010 and 48076-24010. I got them both for around $123 I believe. I'm not really sure about the offset, but I know these have stiffer rubber. My OEM bushings were cracked like yours as well. I had these bushings installed on my IS350 and they made a difference too, but I mainly installed them to solve inner tire wear and unstable steering. My first impressions on the LS430 are heavier steering, but slight increase in NVH (nothing excessive though). I think I can hear more rattles in the cabin after install, so it may be a good idea to try the IS-F bushings, but I personally have not tried them. Overall it was worth it to install, the steering is definitely better. Also, I had to use a pry bar to get the bushings bolts to align up. I might try that tire pressure as well, I'm currently at 35psi all around with stock 17" OEM.
Hm, those look like the zero offset bushings for GS-F/RC-F. The observation on heavier steering is interesting. I've ordered the IS-F bushings; P/N 48075-53020 and 48076-53020. Will report back once they're installed.
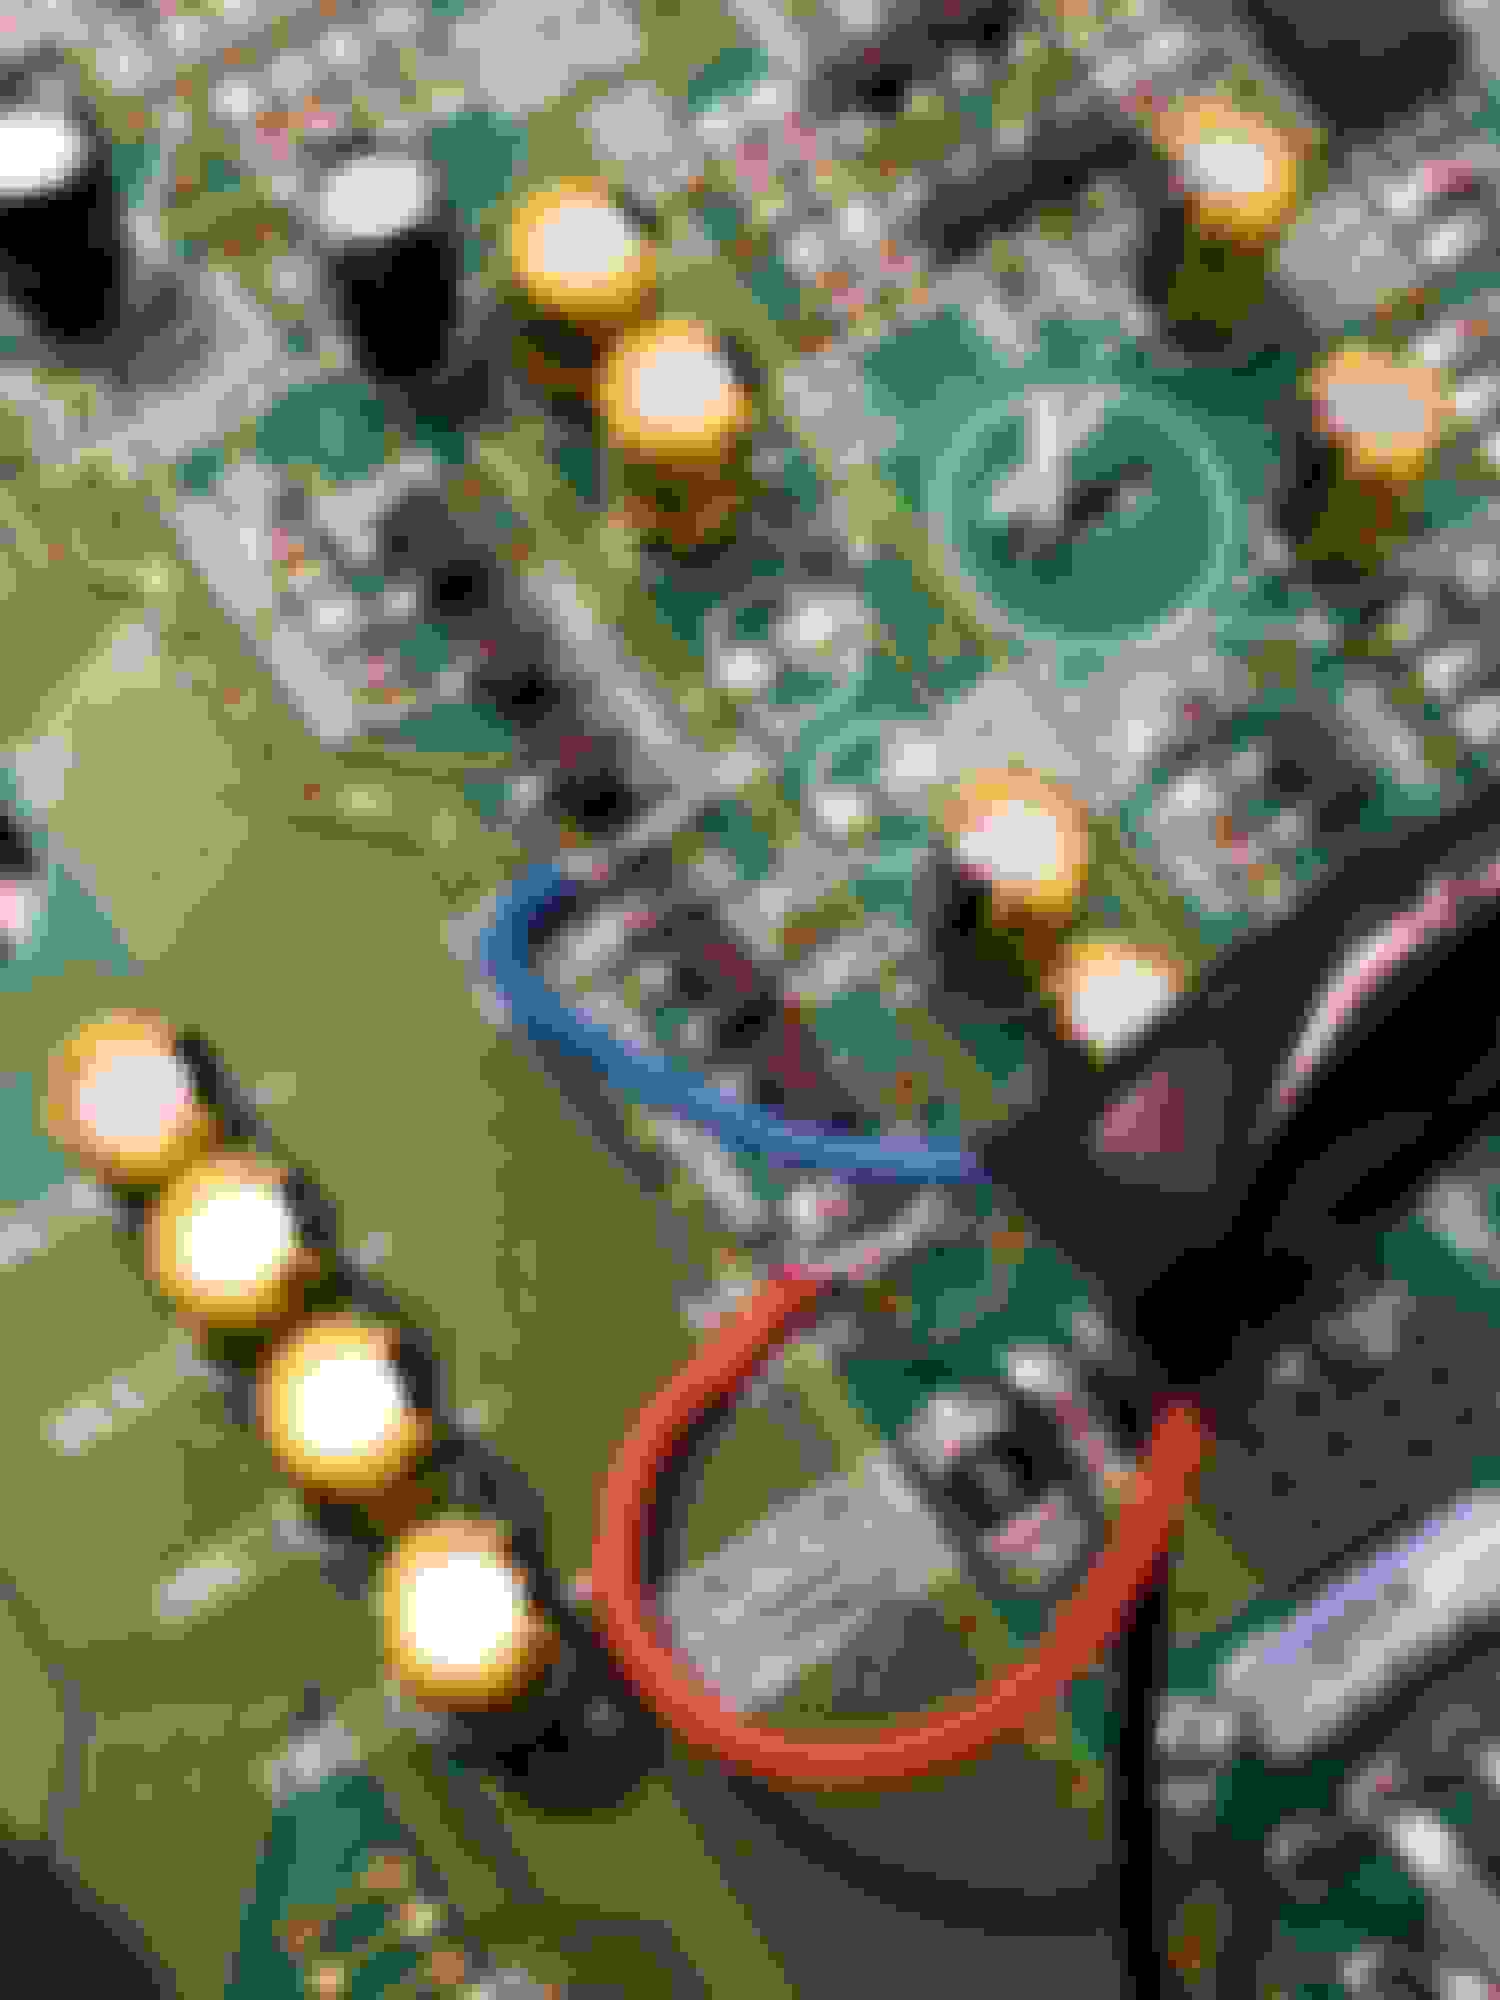
Replaced my abomination of an aux cord job today. I wired this thing up earlier last year and used a really cheap 3.5mm female socket which would cut out all the time as the contacts were really cheap. On top of that, I had wired it into the tape deck control board which had some hiss and noise since it was a real sloppy job. Was going to fix it at first by resoldering the connections and finding a better point to tap into the line and came across someone's blog from Korea when I punched in some info stamped onto the main DAC board. Linked below. Pretty much saved me a ton of time I would've spent poking around with a multimeter. Uploading the schematic in case the blog post gets lost. https://poplinux.tistory.com/m/185?category=359767
Looked like this before. Sloppy job. Used some random wire that was lying around and tapped into the tape recorder controller board. Followed the speedkar99 youtube tutorial. Good tutorial, poor execution on my part.
Grabbed some proper quad cable that I was using for an audio project so I wouldn't have to sleeve individual wires together. Didn't want to skimp this time around.
Per the blog that I pulled up, I pulled the resistors off the board and tapped in there. You'll want to connect your wire to both pads for each side to retain functionality of the tape player. Routed the cable out the back of the head unit and down to a quick disconnect. Soldered the ground wire to one of the bits of the steel frame that was holding the PCB to the head unit assembly.
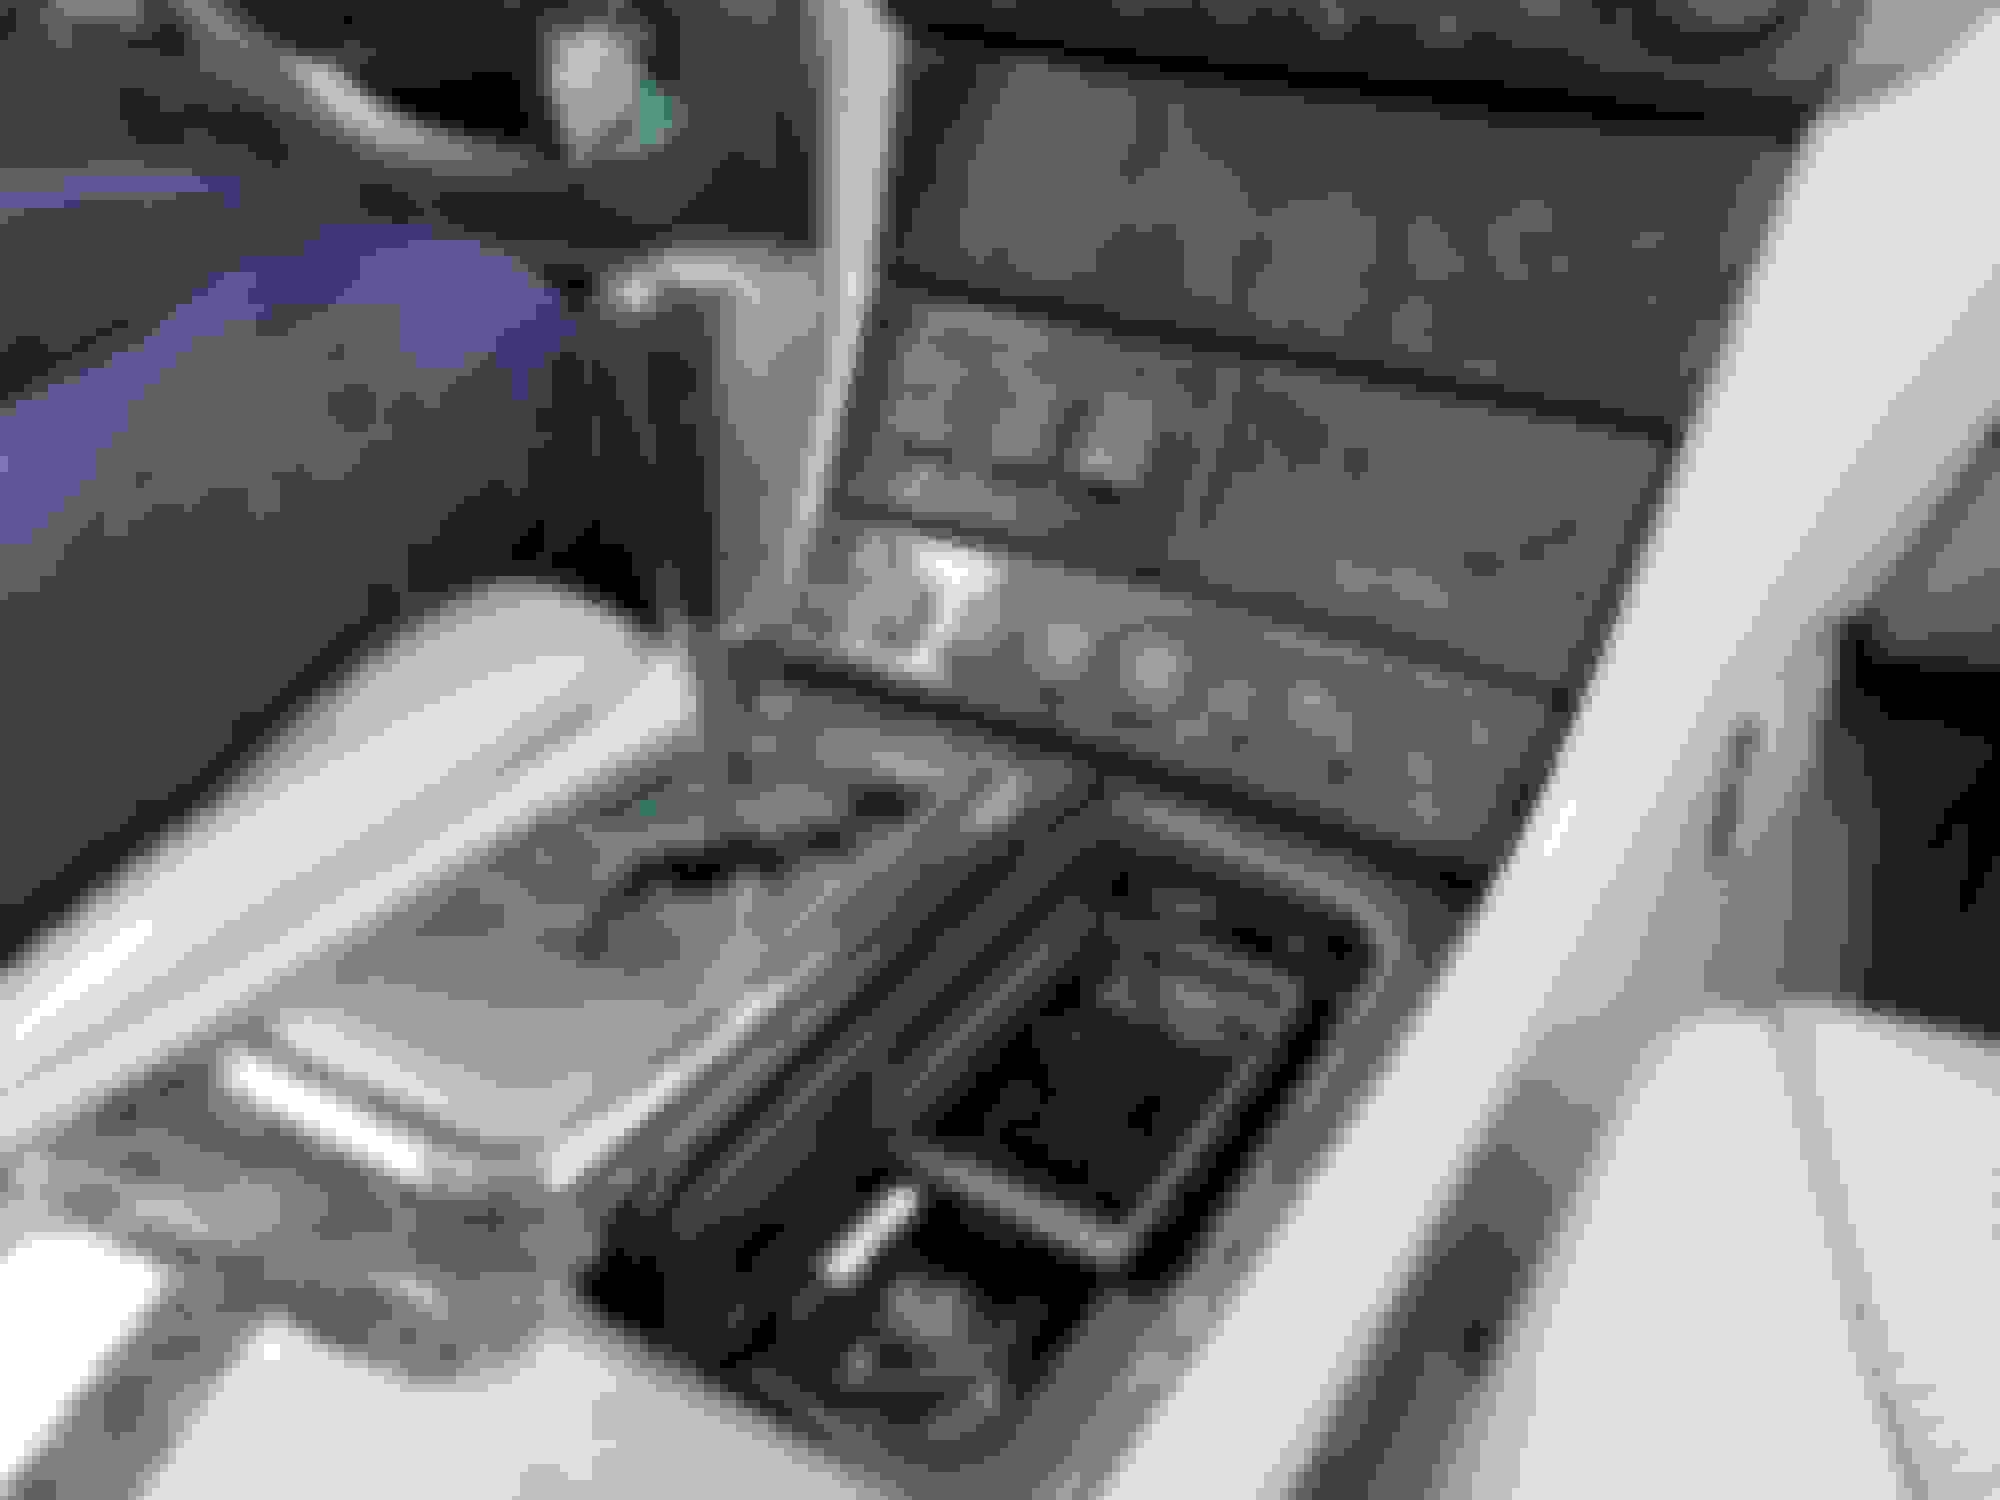
Decided to route the other end of the aux out to the ashtray that sits right of the shift lever. I had it routed to the small sliding tray thing under the CD changer before which didn't really work all that well. I didn't have a 3.5mm female socket on hand so it'll be hardwired to a male plug for the time being. The socket is nice as you can plug in a longer aux for the passengers to use.
Pro-tip; grab the part number and punch it into google before you start drilling into trim panels. You want to make sure you can find and afford another piece in case you somehow mangle the original one.
Finished product. It's almost like the walkman was made to fit in that little spot. I prefer this thing over my phone since i can skip and change tracks without having to look down at a screen. Physical buttons over touchscreen for this use case.
Did the LCA bushings sometime in the middle of the week and have taken it on the highways and over the mountains. The only increase in NVH that I can feel or tell is in the steering wheel. It certainly picks up more vibrations compared to the old unit. Then again, the old bushing was completely shot and this isn't a fair comparison.
In terms of caster gain, when overlapping the two units uninstalled, you can see that the mount hole for the LCA sits lower with the new one. maybe as far as if you installed one of those poly offset bushings. Not really noticeable on the highway or around town. It's really shines when you start getting up to speed going through backroads. Turn in response is a touch better. There's certainly more feedback in those tighter corners. The biggest improvement though is that braking doesn't pull the wheels around anymore. Tapping the brake mid corner doesn't require anywhere near as much correction as it did before. I'm pretty sure any kind of bushing replacement, no matter how cheap, would've solved this last issue as the old ones were long gone.
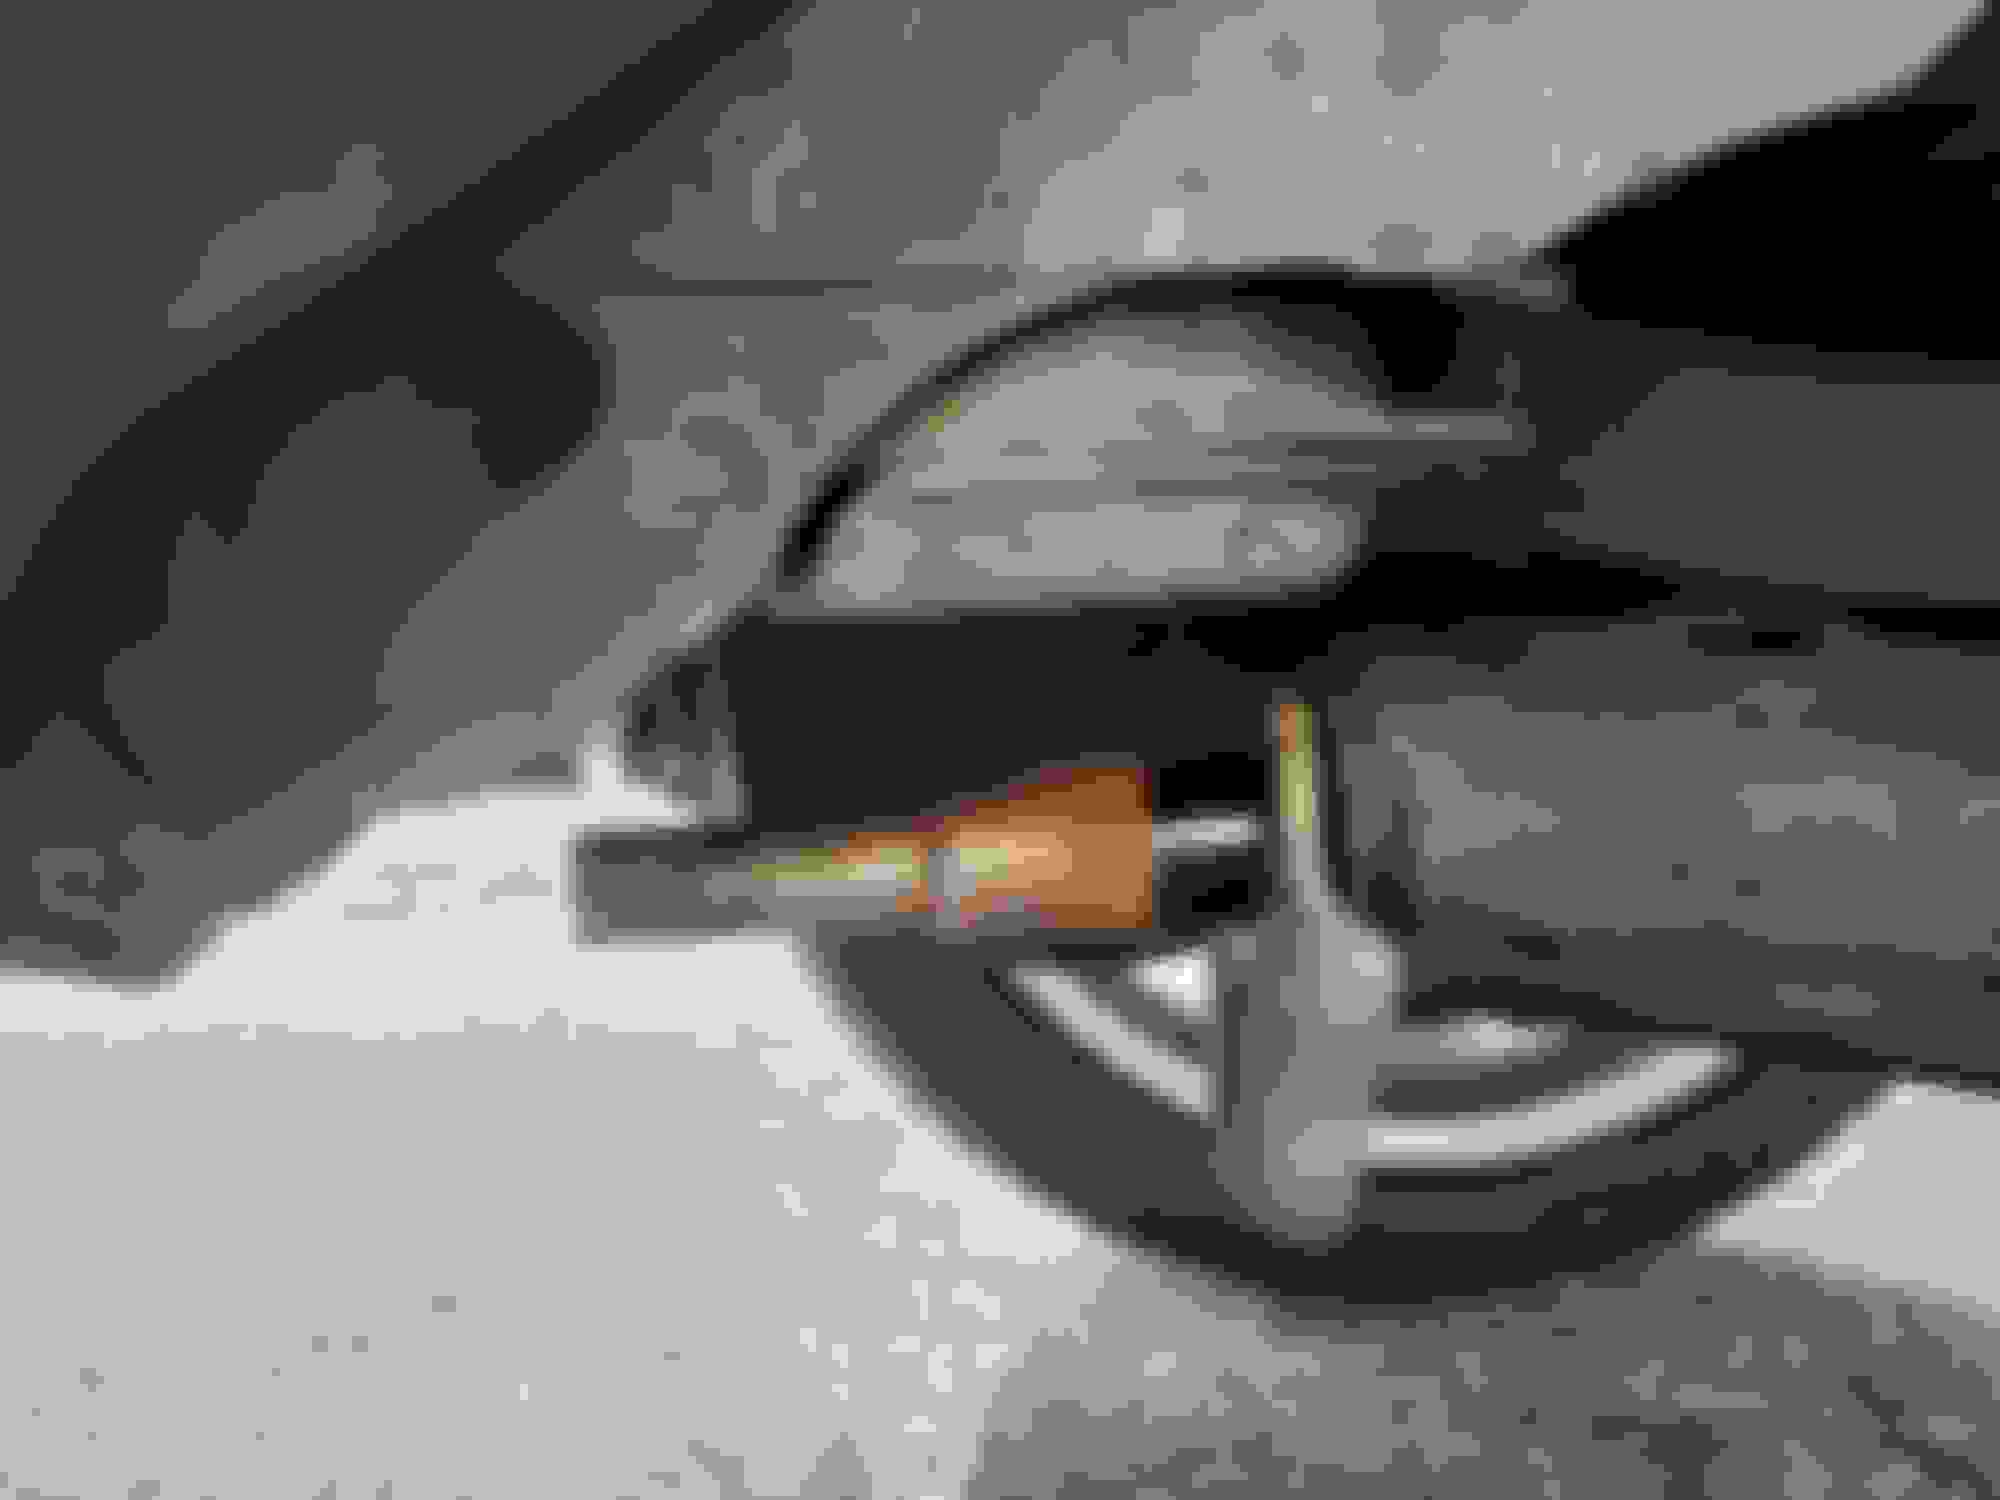
During install, it looks like the surfaces between the LCA and the bushing still rotate past each other when torqued down. The conical washer and the LCA both had these polished up spots where they turned past each other. Assembled everything with molykote m77 which should help the new bushings mate to the LCA surface a little faster and better
92k check up. Mobil 1 synthetic, cleaned out the air filter and MAF. Rounded out the philips screws holding the MAF into the air box so ended up replacing those with some hex head screws lying around. A little inconvenient for future me, but less likely to round these out.
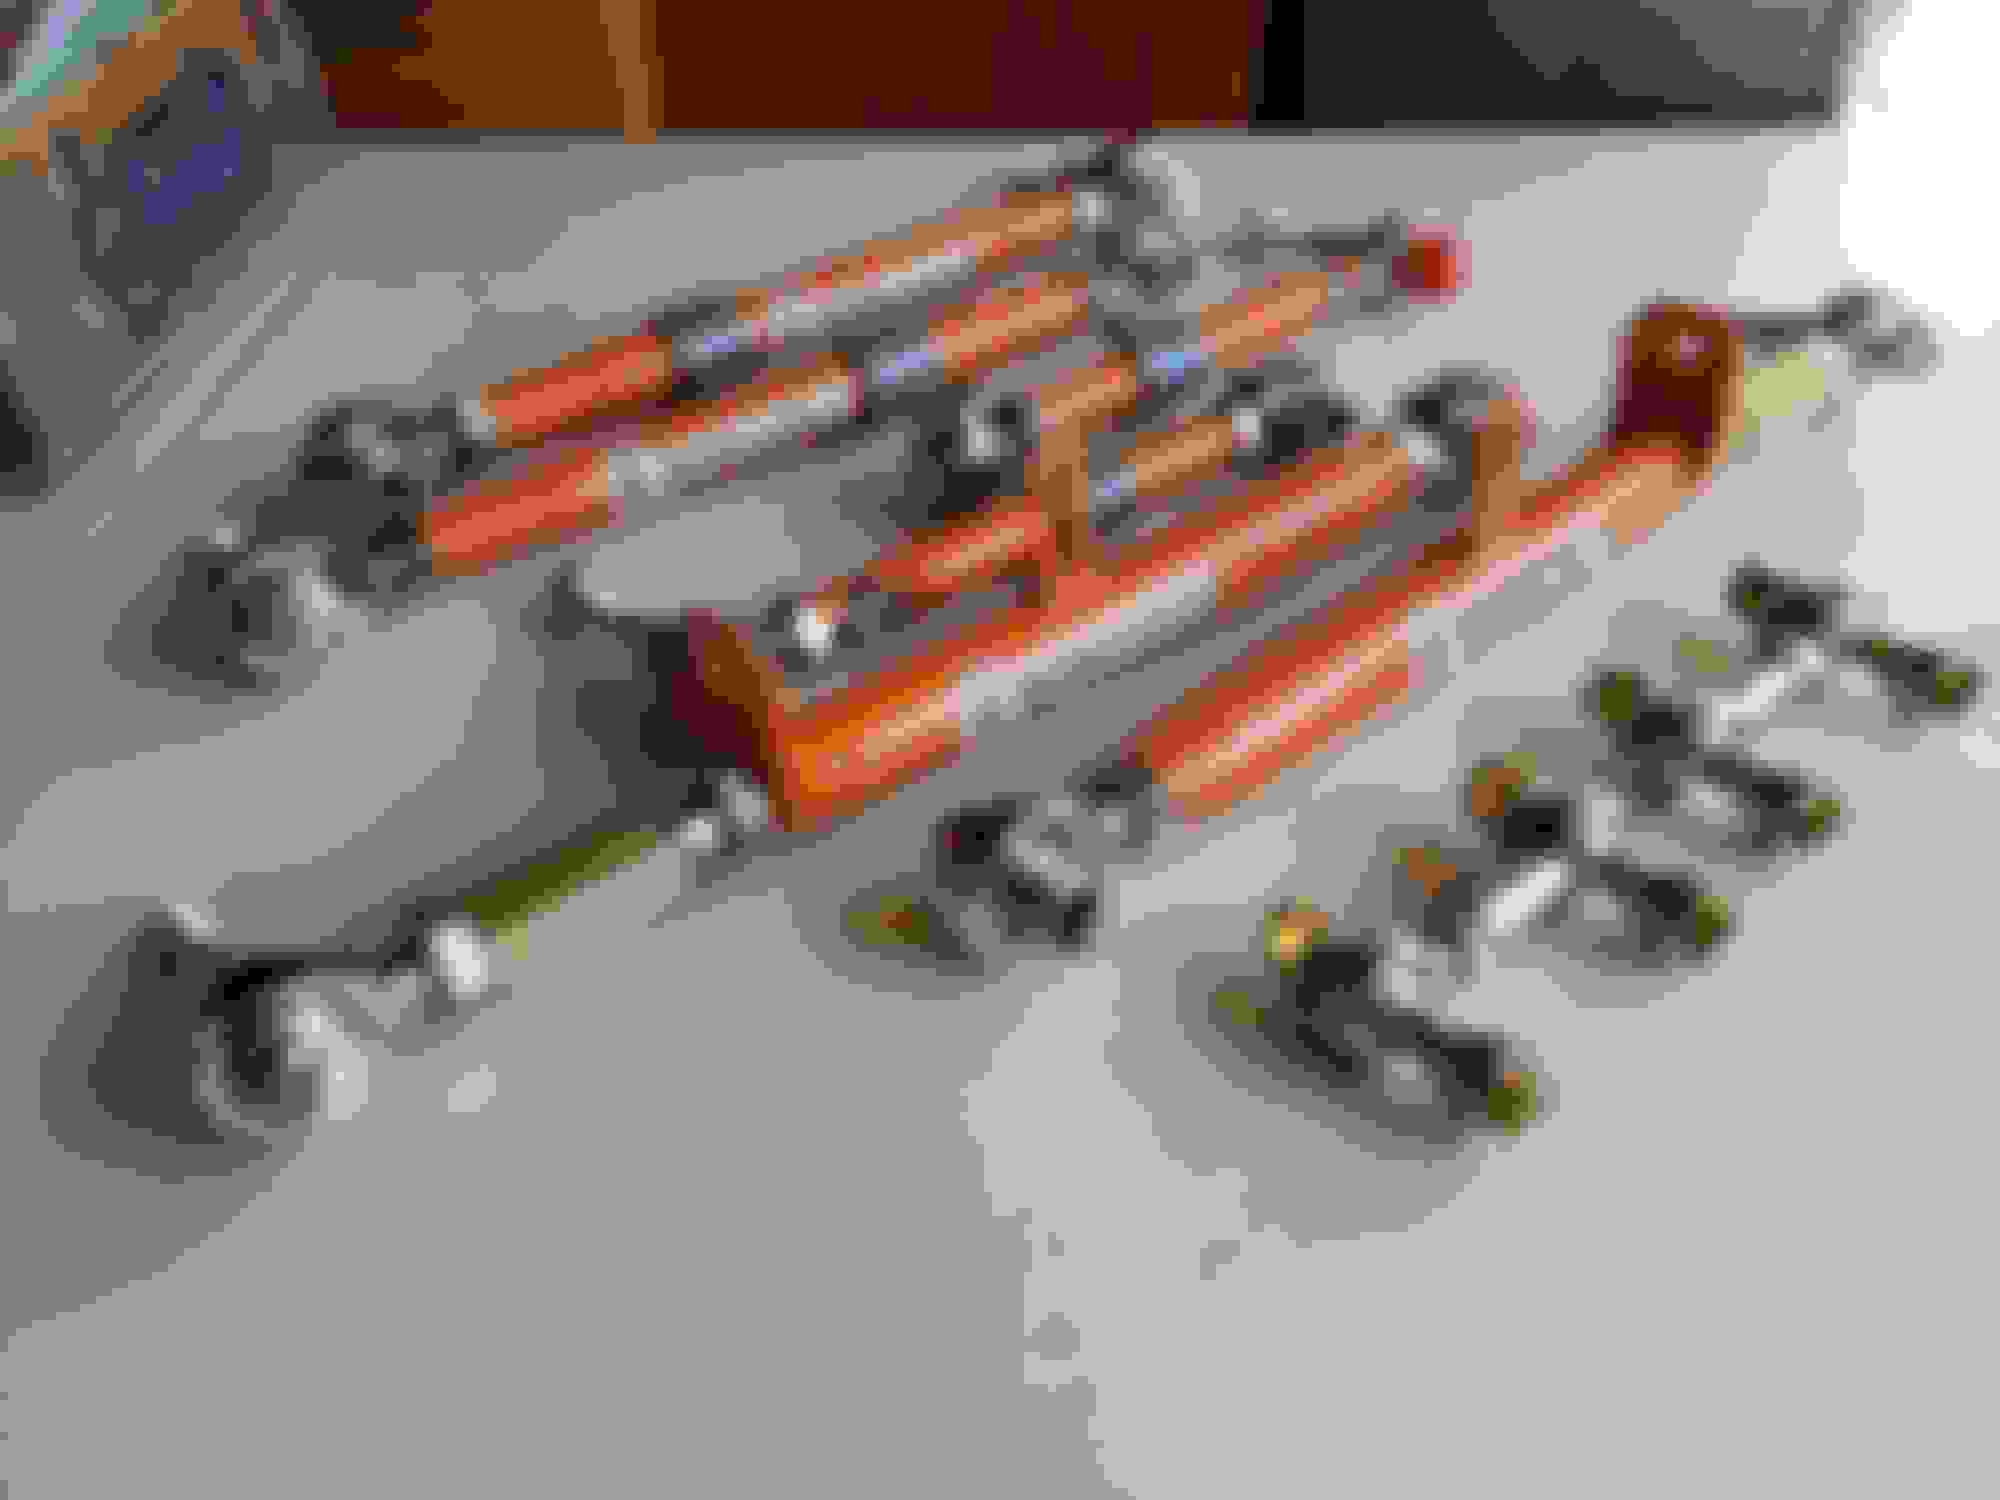
Control arms and trunk lift supports came in today from Figs. Also grabbed sway end links from eibach and sourced some grade 10.9 bolts from mcmaster. Just waiting on coilovers that I ordered a couple weeks ago. Fortune 500 series with swifts in 14k/12k. One part of me thinks that 12k might be a little stiff for the rear, so might be swapping to 10k or getting stiffer front anti roll bars.
Then it's off to get a four wheel alignment once it's all installed. From there, I can mess with the rear suspension geo as you can adjust based on how far you rotate the turnbuckles on the arms.

 07-06-20, 05:26 PM