When you click on links to various merchants on this site and make a purchase, this can result in this site earning a commission. Affiliate programs and affiliations include, but are not limited to, the eBay Partner Network.
Prologue: My 2000 ES300 has seen better days, part of it is due to an accident it went through at some point of its life, urging a replacement of the fender and a driver's door. It appears that the door didn't fit quite right, forcing the mechanic to start messing with adjustments on the window that he didn't fully understand, trying to sit it in the opening, and not doing all that good of a job at it. The Auto function didn't work, and when fully closed, the glass would hit the roof molding, not to mention that the glass was offset to the back of a car, and the tilt was incorrect, causing the door to bounce back each time I attempted to close it. Since I didn't roll the windows all that often, and I knew it will be one huge pain in the neck to deal with, so I let it slide for a while, until my weather insulator got torn through with an edge of the crooked glass, now forcing me to replace the whole seal, and finally delve into the wonders of frameless window paradigm, that is where our story begins.
Theory: Looking into the manual, there isn't much information on what needs to be done, all it says is which bolts need to be turned to access certain adjustments, it doesn't really specify the parameters to which the window needs to be set, especially when it comes to the tilt of the window, the one component that drives everyone away from this gruesome task as far as I can tell, and the one that got me as well, as you shall see later. It took a little while, but I think I got it for the most part.
One very interesting advice that I stumbled across while looking for information is to reference the Rear windows as you go, since they are usually left untouched unless someone really wanted to make your life more difficult, so they can be a good example of how it is supposed to be working. Other advice - if you see a Triangle that mounts the side mirror starting to stretch and tear, you are definitely doing something wrong.
Do NOT expect it to be a quick and easy process, it is tedious, repetitive and does take a good amount of time, as well as a ton of rolling the window up and down to make sure that it is seated the way it is supposed to be.. Adjusting the window is a constant struggle to maintain the given balance within the limiting set of constraints, where one move affects the other, forcing you to re-do the given settings a lot of times, over, and over, and over again. It took me a better part of a day to make sense of it and get the window just right, so that there is no more wind noise, and the door doesn't have to be slammed shut to be closed. I would suggest doing it on weekends, in good weather, and outside, as you will need a lot of room to swing the door open and a lot of light to see what the heck it is that you are doing.
While this specific thread only looks into adjustments on 3rd-gen ES300, the process for any other older Toyota should be relatively similar, save for the placement of some of the adjustments mentioned.
Process:
Difficulty - Very tedious, but easy when you grasp it.
Time - From 2 hours and beyond.
Supplies:
10mm Head
12mm Head
Phillips Screwdriver
A cup of Mint tea
Chapter 1: The Pain
To start, you need to take the door panel off, below is a video on how to do so, though I would really suggest using the Plastic tools for all that to avoid damage to the trim, especially to the handle bezel.
Once the panel is off, you are presented with the view of all the adjustments to the window, which there is .... a number of.
One remark, you won't have to take the entire vapor barrier off, I did it to make at least some sense of what I'm seeing.
First and foremost, it is important to start with positioning the window front to back of the car, towards the Mirror or the B-Pillar in other words to establish the base point. To do that, loosen the 3 bolts that hold the glass to the regulator, making sure to do it carefully, as the window may drop a bit. The Window Regulator plate has pretty wide rectangular openings, allowing you to move the glass in all directions separately from the rest of the door.
Get ready for an entertaining afternoon..
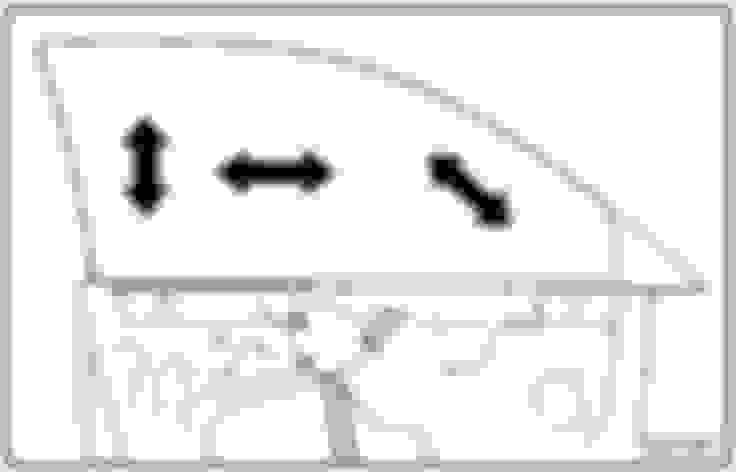
Now you can carefully tap the window by hand to move it in one way or the other, below is a view of the directions this allows you to move the window in, but it's only really suitable for the side-to-side adjustment, more about it later. Depending on how long it was misadjusted, like if you are just replacing the Window Regulator, you can use the indentations in the weatherstrip itself to align the window, referencing rear glass as well, the distance from the B-Pillar should be very similar for both. Other thing to keep in mind is that the edge of the glass must stay parallel to the B-Pillar, or you will get wind noise.
It's fiine, there is reaaally nothing to be frightened of..
If the window was set too high from the start, there is a chance it will be bound by the regulator, it will be in the limits of the adjustment allowed by rectangular holes in the regulator, if that's the case, you will have to lower the Regulator just a bit with those 3 nuts loose, allowing you the room needed to adjust the window correctly. Just make sure to stay within the openings for the nuts in the door, otherwise you won't be able to tighten them back up afterwards.
Now that the window is set for side-to-side motion, starts the most grueling part of this endeavor, and it is not the tilt. The task is to make sure that the glass stays right up to the edge of the weatherstrip. If you look closely, the weatherstrip is molded in such a way that it has a lip right where the glass is supposed to be sitting, the glass must stay flat and right to the edge of that lip all the way across, without crushing or bending it over.
Does anybody even read those?
This can take a while, as it requires monitoring the position of the glass to the B-Pillar, the height of the regulator to allow enough wiggle room, and most importantly, the rotation of the glass, such that it's not twisted one way or another, and the glass is no longer parallel with the lip on the weatherstrip. The worst part is that all the adjustment will get slightly out of balance when you go to adjust the tilt of the glass, so you will have to do your best and slowly work it into place. Best advise I can give here is if you see the triangle that holds the side mirror getting stretched and torn, you are definitely doing something wrong.
Whoopsie-Daisy
Chapter 2: The Bend
Now for the most entertaining part of the adjustment - the Tilt. My biggest misconception going into it was that the glass is supposed to be tilted such that when you close the door, the glass would straighten out and slide under the roof molding, reducing wind noise, and making it a lot harder for some uninvited guests to get in the car, as you won't be able to pry the glass away from the frame, it would hit against the molding.
For better or for worse, this is not how it's supposed to function, the point of this adjustment is to make the glass sit Flat and Parallel to the B-Pillar, and to the rest of the weatherstrip, such that there is equal force on the weatherstrip all across the surface of the glass. Easiest way to monitor it is by checking if the glass is parallel to the B-Pillar when you go to close the door, and that the door closes quite easily, almost effortlessly, which was quite a surprise when I learned it. Other way to monitor it would be to put some water on the seal and close the door to see if the glass rests on the seal all around the edge, water makes it pretty clear as to where the glass touches, and where it doesn't.
To do the adjustment, unscrew the 10mm bolt that holds the Lower Plate to the door completely (be prepared, you will be doing it a LOT), then pull the Plate back, releasing the plastic clips on the Snap as it is called in the manual. The Snap is there to balance out the Setting Nut that does actual adjustment, when you pull the Plate back, it releases the grip of the Snap on threads, causing it to move freely. Next step, turn the Setting Nut to set the angle of the glass, turning it Clockwise tilts the glass Away from the frame, Counterclockwise Towards the frame.
Nothing to get bent out of shape about..
To get any idea how close you are to the desired setting, you will have to put the whole system back together (remember how I wrote you will be taking that 10mm bolt in and out a lot?). Set the Snap to the same distance from the door on the thread as the Setting Nut, the Lower Plate must be Parallel to the surface of the door if that makes it more clear. Only then press the Plate back onto the Snap to lock it in, and thread it back with a 10mm bolt. If the setting is not as desired, rinse and repeat the until the glass is completely parallel with the frame, and the door closes with little effort.
Missing this step has some consequences. If the glass is too far from the frame, it won't make proper contact, and you will get a lot of wind noise, setting it too tight and the door will be really hard to close, not only that, you are basically bending the mechanism out of shape, which it's not designed to withstand, so with each door opening, you will keep wearing it out until something gives in, with the worst part being that you will be getting the same amount of wind noise, as all the contact will be concentrated in the upper edge of the glass, leaving the bottom hanging and not touching the seal at all.
Chapter 3: The Height Restriction
The very last part that's remaining are the Height Stops, they are located on each edge of the glass, and they tell the motor when to stop. The reason they go last is because it's very hard to set them square to the Bumpers on the glass, if they are set by eye, one edge will hit the Stop earlier than the other, which will pull the window out of square with the weatherstrip and B-Pillar, aka all the work you've done thus far is now in vain, hence why they are set only when the window is otherwise fully adjusted.
To set them, carefully roll the window Up right where it is supposed to be, and simply loosen the bolts on each edge to let each Stop drop and rest on the bumper on the glass. That way both Stops will be parallel to each other, and won't be trying to pull the window one way or the other.
You can see how far the bolts are from each other, this is why it is important to set them only when you are done otherwise.
Chapter 4: The New Frontiers
And no, we are not done just yet, there is still an Auto function that is left to sort out, which I am pretty sure you noticed is conspicuously failing to close the window, tripping the Jam protection even when the door is opened. The system relies on the count of revolutions that the motor makes while lifting the window, if it is under or over that count, it trips the Jam protection, causing the window to roll down a bit.
To teach it the new positions, there is a small rubber button on the Window Regulator, you will have to find some small and, importantly, blunt tool that is similar in diameter to said button, do NOT fall to the temptation of using some screwdriver as you will most likely end up puncturing right through the seal, which will likely kill the motor, or at least its ingress protection (I ended up using a blunt end of a drill bit for it), and do NOT use Auto function up until the end of the process.
Now, hope that you set the Stops correctly, and roll the window Up all the way, then press the button on a Regulator, and while Holding it, roll the window all the way Down. When the window is down, release the button and roll it all the way Up again. If done correctly, the Auto function should now be back in working order, you can now test it to see if it works, and repeat the procedure if it doesn't.
One important note is that this "button" doesn't behave as one would expect, it doesn't "click", it just feels like you are doing nothing, but it somehow worked for me, and that's enough to keep me happy.. To be perfectly honest, I am not particularly sure what that button does to set the Auto function, my best guess would be that it disengages the mechanism that count the revolutions of the motor, but I didn't take it apart to find out, being satisfied enough that it does work like a charm.
Gotta wonder how many people even know about it being there.
Chapter 5: Having Fun Yet?
If you think that's all, no, no it's not.. There is one more adjustment that if often overlooked, and for a good reason. The triangle itself that holds the side mirror has some adjustment that can be done, but it's really rare that anyone will ever need it, unless you are replacing the entire door like someone did before me.
The basic premise is the same, loosen the bolts that hold the triangle and it has some range to move up and down, and side to side. 12mm nut with a 5mm Hex set screw on the edge closest to the Hood, near the bottom of the door, is what adjusts the Tilt of the triangle, just like with glass. Turning the set screw Clockwise tilts the triangle Towards the car, Counterclockwise, Away from the car. The thing to understand, however, is that this adjustment is done perfectly at the factory, not a lot of people know about it, so do NOT touch the triangle unless you have some very solid reasons to do so. In my case, someone did just that and wrecked the factory settings, so I had to set it back mostly by feel, and it was anything but fun.
Conclusion: That about does it I think.. Just remember to take your time, there is definitely a proper way to set it, it just take time and patience to find it. On my end, the car did get considerably quieter, even though there is still some wind noise to be heard, and inherent flaw of any car with frameless windows, but I still think the game is worth the candles, even after nearly loosing all my remaining marbles setting them, their look is very hard to beat.
While it all can sound complicated, I promise it will become a lot more clear once you actually start messing with it, you just have to try. Considering that you are looking for a way to adjust a window, there is likely a good reason for it, so there is little chance you will make it worse.
I could've sworn that Windom, a JDM version of ES, came with special roof moldings that extended just a bit more, creating something like a window deflector, which could help with noise, while also giving an interesting look to a car. With that, now that I try to find it all again, I only see actual deflectors that clip onto the existing molding like the ones here, which do look pretty janky, but should still do the job ... I think..? Maybe I indeed just lost my marbles and being delusional right now.. In any case, both solutions are quite large and fragile, so there's no hope of me getting them, at least until we learn how to transport goods without wrecking them in the process. Oh well...
One thing I wanted to ask of others, I do know there are some people around here that have very low mileage ES300, the chances of someone tempering with windows in those cars is quite low, so it would be nice if someone would share a picture of how exactly they are supposed to be seated, and whether I got all of it right, since all of my windows were tempered with, I have no point of reference. Thanks in advance!
 04-07-23, 08:49 PM