

 12-16-14, 11:44 AM
Last edit by: IB Advertising
See related guides and technical advice from our community experts:
Browse all: Lexus IS Brake Guides
- Lexus IS GS: How to Change Brake Disc
Step by step instructions for do-it-yourself repairs
Browse all: Lexus IS Brake Guides

Brake pad and rotor change
 03-31-15 | 02:09 PM
#47

Instructor
Joined: Oct 2005
Posts: 1,032
Likes: 103
From: pa
09-23-15 | 08:25 PM
#48

Driver School Candidate
Joined: Oct 2012
Posts: 30
Likes: 0
From: IN
Changing out brakes is a breeze. Four bolts (well, nine if you count wheel nuts), and voila!
After a bunch of research, I found out that Akebono makes the OEM Toyota/Lexus pads, and are >half as expensive. I put on Centric 125 high-carbon front rotors, and 120 plain rears. MUCH better braking. Total expense was ~$260 and a couple of hours of labor.
After a bunch of research, I found out that Akebono makes the OEM Toyota/Lexus pads, and are >half as expensive. I put on Centric 125 high-carbon front rotors, and 120 plain rears. MUCH better braking. Total expense was ~$260 and a couple of hours of labor.
09-28-15 | 09:46 PM
#49

Driver School Candidate
Joined: Dec 2009
Posts: 18
Likes: 0
From: WI
Nice to see this thread still alive.
Update 3 years later after my last post, changed my rear brake pads again (last done in 2010). Keep in mind, now I have 240,000+ miles on the car. Rotors still look good. I did have to replace my left rear caliper though, as I foolishly let that side grind too long until the piston seal leaked. The only reason I did is that I couldn't get a lock lugnut off on my own (screwed too tight by the shop when I last had my tires replaced). Just goes to show that the only way you know a job is done right is when you do it yourself.
Update 3 years later after my last post, changed my rear brake pads again (last done in 2010). Keep in mind, now I have 240,000+ miles on the car. Rotors still look good. I did have to replace my left rear caliper though, as I foolishly let that side grind too long until the piston seal leaked. The only reason I did is that I couldn't get a lock lugnut off on my own (screwed too tight by the shop when I last had my tires replaced). Just goes to show that the only way you know a job is done right is when you do it yourself.
11-26-15 | 05:00 PM
#50

Driver School Candidate
Joined: Nov 2015
Posts: 6
Likes: 1
From: California
I made a video when I changed the front pads on My friend's '95 ES300. I know this is an old thread, but it's still coming up on the first page of Google. I didn't use a C-clamp or Brake caliper piston compression tool, just a large screwdriver. Here's a link to the video:
08-29-17 | 08:34 AM
#51
Driver School Candidate
Joined: Aug 2017
Posts: 2
Likes: 0
From: Washington
This yellow mark is from the factory. All its for is to make sure you put the rotor back in the original place. When you get new rotors, be sure to mark them too.
 .....whats that yellow mark on top of the rotor? cause I got the same yellow mark.
03-15-18 | 06:09 PM
.....whats that yellow mark on top of the rotor? cause I got the same yellow mark.
03-15-18 | 06:09 PM
#52
Lexus Champion
Joined: Aug 2012
Posts: 1,729
Likes: 120
From: Toronto, Canada
I'd like to update this thread and share my short DIY video and some photos replacing a rear caliper on my Toyota Camry, which is the same on the ES:
The rear caliper was seizing up. Some of the signs I got to narrow it down to the right rear caliper were:
- the wheel and brakes would heat up and smell burnt after driving on the highway
- car would feel sluggish
- the car would vibrate at speed (due to the rotor warping from heat)
- the brake pedal would vibrate when braking
- the brakes were not as effective
- even after lubricating the sliders, the problem resurfaced
- The caliper does not want to easily retract with a c-clamp or channel-lock pliers
- the brake pads are worn more on this one side
- the wheel is difficult to rotate by hand when jacked up
Here are some photos of the process:
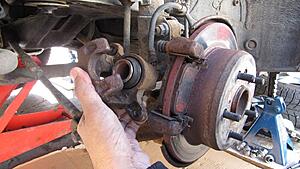
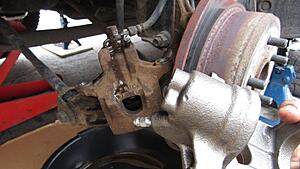
Old caliper, removed (Canadian car, so things are rusty okay!):
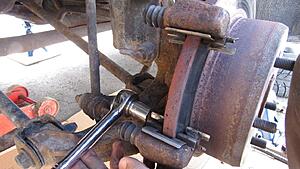
Breaking those caliper bracket bolts free was a real chore, even with a breaker bar!
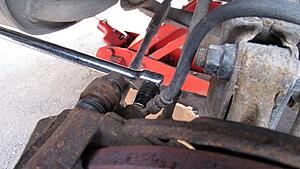
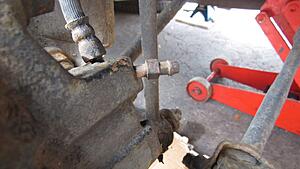
Even the banjo bolt needed a breaker bar to loosen up:
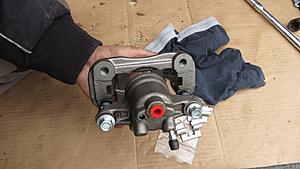
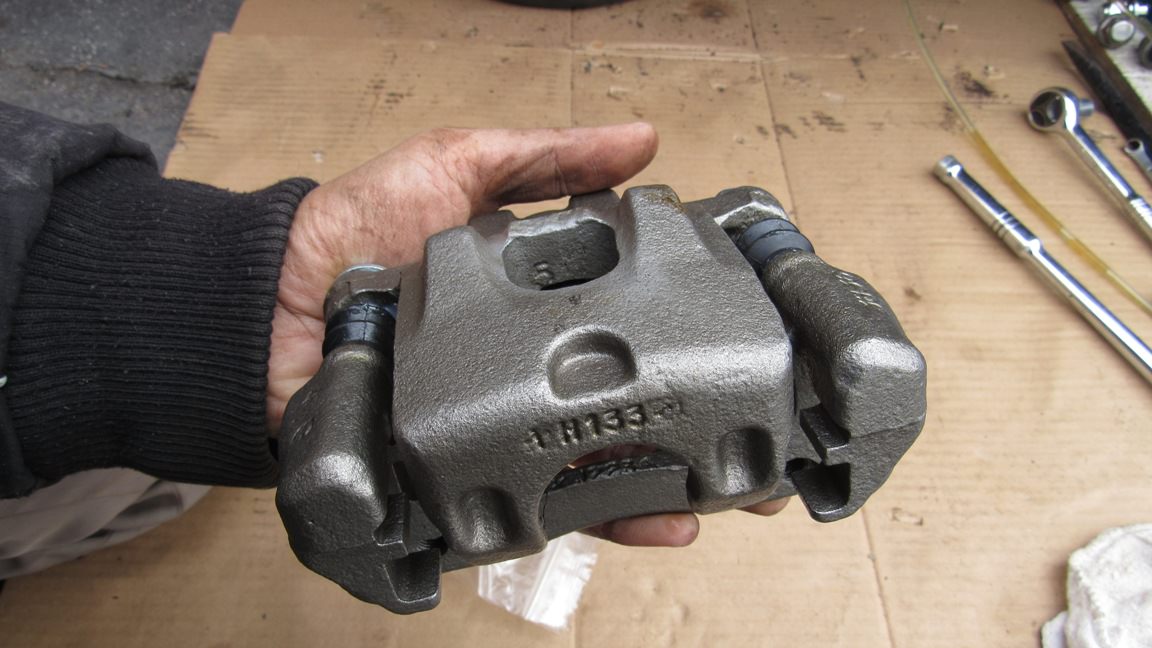
Rebuilt caliper:

Try to remove the caliper and replace the new one as quickly as possible. It could get messy, and you don't want the master cylinder to drain of fluid completely through gravity:
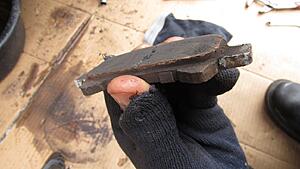
My brake pads were worn. I'm going to need new ones soon.
Finally I got around to bleeding the brakes. On the opposite side, the caliper I didn't change, I bent the bleeder screw so I didn't get to bleed that one. I hope it doesn't snap off:
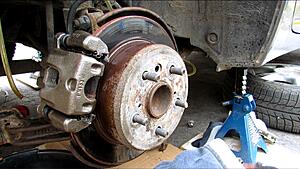
All done, no more overheating brakes on the highway:
Enjoy!
The rear caliper was seizing up. Some of the signs I got to narrow it down to the right rear caliper were:
- the wheel and brakes would heat up and smell burnt after driving on the highway
- car would feel sluggish
- the car would vibrate at speed (due to the rotor warping from heat)
- the brake pedal would vibrate when braking
- the brakes were not as effective
- even after lubricating the sliders, the problem resurfaced
- The caliper does not want to easily retract with a c-clamp or channel-lock pliers
- the brake pads are worn more on this one side
- the wheel is difficult to rotate by hand when jacked up
Here are some photos of the process:
Old caliper, removed (Canadian car, so things are rusty okay!):

Breaking those caliper bracket bolts free was a real chore, even with a breaker bar!

Even the banjo bolt needed a breaker bar to loosen up:

Rebuilt caliper:

Try to remove the caliper and replace the new one as quickly as possible. It could get messy, and you don't want the master cylinder to drain of fluid completely through gravity:

My brake pads were worn. I'm going to need new ones soon.

Finally I got around to bleeding the brakes. On the opposite side, the caliper I didn't change, I bent the bleeder screw
so I didn't get to bleed that one. I hope it doesn't snap off:
All done, no more overheating brakes on the highway:

Enjoy!
05-02-18 | 07:35 AM
#53

Rookie
Joined: Jul 2017
Posts: 73
Likes: 6
From: FL
One thing I've learned from years of building and driving race cars - and I'm old enough to remember when sex was safe and racing was dangerous:
A race car is not a tool to be used to show off the skill of the driver. Rather, the driver is a tool that should be used to allow the car to reach its performance potential.
A race car is not a tool to be used to show off the skill of the driver. Rather, the driver is a tool that should be used to allow the car to reach its performance potential.

Thread
Thread Starter
Forum
Replies
Last Post
81corolla
RX - 1st Gen (1999-2003)
8
01-07-09 12:25 PM