

 12-16-14, 11:44 AM
Last edit by: IB Advertising
See related guides and technical advice from our community experts:
Browse all: Lexus IS Brake Guides
- Lexus IS GS: How to Change Brake Disc
Step by step instructions for do-it-yourself repairs
Browse all: Lexus IS Brake Guides

Brake pad and rotor change
08-09-04 | 07:39 PM
#1
Thread Starter
Lexus Fanatic
Joined: Aug 2002
Posts: 7,379
Likes: 22
From: Florida
My friend who's an expert at fixing up American and Japanese cars helped me change the front brakes on my ES last weekend. The only reason I went to my friend for assistance (instead of doing the job myself) was that he had all the tools (i.e. garage jack stand, torque wrench, various metric sockets, etc).
OK, here are all the steps I can remember from the brake job:
1) While the tire is on the ground, loosen the lug nuts (don't forget your wheel lock key if your wheels came with wheel locks). My friend and I discovered that one of my front wheels had been overtorqued to at least 150 ft-lbs by some dumb technician who decided to use an air gun instead of a torque wrench when he checked my brakes last month. This may be one of the reasons why my rotors are warped Important lesson to learn: Never use an air gun to tighten your lug nuts; always use a torque wrench and torque the nuts to the proper factory torque setting.
2) Go ahead and jack up the car and take the lug nuts and wheel off.
3) Behind the brake piston assembly there are two 17mm bolts holding the assembly to the rotor. Remove both of those bolts (you may have to resort using extra pressure if the bolts have never been taken out).
4) Set the piston assembly aside (i.e. laying it on a bucket or hanging it on some wire). Be careful not to put any strain on the brake lines as you could mess up the ABS sensor.
5) By now your brake job should look something like this:
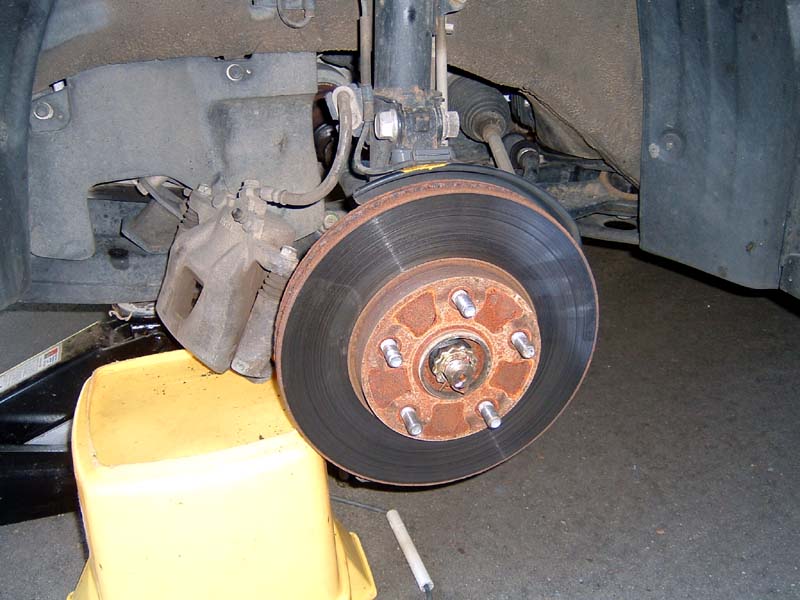
You should see (2) 10-24 pitch threaded holes on the inner bolt circle of the rotor. You will need to find a couple bolts that will fit in those holes (e.g. 12 mm size) and force the rotor to come out. That was the tricky part that I probably couldn't have figured out if my friend didn't help me
6) After taking the old rotor out, use some WD-40 on the small hub and clean up and prepare the area for interfacing with the new rotor. Time to put your new rotor in.
7) Take out your old brake pads from the caliper, and remove the metal shims from the pads (remember which shims go to which orientation on the brake pads). Clip the shims onto the new brake pads, and place the new brake pads into the caliper the same way as with your old pads. It is not necessary here, but we put in some Brake Quiet fluid (http://www.carwashwarehouse.com/TEC99220.php) on the used sides of the brake pads for better convenience.
8) Before putting the piston assembly back into place with the rotor, open the hood, place some rags around the brake fluid reservoir and remove some brake fluid. Do not let the brake fluid touch the paint!
9) You want to push the brake piston all the way away from the rotor using a C-clamp or some other means. The idea here is ensure a tight and secured fit of the brake pad part of the piston onto the rotor. This piston pressure fit step also affects the level of your brake fluid, so make sure it doesn't overflow.
10) Put the piston assembly back into place with the rotor. Before putting the wheel back in, it is a good idea to lay some anti-sieze grease over the lug nut bolts so it will be easier to take the wheel and rotor off the next time.
11) Put the wheel and lug nuts back in, finger-tighten all nuts in 5-star fashion, and use a torque wrench to torque the nuts in 5-star fashion.
12) Take your car out for a test drive and test the brakes at slow and abrupt stops separately. If everything checks out OK, mission accomplished Take note of the miles on your odometer so you know the history of your brake change.
I attached a picture of my new front brakes (please mind the curbed lip on the wheel). The blue stuff on the brake assy is the Brake Quiet applicant.
Other related links on changing brakes:
http://www.lexls.com/front_brake_rotor.html
http://lexusmodz.netfirms.com/GS_DIY/change_rotor
http://lexusmodz.netfirms.com/GS_DIY...ers/index.html
OK, here are all the steps I can remember from the brake job:
1) While the tire is on the ground, loosen the lug nuts (don't forget your wheel lock key if your wheels came with wheel locks). My friend and I discovered that one of my front wheels had been overtorqued to at least 150 ft-lbs by some dumb technician who decided to use an air gun instead of a torque wrench when he checked my brakes last month. This may be one of the reasons why my rotors are warped
Important lesson to learn: Never use an air gun to tighten your lug nuts; always use a torque wrench and torque the nuts to the proper factory torque setting.2) Go ahead and jack up the car and take the lug nuts and wheel off.
3) Behind the brake piston assembly there are two 17mm bolts holding the assembly to the rotor. Remove both of those bolts (you may have to resort using extra pressure if the bolts have never been taken out).
4) Set the piston assembly aside (i.e. laying it on a bucket or hanging it on some wire). Be careful not to put any strain on the brake lines as you could mess up the ABS sensor.
5) By now your brake job should look something like this:
You should see (2) 10-24 pitch threaded holes on the inner bolt circle of the rotor. You will need to find a couple bolts that will fit in those holes (e.g. 12 mm size) and force the rotor to come out. That was the tricky part that I probably couldn't have figured out if my friend didn't help me
6) After taking the old rotor out, use some WD-40 on the small hub and clean up and prepare the area for interfacing with the new rotor. Time to put your new rotor in.
7) Take out your old brake pads from the caliper, and remove the metal shims from the pads (remember which shims go to which orientation on the brake pads). Clip the shims onto the new brake pads, and place the new brake pads into the caliper the same way as with your old pads. It is not necessary here, but we put in some Brake Quiet fluid (http://www.carwashwarehouse.com/TEC99220.php) on the used sides of the brake pads for better convenience.
8) Before putting the piston assembly back into place with the rotor, open the hood, place some rags around the brake fluid reservoir and remove some brake fluid. Do not let the brake fluid touch the paint!
9) You want to push the brake piston all the way away from the rotor using a C-clamp or some other means. The idea here is ensure a tight and secured fit of the brake pad part of the piston onto the rotor. This piston pressure fit step also affects the level of your brake fluid, so make sure it doesn't overflow.
10) Put the piston assembly back into place with the rotor. Before putting the wheel back in, it is a good idea to lay some anti-sieze grease over the lug nut bolts so it will be easier to take the wheel and rotor off the next time.
11) Put the wheel and lug nuts back in, finger-tighten all nuts in 5-star fashion, and use a torque wrench to torque the nuts in 5-star fashion.
12) Take your car out for a test drive and test the brakes at slow and abrupt stops separately. If everything checks out OK, mission accomplished
Take note of the miles on your odometer so you know the history of your brake change.I attached a picture of my new front brakes (please mind the curbed lip on the wheel). The blue stuff on the brake assy is the Brake Quiet applicant.
Other related links on changing brakes:
http://www.lexls.com/front_brake_rotor.html
http://lexusmodz.netfirms.com/GS_DIY/change_rotor
http://lexusmodz.netfirms.com/GS_DIY...ers/index.html
Last edited by meZoom!; 10-14-04 at 01:02 PM.
The following users liked this post:
pickd4prez (05-31-22)
08-10-04 | 08:35 PM
#5
Thread Starter
Lexus Fanatic
Joined: Aug 2002
Posts: 7,379
Likes: 22
From: Florida
Originally posted by el gato
wait a minute Doug....can I call you Doug .....whats that yellow mark on top of the rotor? cause I got the same yellow mark.
wait a minute Doug....can I call you Doug
.....whats that yellow mark on top of the rotor? cause I got the same yellow mark.
08-11-04 | 09:00 PM
#7
Pole Position
Joined: Jan 2004
Posts: 316
Likes: 0
From: EastLos
Originally posted by el gato
wait a minute Doug....can I call you Doug .....whats that yellow mark on top of the rotor? cause I got the same yellow mark.
wait a minute Doug....can I call you Doug
.....whats that yellow mark on top of the rotor? cause I got the same yellow mark.
Great post Doug!

Trending Topics
07-26-05 | 09:00 AM
#9
Just saw the right up on the brakes... I really need to do this also with 65k on the car.... So, What ft./lbs of torque do you use for the caliper bolts and do you have to bleed the brakes? I guess not if your not taking the brake line off right?... Looks like a simple job that may take about an hour.... Also whats a good website to get OEM brake rotors and pads from? Thanks
Tony
Tony
07-26-05 | 09:53 AM
#10
Thread Starter
Lexus Fanatic
Joined: Aug 2002
Posts: 7,379
Likes: 22
From: Florida
Tony, we didn't put a torque spec on the caliper bolts; I believe we just tightened them down with the appropriate wrench. Now, if you're talking about lug nuts, then you'd have to torque the bolts down to 76 ft-lbs (and don't forget to fasten them in a criss-cross fashion).
Bleeding the brakes is not necessary when changing the brakes, unless you plan to change out the brake lines.
The best place I've found for purchasing OEM brake pads and rotors is http://www.irontoad.com. They're actually the parts department of a Lexus dealership in PA, and the prices are discounted much more than locally. Shipping is fast, and service is top-notch
05-04-06 | 11:03 PM
#12

Driver School Candidate
Joined: May 2006
Posts: 45
Likes: 0
From: CA
just reading this,had a question about the torque wrench thing, ive changed tons of brakes big and small of both disc and drum i dont think it goes for drum but for the disc u said dont use an impact gun to tighten them, thats all ive ever used and never had a problem and ive done about 3 ES's and about 10 camrys is it just a hit or miss thing with warping them and ive never had the bad luck or what?
12-21-06 | 11:01 AM
#13

Driver School Candidate
Joined: Dec 2005
Posts: 14
Likes: 0
From: NJ
Question for you guys, I bought some Akobono pads (the name is something like that, theyre supposed to be OEM) and they already have a metal shim on the ack of them, I tried to put the old metal shims ontop of them but they didnt quite fit.....the new metal shims are a bit smaller width wise compared to the old ones, so I don't need to re-use the old ones right? I can just apply some anti-squeal to the new metal shim and be good to go?
12-21-06 | 03:26 PM
#14

Lexus Champion
Joined: Apr 2005
Posts: 2,496
Likes: 6
From: AL
Akebone ProACT. Well it's a 2 part metal shim. One's a shim & one they call something else LoL!
Aslong as it's 2 thickenesses of metal you're fine. Otherwise you amy want to use the corrisponding old parts on the new pad.
Apply anti-squeal to every surface that touches each other. Including the outside that will make contact with the piston.
Rotors need about 1,000 miles of very easy driving to wear in (Says Brembo), Pads need 100-250 miles of very easy driving to wear in.
04-30-07 | 07:41 PM
#15

Lexus Champion
Joined: Sep 2003
Posts: 2,727
Likes: 0
From: Florida
bump on this. This morning I read this thread and started on replacing my rotors and pads off of my 97 es300. Big problem for me was removing the 17mm bolts. I sprayed some WD-40 and waited for 30mins with no luck. I tired putting my weight into it with no luck and im not a small kid (210pds).
Any info guys??
Any info guys??