
New Leather Seats
 05-06-08, 10:57 PM
#31
Lexus Champion
Thread Starter

But you can save money by doing a DIY install.
As promised, pictures of the rear seat install (and BTW the AP Stats test was incredibly easy)
Before.

Remove the hog rings around the bottom edge of the seat by using pliers.
Then fold up the sides and in-twist the hog rings holding the middle inserts.


This is what the middle insert/foam padding looks like. The covers are hooked on to a wire at the bottom of the insert area.

Last edited by tuan92129; 05-06-08 at 11:28 PM.
 05-06-08, 11:28 PM
#32
Lexus Champion
Thread Starter
Entire rear seat

Take these metal rods out of the white insert from the old covers, and slip them into the new ones.

Use a hog ring plier (ringer plier) to compress the hog ring into a circle through the two metal rods and fabric.

You have to hog-ring in the order you took them off. I did two sides of the seat insert, but couldn't do a corner insert on the other side..
Then you have to undo the hog rings and re- do them.
The covers don't just slip on, you have to 'massage it' into place, and i think that took most of the time, trying to make it look nice

The middle inserts were sewn flat I tried to gather them up, but its very little.
I did gather the side bolsters though.

Right now, i only have the front headrests and the rear seat cushion done.
Compared to the old leather, i think this is a good upgrade, although the quality of the 'leather' is questionable. At least it has a leather smell, a matte color, and is softer to the touch than the old sun-baked/cracked leather.
Take these metal rods out of the white insert from the old covers, and slip them into the new ones.
Use a hog ring plier (ringer plier) to compress the hog ring into a circle through the two metal rods and fabric.
You have to hog-ring in the order you took them off. I did two sides of the seat insert, but couldn't do a corner insert on the other side..
Then you have to undo the hog rings and re- do them.
The covers don't just slip on, you have to 'massage it' into place, and i think that took most of the time, trying to make it look nice
The middle inserts were sewn flat
I tried to gather them up, but its very little.I did gather the side bolsters though.
Right now, i only have the front headrests and the rear seat cushion done.
Compared to the old leather, i think this is a good upgrade, although the quality of the 'leather' is questionable. At least it has a leather smell, a matte color, and is softer to the touch than the old sun-baked/cracked leather.
 05-07-08, 08:29 AM
#34
Lexucanafer
That actually looks pretty good so far. Did the new covers come with installation instructions? Definitely lighter in color than your old seats but looks nice. Guess I was never much of a fan of the tan colored interior. Just hope your new covers wear well.
05-07-08, 08:51 AM
#35
Lexus Champion
Thread Starter
They did not, since there was 'professional installation required. I actually found the installation process very easy to understand (look on leatherseats.com website).
The new covers are in a lighter tan color, which i think makes the car a little newer compared to the darker tan.
The new covers are in a lighter tan color, which i think makes the car a little newer compared to the darker tan.
05-07-08, 06:21 PM
#36
Driver

Join Date: Dec 2005
Location: CA
Posts: 141
Likes: 0
Received 0 Likes
on
0 Posts
Don't forget to take pix for the rest of the seats, such as the back between the cabin and the trunk as well as those pix of the front, particularly how to go around those plastic cover for power control and the electrical wiring. I'm right behind u in this project. Thanks Tuan. 
05-07-08, 11:11 PM
#37
Lexus Champion
Thread Starter
I got my RaamMat Sound Deadening Material in today!!!!!But.... I got TWO more AP Exams to go
I did install the glove box leather today. It was a very simple process.
1. Take out the lid.
-remove two screws from the bottom of the glove box
-take out the bin
-Take out two phillips screws from the metal bracket holding the lid
2. Take out all the little screws around the inner plastic part of the glove box. You will need a very small screw bit to remove these.
-Take out 2 screws for the locking mechanism, and 2 screws holding the hinge.
3. Install leather.
-You should probably keep the old leather in there since its glued on.
-Add a 1-inch thick layer of batting. (its white and fuzzy) I got tired of the hard surface of the glove box...now the top is really soft

-slip on the new cover, and mold it to fit the contours of the glove box.
4. get upholstery adhesive and spray a light layer around the sides of the old glove box and wrap the leather cover around it, making sure the stiching is even on both sides.
-Its important that you push the corner seams in as tightly as possible b/c the black plastic cover has a tigth fit.


BTW the leather color from Leatherseats.com that matches perfectly with the 95-96 tan is 'adobe' so make sure you get a sample of that.
05-08-08, 11:59 PM
#38
Lexus Champion
Thread Starter
pics from the rear seat back installation.
-Rear seat cushion removed by pulling on the middle of the seat insert.
Remove the cushion, and remove two screws holding the bottom of the seat back. Lift the seat up, and out.
Remove all hog rings around the edge of the seat.

Then, remove the middle arm rest/pass-through by removing two screws.

(The pic came out weird..) Since the new arm rest cover wasn't padded, and the old one was, I wrapped the front and back of the arm rest in a 1 inch batting.

Pull the old wires out of the old cover and insert into the new.
Start at the TOP of the seat, and position the leather around the edge.
Then fold the bottom of the seat cover up, and hog-ring the inserts, going down.
To gather the inserts if they weren't sown that way, bunch up the fabric and hog ring on the sides to keep it in place.


-Rear seat cushion removed by pulling on the middle of the seat insert.
Remove the cushion, and remove two screws holding the bottom of the seat back. Lift the seat up, and out.
Remove all hog rings around the edge of the seat.
Then, remove the middle arm rest/pass-through by removing two screws.
(The pic came out weird..) Since the new arm rest cover wasn't padded, and the old one was, I wrapped the front and back of the arm rest in a 1 inch batting.
Pull the old wires out of the old cover and insert into the new.
Start at the TOP of the seat, and position the leather around the edge.
Then fold the bottom of the seat cover up, and hog-ring the inserts, going down.
To gather the inserts if they weren't sown that way, bunch up the fabric and hog ring on the sides to keep it in place.
05-31-08, 07:32 PM
#40
Lexus Champion
Thread Starter
Now that AP Testing is over......Senioritis (6 school days left )
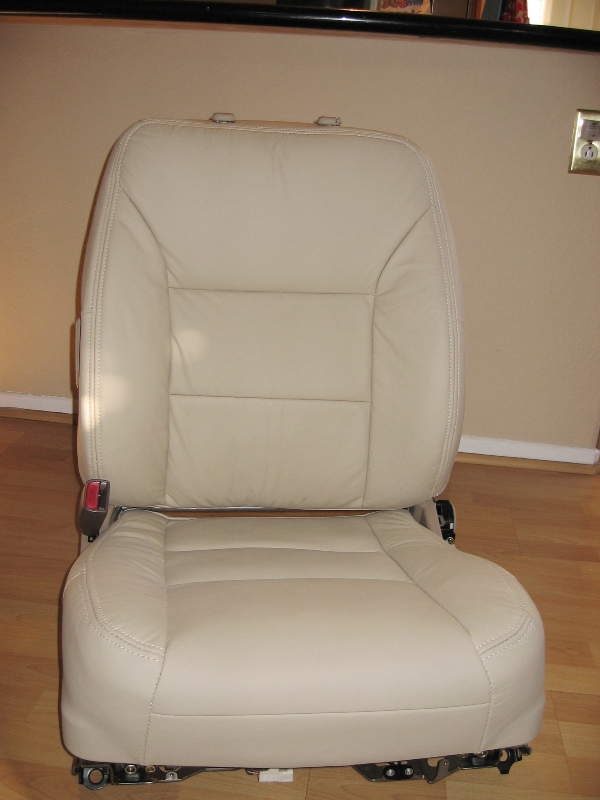
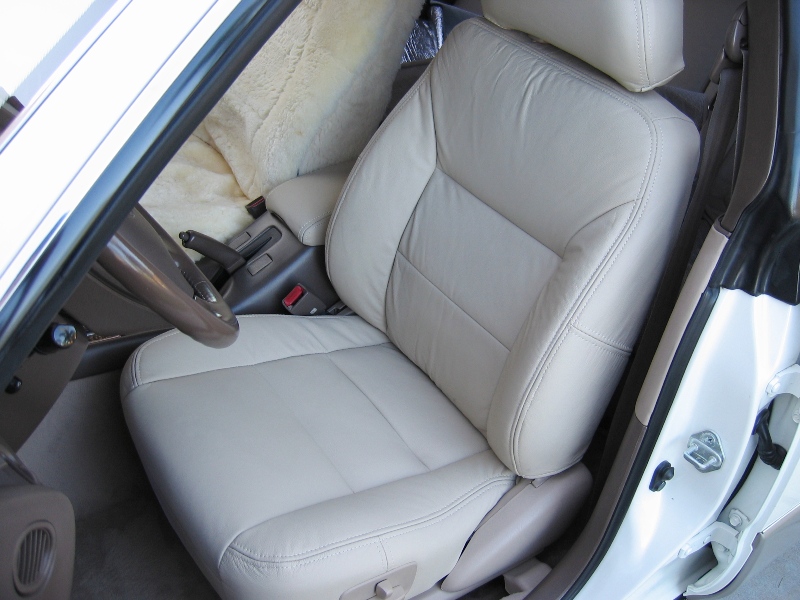
Finally finished the front passenger and driver's seat install today.
The front seat cushions were made too small and the foam has degraded from use, especially the side bolsters.
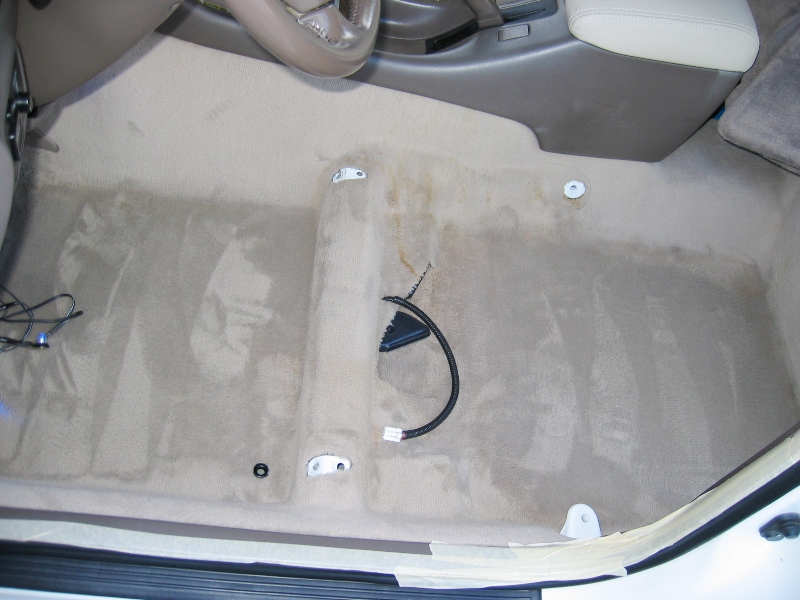
There was a ton of junk on the carpet that i never knew was there, and spent a day shampooing the carpet.
Carpet, after cleaning. (some stains wouldn't come out)

Next project: Sound deadening
(6 school days left )Finally finished the front passenger and driver's seat install today.
The front seat cushions were made too small
and the foam has degraded from use, especially the side bolsters. There was a ton of junk on the carpet that i never knew was there, and spent a day shampooing the carpet.
Carpet, after cleaning. (some stains wouldn't come out)
Next project: Sound deadening
 05-31-08, 07:56 PM
#43
Lexus Champion
Thread Starter
Its comfortable, compared to the old covers, but the seat design isn't really comfy to begin with.
For the price that i got it, i like how its soft and supple, not plasticky and hard like the old covers. The inserts look like genuine leather, but i really cannot tell the difference anymore. These should last my another 4 years until i get a new car.
For the price that i got it, i like how its soft and supple, not plasticky and hard like the old covers. The inserts look like genuine leather, but i really cannot tell the difference anymore. These should last my another 4 years until i get a new car.
05-31-08, 08:06 PM
#44
Lexus Test Driver
Join Date: Apr 2007
Location: FL, O-Town
Posts: 1,005
Likes: 0
Received 0 Likes
on
0 Posts
Looks great for the price! And The fact that you didn't need a professional to install it just makes this another option for people wanting to replace their seats covers.