
Stripped screw for IACV -_-
 12-22-09 | 02:24 PM
#1

Thread Starter
Driver
Joined: Dec 2007
Posts: 124
Likes: 2
From: FL
So I did it
I had some time on my hands and decided to go ahead and clean out the IACV. In the process of taking off the two screws holding it on I of course stripped one of the screws. I tried using my screw remover kit, but it only made it worse and the screw is now perfectly bored out so that nothing will grab I'm not sure if its the soft aluminum or what but everything I use only makes it worse.
Any ideas, I'm not sure what the next step is after this as to getting it out.
Hex bolts are definitely going in next
I had some time on my hands and decided to go ahead and clean out the IACV. In the process of taking off the two screws holding it on I of course stripped one of the screws. I tried using my screw remover kit, but it only made it worse and the screw is now perfectly bored out so that nothing will grab
I'm not sure if its the soft aluminum or what but everything I use only makes it worse. Any ideas, I'm not sure what the next step is after this as to getting it out.
Hex bolts are definitely going in next
Last edited by schmoozer; 12-22-09 at 02:28 PM.
12-22-09 | 03:18 PM
#2
Lexus Champion
Joined: Dec 2007
Posts: 1,673
Likes: 2
From: New Jersey
if the screw doesn't have a hex head at all, you are in a huge pickle because the best access [to do the next thing to remove the screw ] will require you to remove the IM. that shouldn't be too hard, but then again, you just messed up that ..... haha
seriously, either take the upper intake manifold off or leav it on and see if the screw has a hex head [in addition to phillips in the middle].
if you have to remove the IM, you'll need penetrant [e.g. pb blaster] and one of these things to remove your messed up screws:
1 http://www.sears.com/shc/s/p_10153_1...0070921x00003a
[impact driver + hammer]
2 a drill bit+ and bolt [also does screw naturally] extractor combo that deal with screw/bolt in question
12-22-09 | 03:28 PM
#3
Thread Starter
Driver
Joined: Dec 2007
Posts: 124
Likes: 2
From: FL
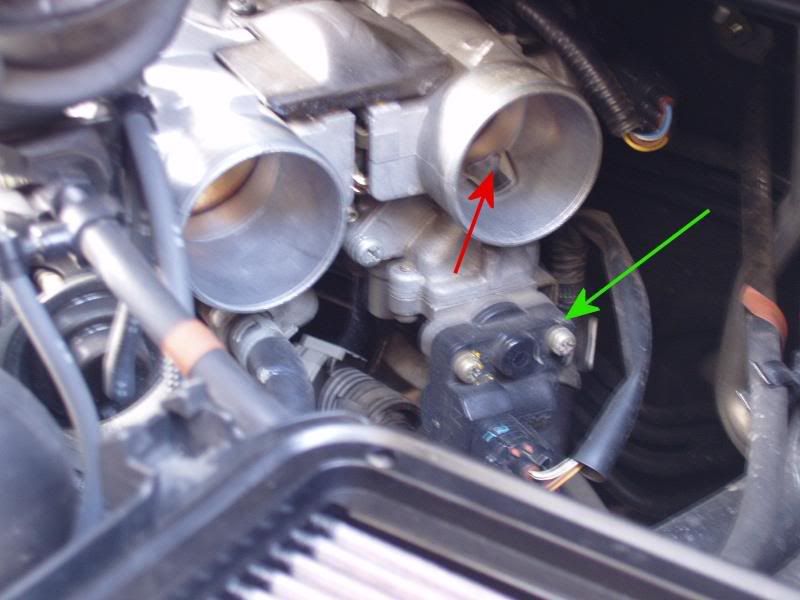
The green arrows are the screws i'm talkin about (not mine obviously lol)...i'm not sure what taking off the intake manifold will do.
I'm ready to just go to town on it and drill it out but being a car I'm hesitant because i'm not sure whats behind it.
Maybe I'll just take it somewhere tomorrow considering my screw removal set did nothing, and the money I spend on something else I could have just gotten it done.
But if anyone knows of a trick that worked for them or a really good removal set I might give it a go. If it comes down to like your saying that I'll have to remove the IM I'll just take it somewhere and i'm sure they can get it out no sweat.
 12-22-09 | 03:56 PM
#5
Thread Starter
Driver
Joined: Dec 2007
Posts: 124
Likes: 2
From: FL

Last edited by schmoozer; 12-22-09 at 04:01 PM.
12-22-09 | 04:22 PM
#6
OH, ok.
Next step. Drill it out, SLOWLY! I mean SLOWLY!
You know where the center of the screw is. You have one screw out, so you KNOW the diameter of the hole. Use a drill bit as close as possible to the hole size, and drill very very slowly. Your basically drilling the head off. I can get some pictures as to what I mean if you'd like.
12-22-09 | 04:42 PM
#7

Use an impact screwdriver and a vice. I've seen this all too many times. These screws are typically super hard to take off and using a hand screwdriver is pretty much out of the question. The results is what you're going through now, unfortunately.
Trending Topics
12-22-09 | 04:47 PM
#8
Thread Starter
Driver
Joined: Dec 2007
Posts: 124
Likes: 2
From: FL
OH, ok.
Next step. Drill it out, SLOWLY! I mean SLOWLY!
You know where the center of the screw is. You have one screw out, so you KNOW the diameter of the hole. Use a drill bit as close as possible to the hole size, and drill very very slowly. Your basically drilling the head off. I can get some pictures as to what I mean if you'd like.
Next step. Drill it out, SLOWLY! I mean SLOWLY!
You know where the center of the screw is. You have one screw out, so you KNOW the diameter of the hole. Use a drill bit as close as possible to the hole size, and drill very very slowly. Your basically drilling the head off. I can get some pictures as to what I mean if you'd like.
12-22-09 | 04:53 PM
#9
Thread Starter
Driver
Joined: Dec 2007
Posts: 124
Likes: 2
From: FL
I'm not familiar with an impact screwdriver though, could you explain?
The screw removal kit I have pretty much just kept digging and digging and cutting out more and more medal so there is basically just a smooth metal crater there. I have this gut feeling that drilling it out is the only cure now. But this impact screwdriver sounds interesting.
12-22-09 | 05:55 PM
#10
Using the known diameter of the hole the screws goes in, find a drill bit as CLOSE to that size, without being bigger.
SLOWLY drill into the EXACT center of the screw, VERY VERY slow!
As you can see int he pictures, the drill bit is the same size as the screw/hole. So the drill bit comes to a tip. So you will basically me drilling thought to just past the edge of the screw head. So you be drilling the screw head off. Then once you get the sensor off, you can simply use pliers to unscrew the threaded piece.
Let me know if this helps, or if it;s total crap.
12-22-09 | 06:36 PM
#11
Lexus Champion
Joined: Dec 2007
Posts: 1,673
Likes: 2
From: New Jersey
asg, that drill bit is way too big for that screw. you're picture is so wrong its not funny. you must drill a pilot hole, much smaller than the screw, for the screw extractor to fit in. there's a chart that has what size for what on Irwin webpage [google it].
I was wrong saying remove intake manifold. I was thinking of my 93 3vz-fe engine and where the IACV is located on that. the pic you now have showing it gave me better insight.
I think you might be able to get it off without removing anything -- just use a impact driver with the appropriate bit in it. otherwise, you might have to remove the throttle body , with the idle control still attached, and place in a vice and then use the impact driver. this is of course only if you cant get enough leverage without removing it. and dont forget to use some pb blaster too.
you might take comfort in knowing it could be a far worse situation you're in with a messed up bolt/screw.
with impact hammer it will only take 3 seconds and that screw will be loose. and like you said you would do, I would replace it with a hex of appropriate dimensions and thread pitch - and make sure not to torque too tight.
12-22-09 | 10:43 PM
#12

Intermediate
Joined: Nov 2009
Posts: 409
Likes: 0
From: WI
I agree 100% with iicoolpass. The impact driver will be the "right tool for the job" which can be priceless. A little pb blaster and an impact driver, provided you have enough room to tap the impact driver with a hammer, and you should have the screw out in a second or two. If you have never used an impact driver, the socket end is kinda like a rachet, meaning it works in both directions. With that being said just remember right tighty, lefty loosy and you should be all set. By the way the impact driver is a great addition to any dyi'er tool box.
12-23-09 | 01:29 AM
#13
Lexus Champion
Joined: Dec 2007
Posts: 1,673
Likes: 2
From: New Jersey
here's another method i have used many times . its similar to the impact driver.
pb blaster, then get screwdriver that fits that screw perfectly, preferably stubby, and while putting twist on it, give hard smacks with a hammer on the end handle of screwdriver [as if to push the driver into the screw perfectly head on] while turning very hard especially when it gets smacked.
the impact driver and hammer might be too tight a fit, but this might work better for you. but if the screw just strips more or something, then do what you got to do to remove that part of the engine, secure it or put it on table and carefully so not to damage anything, use an impact driver with a heavy hammer. practice first on something else you dont care about to get the hang of it and make sure its on loosen direction.
Last edited by llcoolpass; 12-23-09 at 01:33 AM.

Thread
Thread Starter
Forum
Replies
Last Post