
Brake System Overhaul - Seized Calipers
 07-24-10, 03:09 PM
#1
Driver
Thread Starter
Join Date: Jul 2010
Location: N.J. All Day
Posts: 183
Likes: 0
Received 0 Likes
on
0 Posts
So I'm at a point where my 99 ES300 needs a front braking system overhaul. I need new front calipers, rotors, pads, brake hoses and brake fluid. My first quote was $900 (parts & labor; 3 hour job; local shop) and I could keep getting quotes but I'm ready to learn something new and useful. Fortunately I have a co-worker buddy who is mechanically inclined with 20+ years prior auto mechanic experience and is now our senior systems engineer at work. Plus he owes me a favor for helping him rebuild our data comm server room  . I might even record it and/or take photos in an attempt to create a front caliper DIY tutorial... I dont know yet... Let me think about it.
8/9/10 EDIT: I ended up doing this job myself.
Pricing front calipers online I found these at RockAuto. Anyone using these? Thoughts?
http://cardone.com/English/club/memb...PARTNUM=171974
A-1 CARDONE Part # 171974 Reman. Bolt-On Ready Caliper w/Installation Hardware & Pad; OE Metal Piston; Ceramic Pads; Front Left
Price: $64.79
Core: $50.00
Total: $114.79

http://cardone.com/English/club/memb...PARTNUM=171975
A-1 CARDONE Part # 171975 Reman. Bolt-On Ready Caliper w/Installation Hardware & Pad; OE Metal Piston; Ceramic Pads; Front Right
Price: $64.79
Core: $50.00
Total: $114.79

Any advice, direction, product review, recommedations, concerns, constructive criticism and personal experience is definitely welcomed...
Thanks,
Ryan
. I might even record it and/or take photos in an attempt to create a front caliper DIY tutorial... I dont know yet... Let me think about it. 8/9/10 EDIT: I ended up doing this job myself.
Pricing front calipers online I found these at RockAuto. Anyone using these? Thoughts?
http://cardone.com/English/club/memb...PARTNUM=171974
A-1 CARDONE Part # 171974 Reman. Bolt-On Ready Caliper w/Installation Hardware & Pad; OE Metal Piston; Ceramic Pads; Front Left
Price: $64.79
Core: $50.00
Total: $114.79
http://cardone.com/English/club/memb...PARTNUM=171975
A-1 CARDONE Part # 171975 Reman. Bolt-On Ready Caliper w/Installation Hardware & Pad; OE Metal Piston; Ceramic Pads; Front Right
Price: $64.79
Core: $50.00
Total: $114.79
Any advice, direction, product review, recommedations, concerns, constructive criticism and personal experience is definitely welcomed...
Thanks,
Ryan
Last edited by decypher; 08-09-10 at 03:20 PM.
 08-01-10, 03:30 PM
#2
Driver School Candidate

Join Date: Jul 2010
Location: FL
Posts: 34
Likes: 0
Received 0 Likes
on
0 Posts
Go with the Centric Posi-Quiet units..they are cheaper and come with a protective coating that will resist surface rust.
CENTRIC Part # 14244176 (Front Left Loaded) $57.99 Caliper + $35.00 Core = $92.99
CENTRIC Part # 14244175 (Front Right Loaded) $57.99 Caliper + $35.00 Core = $92.99
I have used them in other applications with no issues to date, good luck
CENTRIC Part # 14244176 (Front Left Loaded) $57.99 Caliper + $35.00 Core = $92.99
CENTRIC Part # 14244175 (Front Right Loaded) $57.99 Caliper + $35.00 Core = $92.99
I have used them in other applications with no issues to date, good luck
08-01-10, 10:06 PM
#3
Driver
Thread Starter
Join Date: Jul 2010
Location: N.J. All Day
Posts: 183
Likes: 0
Received 0 Likes
on
0 Posts
Thanks for the heads up on the Centrics...
I ended up ordering these from RockAuto:
RAYBESTOS Part # RC10973QS FL; Quiet Stop; Loaded w/ Hardware & Ceramics - $80.79
RAYBESTOS Part # RC10974QS FR; Quiet Stop; Loaded w/ Hardware & Ceramics - $80.79
I also picked up an ATP cabin air filter - $26.79 (found the DIY tutorial on CL and figured I'd change it)
Picked up new front rotors from PartsGeek:
Brembo Blanks; Front; Part #: W0133-1607102 - $38.41 ea. plus shipping. (FYI-- I ordered these rotors at 4pm on Thursday and I received them the next morning. I highly recommend PartsGeekDOTcom, if the price is right and they have what you need, give em a shot.
Right after I purchased said rotors I found comparable Brembo blanks for $36.95 plus free shipping on orders over $50, (buy a pair). The sku/part# is W0133-1607102 @ OvernightAutoPartsDOTcom. I've never heard of them before nor have I purchased from them but the price and free shipping is a phenomenal deal.
Now I just have to hit the local auto parts store to get new brake hoses and fresh fluid!
08-01-10, 10:28 PM
#4

Brake jobs with brand new everything goes really fast, basically unbolt and bolt back on. Getting the parts on the car should take no more than and hour for both sides and maybe another half hour to bleed the brakes. Your friend should be able to knock this out in no time. I can only think of about 12 bolts that will need to be removed other than the lug nuts.
Two caliper to caliper mount bolts per side.
Two caliper mount to knuckle bolts per side.
One, bolt from flex hose to hard line per side.
One, bolt from flex hose to caliper per side.
Repeat and everything will be back together with new parts.
Bleed and you're golden.
Two caliper to caliper mount bolts per side.
Two caliper mount to knuckle bolts per side.
One, bolt from flex hose to hard line per side.
One, bolt from flex hose to caliper per side.
Repeat and everything will be back together with new parts.
Bleed and you're golden.
08-01-10, 10:40 PM
#5
Driver
Thread Starter
Join Date: Jul 2010
Location: N.J. All Day
Posts: 183
Likes: 0
Received 0 Likes
on
0 Posts
I think im gonna give it a shot myself and have him give me a hand when I flush out and replace the old fluid. I was debating on whether to bleed the old school 2-man way, gravity bleed, or just buy a motive power bleeder. I just cant justify spending the dough on a power bleeder I might use once or twice every year or 2. (like maybe helping a buddy, or use it on my wife's car etc.)
What's the deal with flushing / bleeding these cars and the ABS actuator?
What's the deal with flushing / bleeding these cars and the ABS actuator?
08-09-10, 09:38 AM
#6
Driver
Thread Starter
Join Date: Jul 2010
Location: N.J. All Day
Posts: 183
Likes: 0
Received 0 Likes
on
0 Posts
DISCLAIMER: I AM NOT LIABLE OR RESPONSIBLE FOR ANY DAMAGE YOU INCUR WHETHER IT BE YOURSELF, YOUR PROPERTY, OTHER HUMAN BEINGS or THEIR PROPERTY.
Job Description: Front Rotors, Front Calipers, Pads and Rubber Hydraulic Brake Flex Hoses
Well I ended up doing the entire front brake job myself and what a better way to learn something hands on, by doing it yourself. Now by ALL MEANS-- I AM NOT an auto mechanic & I DO NOT recommend replacing your own brakes unless you plan on rigorously testing them in a remote location away from civilization so you do not injure or KILL YOURSELF or OTHERS. However if you are a DIY'er then by all means work SMART and take all safety precautions while working on your vehicle. And, WEAR SAFETY GLASSES! If I forget to cover something or the pictures are not self-explanatory feel free to ask any questions.
I'd like to thank Lexusk8 for creating the Brake Pad and Rotor Change DIY Tutorial with pictures. Here's a link: https://www.clublexus.com/forums/es3...or-change.html
I initially followed this tutorial until the time came for me to remove the rotor... the old rotor was frozen/rusted on to the hub assembly, I must've tried whacking it from the inside with a hammer for 45 minutes until I tried using the 10-24 pitch bolts to push it off, even that didn't work, I just ended up snapping the bolt!

What I did to finally get the rusted rotor off was find two bolts smaller then the hole where the caliper bracket mounts; I used GRADE 8, 5/16" bolts, 3" long, 5/16" washers and 5/16" nuts. See how this works in the appropriate picture below.
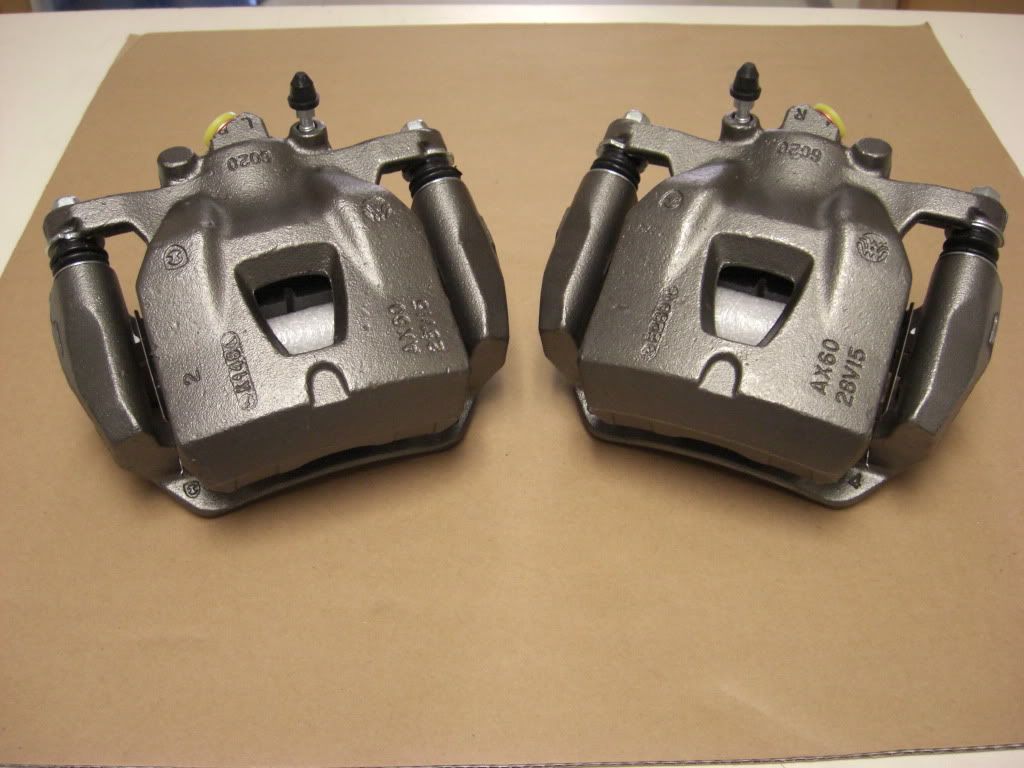

New parts
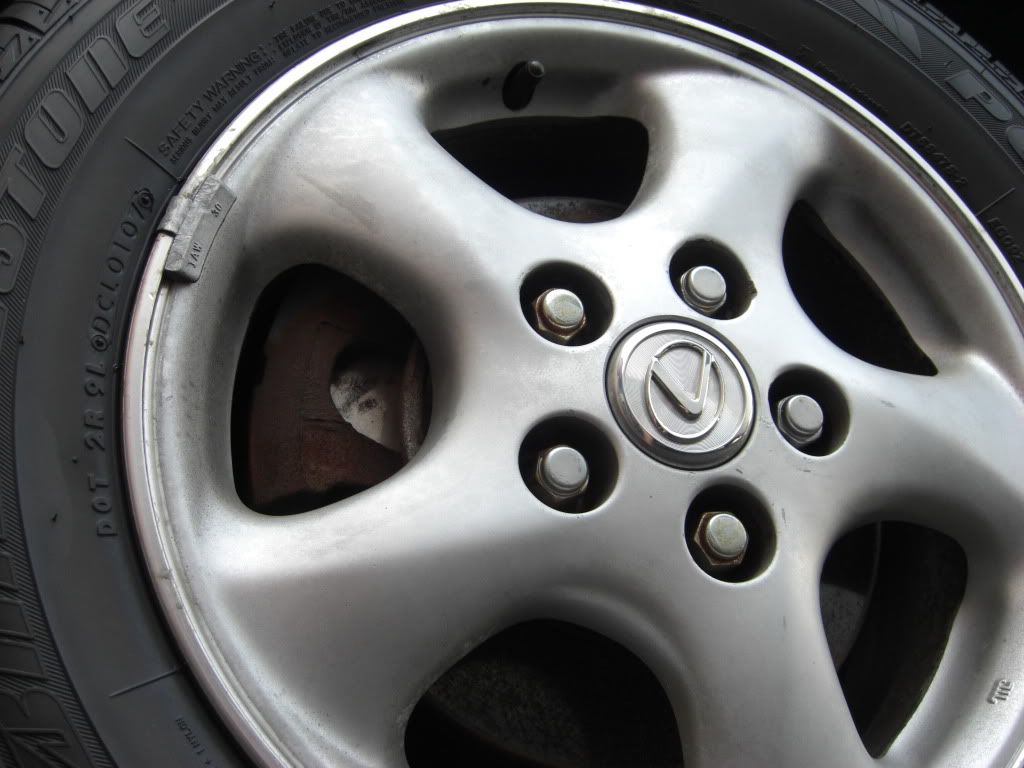
Front Left Seized Caliper
Loosen appropriate lugs, place wheel chocks in front and behind back tires and jack the vehicle up. (*Note: The Burns Hyundai plate holder needs to come off asap LOL I forgot about that stupid thing... I was a salesman there for about 3 years and I actually had the "proverbial old man" trade this ES300 in with 36K miles on it in 2004. It now has 67K miles.)
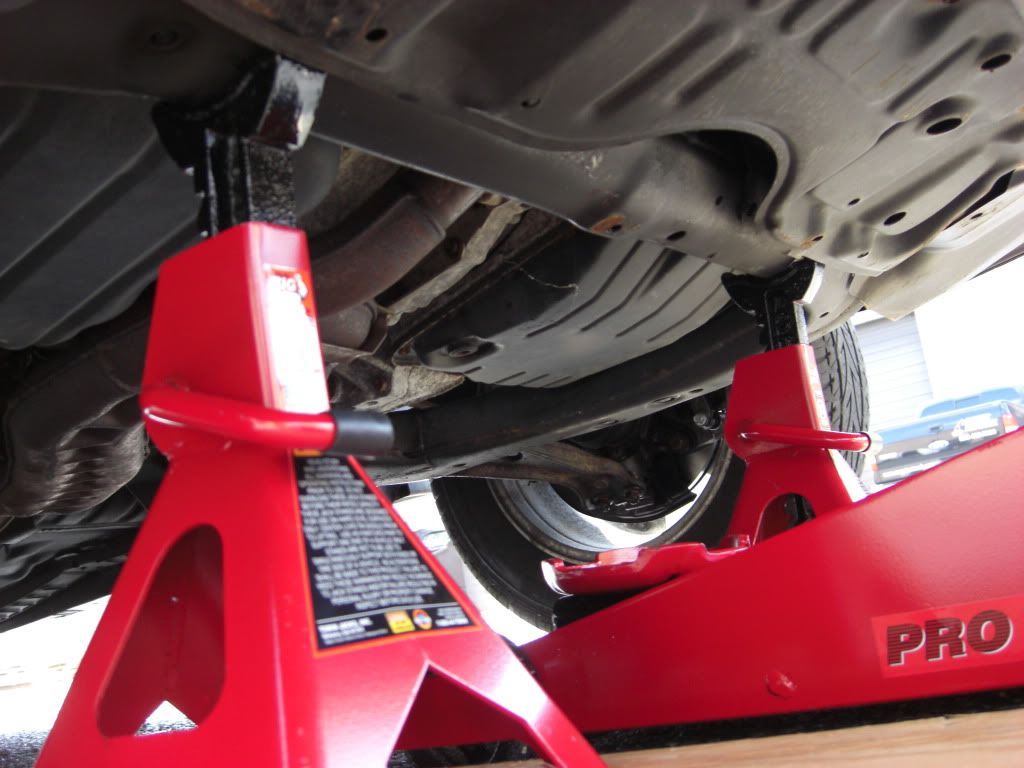
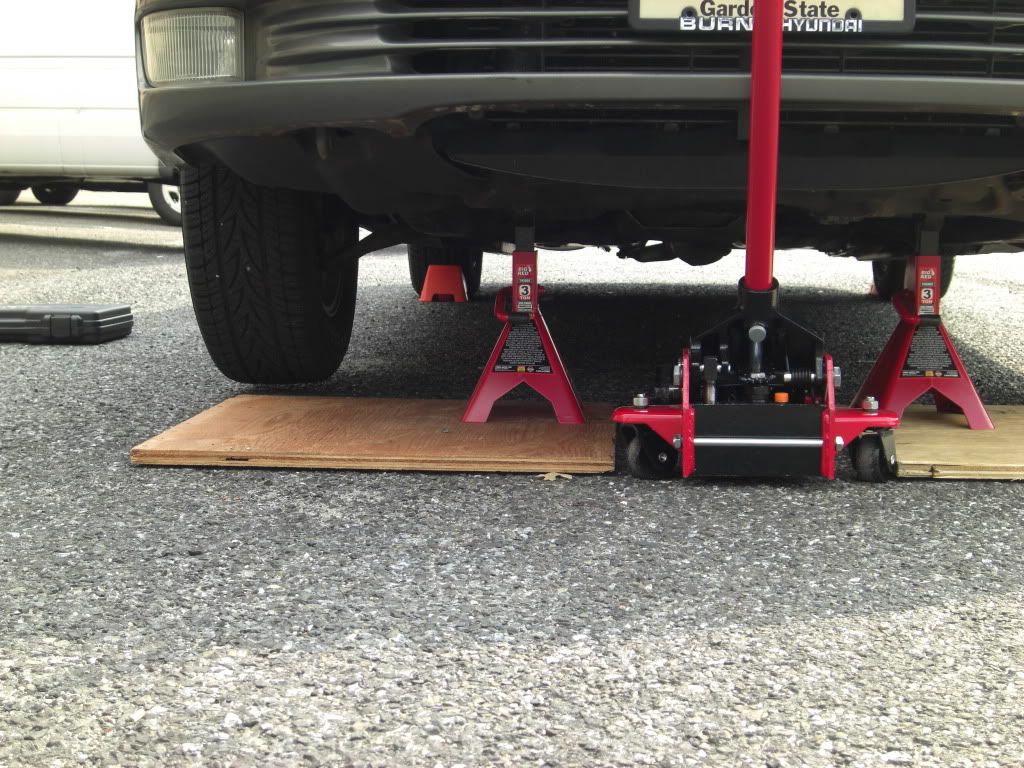
Jack stand placement (I set my jack stands on plywood since I was working on asphalt that was heated by the summer sun all day. The plywood prevents the stands from sinking into the asphalt which in turn could cause the car to fall and crush me or my body parts). Slowly lower the floor jack until the vehicle is supported by the jack stands. Give the vehicle a few good shoves to make sure it IS secure. Remove the lug nuts and wheel(s).

Here we go...
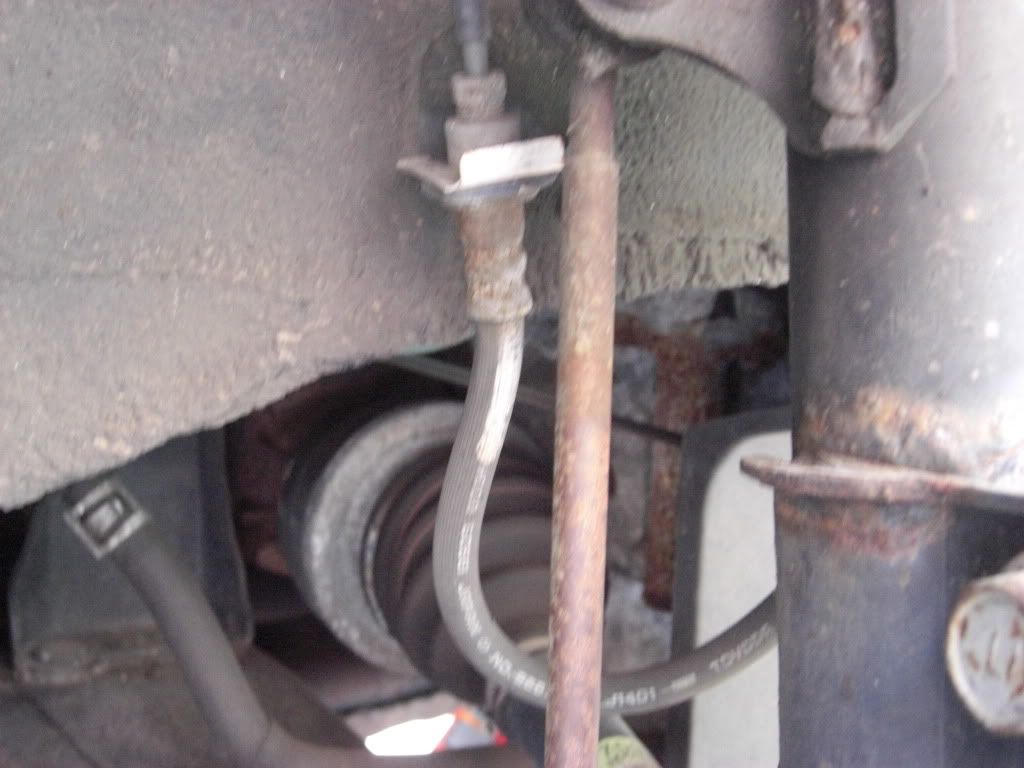
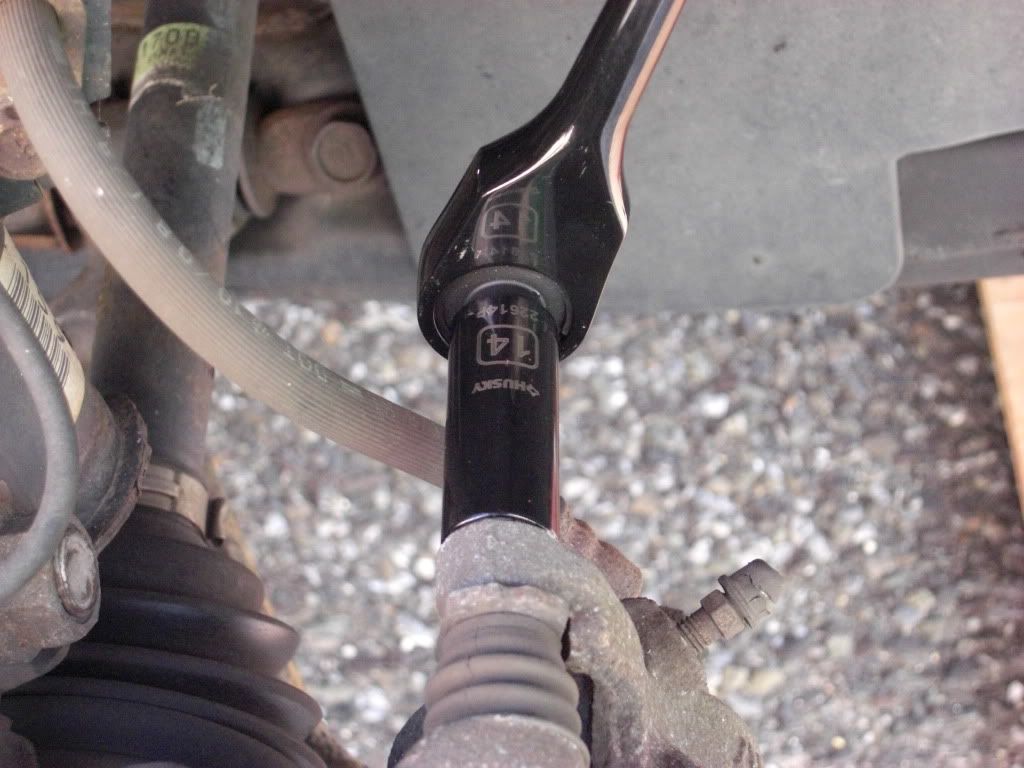
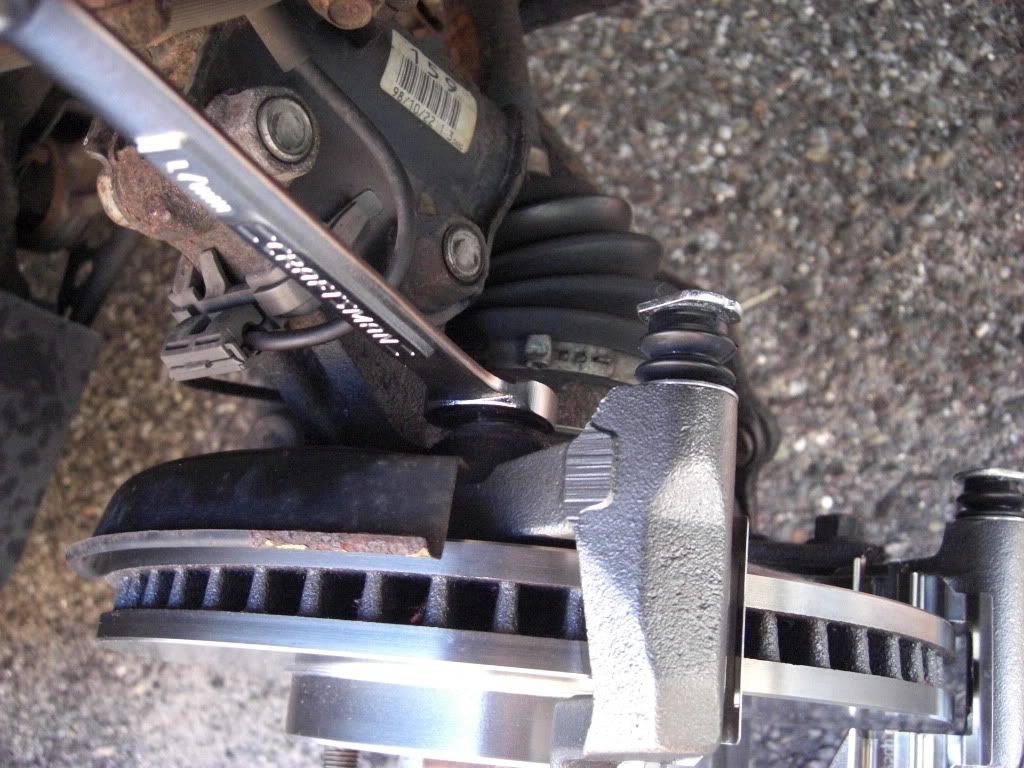
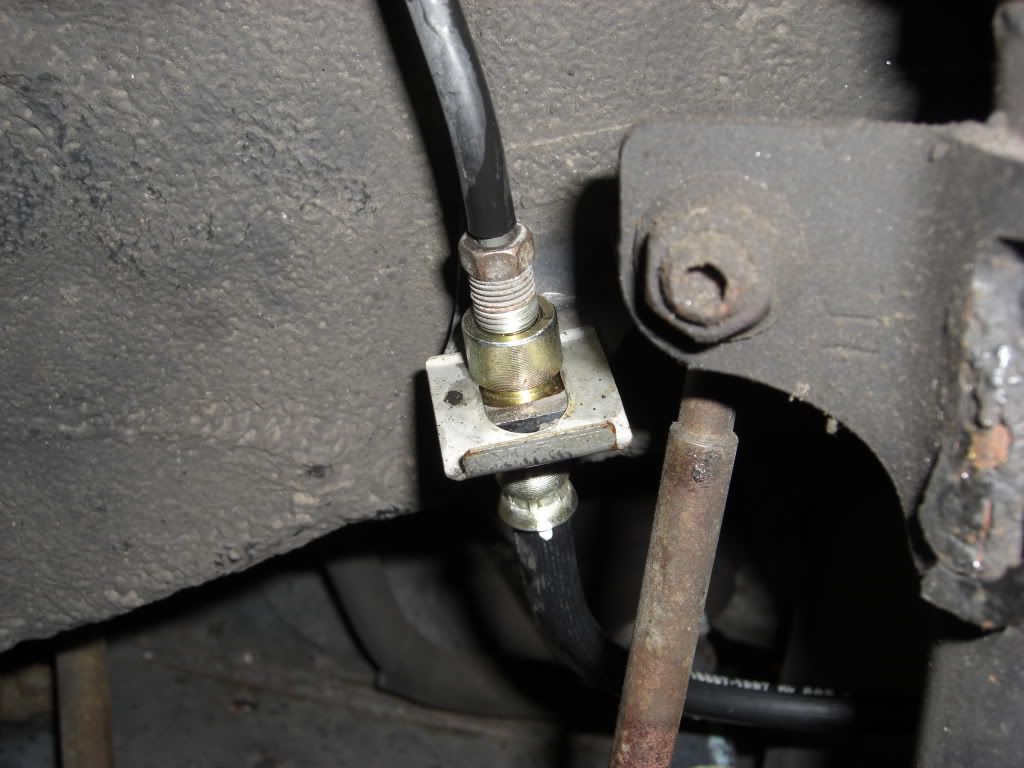
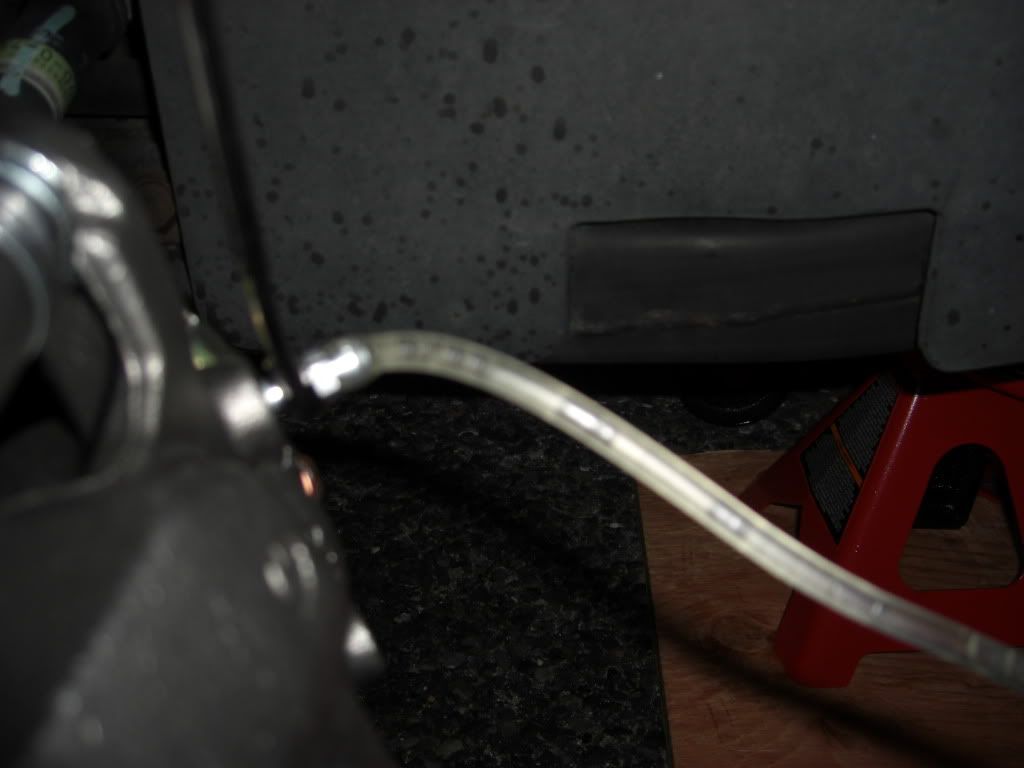
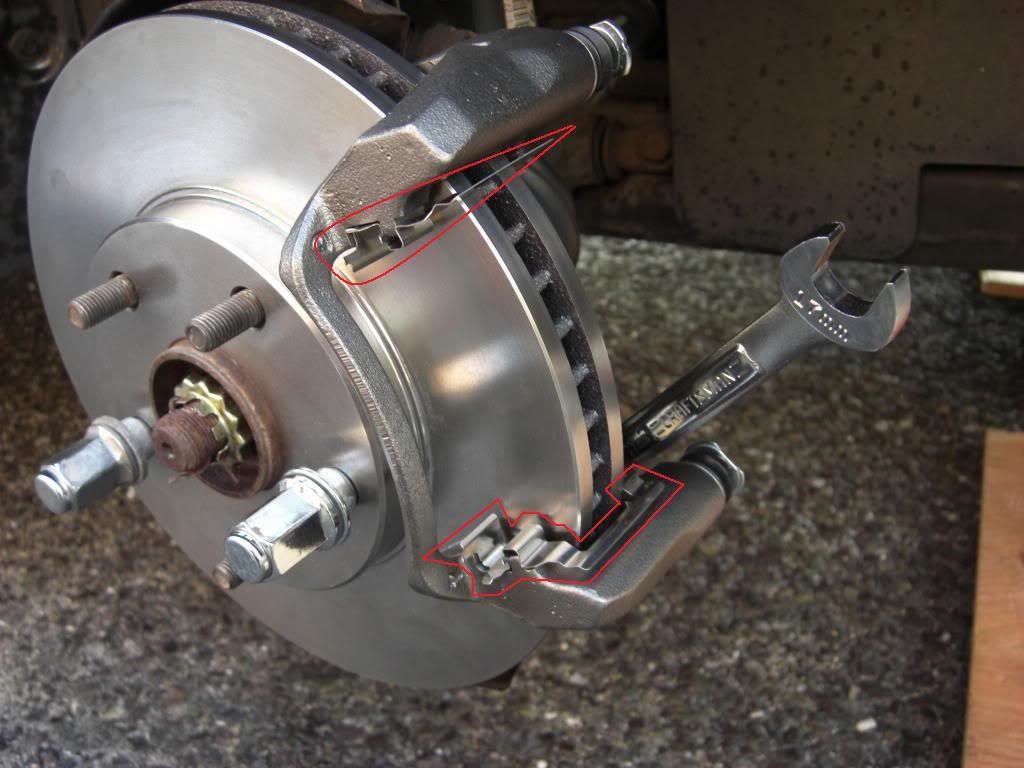
*Flex hose reference #1* Notice the layout of the hydraulic rubber flex hose. I highly suggest that if you have never done this type of install that you take A LOT of pictures to use as reference so you can properly install the new flex hose the same exact way. Be sure to notice how it bends/curves and around which components. The new hose MUST be installed the SAME EXACT WAY.
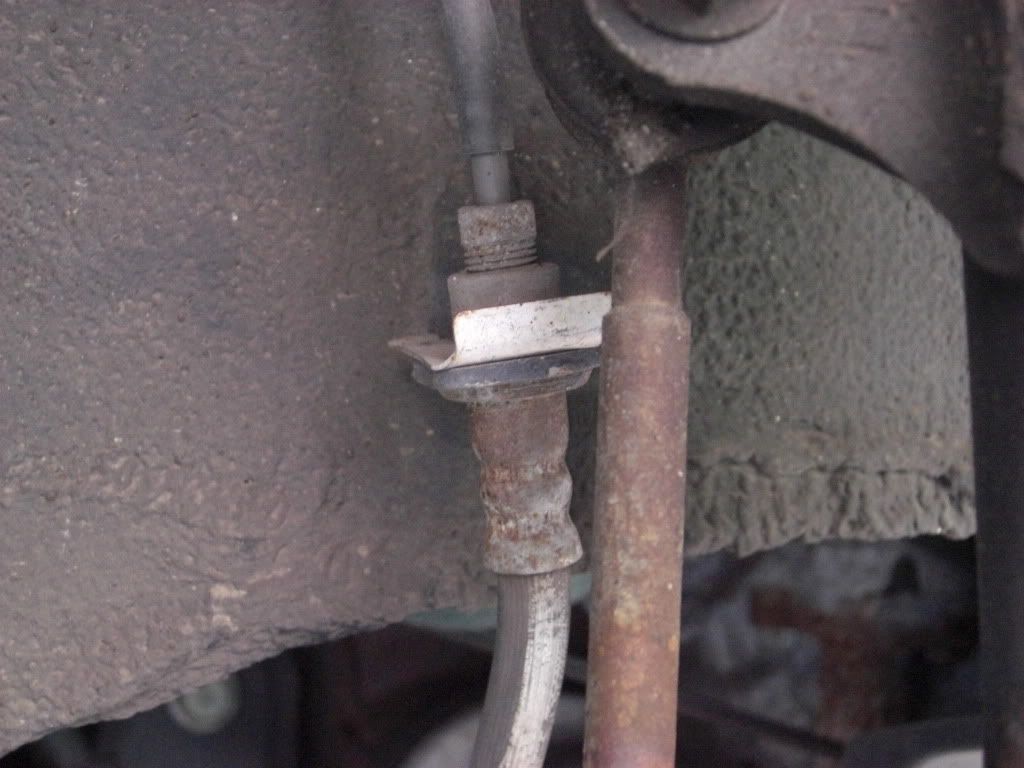
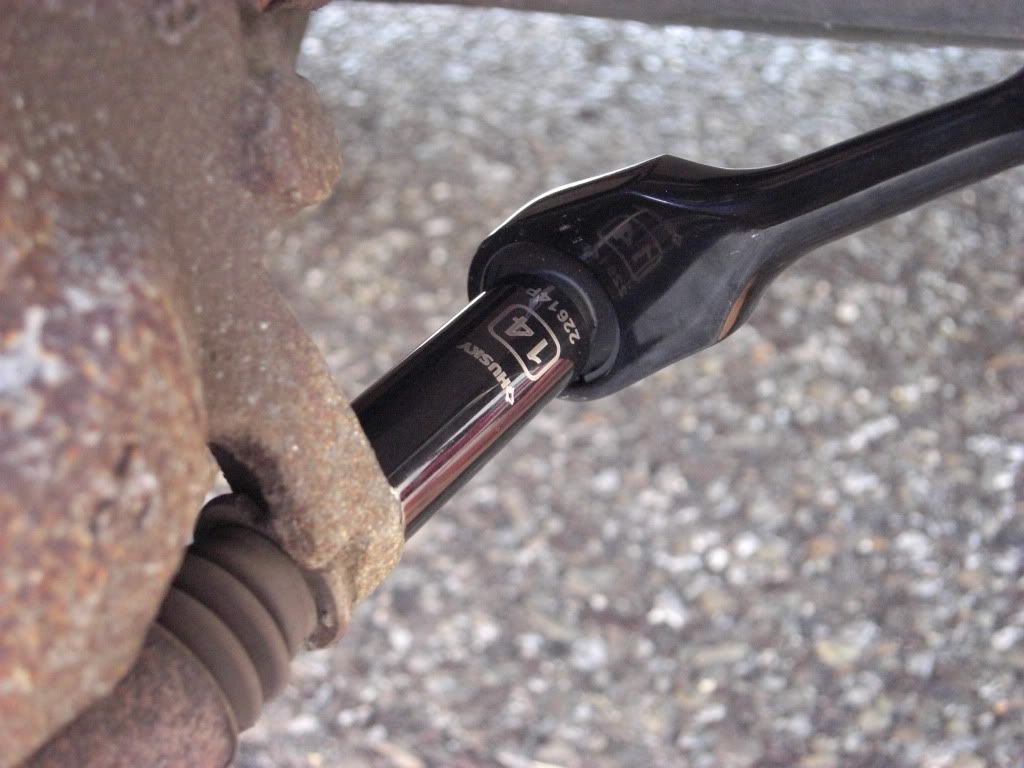
*Flex hose reference #2* Notice how the retaining clip is situated-- this is extremely important.
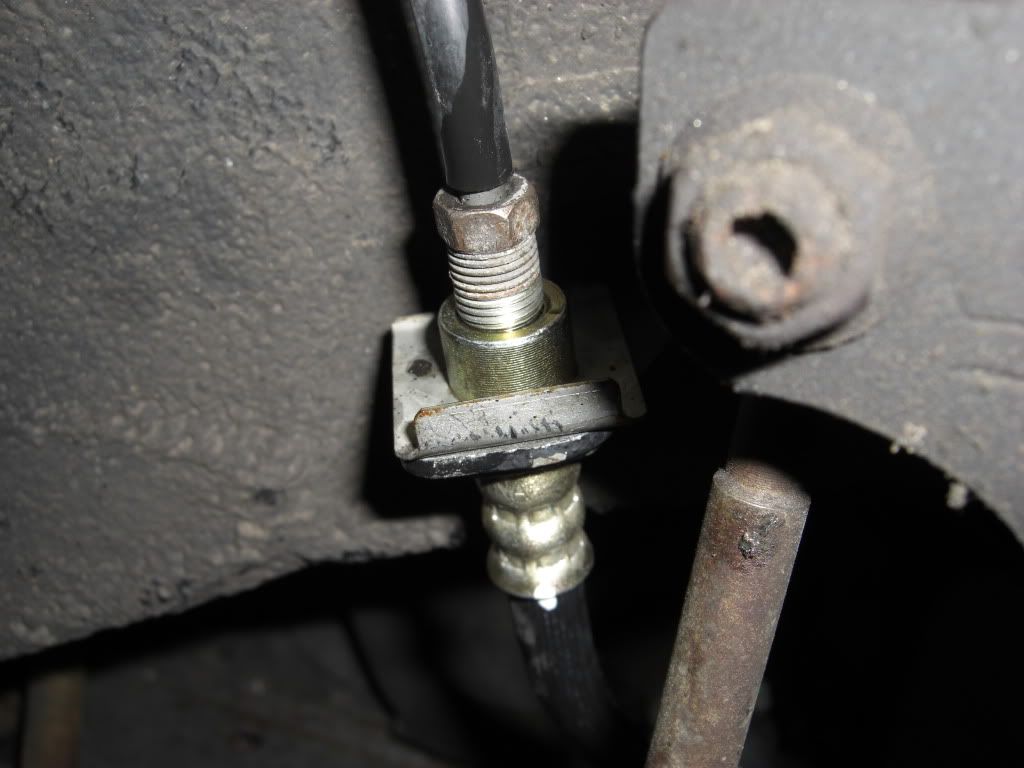
*Flex hose reference #3* Notice how the flex hose wraps around and how the bracket is attached.
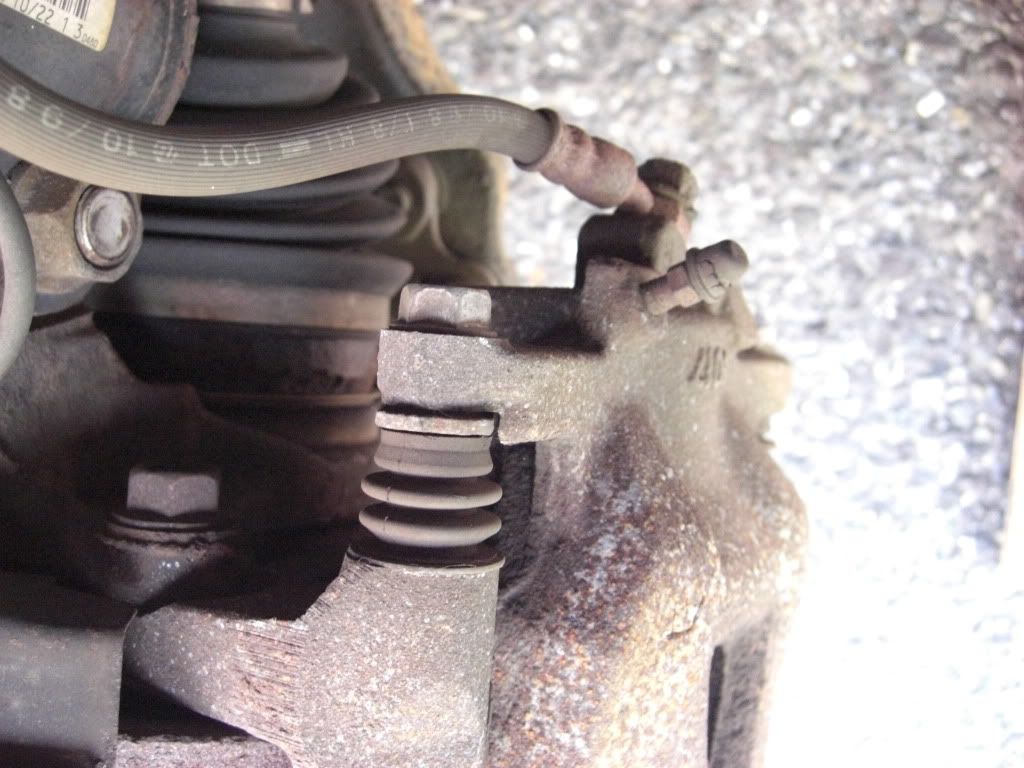
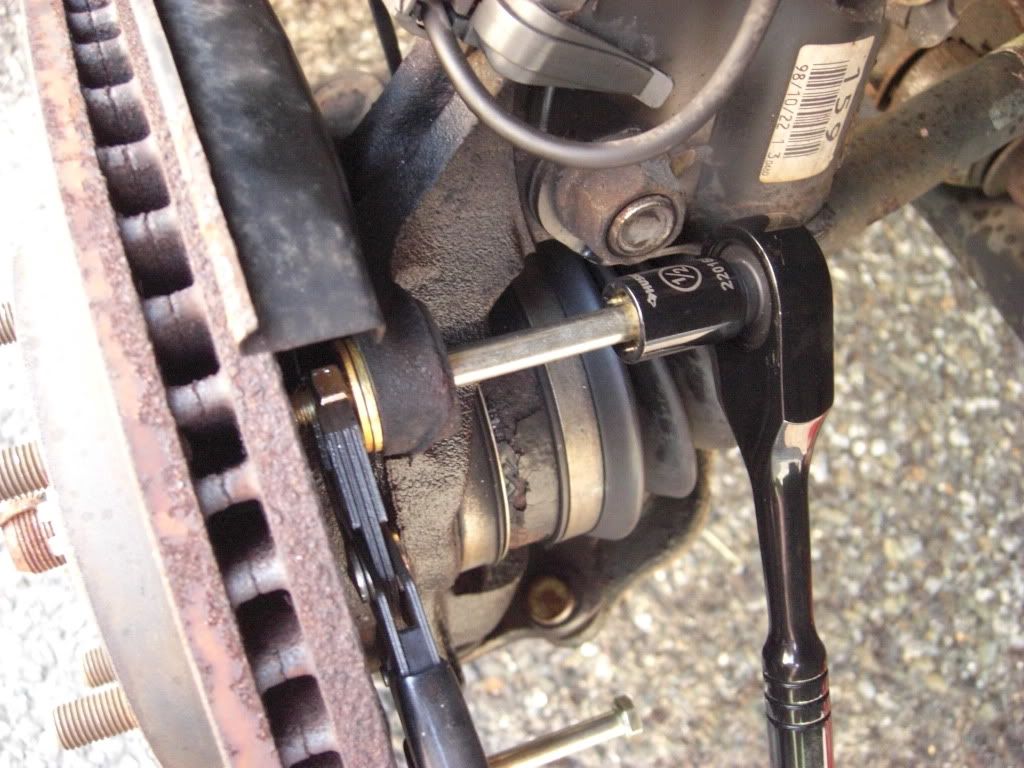
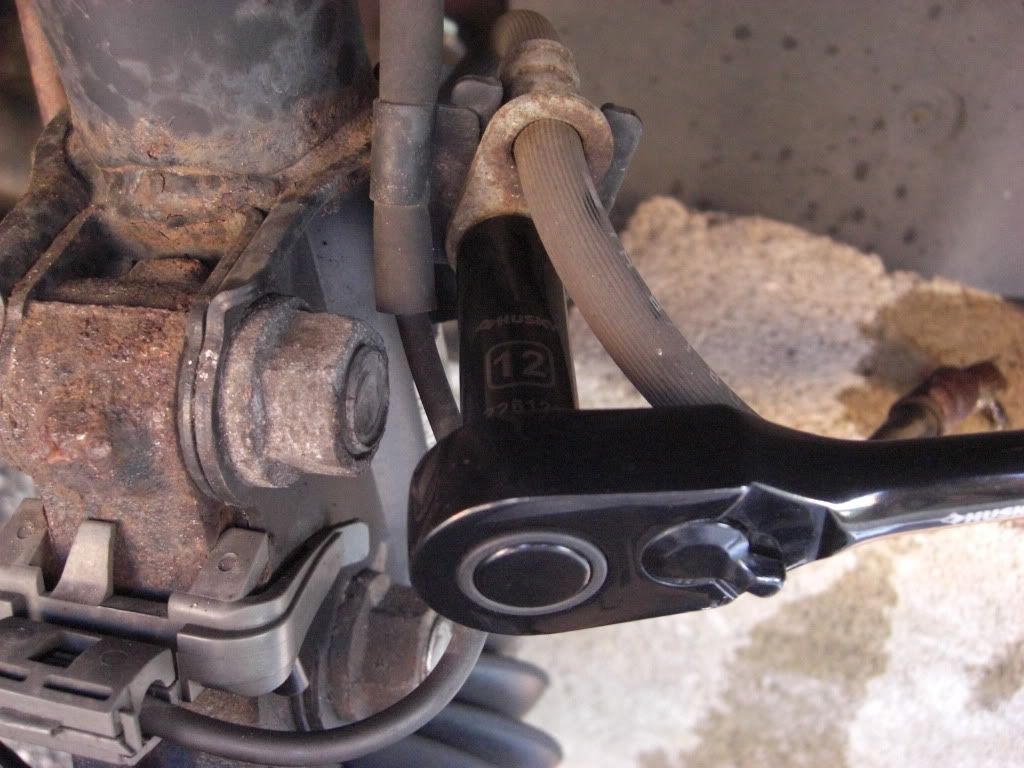
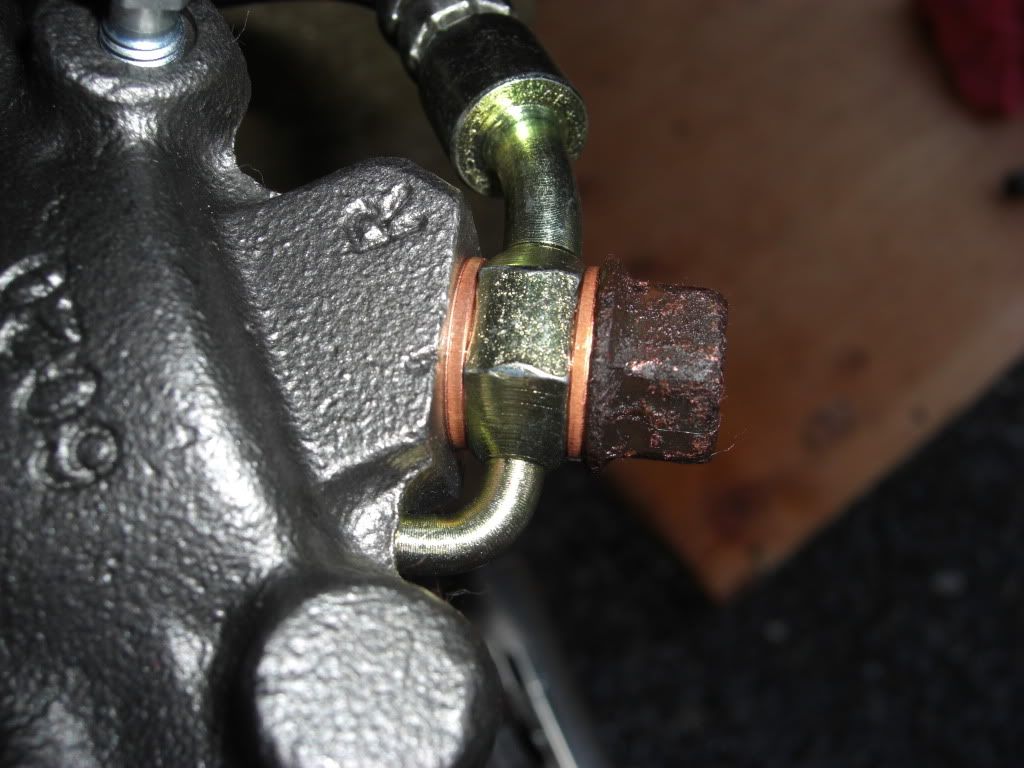
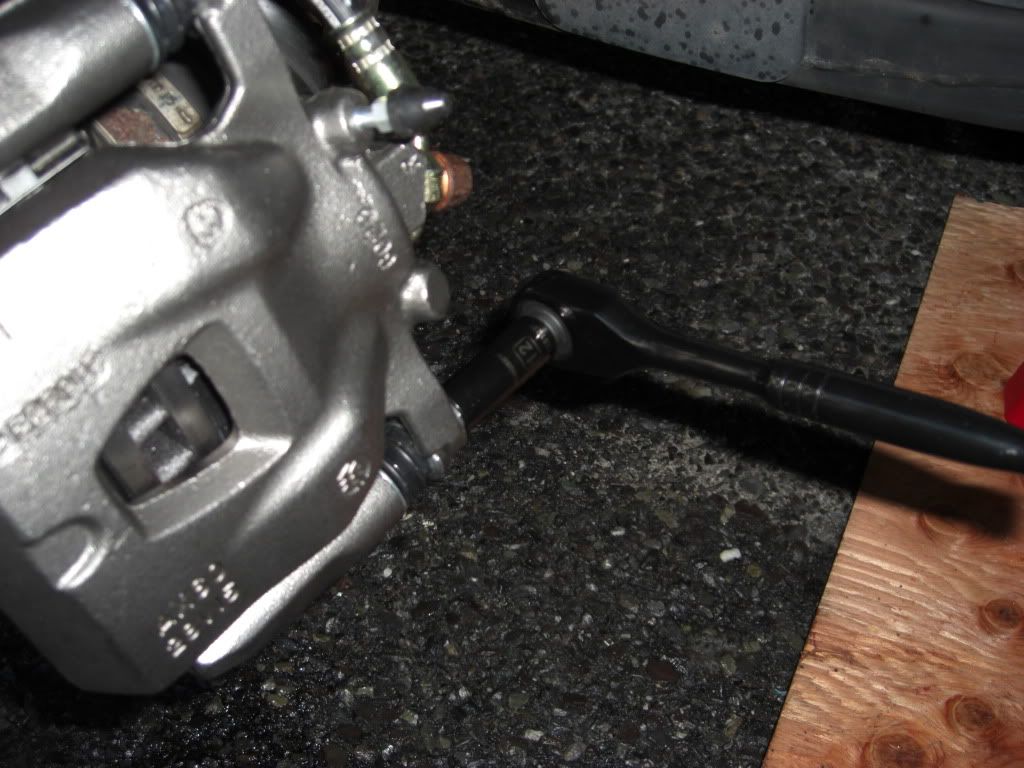
*Flex hose reference #4* Notice how the flex hose connects to the caliper. Be sure to note the metal hook that connects to the corresponding hole on the caliper. (you can't see it in this picture but you will know what I'm talking about when you see it)
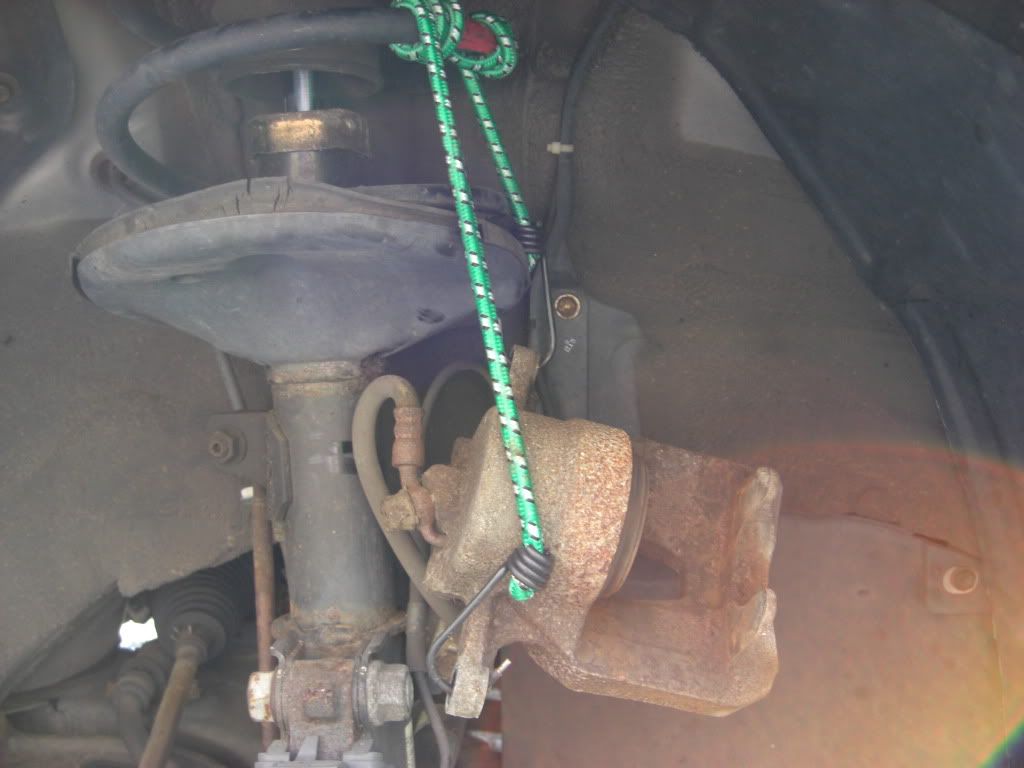
Remove the bolts that hold the caliper on to the bracket. Either find something tall enough to carefully hold the caliper piston away from your work area or use a bungee cord to suspend it. You don't want to let the weight of the piston hang freely by the brake hose, especially if you are not replacing the flex hose.
*Method I used to remove the frozen / rusted rotor* Insert the Grade 8, 5/16" bolt/washer/nut combinations (^see above) into the caliper bracket torque plate holes. Place one bolt set into the two openings. Next, use something to hold the nut in place (I used my Craftsman Robo Grips -- friggin awesome tool that I highly recommend to everyone!), then use a wrench or ratchet to tighten the bolts, tighten each one -- go back and forth to each configuration -- a few turns for each bolt until the pressure forces the rotor off. You may hear a loud "POP" once the rotor is free.
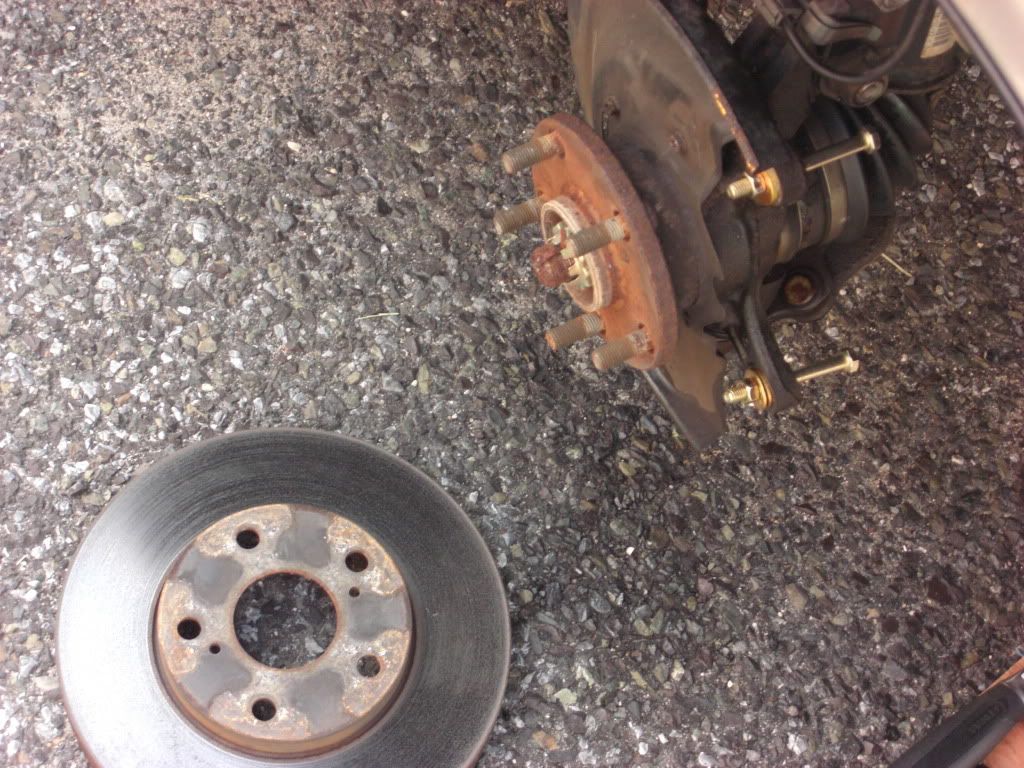
Ahhhhhhh, YES, I finally got that **** off of there! Muaahahahaaa!!
Job Description: Front Rotors, Front Calipers, Pads and Rubber Hydraulic Brake Flex Hoses
Well I ended up doing the entire front brake job myself and what a better way to learn something hands on, by doing it yourself. Now by ALL MEANS-- I AM NOT an auto mechanic & I DO NOT recommend replacing your own brakes unless you plan on rigorously testing them in a remote location away from civilization so you do not injure or KILL YOURSELF or OTHERS. However if you are a DIY'er then by all means work SMART and take all safety precautions while working on your vehicle. And, WEAR SAFETY GLASSES! If I forget to cover something or the pictures are not self-explanatory feel free to ask any questions.
I'd like to thank Lexusk8 for creating the Brake Pad and Rotor Change DIY Tutorial with pictures. Here's a link: https://www.clublexus.com/forums/es3...or-change.html
I initially followed this tutorial until the time came for me to remove the rotor... the old rotor was frozen/rusted on to the hub assembly, I must've tried whacking it from the inside with a hammer for 45 minutes until I tried using the 10-24 pitch bolts to push it off, even that didn't work, I just ended up snapping the bolt!
What I did to finally get the rusted rotor off was find two bolts smaller then the hole where the caliper bracket mounts; I used GRADE 8, 5/16" bolts, 3" long, 5/16" washers and 5/16" nuts. See how this works in the appropriate picture below.
New parts
Front Left Seized Caliper
Loosen appropriate lugs, place wheel chocks in front and behind back tires and jack the vehicle up. (*Note: The Burns Hyundai plate holder needs to come off asap LOL I forgot about that stupid thing... I was a salesman there for about 3 years and I actually had the "proverbial old man" trade this ES300 in with 36K miles on it in 2004. It now has 67K miles.)
Jack stand placement (I set my jack stands on plywood since I was working on asphalt that was heated by the summer sun all day. The plywood prevents the stands from sinking into the asphalt which in turn could cause the car to fall and crush me or my body parts). Slowly lower the floor jack until the vehicle is supported by the jack stands. Give the vehicle a few good shoves to make sure it IS secure. Remove the lug nuts and wheel(s).
Here we go...
*Flex hose reference #1* Notice the layout of the hydraulic rubber flex hose. I highly suggest that if you have never done this type of install that you take A LOT of pictures to use as reference so you can properly install the new flex hose the same exact way. Be sure to notice how it bends/curves and around which components. The new hose MUST be installed the SAME EXACT WAY.
*Flex hose reference #2* Notice how the retaining clip is situated-- this is extremely important.
*Flex hose reference #3* Notice how the flex hose wraps around and how the bracket is attached.
*Flex hose reference #4* Notice how the flex hose connects to the caliper. Be sure to note the metal hook that connects to the corresponding hole on the caliper. (you can't see it in this picture but you will know what I'm talking about when you see it)
Remove the bolts that hold the caliper on to the bracket. Either find something tall enough to carefully hold the caliper piston away from your work area or use a bungee cord to suspend it. You don't want to let the weight of the piston hang freely by the brake hose, especially if you are not replacing the flex hose.
*Method I used to remove the frozen / rusted rotor* Insert the Grade 8, 5/16" bolt/washer/nut combinations (^see above) into the caliper bracket torque plate holes. Place one bolt set into the two openings. Next, use something to hold the nut in place (I used my Craftsman Robo Grips -- friggin awesome tool that I highly recommend to everyone!
), then use a wrench or ratchet to tighten the bolts, tighten each one -- go back and forth to each configuration -- a few turns for each bolt until the pressure forces the rotor off. You may hear a loud "POP" once the rotor is free.Ahhhhhhh, YES, I finally got that **** off of there! Muaahahahaaa!!
Last edited by decypher; 08-09-10 at 03:33 PM. Reason: ...
08-09-10, 10:15 AM
#7
Nice writeup I look forward to the rest. I just had the rear brakes done this winter but I'll refer back to this thread when it comes time for my front brakes, looks easy enough to do. Good pictures too btw.
Trending Topics
08-09-10, 02:58 PM
#8
Driver
Thread Starter
Join Date: Jul 2010
Location: N.J. All Day
Posts: 183
Likes: 0
Received 0 Likes
on
0 Posts
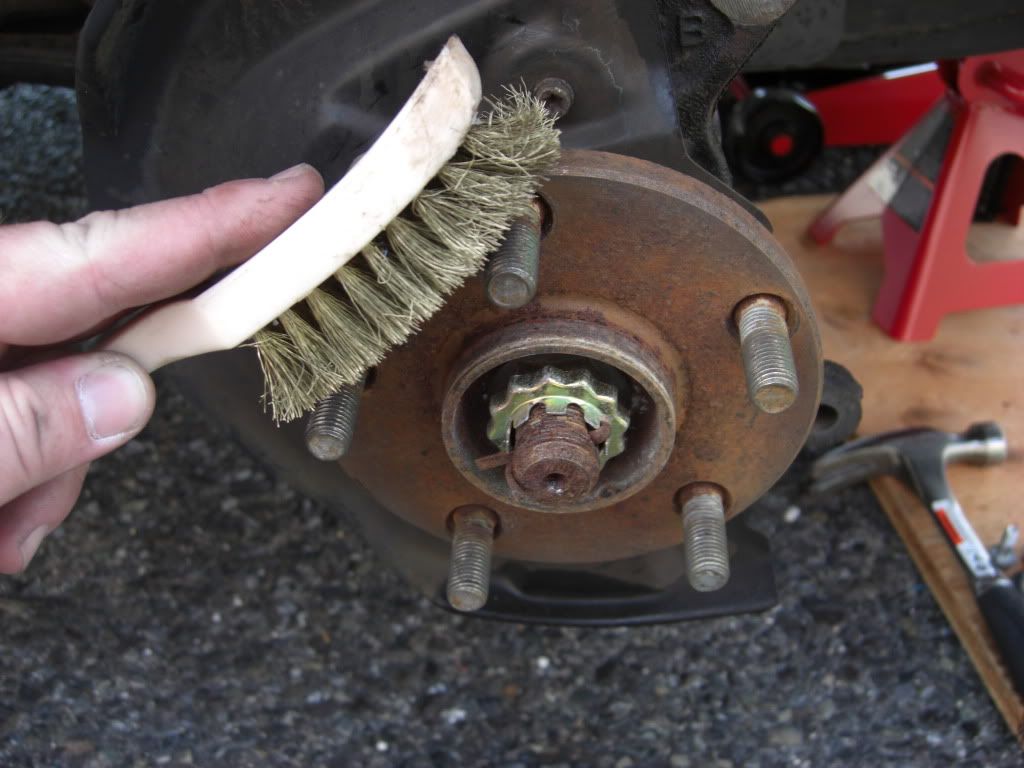
Here I used a wire brush to clean the face of the hub and the lug stud threads.
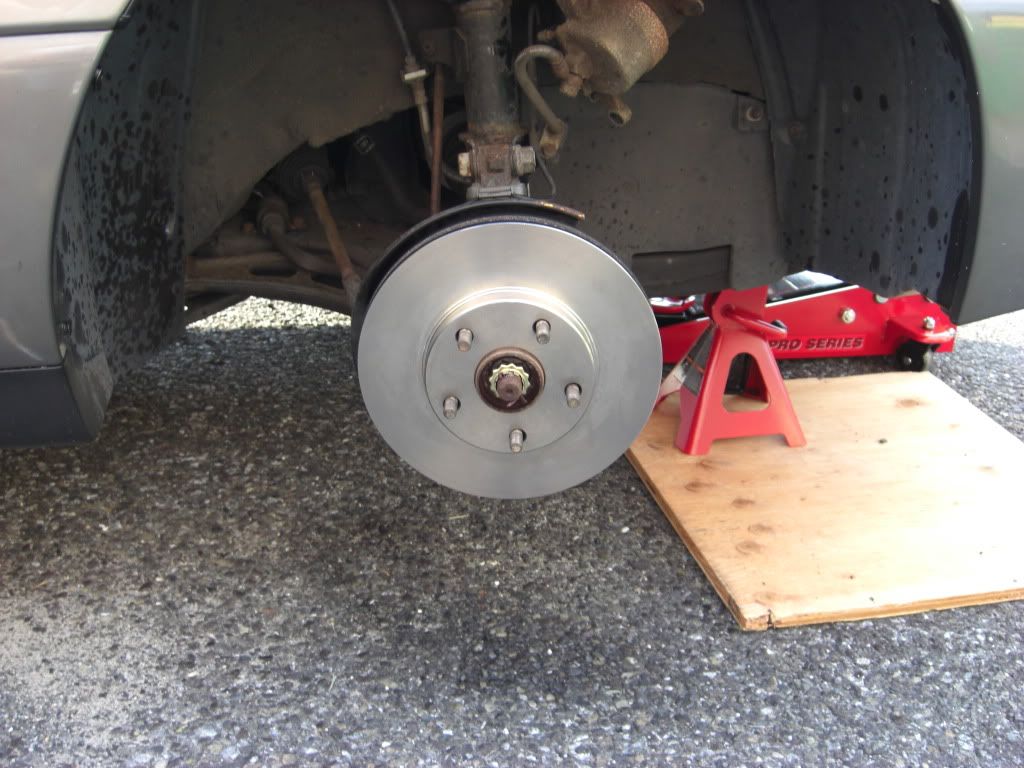
Shazam! Look how clean I got it, LOL. I'm kidding, pop on the new rotor.

Add the new caliper bracket and bolt it on to the torque plate. (I temporarily threw a couple lugs on just to help keep everything in place)
By this point I removed the bungee cord so I wouldn't forget about it plus it was time to start making a mess by diconnecting the brake hose at the caliper end. I carefully slid a concrete block inside the wheel well so I could set the old piston on it and disconnect the brake hose. (*Note: Brake fluid will immediately start dripping out very slowly once the bolt and copper washers/gaskets are removed from the caliper piston assembly)
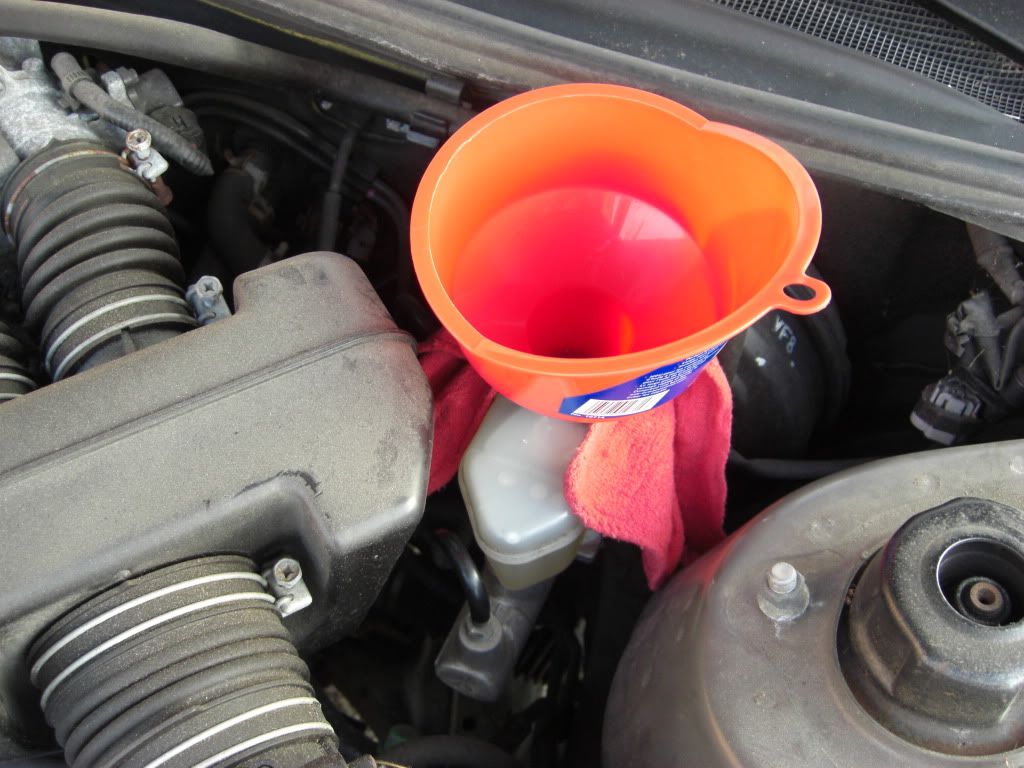
Make sure your hood is open and you have plenty of the proper brake fluid as well as a funnel and lots of clean rags. (*Note: Brake fluid will remove paint from a car. If you spill brake fluid on your paint DO NOT rub it with a rag, instead pour fresh water over the affected area)
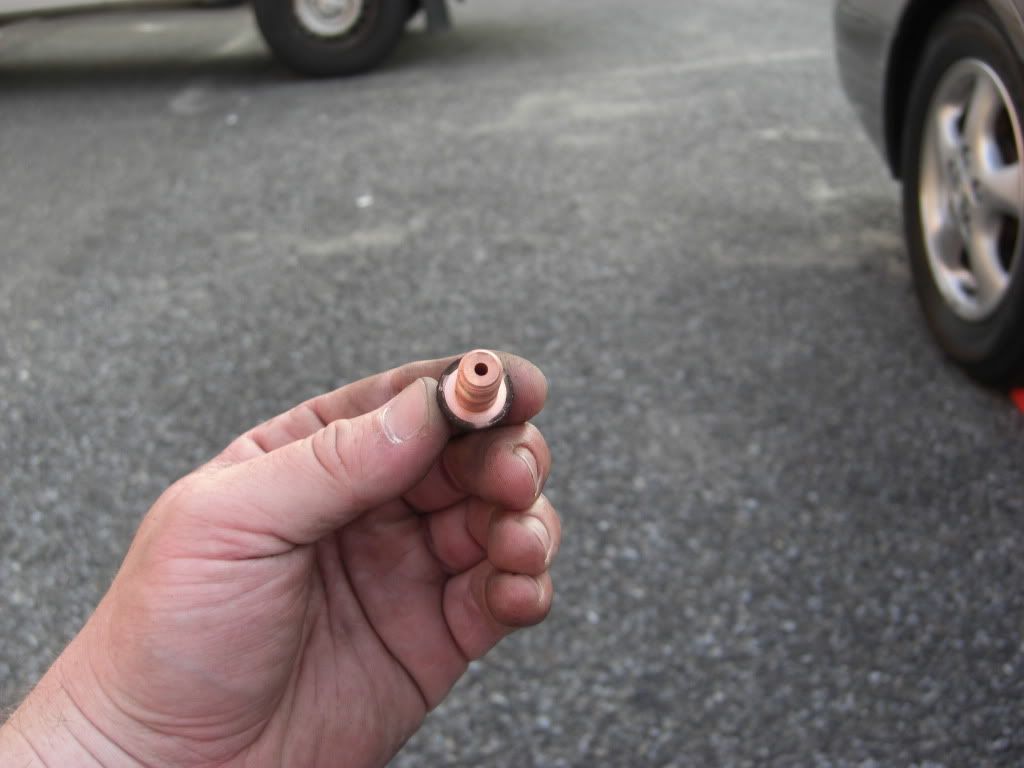
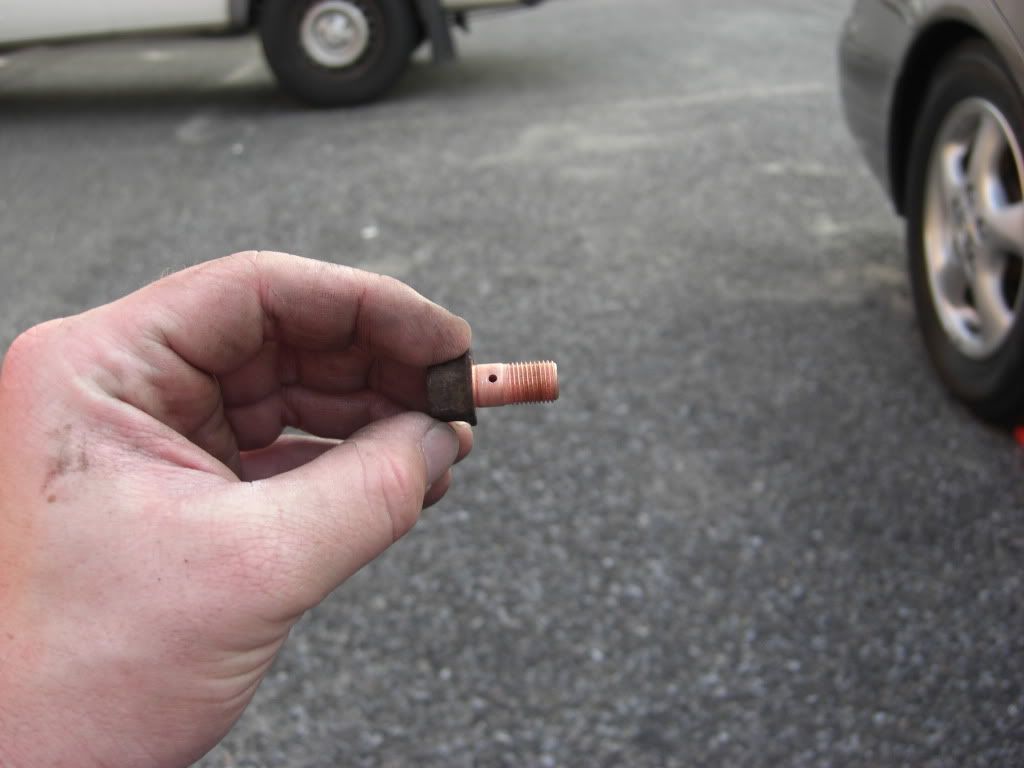
Set the bolt from the old piston/hose assembly aside and discard the old copper gaskets. You will need to reuse the bolt unless you bought a new one. Clean out the "jets" (holes) on the bolt with brake cleaner to remove any debris inside then let it dry. (*Note: Sometimes you will get new copper gaskets with the purchase of a new caliper and/or with a new brake hose. You DO NOT want to reuse the old copper washers.)
Remove the center bracket holding the brake hose. (*Note: the orientation of how the hose is attached. Be sure to keep the piece (speed sensor bracket?) beneath the brake hose mounting plate in-place when installing the new hose, you will see the tab that holds it in place...)
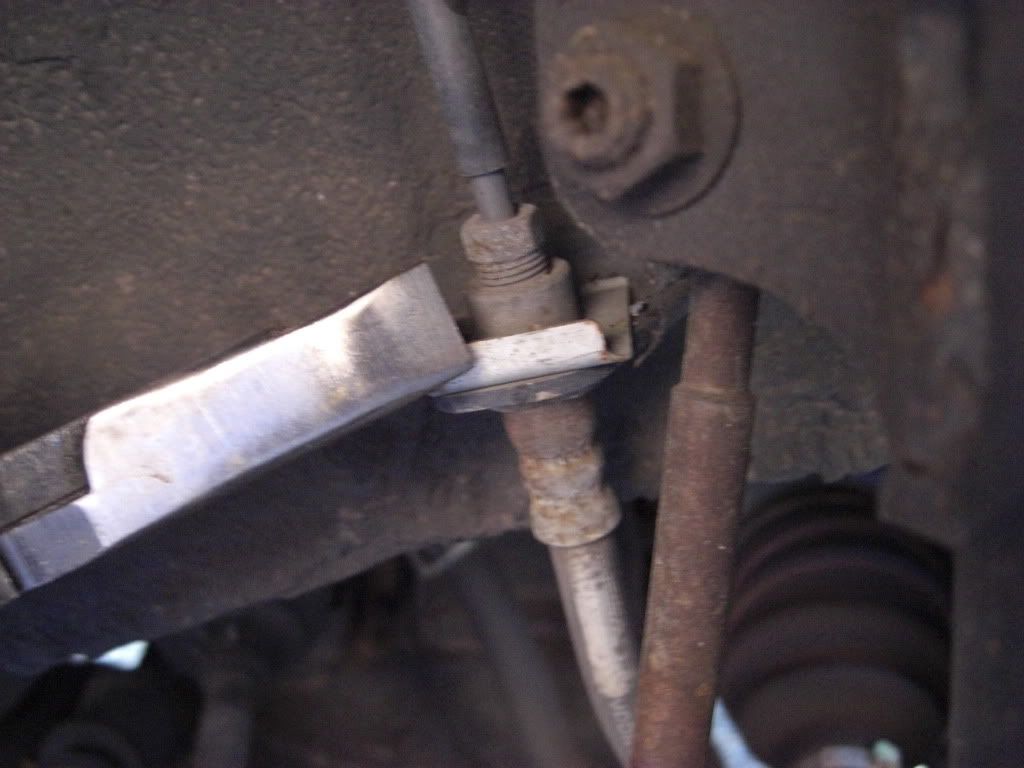
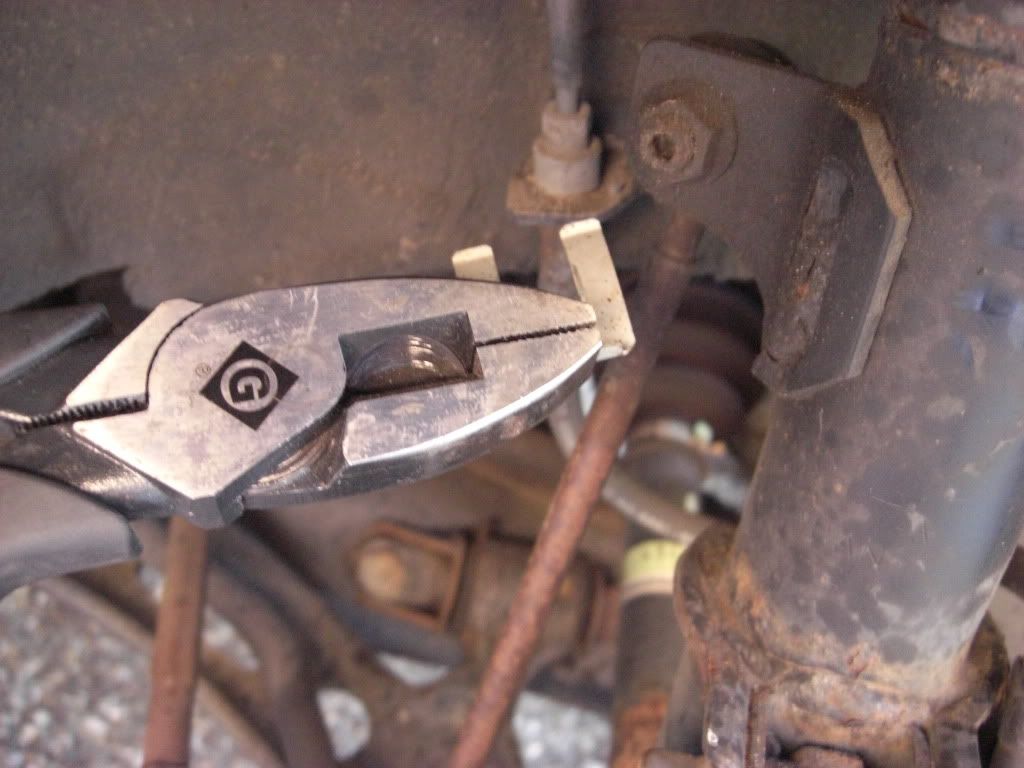
Continue to follow the old brake hose upward. I used a pair of pliers to grab and pull the retaining clip.(*Note: NOTICE how it curves around--VERY IMPORTANT--the new hose will need to be identical.) (**Note: The retaining clip fits into a goove on the end of the flex hose before it connects to the steel line)
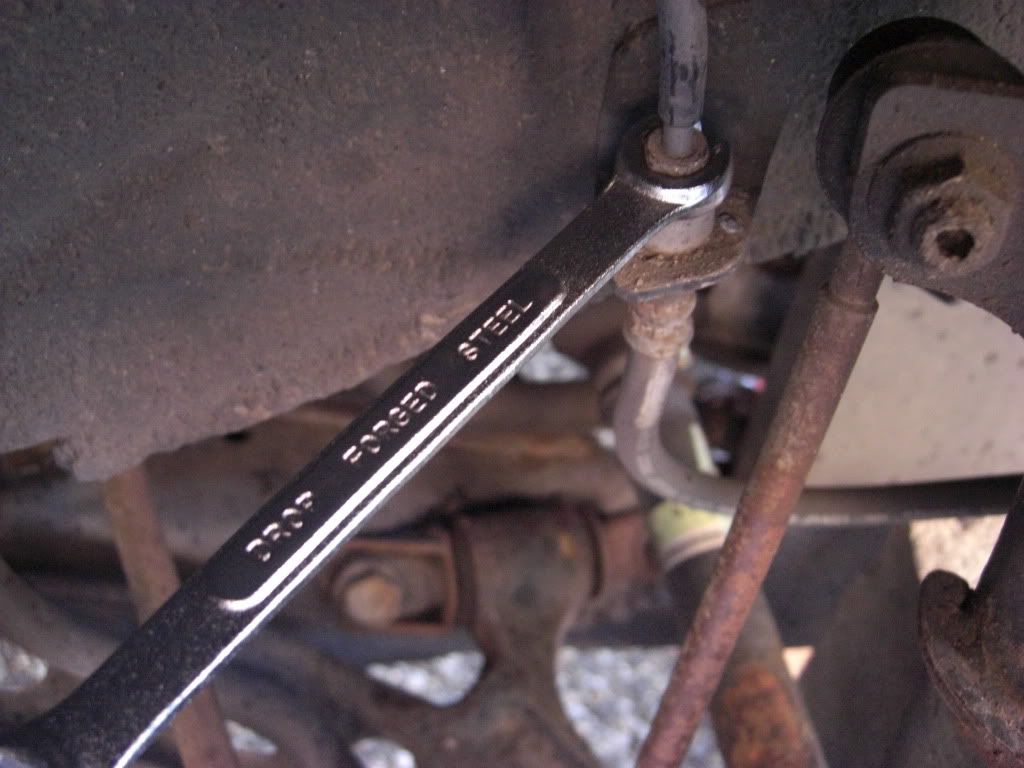
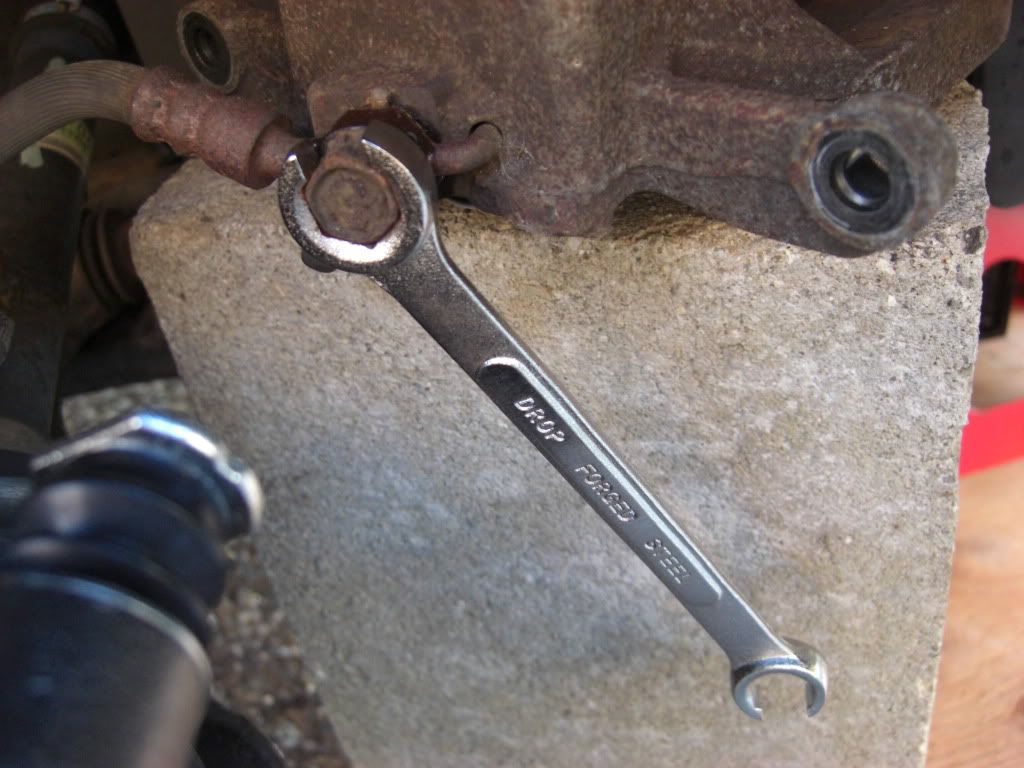
Make sure your safety glasses are still on. Disconnect the STEEL LINE from the flex hose with a 10mm LINE WRENCH so you don't strip the nut on the hydraulic steel brake line. Be cautious of dripping brake fluid.

Install the new flex hose to the steel line... See the groove where the retaining clip slides in? OK, good. Make sure the retaining clip is situated on top of the bracket as seen ^above. Thread the steel line into the brake hose and tighten it with a 10mm Line Wrench according to the appropriate torque spec.
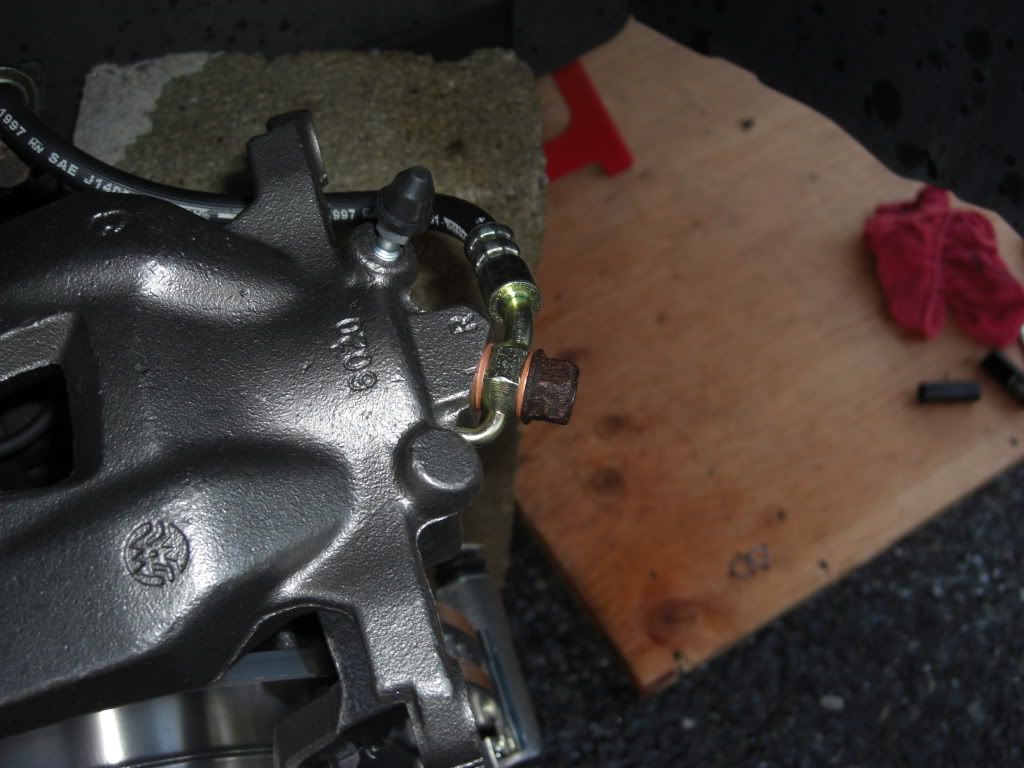
Bolt the flex hose to the caliper using new copper gaskets and torque to spec. (*Note: the hook on the hose... it goes into the appropriate hole on the caliper.) Now, had I done this job before I probably would've mounted the new caliper on to it's bracket w/ pads prior to the above steps but when I was running back and forth to check the brake fluid level I got a tad out of sync LOL... Hey, you live and you learn! If anyone has advice on installation steps feel free to share...
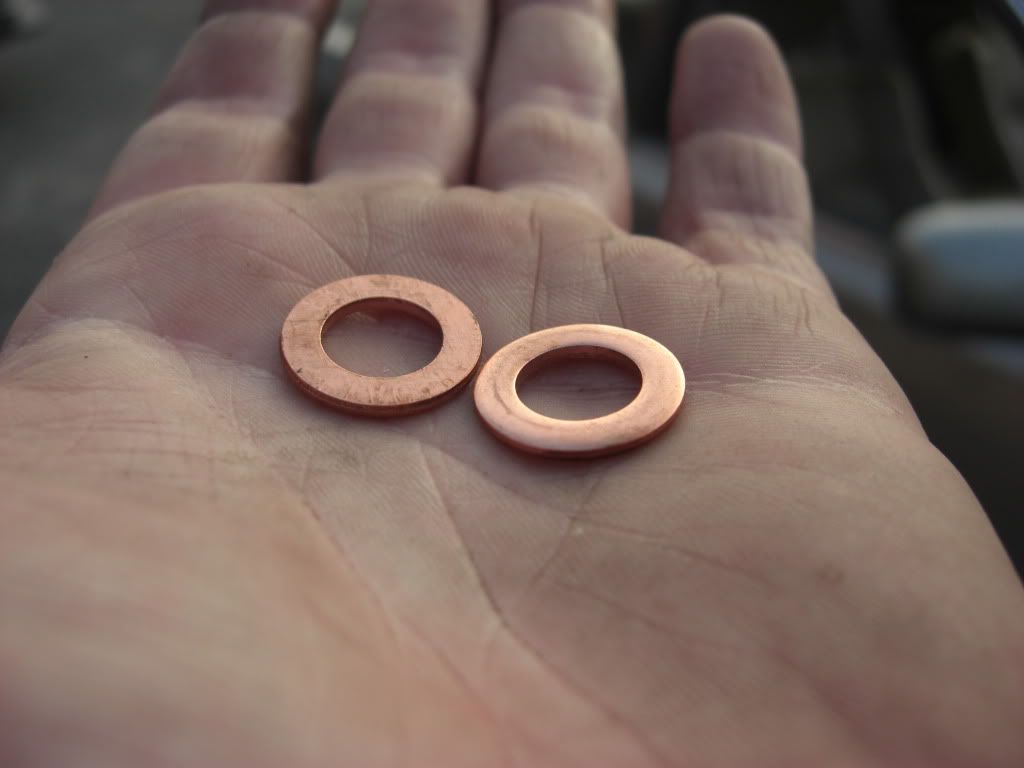
Notice that the gaskets have flat and rounded sides.
Bada-bing-bada-boom
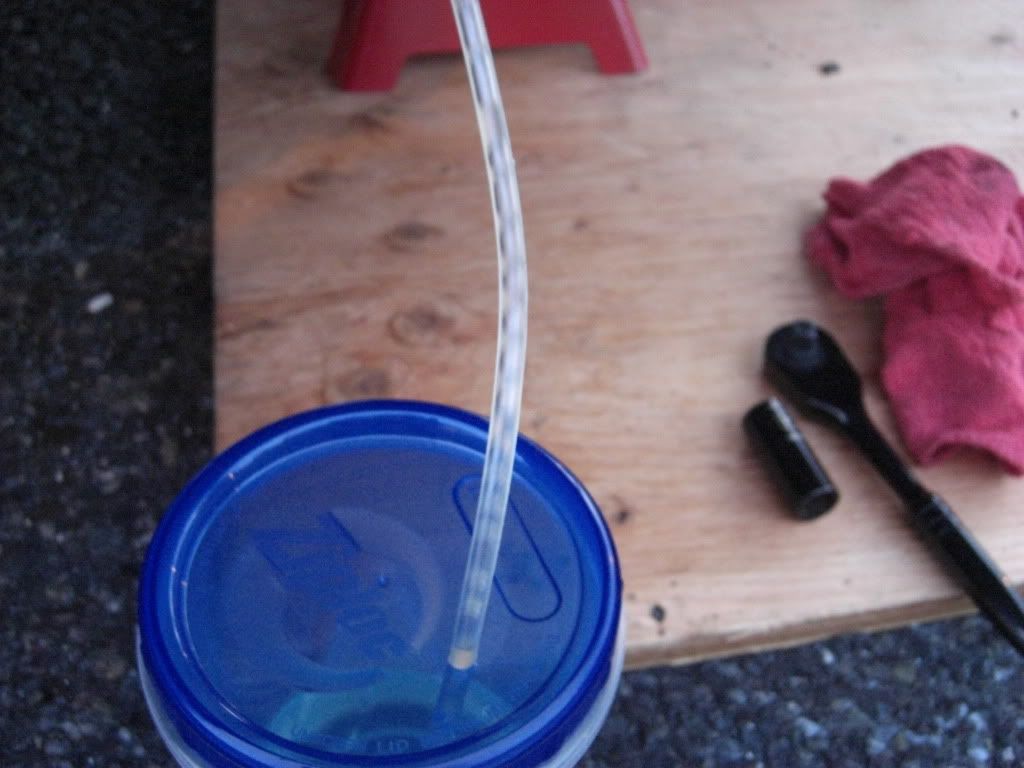
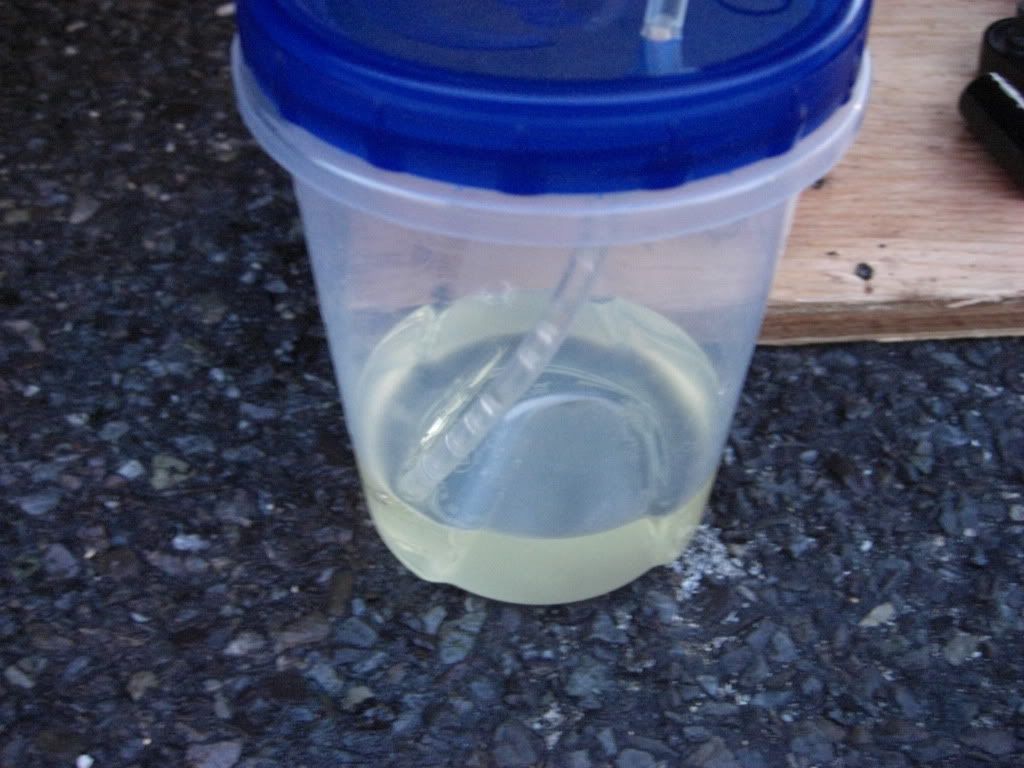
I chose to use the gravity bleeding method since I was working solo and it seems to have worked... The pedal feels pretty firm... I'll report back if anything changes.
Good luck and enjoy,
Ryan
Last edited by decypher; 08-09-10 at 03:40 PM.
08-09-10, 03:50 PM
#9
Driver
Thread Starter
Join Date: Jul 2010
Location: N.J. All Day
Posts: 183
Likes: 0
Received 0 Likes
on
0 Posts
I know this post kinda goes a little off-topic in the beginning but I have the entire DIY saved in vBulletin code for a future DIY thread if applicable...
04-06-11, 04:31 PM
#10
Driver School Candidate

Join Date: Feb 2009
Location: MN
Posts: 40
Likes: 0
Received 0 Likes
on
0 Posts
Good job man! My brother is going to be helping me replace my rotors and pads in a couple months and if we run into anything I will refer to this DIY. I appreciate your time and effort to show all your work along the way!
04-11-11, 09:14 PM
#11
Driver
Thread Starter
Join Date: Jul 2010
Location: N.J. All Day
Posts: 183
Likes: 0
Received 0 Likes
on
0 Posts
No problem bud.. Take your time, work smart, and make sure you tighten all your bolts to the appropriate specification using a torque wrench.
Couple things to add to this homebrew DIY:
1. Now that I know they make brake line plugs I would have capped off the the brake line once I opened them up to prevent fluid loss.
2. Keep an eye on your brake fluid level for the next few days just to make sure there are no leaks.
Couple things to add to this homebrew DIY:
1. Now that I know they make brake line plugs I would have capped off the the brake line once I opened them up to prevent fluid loss.
2. Keep an eye on your brake fluid level for the next few days just to make sure there are no leaks.
 06-20-11, 04:07 AM
#15
Driver School Candidate

Join Date: May 2011
Posts: 46
Likes: 0
Received 0 Likes
on
0 Posts
Very nice writeup - should be easy to follow for any DIYer. Only 1 thing to add. Make sure you add some anti-seize to the face of the wheel hub. That will prevent the rotors from becoming frozen to the car.
Another method for removing them is with a hammer, beat the back side of the rotor 2-3 times, rotate the rotor 90 degrees and repeat. Keep going until the rotor comes off. Use this method if you are going to be replacing the rotors. Duhh.
And just a quick q about the core. You know that is just a deposit which you get back when you return the old nasty calipers - right?