
DIY: Rear Strut Replacement
 04-07-15, 07:36 PM
#1
Lexus Champion
Thread Starter
Here's how to replace your rear struts.
Demonstrated here is the procedure for the 2002-2006 Lexus ES300/ ES330.
DIY Video:
A few photos outlining the procedure:
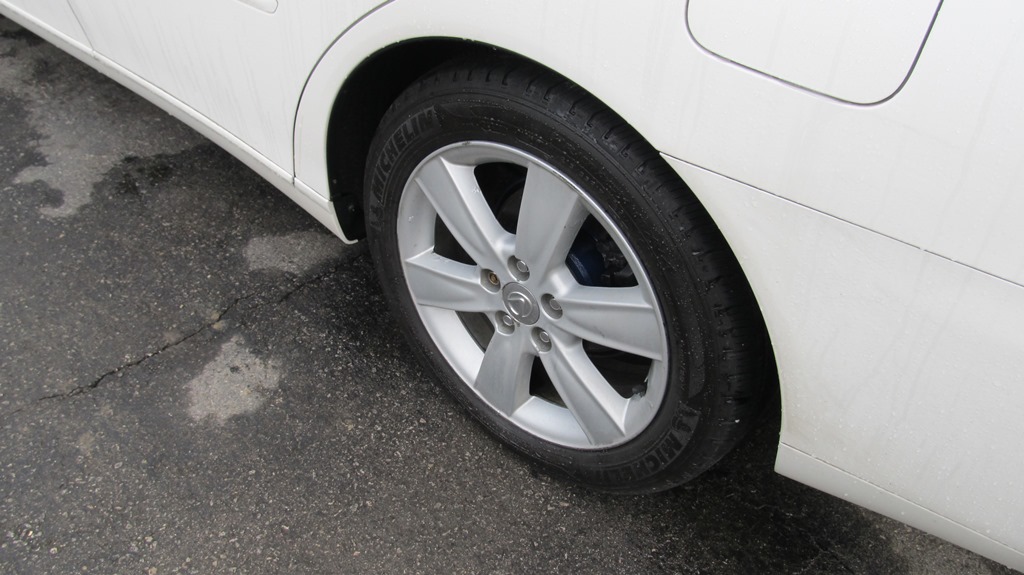
First step is to jackup the vehicle and remove the rear wheel.
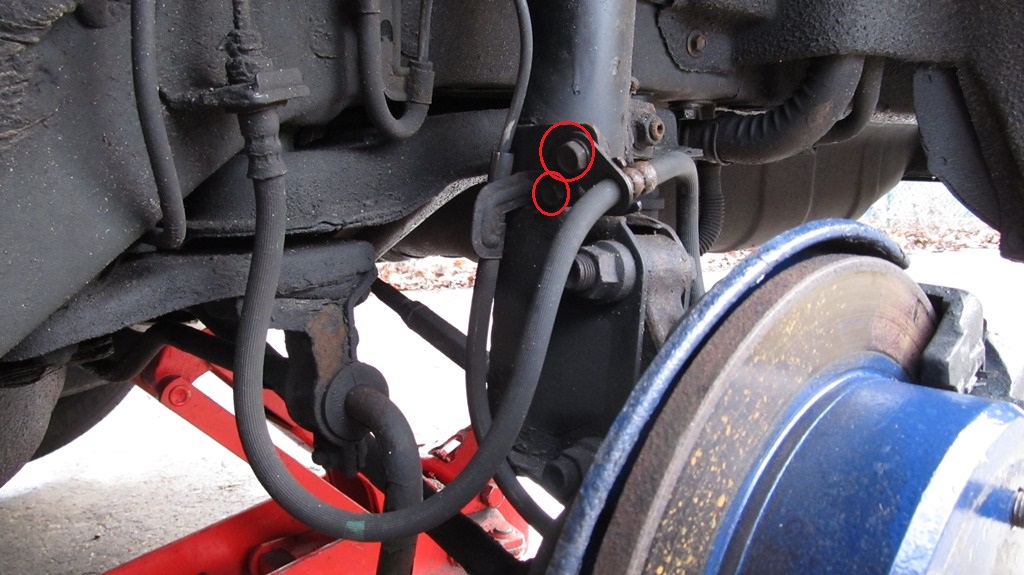
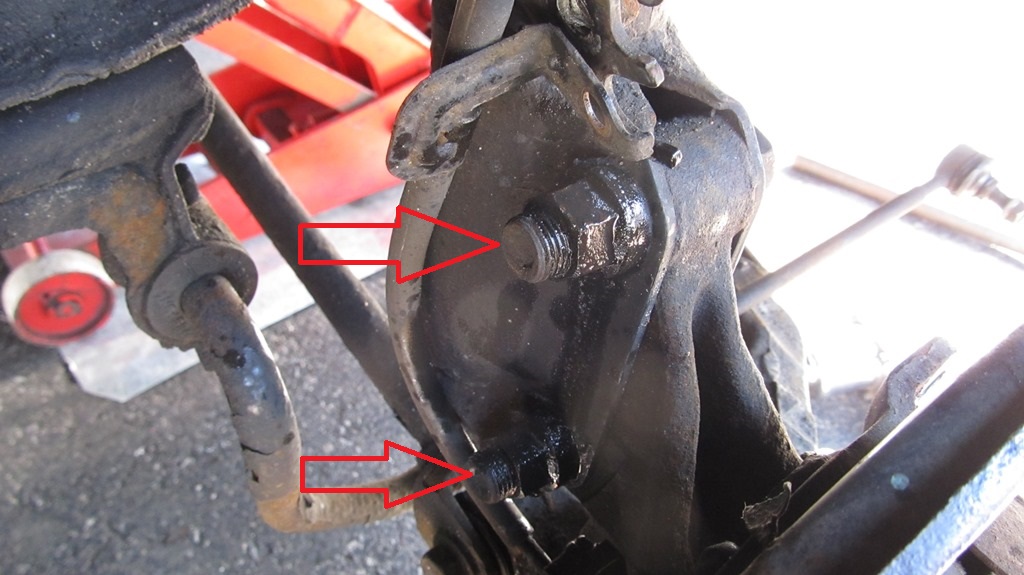
Then remove the 10mm bolt and 12mm bolt holding the ABS wire and brake hose to the strut:
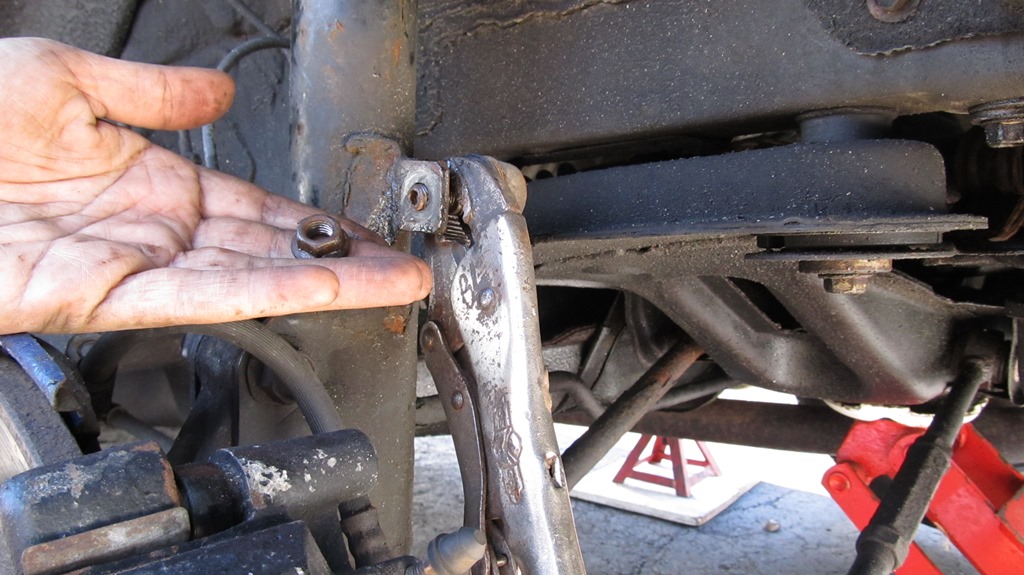
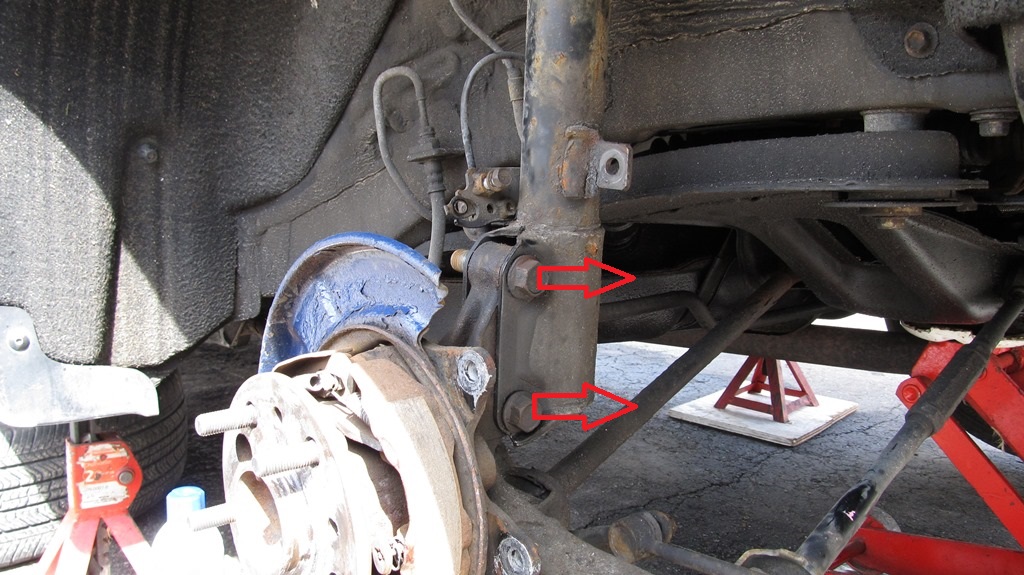
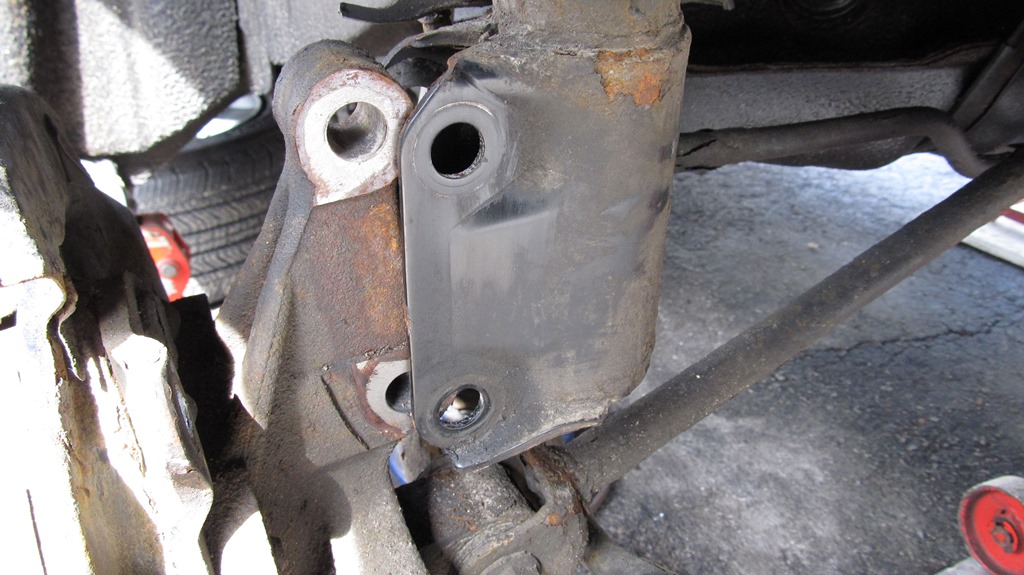
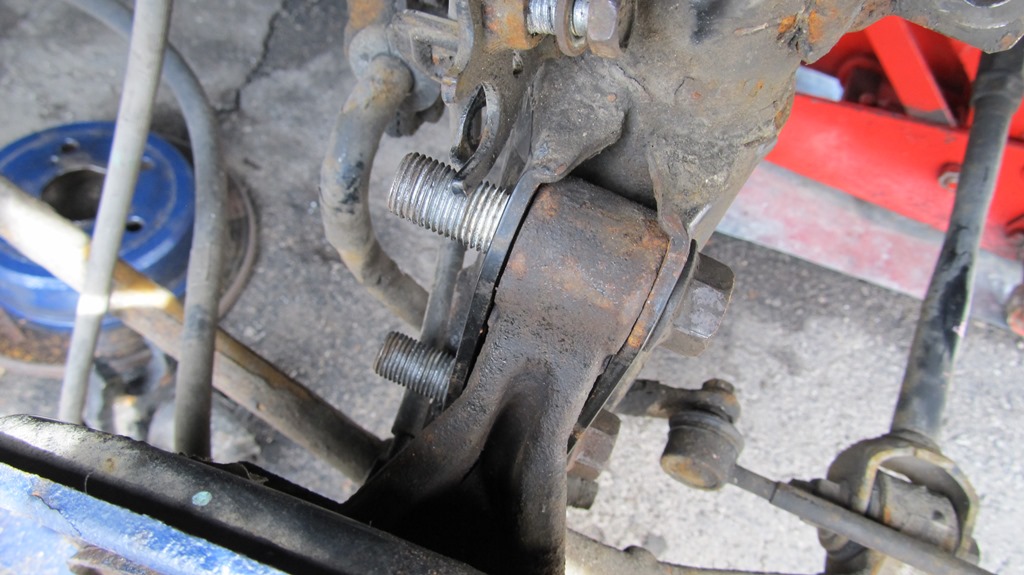
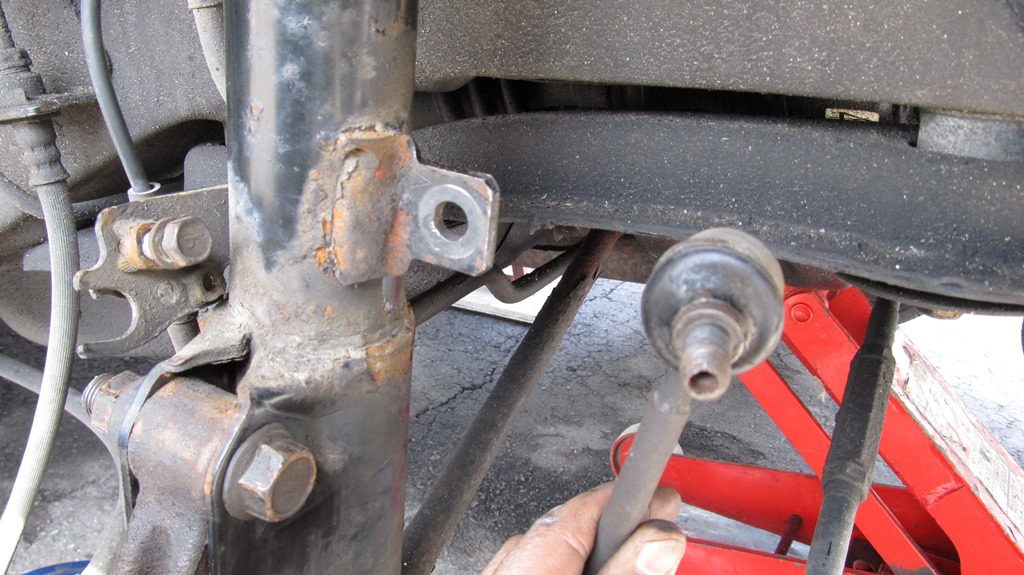
Then remove the rear stabilizer linkage.
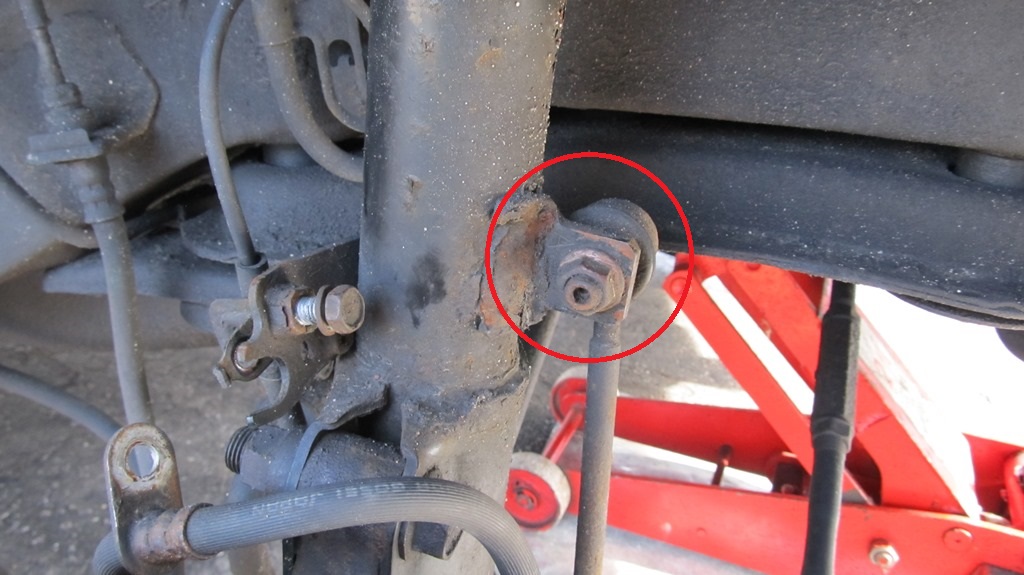
Sometimes this can get rusted and you have to saw it off and replace it. There's a 5mm hex socket inside the bolt that you can hold to turn off the 14mm nut.
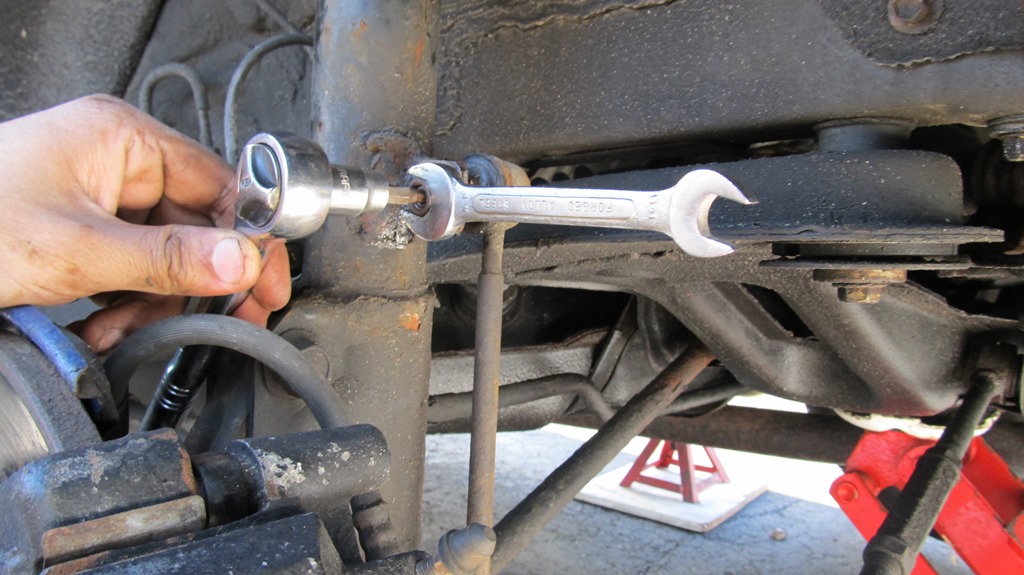
I ended up using a vise grip to hold the bolt at the linkage and zipped it off with my impact gun. This might damage the linkage or boot.
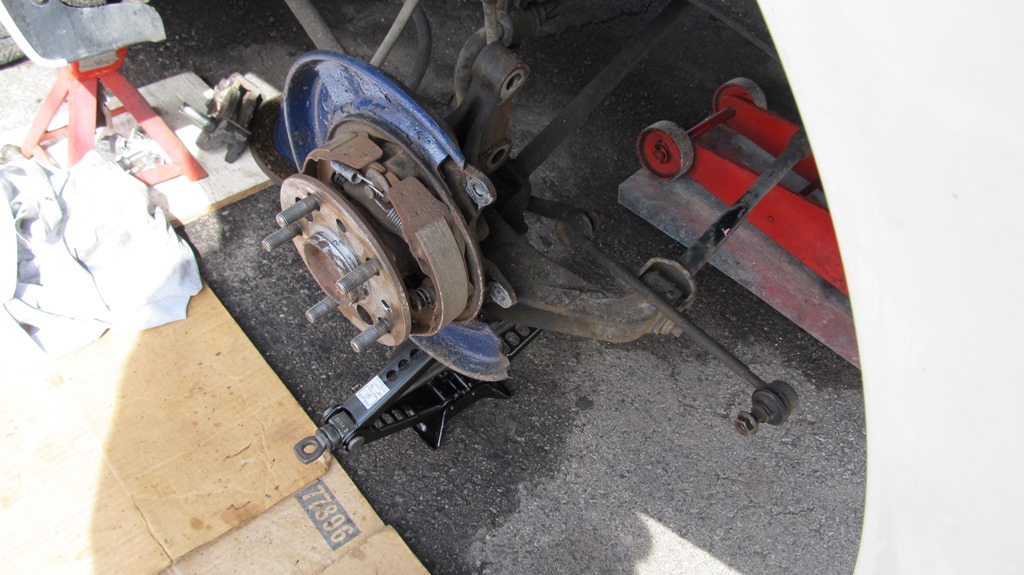
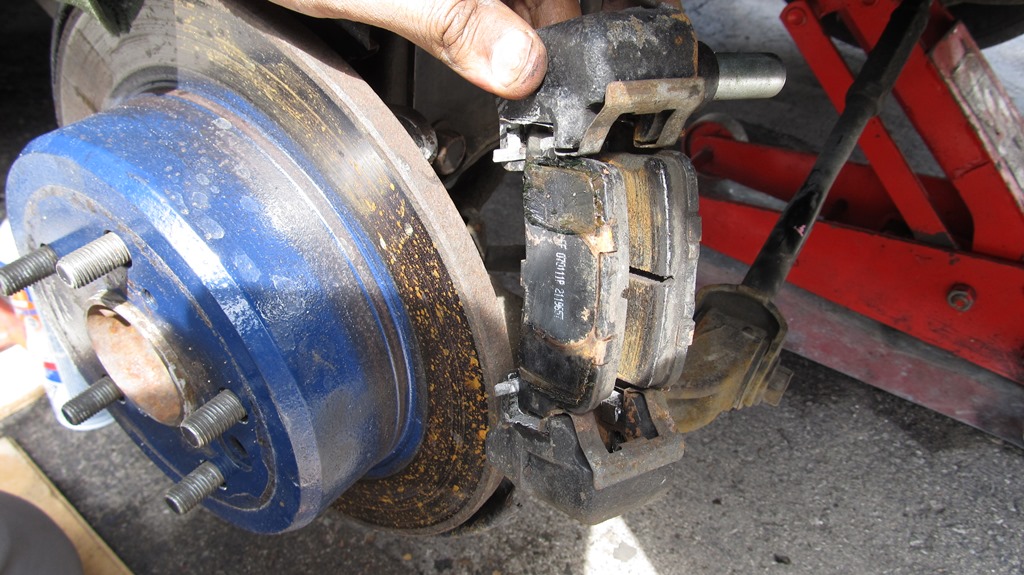
Remove the 17mm caliper slider bolt and rear caliper.
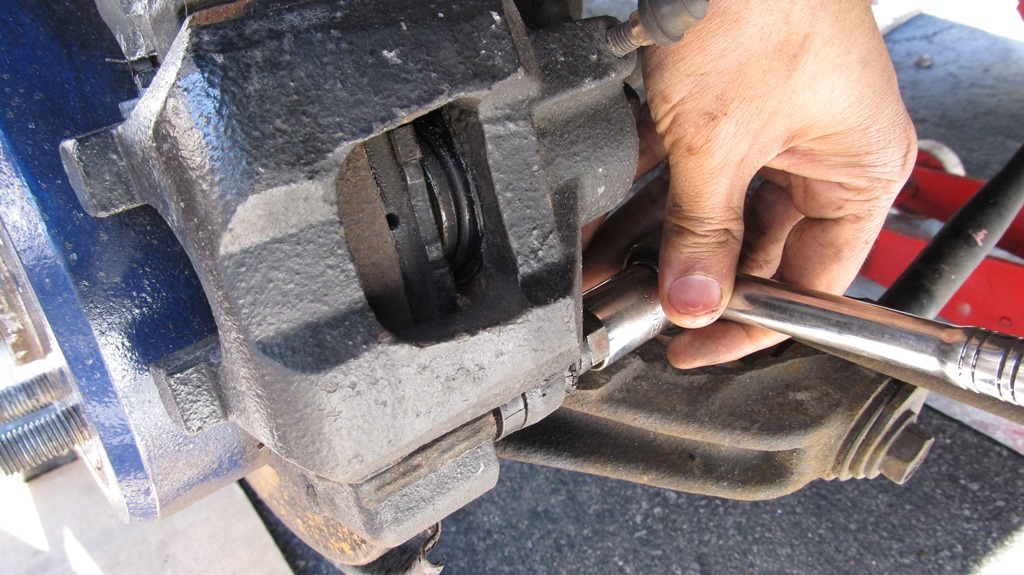
Remove the two 14mm caliper bracket bolts, as well as the caliper bracket and pads:
Remove the brake rotor:
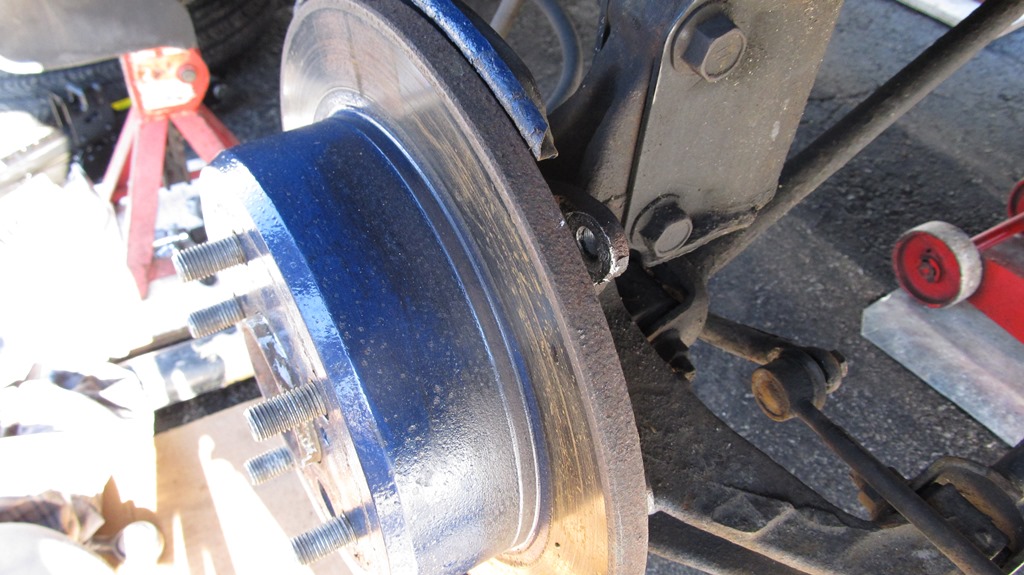
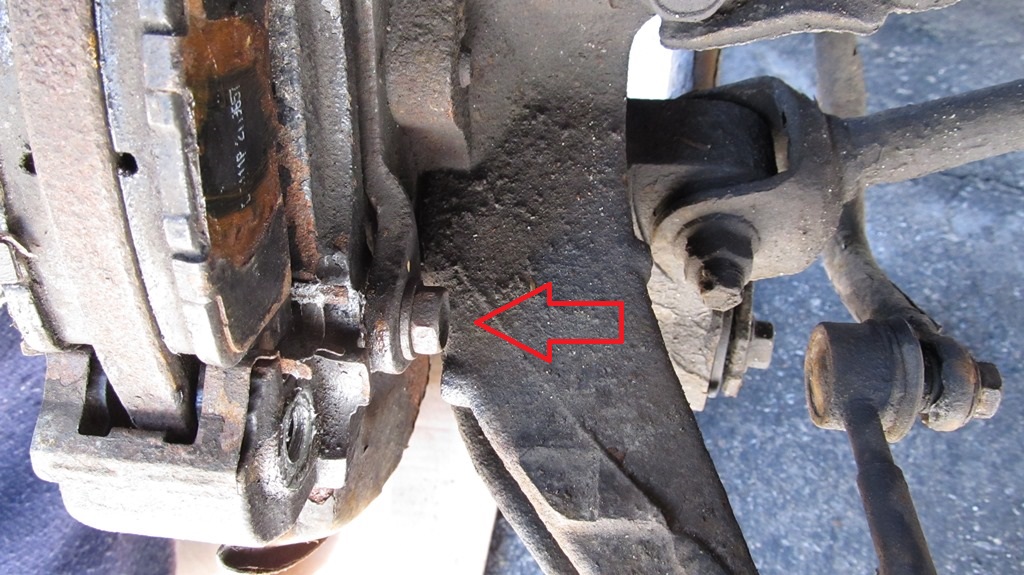
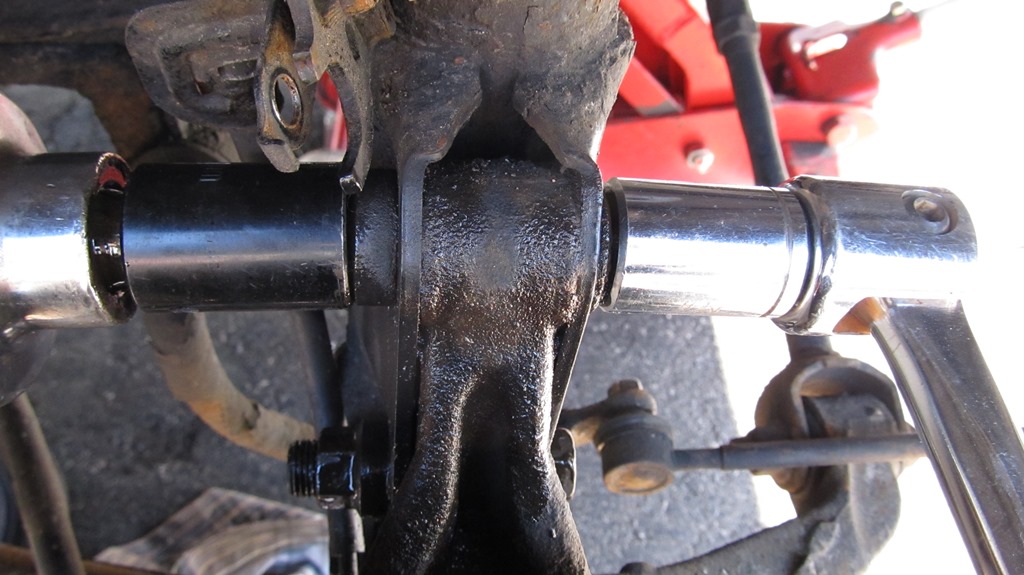
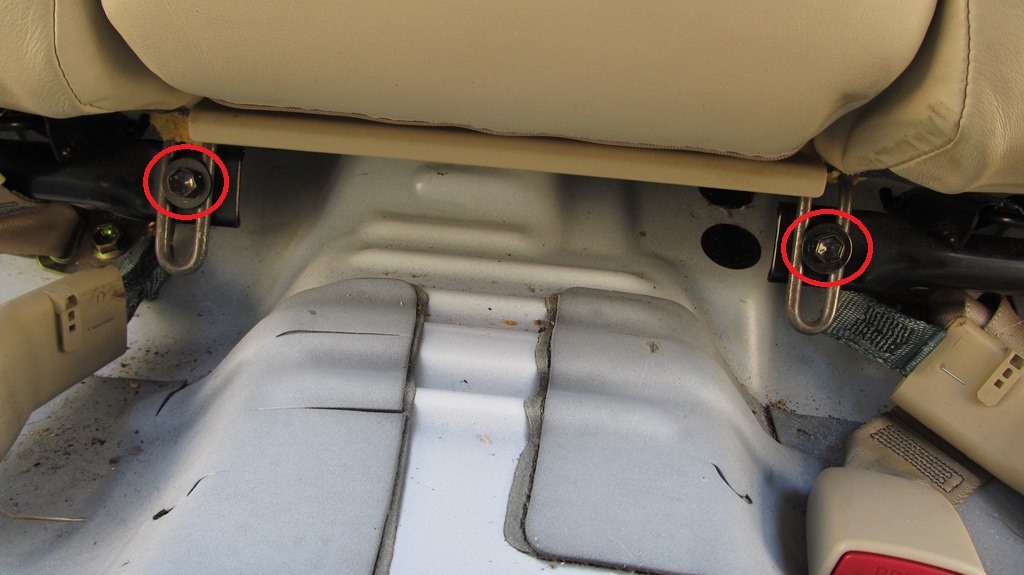
Loosen up and remove the 19mm nuts at the bottom of the strut.
You might need a long breaker bar or impact gun to knock these loose. Don't remove the bolts just yet:
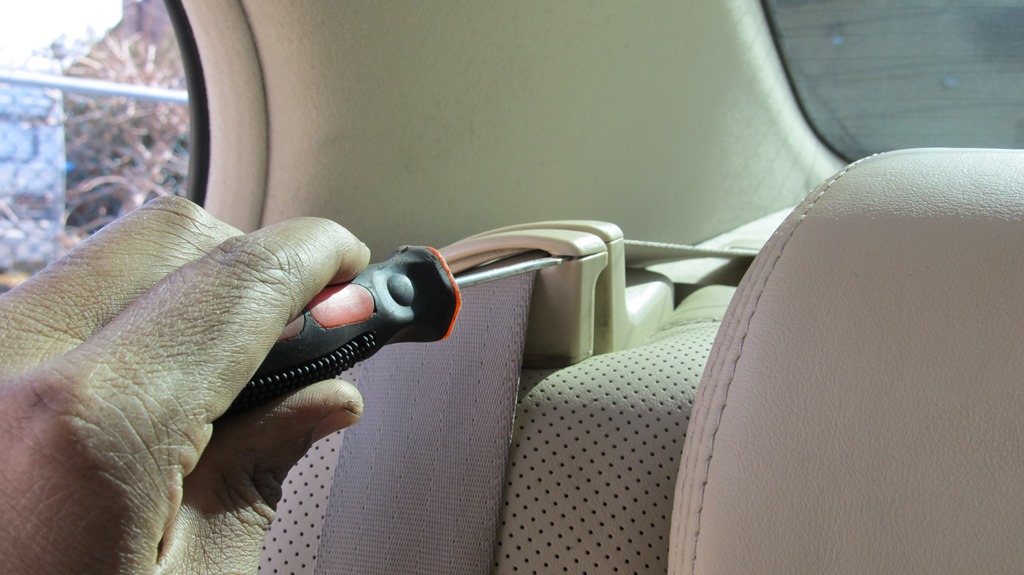
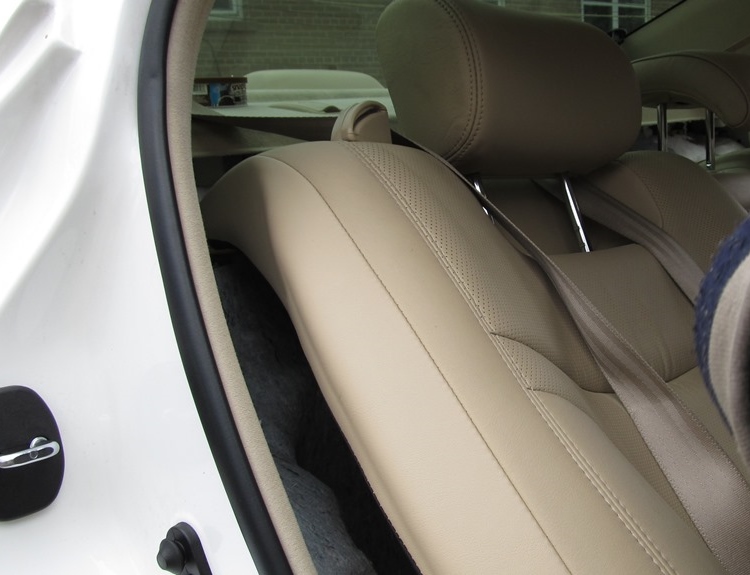
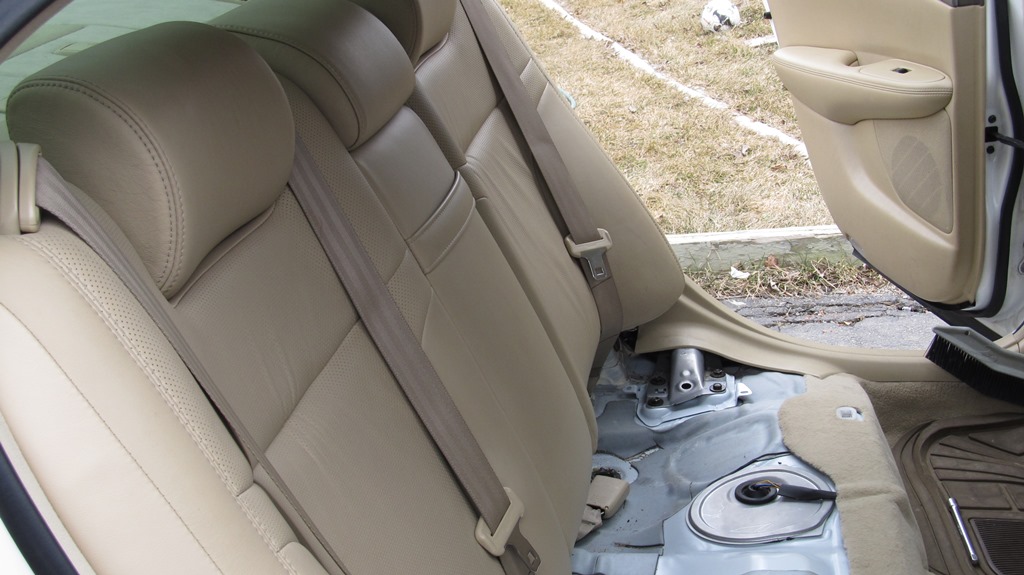
Remove the rear seat bottom by pulling straight up:
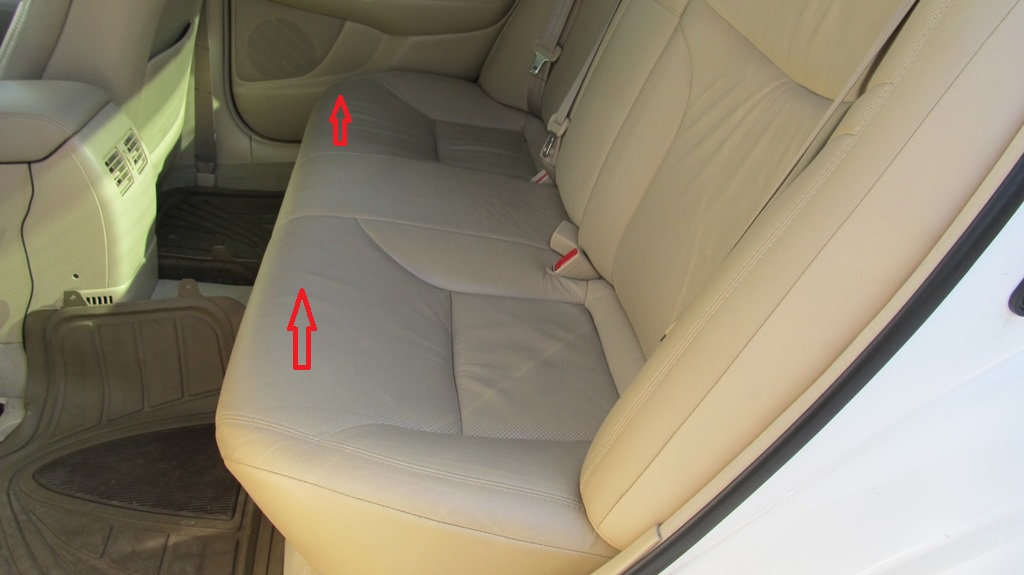
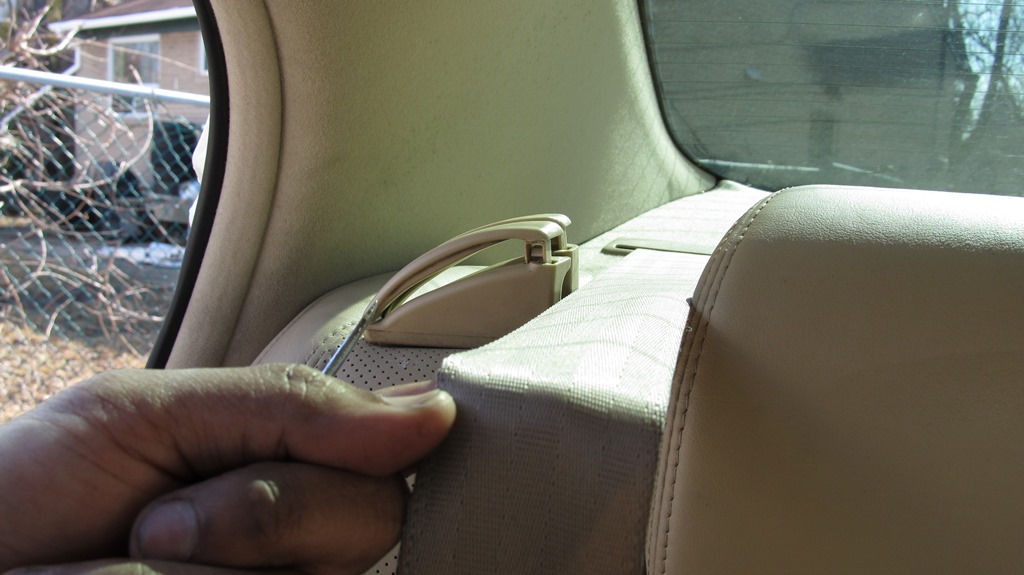
Remove the seat belt from its guide by prying it up:
Next you have to remove the rear seat back. On cars without folding seats, like the Lexus, there are 4 12mm bolts that you remove across the bottom of the seat back:
Left side:

Right side:
Middle:
Lift up on the seat back to disengage it from the clips at the top, then pull forward the seat:

A look at the seat back:
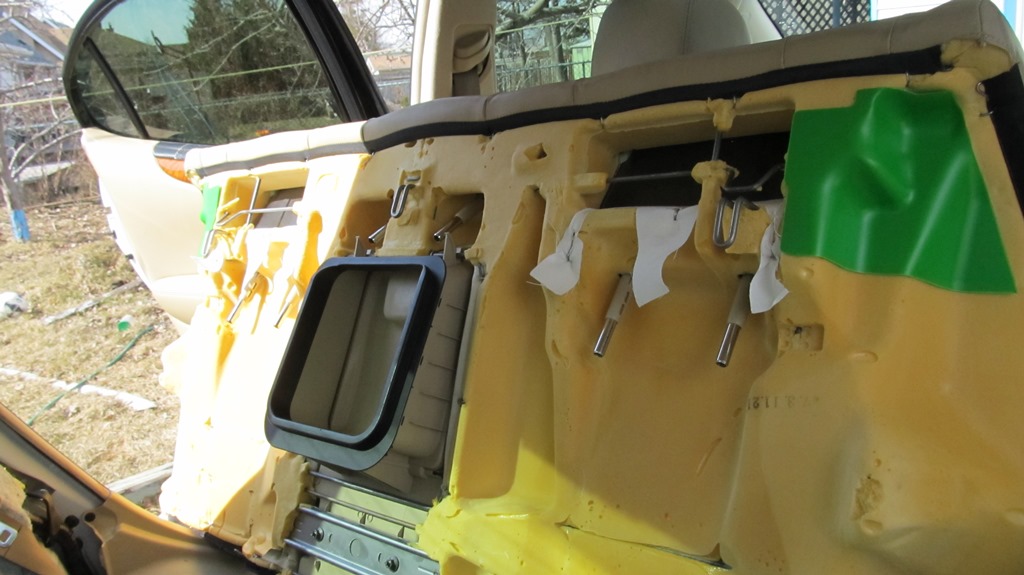
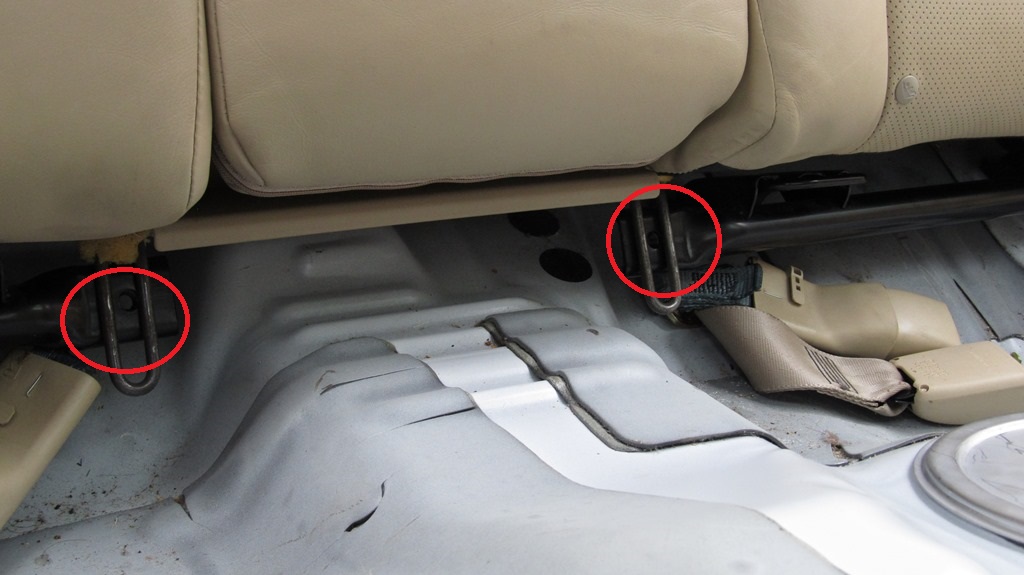
This is the clip that has to be disengaged behind the seat back:
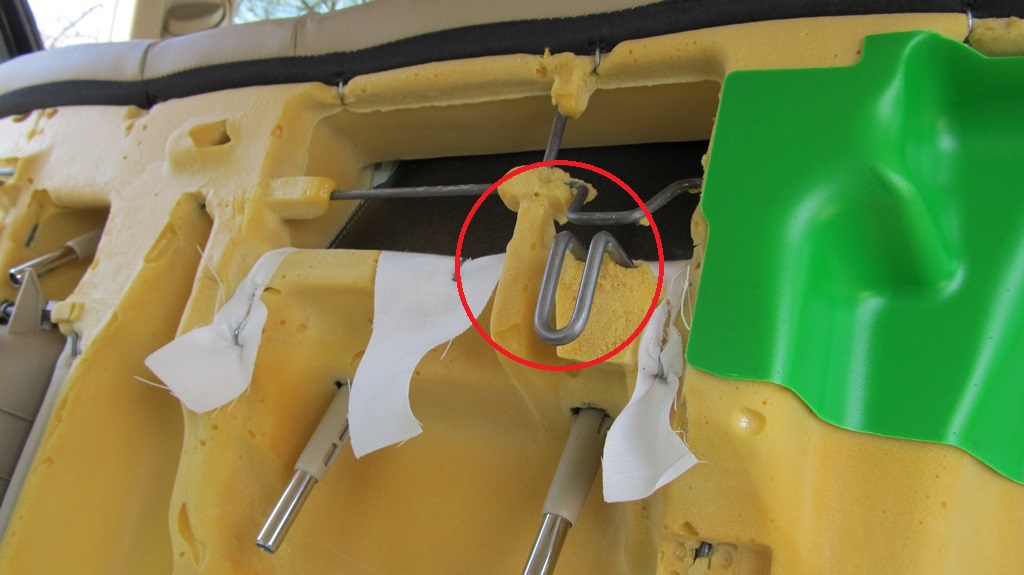
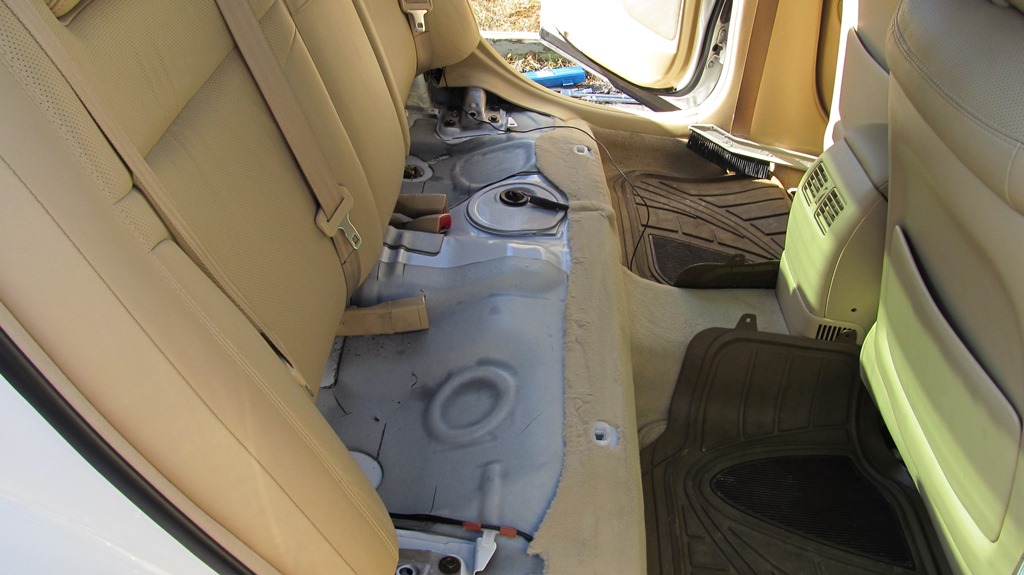
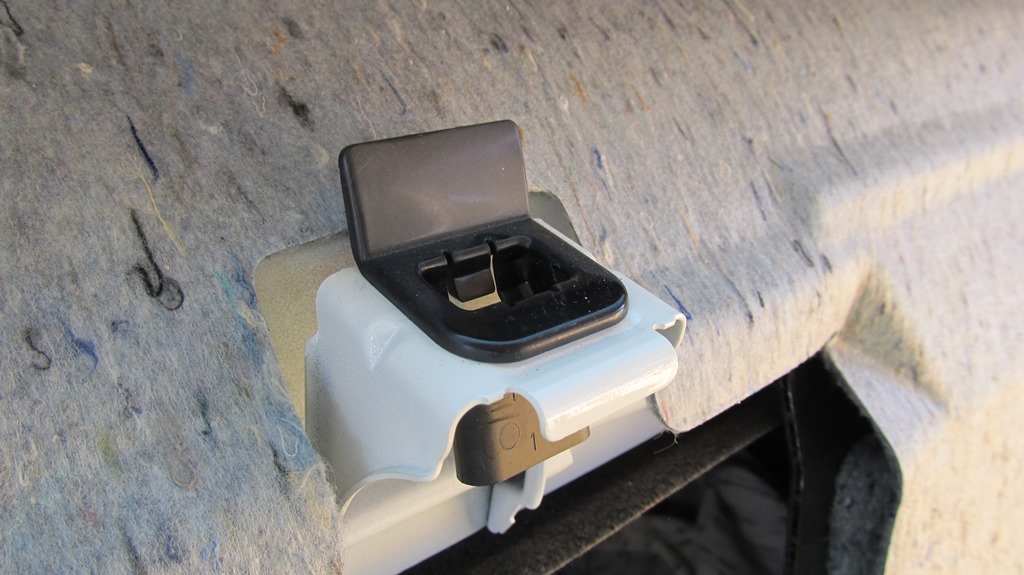
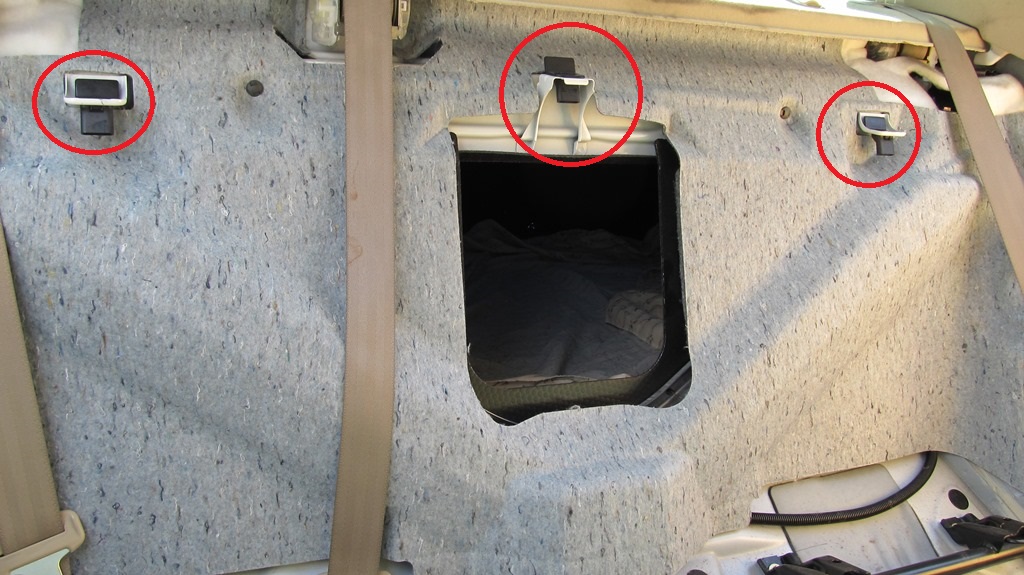
And this is what it looks like on the trunk wall:
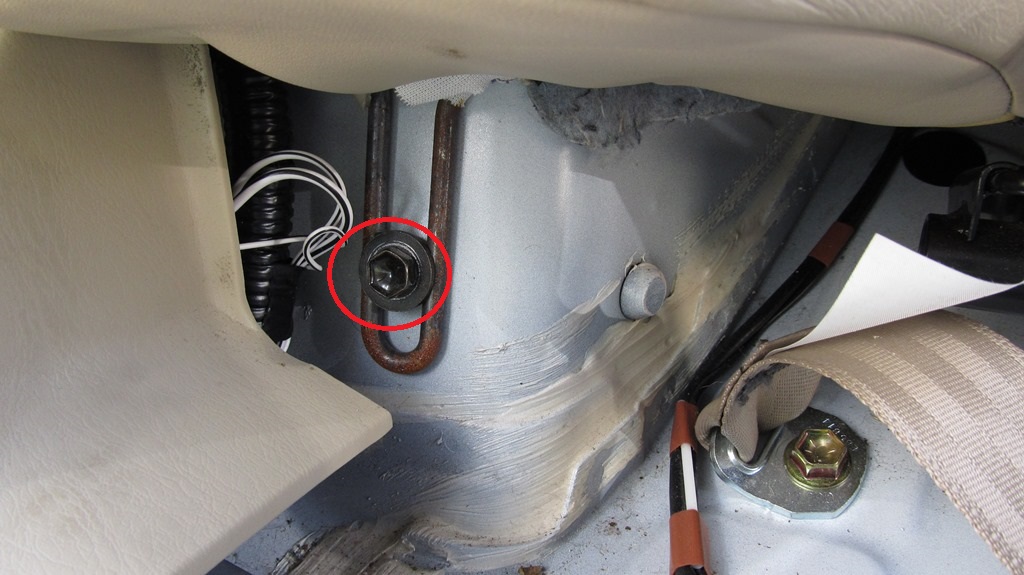
Here's what the rear suspension brace looks like under that sound deadener:
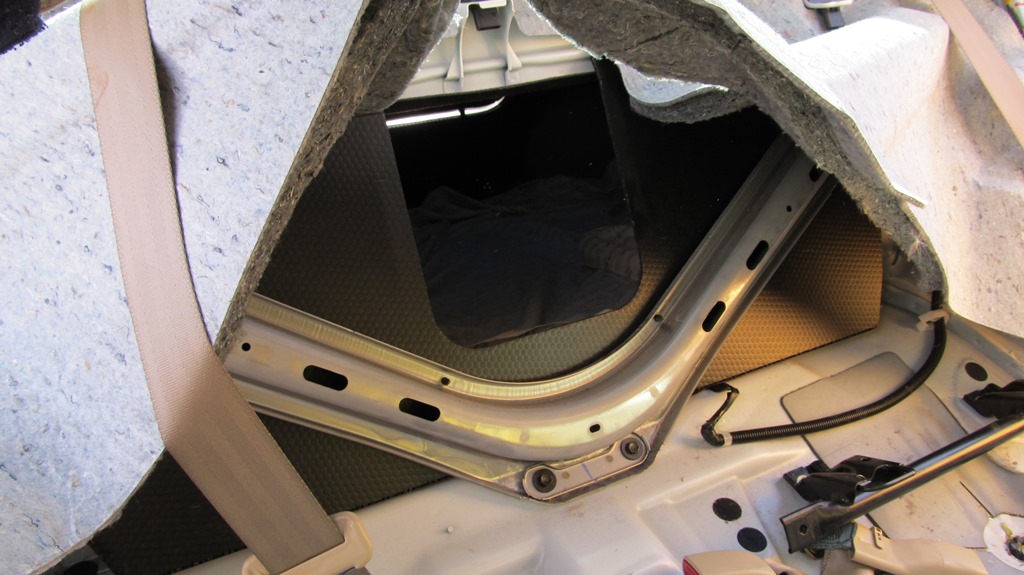
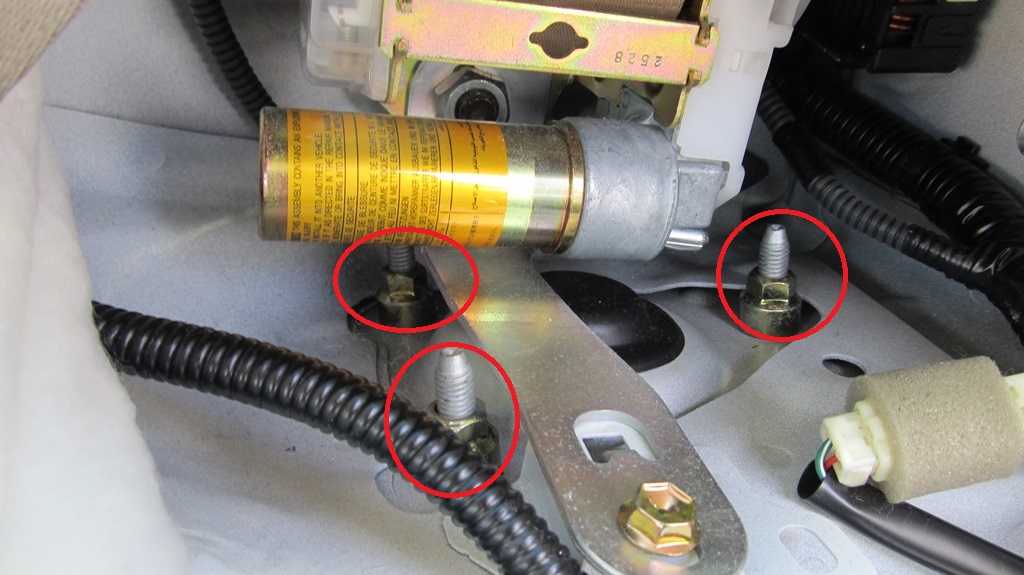
You can now access the three 12mm nuts at the top of the strut mount by pulling back the padding.

Demonstrated here is the procedure for the 2002-2006 Lexus ES300/ ES330.
DIY Video:
A few photos outlining the procedure:
First step is to jackup the vehicle and remove the rear wheel.

Then remove the 10mm bolt and 12mm bolt holding the ABS wire and brake hose to the strut:

Then remove the rear stabilizer linkage.

Sometimes this can get rusted and you have to saw it off and replace it. There's a 5mm hex socket inside the bolt that you can hold to turn off the 14mm nut.

I ended up using a vise grip to hold the bolt at the linkage and zipped it off with my impact gun. This might damage the linkage or boot.

Remove the 17mm caliper slider bolt and rear caliper.

Remove the two 14mm caliper bracket bolts, as well as the caliper bracket and pads:

Remove the brake rotor:

Loosen up and remove the 19mm nuts at the bottom of the strut.

You might need a long breaker bar or impact gun to knock these loose. Don't remove the bolts just yet:

Remove the rear seat bottom by pulling straight up:


Remove the seat belt from its guide by prying it up:


Next you have to remove the rear seat back. On cars without folding seats, like the Lexus, there are 4 12mm bolts that you remove across the bottom of the seat back:
Left side:

Right side:

Middle:

Lift up on the seat back to disengage it from the clips at the top, then pull forward the seat:

A look at the seat back:

This is the clip that has to be disengaged behind the seat back:

And this is what it looks like on the trunk wall:


Here's what the rear suspension brace looks like under that sound deadener:

You can now access the three 12mm nuts at the top of the strut mount by pulling back the padding.

Last edited by speedkar9; 04-07-15 at 07:39 PM.

The following users liked this post:
machadosl (10-01-23)
04-07-15, 07:37 PM
#2
Lexus Champion
Thread Starter
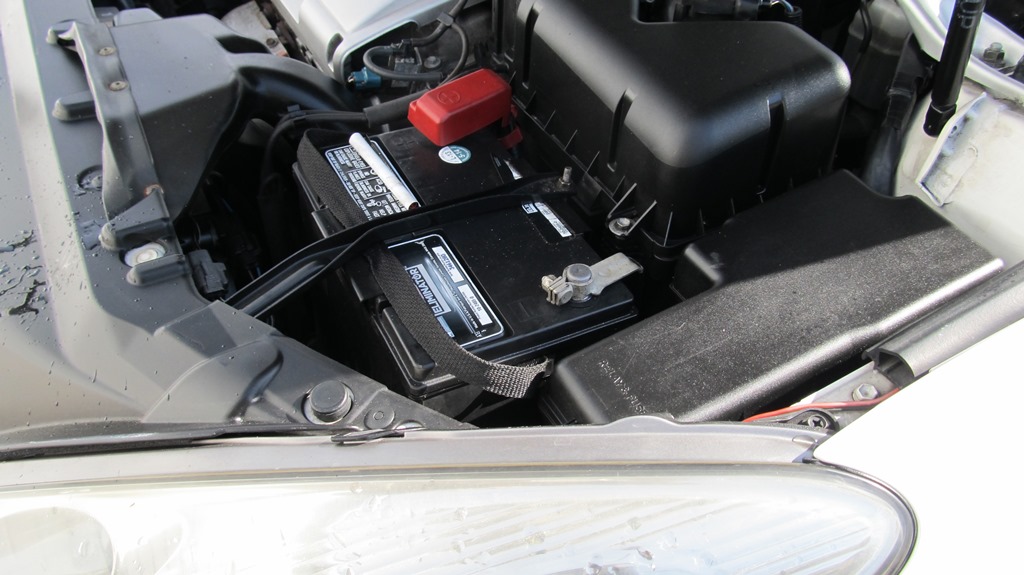
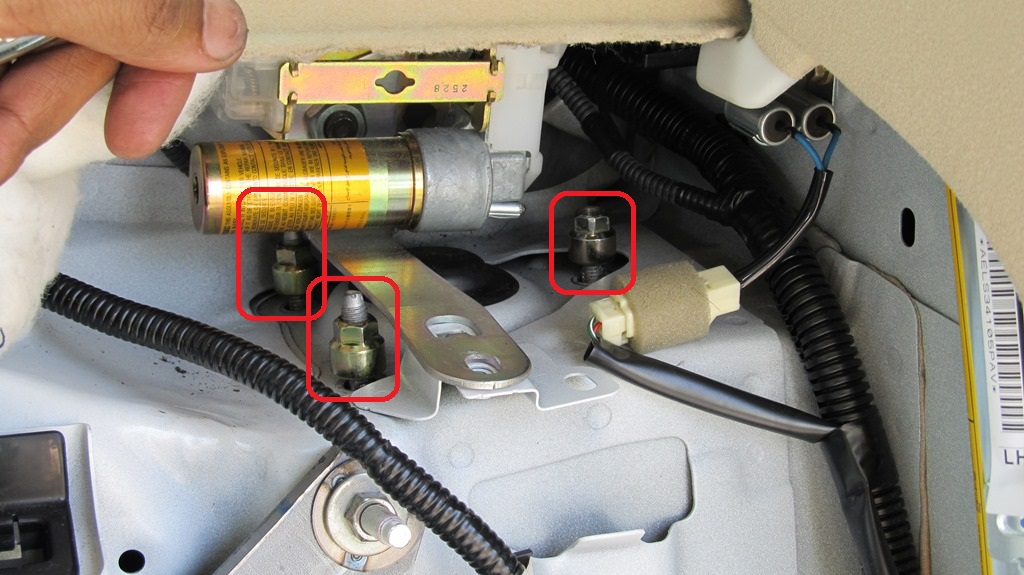
Since your working so close to the side airbags, disconnect the battery as a precaution:
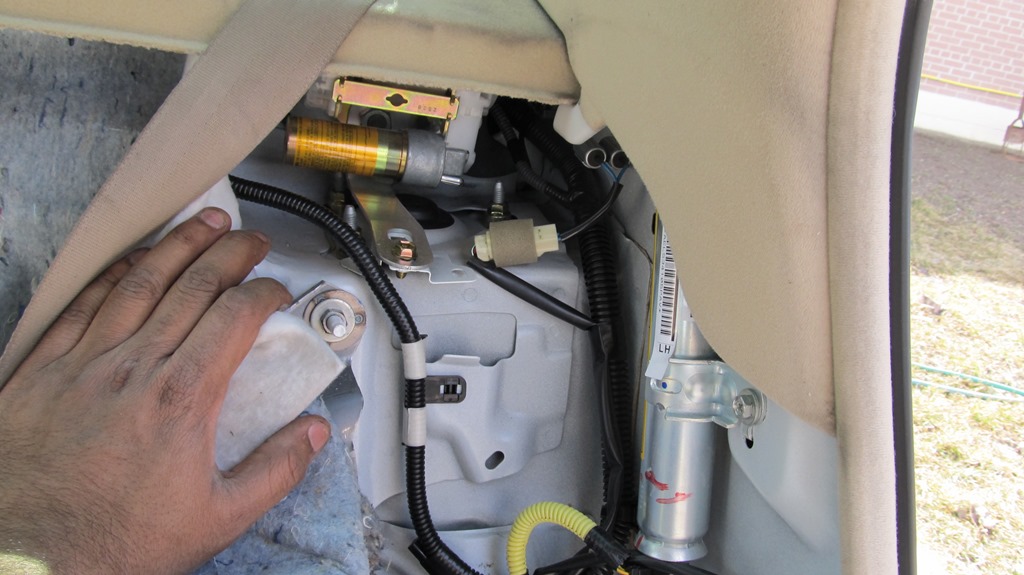
Remove the three 12mm nuts using a ratcheting wrench. The seat belt tensioner might impede access but once you break them loose it shouldn't be too hard to snake out the nuts:
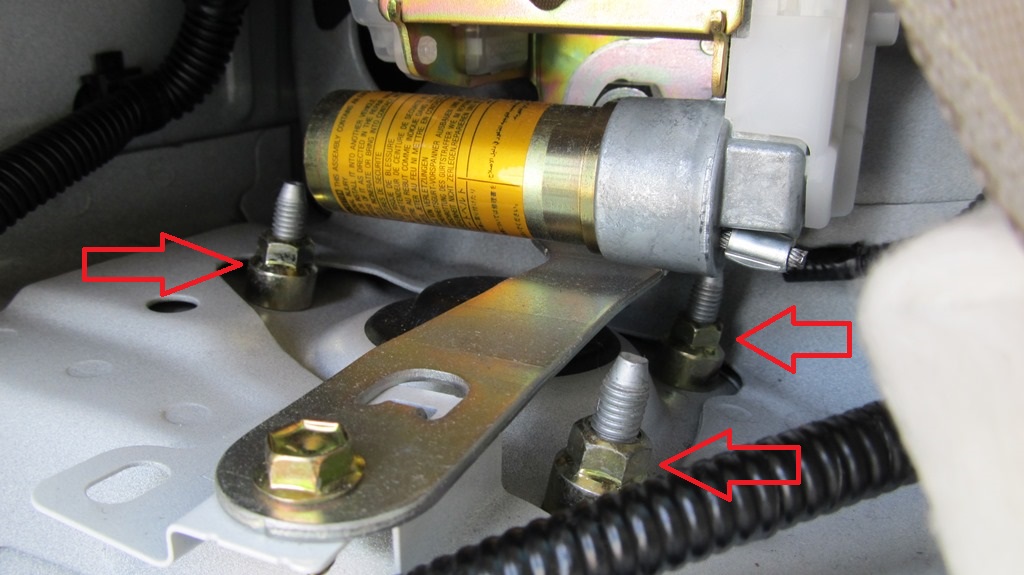
Left side:
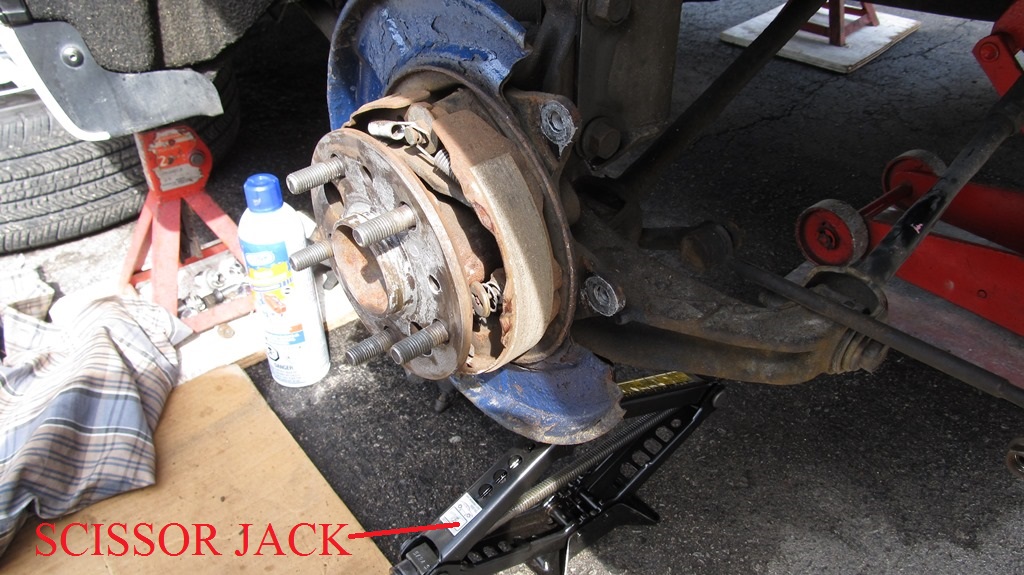
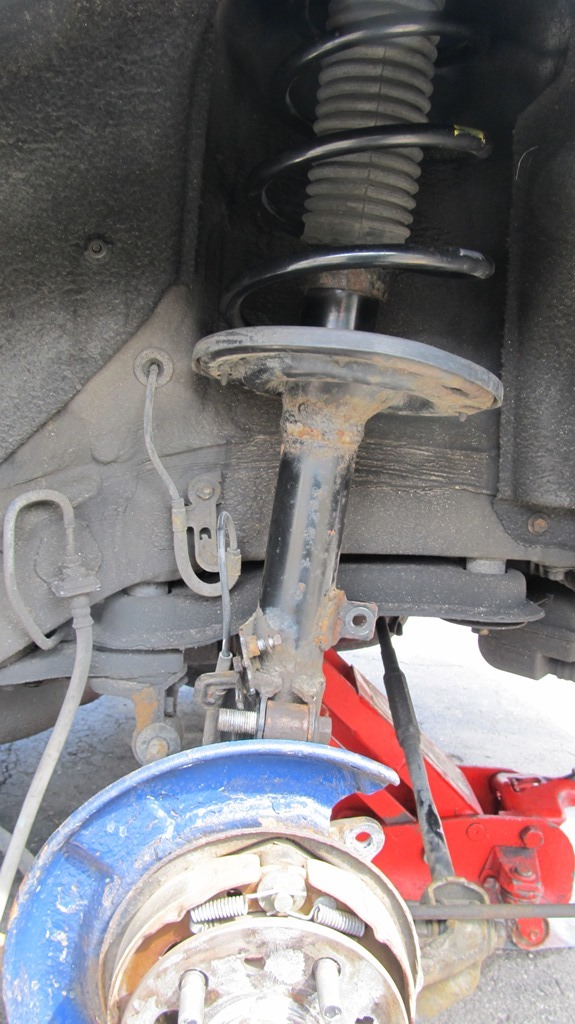
Support the bottom of the strut with a scissor jack
Remove the two 19mm strut bolts. Since there's some weight on them from the strut you might need to tap it lightly with a screw driver and hammer:
Here's the strut removed from the car:
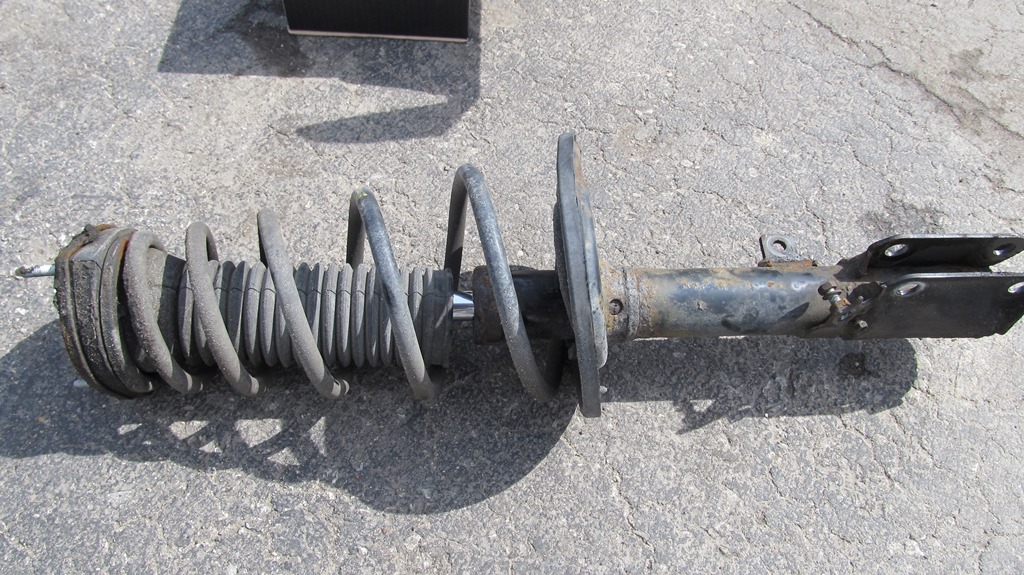
To replace the struts, compress the spring and remove the 19mm nut at the top. You'll need a special spanner if you have adjustable suspension, as the wiring goes right through the middle of the strut.
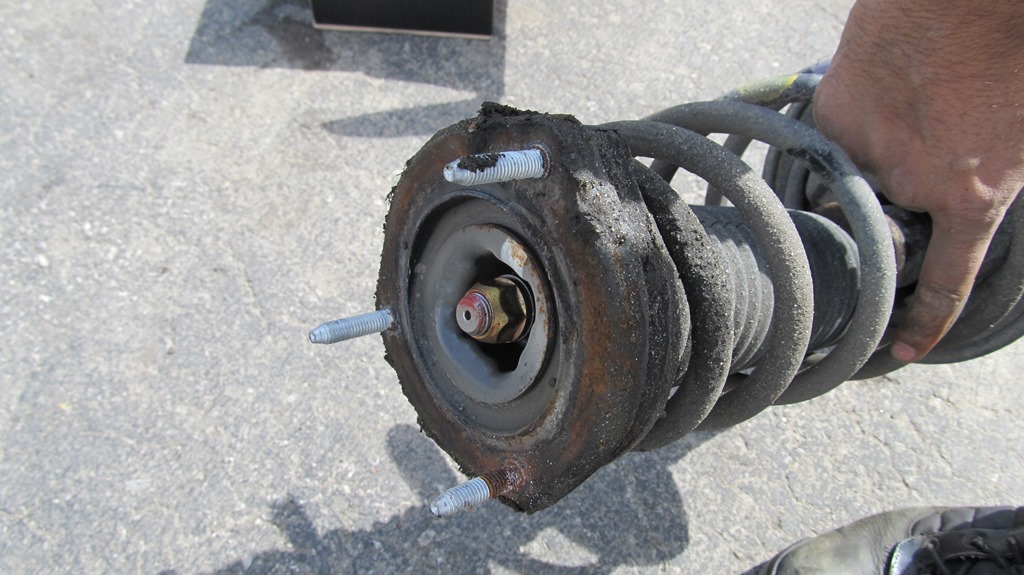
If you're replacing the entire strut assembly with a quick-strut, double check that the new strut has the same mounting positions for the stabilizer linkage, ABS and brake lines, and aligns exactly with the OEM strut.
Replacement OEM struts are the same for the Lexus ES and Camry (the spring differs).
Toyota part number 48530-33281- Right strut
Toyota part number 48540-33281 - Left strut
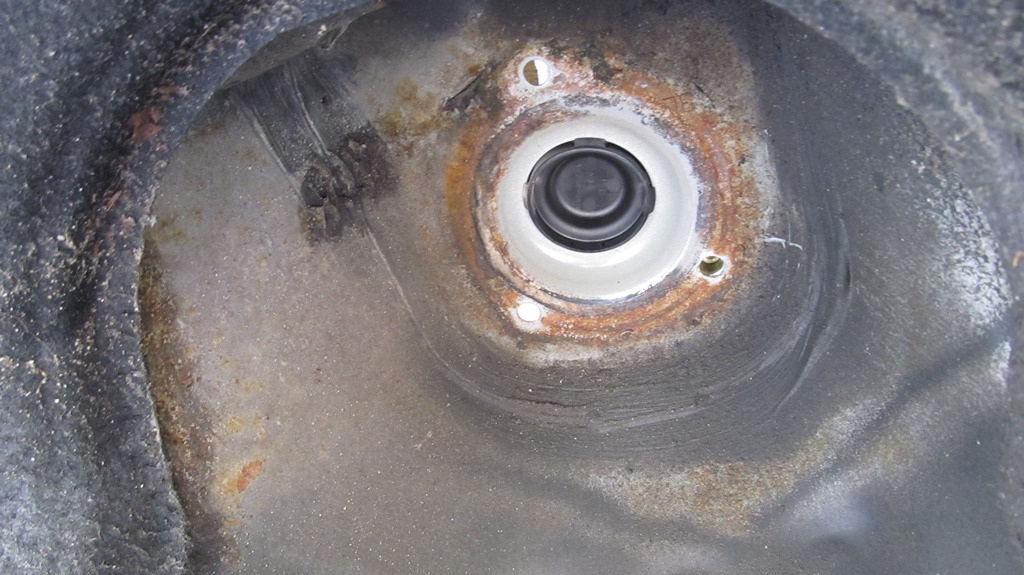
The top of the strut mount, inside the wheel well is a bit rusty, good idea to spray some primer or rust proofing. Consider adding some felt or rubbery material to prevent clunking noises, as in this thread:
http://www.toyotanation.com/forum/10...placement.html
Replacement is the reverse of installation:
Replace the strut into the wheel well and align the knuckle into the strut:
Catch the two bolts at the bottom, but don't tighten them until you get the top ones in:
Catch the three nuts at the top of the strut mount and finger tighten them:
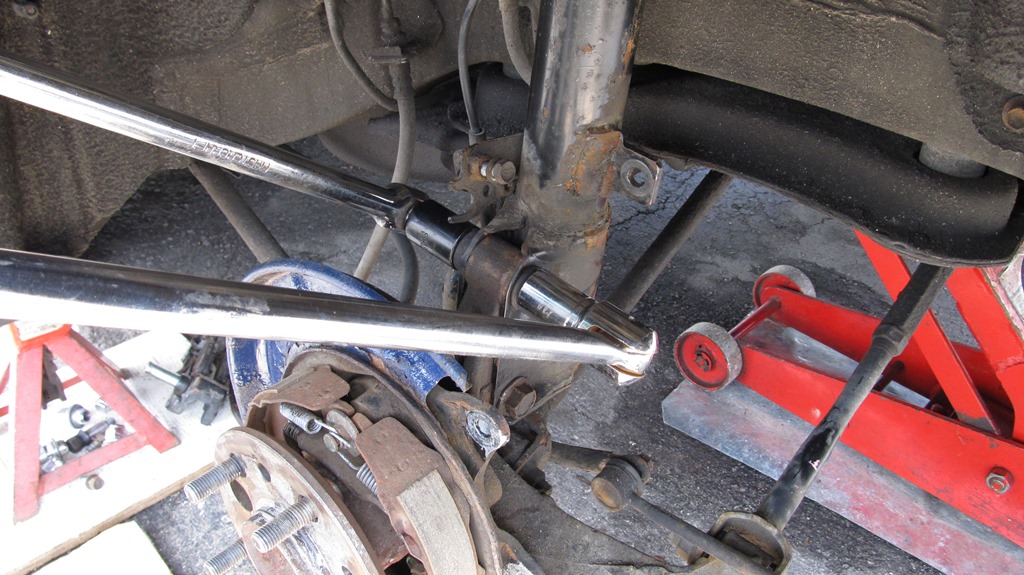
Tighten the two 19mm bolts at the knuckle, really tight, manual calls for ~180 ft-lb:
Replace the stabilizer linkage and ABS/ brake line bolts:
Replace the brake pads, rotor and caliper:
Lower the vehicle after putting on the wheel. When the car is on its own weight, tighten up the nuts at the top of the strut mount.
Replace the rear seat back in the car. Lift it up over the ledge and drop it down. By far the hardest struggle of this job:
Replace the bolts at the bottom of the seat back:
Finally, replace the seat bottom:
To conclude, the rear seat back is probably the biggest hurdle to get in, followed by the rear stabilizer linkage, if yours is rusted like mine.
Prepare yourself with a cut off tool and new replacement linkages
in case you have to saw off the linkages.

Remove the three 12mm nuts using a ratcheting wrench. The seat belt tensioner might impede access but once you break them loose it shouldn't be too hard to snake out the nuts:

Left side:


Support the bottom of the strut with a scissor jack

Remove the two 19mm strut bolts. Since there's some weight on them from the strut you might need to tap it lightly with a screw driver and hammer:

Here's the strut removed from the car:

To replace the struts, compress the spring and remove the 19mm nut at the top. You'll need a special spanner if you have adjustable suspension, as the wiring goes right through the middle of the strut.

If you're replacing the entire strut assembly with a quick-strut, double check that the new strut has the same mounting positions for the stabilizer linkage, ABS and brake lines, and aligns exactly with the OEM strut.
Replacement OEM struts are the same for the Lexus ES and Camry (the spring differs).
Toyota part number 48530-33281- Right strut
Toyota part number 48540-33281 - Left strut
The top of the strut mount, inside the wheel well is a bit rusty, good idea to spray some primer or rust proofing. Consider adding some felt or rubbery material to prevent clunking noises, as in this thread:
http://www.toyotanation.com/forum/10...placement.html

Replacement is the reverse of installation:

Replace the strut into the wheel well and align the knuckle into the strut:

Catch the two bolts at the bottom, but don't tighten them until you get the top ones in:


Catch the three nuts at the top of the strut mount and finger tighten them:

Tighten the two 19mm bolts at the knuckle, really tight, manual calls for ~180 ft-lb:

Replace the stabilizer linkage and ABS/ brake line bolts:

Replace the brake pads, rotor and caliper:

Lower the vehicle after putting on the wheel. When the car is on its own weight, tighten up the nuts at the top of the strut mount.
Replace the rear seat back in the car. Lift it up over the ledge and drop it down. By far the hardest struggle of this job:

Replace the bolts at the bottom of the seat back:

Finally, replace the seat bottom:

To conclude, the rear seat back is probably the biggest hurdle to get in, followed by the rear stabilizer linkage, if yours is rusted like mine.
Prepare yourself with a cut off tool and new replacement linkages
in case you have to saw off the linkages.
The following users liked this post:
machadosl (10-01-23)
04-08-15, 03:53 AM
#3
Pole Position
Join Date: Nov 2013
Location: wellington, nz
Posts: 292
Likes: 0
Received 0 Likes
on
0 Posts
Great write up! The procedure is pretty much identical for a 1992-1996 ES300 / Windom... I don't think the older ones have air bag stuff to worry about in and around the strut mounts (mine doesn't) but I'm not sure if some might... but either way this guide would certainly get you thru the replacement on the older models as well...
The part numbers might be different for the older model struts also..
The part numbers might be different for the older model struts also..
Last edited by gtstcactus; 04-08-15 at 03:56 AM.
 04-10-15, 06:21 PM
#6
Lexus Champion
Thread Starter
Thanks all. The procedure is similar to previous generation ES's and Camry's (with the exception of the folding seat).
That back seat was a bit of a struggle to get up and over the clips. Other than the expected rusty stabilizer linkage, this job is pretty straight forward.
Just make sure you clean your hands before working on the interior...
That back seat was a bit of a struggle to get up and over the clips. Other than the expected rusty stabilizer linkage, this job is pretty straight forward.
Just make sure you clean your hands before working on the interior...


Trending Topics
01-20-16, 06:10 AM
#8
Pole Position


 01-25-16, 04:59 PM
#14
Intermediate
Thanks all. The procedure is similar to previous generation ES's and Camry's (with the exception of the folding seat).
That back seat was a bit of a struggle to get up and over the clips. Other than the expected rusty stabilizer linkage, this job is pretty straight forward.
Just make sure you clean your hands before working on the interior...
That back seat was a bit of a struggle to get up and over the clips. Other than the expected rusty stabilizer linkage, this job is pretty straight forward.
Just make sure you clean your hands before working on the interior...
01-27-16, 06:53 PM
#15
Lexus Champion
Thread Starter
I didn't take my strut assembly apart to know for sure.
If you want the stock Lexus smooth ride, you'll have to fork out for OEM struts. If you want something durable, but stiffer, go with KYB. If you want a soft ride but don't mind swapping struts every few years, go with Monroe. If your doing it for the sake of selling the car, I'm sure Camry quick struts will bolt up fine.