When you click on links to various merchants on this site and make a purchase, this can result in this site earning a commission. Affiliate programs and affiliations include, but are not limited to, the eBay Partner Network.
Sun Visor's Backlit Repair | 1996-2001 Lexus ES300
Hello,
Just decided to share the sun visor's backlit saga. Hope that someone will find it useful!
Prologue: A while ago, I've noticed that the backlit in both of my visors doesn't work. Interestingly enough, it didn't work only when it was fully opened (rings some bells right off the bet, isn't it). Since I was way too lazy to figure out why exactly it doesn't work, I just figured to replace both of them with the ones that I found going around the junkyard. And wouldn't you know it, they've had the same exact issue! That was a declaration of war, that is when I realized that I need to dig deeper in order to mend it, and since now I've got an extra pair, I've had nothing to lose...
Theory: So what in particular causes the light to act in such way? The answer is simple - there are two contacts that are supposed to get shorted each time the cover is opened, yet over time, those contacts are getting bent out of shape and loose the contact with the lid. So our task is to bend them back. I promise it will make sense as we continue on.
Since I've had nothing to lose, and frankly nothing else to do, I decided to look into it a bit closer. And in process of my carnage .. highly scientific experiments, I found out that the mirror assembly can be removed and repaired.
Process:
Difficulty - Moderately easy.
Time - 30m to 1h.
Supplies:
Small flat head screwdriver
Phillips screwdriver
Needle-Nose Pliers (preferred)
Multimeter (preferred)
Patience and relatively straight hands (preferred)
Let us begin with actually removing the visor from the car - firstly, we need to remove the triangle cover to access the screws that hold the visor in place. The best solution that I came up with is to start prying outwards from the alignment tab (or whatever it is), since there are three clips that are located on each side of the triangle.
After the cover is removed, we are presented with two phillips screws that need to come out.
Now unclip the visor from the second holder and pull down on the visor. Do not pull too hard! There is a wiring harness still attached!
Pull on the wire until you will see the pigtail, and then disconnect it.
Great, now the sun visor is disconnected from the car and could be moved to a highly more preferable workbench.
From now, we need to be extra careful, since it is not only a plastic trim, but also a fragile glass, with all those legends about "seven years of adversity if you will look in a broken mirror" and all that kind of stuff.
Are you still reading? Good. What we are going to do now is pry the mirror assembly out of its frame. In order to do that, we will need to take a flat head screwdriver and wedge it in between the mirror trim and the frame, a bit offset from the center, since there are two clips on each side of the trim.
After the front is pried out, we'll need to pull the mirror assembly forward (toward the side that you just pried). Be really gentle with it! Sometimes fabric gets caught up on the wire guides. And do not pull it out completely, there are still wires attached.
At first it may look like the wires are soldered in place, but they are not, it is a bit trickier..
Because of my laz ... I mean ingenuity, I now have two sets of mirror assemblies, and to my surprise they have different constructions. The one that I pulled off of scrapped Lexus has two tabs that hold the wire, and in order to pull it out, you just need to push on one of the tabs and remove the wire.
Easy enough, right? Yet it is only the thin end of the wedge - when I removed my mirror, the Holy Grail of Toyota's infinite wisdom came in sight..
I have tried pulling on it, prying on it, bending it.. To be honest, I was right on the verge of cutting it. The solution is much simpler though, just pull on the wire moderately hard, while wiggling it all over the place, and it will eventually come out.
Alright, with that out of the way, we are halfway done!
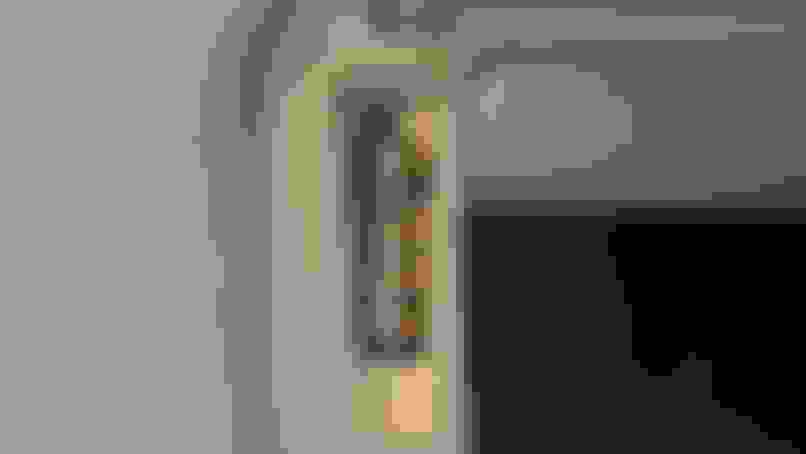
Now we can peek inside and take a closer look at those two finicky contacts that I wrote about in the beginning. They are located on the Left side, to the Right of the hinge...
OK, I give up, just look at the picture.
The biggest drawback of this project is that the cardboard backplate is "spot-welded" in place, so it is seemingly impossible to remove it without obliterating it.
Because if that, I think that the best way to approach this is to bend the left cardboard corner a bit to gain full access to the contacts. I didn't feel like removing the whole lid, although it is possible, so I decided to shape the contacts with the lid in place. Basically you just need to regain the contact in whatever way that works for you. It is easier than it sounds, trust me.
Close the lid and CAREFULLY, using the screwdriver, bend the contacts inwards at the point where the lid will have to touch them. If you would overdo it, just open the lid and use the "jumper" as the prop to bend them back.
Now, it is a testing time. In order to test it, you will need some way of knowing that the circuit is closed. I used a continuity testing of a standard multimeter, but in a pitch you can always use something like a light bulb with the power source and a bit of shamanistic magic. Measure from the wire clamp to the light bulb leg, the one that is closer to the contacts. If the lid is closed - the circuit should be opened. If the lid is opened - the circuit should be closed. Simple as that.
If it's all good, we could start our final phase - assembly. Basically it is just a reverse of what was already done: put the wires back (don't forget that you can always use priers tighten the hole for the wire), slide it into the frame (back side first). But do not click it into place just yet!Test it first, it may not work out as expected (ask me how I know).
Bonus Material: While you're still in there, you may consider a couple of other things, like if the lid stays shut or keeps opening by itself?
If you experience this, don't you worry, there is an easy solution for that problem! All you need to do is remove and bend the springs a bit. In case if you are wondering, the spring is not "point-welded", nor it is under any pressure - it just sits there, so you can safely remove it and then put it back.
And if the lights don't work at all, it is a good reason to pay a visit to the light bulbs location - just pry off the cover/reflector and take a look at what appears to be a standard fuse (o_0). Is it just me or it is indeed a fuse that they used as a light bulb?
Conclusion: I have spent around an hour on the whole thing, but I was going in a trial & error mode and was taking pictures in the process. If I would ever do it again, I would probably manage it in around 20-ish minutes. Price-wise, if not count the visors that I've got from junkyard, it is basically a free fix!
And so, that is my first tutorial on this forum, I tried to put as many pictures as I could, and explain it to the best of my abilities.
Since it is the first experience, I would really appreciate your feedback: what is good, what could be done better, and what is an outright crap. Thank you!
Please let me know if you have any questions, concerns or propositions, and best of luck!
That is indeed a light bulb that looks exactly like a fuse. Pretty shoddy way Lexus came up with for the switch not the best design. Thanks for the write up! There are LED versions in that form factor
 12-22-19, 06:43 PM