When you click on links to various merchants on this site and make a purchase, this can result in this site earning a commission. Affiliate programs and affiliations include, but are not limited to, the eBay Partner Network.
Mine has already been installed. One piece was the outer shell that matches the color of the car. The other two were black plastic pieces for the inside perimeter of the outer shell piece. Sorry if my terminology is basic - I�m not a car person! But I broke the black plastic part of this mirror and I was told that the whole mirror had to be replaced. I found this info and tutorial, and my son did the installation. So my mirror was fixed for the cost of the part instead of over $1,100.00 as quoted by a repair shop and a dealership. My son said it was an easy fix, and the hardest part was finding a screw that he had dropped on the driveway!
That's exactly the information I was looking for. Cool.
Just did the same thing to the passenger side on my 2018 ES 350 when backing out of the garage, although the damage is slightly different from the OP. Does this look the entire mirror assembly needs replacing? Haven't checked if the blind spot and rear cross-traffic alert works as I'm hesitant to take the car out with the damage. The turn signal cover on the mirror is cracked as well, but the turn signal works. This looks to be separate from p/n 8791A-76070. Would anyone know the p/n for the turn signal on the mirror housing? Edit: The turn signal p/n is 81730-50120.
Also, when searching for 8791A-76070-A0 which is the associated color code (eminent white pearl), it shows up as not fitting the 2018 ES, but all other color suffixes (J4, A2, B1, etc) show to fit. I'm thinking this has to be some sort of glitch.
Edit: Got off the phone with the Lexus dealer parts dept and they state that the color code for my VIN is 8791A-76070-A2 which shows up as Sonic Quartz (paint code 085). Guess Eminent White Pearl and Sonic Quartz are the same.
Was able to get this done by myself and put $300 - $400 back in my pocket based on dealership prices. Parts for both the housing and side turn signal ran $195 and change. This has been covered here extensively before and my main concern before beginning the job was the mirror removal. This was easier than anticipated as once you understand where the clips are that hold the mirror in, the force can be applied near it to dislodge. Here are the steps I followed:
1) Roll the windows down on the side where the side mirror is being worked on. Place a microfiber towel over the rolled-down window door. Move side mirror housing outward so it's easier to work on.
2) Notice that p/n 8791A-76070 comes with three pieces - the outer housing (body color), the inner housing (black color), and the bottom piece (black color) with the cutout for the puddle light. Put the black bottom piece into the notches of the body-colored outer housing and set it aside (or wait to do this until after step 5).
3) Tilt the mirror all the way up and use fingers on both hands near the bottom two clips to dislodge (not the bottom corners of the mirror, but towards the middle). Dislodge the top two clips by pushing the mirror down (don't re-engage the bottom clips dislodged) and dislodge the top clips from either corner (applying pressure as much in from the corners as possible). The mirror should come off and is held on by the wiring. I chose to let it hang as there's plenty of slack and placed it on the microfiber towel during the job as needed.
4) Remove the 5 screws holding the outer (typically vehicle body color) and inner housing (black piece) together. Be careful with the last screw as the housing will come apart readily once that's removed and you don't want to drop anything onto the floor. In my case, both were damaged so it wouldn't have mattered.
5) You'll see that the puddle lamp and turn signal pieces housed within readily separate. The puddle lamp housing is a bit tricky to put back in (as someone here had mentioned, and after struggling with this for a while, figured out the best way to put it back when reassembling and see step 7 below. Disconnect the connector to the side turn signal by depressing the small tab and pulling it out if the side turn signal is being replaced.
6) If you have to replace the inner housing, first notice where it connects to the neck groove on the side mirror assembly, then remove by pulling out and routing the mirror at an angle through it. Place the mirror on the microfiber towel. In my case, since the outer edge of the inner housing was damaged, this step was involved.
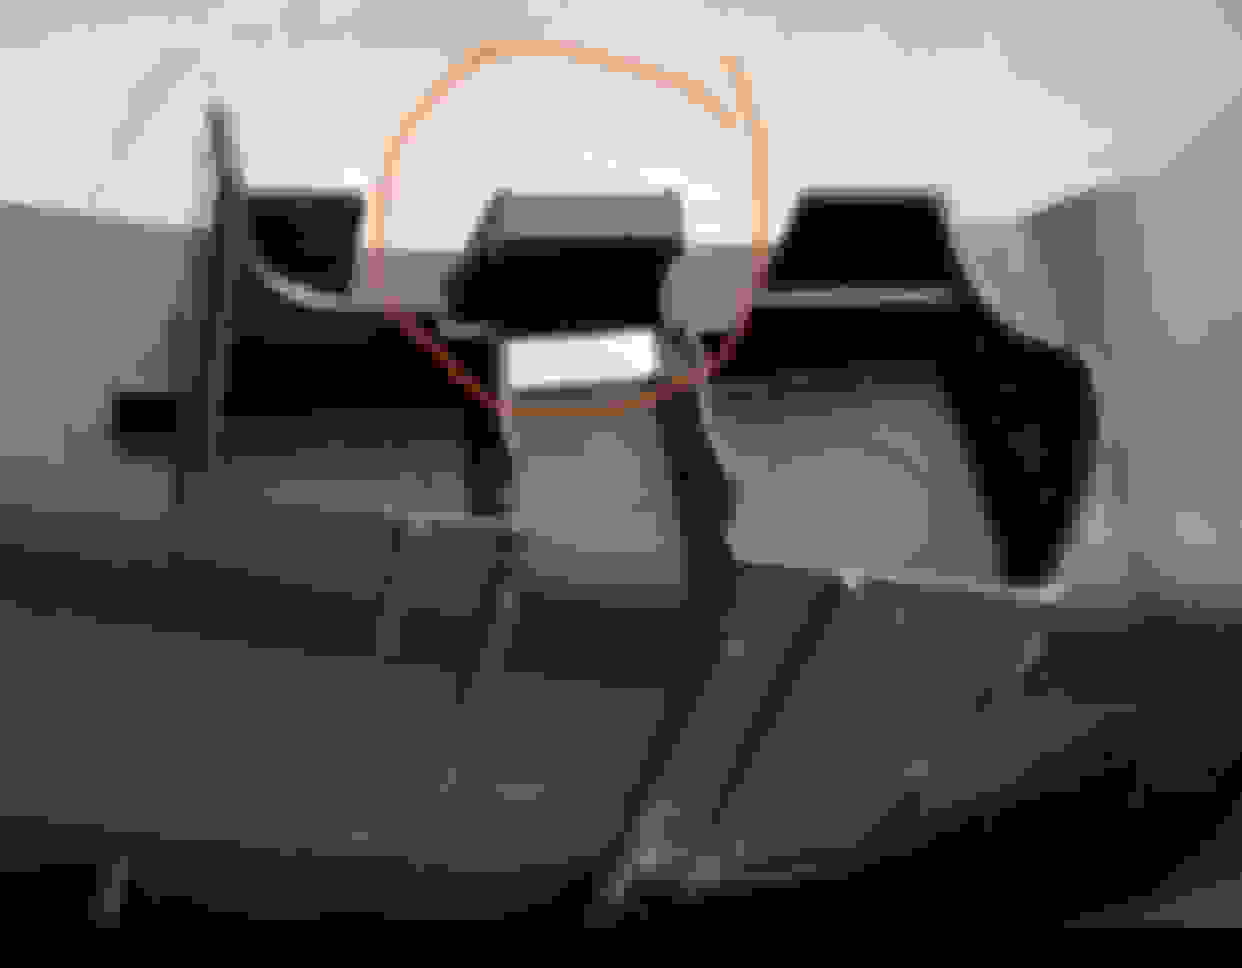
7) Route the mirror at an angle through the new inner housing (black piece) and place the new inner housing onto the neck groove. Before placing the body-colored outer housing, notice how the puddle lamp housing fits onto the inner housing. You'll see that there's an upper 'tongue' where it is placed onto (circled in the picture below). Secure the puddle lamp housing onto this tongue first and slide in the bottom. The puddle lamp housing should now remain in without any additional support.
8) Place the side turn signal into the outer housing (body-colored) and into the notches where this is to be placed. Re-connect the wiring connector onto the new side turn signal if needed.
9) Carefully place the outer housing (along with the side turn signal) onto the neck groove and line it up with the inner housing. Ensure that the black inner housing 'tucks' in on the outer housing all around, especially around the neck groove. That'll help prevent dis-assembly and trying to put this back together properly again. The screw holes should all now line up.
10) Do a quick check with the keyfob to ensure the functionality of both the puddle light and the side turn signal (lock/unlock).
11) Put all the screws back and tighten halfway. You'll notice that the gaps now decrease and place a small amount of pressure onto areas to help line things up if needed. Be careful to avoid excessive pressure since these are plastic pieces.
12) Once everything lines up and the inner and outer housings are tucked in properly, tighten all the screws. Again, hand tightening is enough with no excessive amounts of force.
13) Place the mirror back by lining it up with the notches where the clips mount to the mirror and press in around the center of the mirror with force applied to the clips. The mirror should now be in place and check for proper fit and no side is loose.
14) Turn the vehicle ON and check mirror functionality by moving the mirror to all sides.
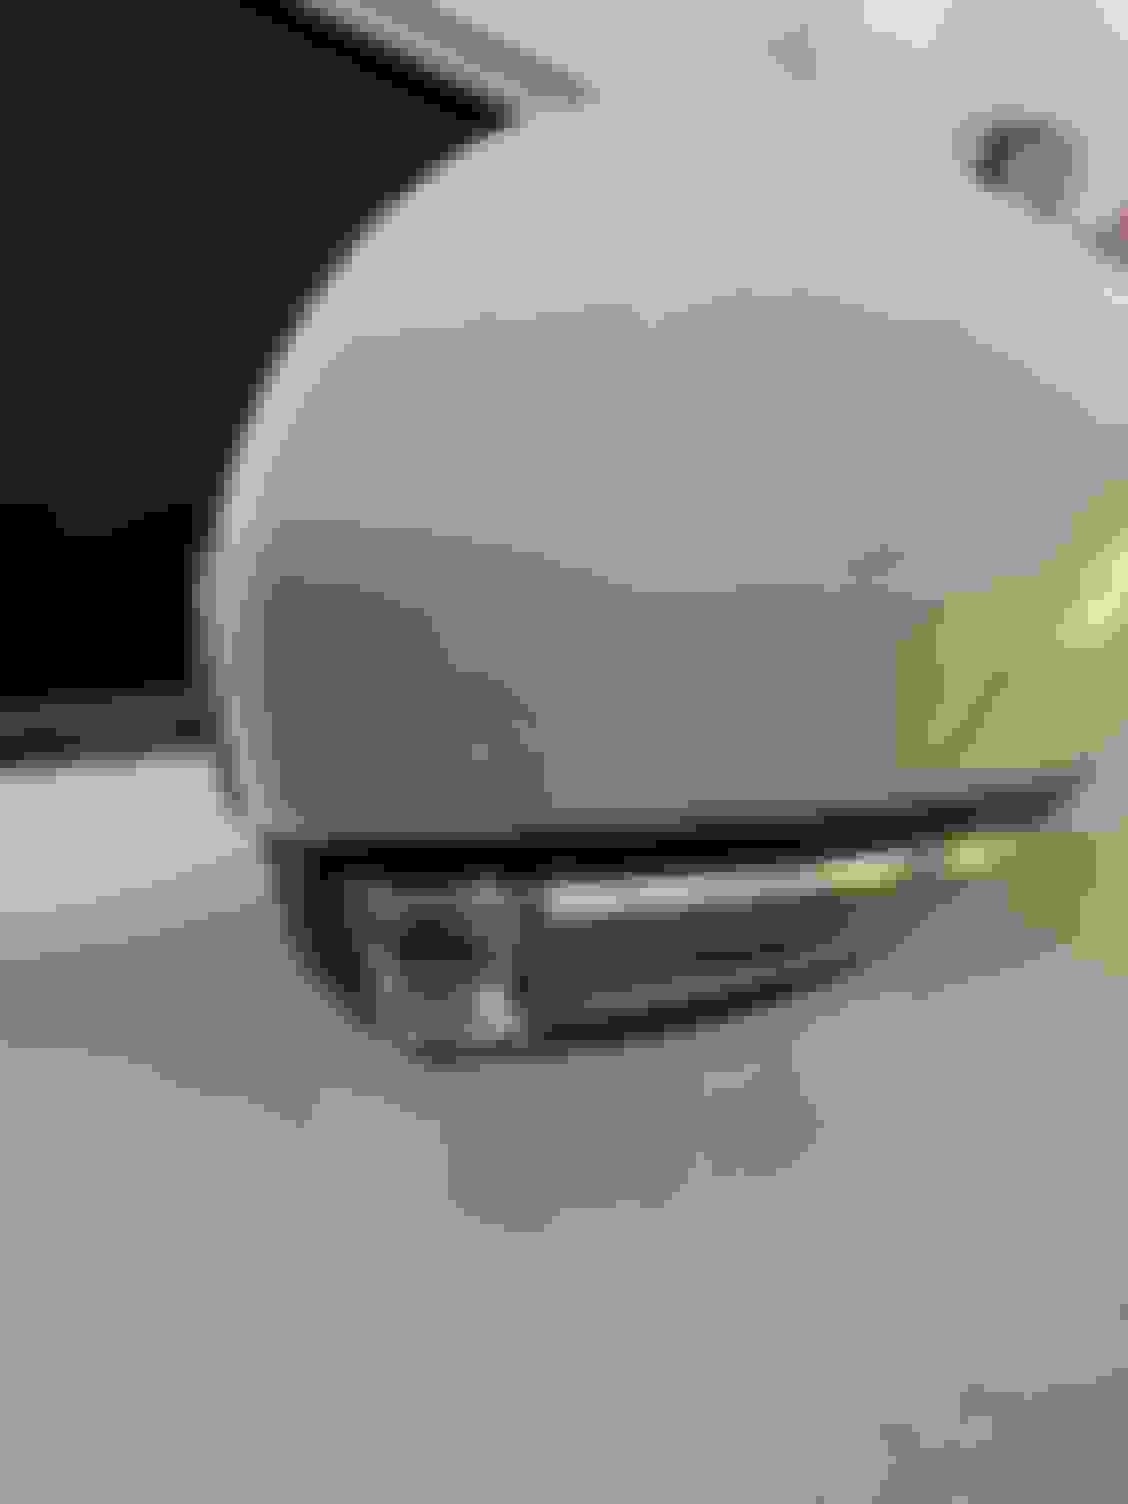
15) Check for a proper fit everywhere and voila, congrats on a job well done!
Hope this will help someone else looking to get this done on their own. Easy enough job and no need to pay the dealership for something a beginner can do in an hour or two.
Finished job:
Tongue where puddle lamp goes in:
Last edited by lji; 04-11-21 at 01:19 PM.
Reason: Better readability

 12-02-18, 09:10 AM