How to change the speedo/tacho gauges
 07-13-08, 04:39 PM
#1
Lead Lap
Thread Starter

Join Date: Jul 2008
Location: Canada
Posts: 797
Likes: 0
Received 0 Likes
on
0 Posts
This is for a Toyota Aristo, which is a Lexus GS300 from Japan, i'm not 100% sure if the lexus one is exactly like this, but i have a user that should be on here that bought a LED kit off me from clubaristo.net that has a GS300, and he should be fitting his bulbs right away here soon.
WARNING: DO NOT have your keys in the ignition while changing any lights, you'll run a risk of setting off the airbag itself, and the dreaded lame airbag light.
NOTE #1: keep in mind none of the bulbs pictured are the stock ones, except for where noted, I already had my whole interior done in blue LED's remember, so you won't see the EXACT thing that i show, but it'll be a little green GLASS bulb that you need to be carefull removing cause they break EASILY, trust me.
NOTE #2: Once the LED's are installed, if they don't work, simply take it out, flip it around, and install it the other way, since LED's have + and - and only work one way, so if it doesn't work, pull it out, twist it 180 degrees, and push it back in, simple as that
this mod requires a lot of trial error type fittings, so make sure you have a bit of time, i can rip out the cluster, change the LED's, do all the trial and error, and have them all working 100% and install the cluster, in about half hour now, so allow yourself an hour for the first time around.
Since LED's are directional, some spotting may occur, but be patient, i'll have a list up of how to get rid of it, if there is any, i just went ahead and did the mod anyway(so i don't know how they'll look by doing what i list here only), but it's more complicated, and might need to get better pictures, but please try this, and let me know how it looks
make sure your steering wheel is extended all the way down, and forwards, turn the auto return switch off so it stays like that, and then remove the keys, VERY IMPORTANT YOU REMOVE THE KEYS.
with that out of the way....
How to change your speedometer/tachometer/gas/temp gauges to LED's
1. Remove the TRAC and dimmer siwtch panel by sticking a flathead screw driver into the crack, and pushing towards the dash, so that the panel pops out towards you like so:


2. Unclip the two clips:


3. You will then be left with 4 "star head" screws you need to remove:

4. Once the screws are out, take a flathead and pry the cluster out from the top(or use your fingers, i find a screwdriver easier):

5. Unplug the 4 plugs, once again i used a flathead, i find it's easier than your fingers. Remove the top ones first:

then the back ones:

6. Pull the unit towards you, and you will then have the whole cluster in your hands. take it inside or somewehre you feel comfortable working on it with lots of light and a flat serface where you won't loose anything.
7. Remove the 4 screws that hold the white cover on that are circled in RED:

8. You'll be left with so:

a) Pop up the 2 black clips( 2 poins on each one, 1 on either side of hte ribbon, so 4 "pop up" points in total) be very careful, and gentle, but just take a finger nail on very left of hte black part, to the left of hte ribbon, and pul up, it'll only pop up about 1/8 of an inch(3mm or so) so not much at all.
b) gently pull the ribbon out, by wiggling it side to sid while lifting up and using two fingers, i repeat be gentle, if you have to force it out, check the black parts again, you shouldnt' be forcing anything.
c) remove all the screws circled in red.
WARNING: DO NOT have your keys in the ignition while changing any lights, you'll run a risk of setting off the airbag itself, and the dreaded lame airbag light.
NOTE #1: keep in mind none of the bulbs pictured are the stock ones, except for where noted, I already had my whole interior done in blue LED's remember, so you won't see the EXACT thing that i show, but it'll be a little green GLASS bulb that you need to be carefull removing cause they break EASILY, trust me.
NOTE #2: Once the LED's are installed, if they don't work, simply take it out, flip it around, and install it the other way, since LED's have + and - and only work one way, so if it doesn't work, pull it out, twist it 180 degrees, and push it back in, simple as that
this mod requires a lot of trial error type fittings, so make sure you have a bit of time, i can rip out the cluster, change the LED's, do all the trial and error, and have them all working 100% and install the cluster, in about half hour now, so allow yourself an hour for the first time around.
Since LED's are directional, some spotting may occur, but be patient, i'll have a list up of how to get rid of it, if there is any, i just went ahead and did the mod anyway(so i don't know how they'll look by doing what i list here only), but it's more complicated, and might need to get better pictures, but please try this, and let me know how it looks
make sure your steering wheel is extended all the way down, and forwards, turn the auto return switch off so it stays like that, and then remove the keys, VERY IMPORTANT YOU REMOVE THE KEYS.
with that out of the way....
How to change your speedometer/tachometer/gas/temp gauges to LED's
1. Remove the TRAC and dimmer siwtch panel by sticking a flathead screw driver into the crack, and pushing towards the dash, so that the panel pops out towards you like so:
2. Unclip the two clips:
3. You will then be left with 4 "star head" screws you need to remove:
4. Once the screws are out, take a flathead and pry the cluster out from the top(or use your fingers, i find a screwdriver easier):
5. Unplug the 4 plugs, once again i used a flathead, i find it's easier than your fingers. Remove the top ones first:
then the back ones:
6. Pull the unit towards you, and you will then have the whole cluster in your hands. take it inside or somewehre you feel comfortable working on it with lots of light and a flat serface where you won't loose anything.
7. Remove the 4 screws that hold the white cover on that are circled in RED:
8. You'll be left with so:
a) Pop up the 2 black clips( 2 poins on each one, 1 on either side of hte ribbon, so 4 "pop up" points in total) be very careful, and gentle, but just take a finger nail on very left of hte black part, to the left of hte ribbon, and pul up, it'll only pop up about 1/8 of an inch(3mm or so) so not much at all.
b) gently pull the ribbon out, by wiggling it side to sid while lifting up and using two fingers, i repeat be gentle, if you have to force it out, check the black parts again, you shouldnt' be forcing anything.
c) remove all the screws circled in red.
 07-13-08, 04:41 PM
#2
Lead Lap
Thread Starter
Join Date: Jul 2008
Location: Canada
Posts: 797
Likes: 0
Received 0 Likes
on
0 Posts
9. unplug the odometer simply by pulling on it:


10. gently lift the top circuit board up, by grabbing the edges carefully lift up:


11. You will then be left with this:

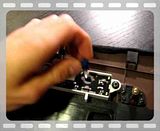
12. The bulbs you need to change are the green ones, there is 9 that you need to change in total. Take each one at a time, and turn counter clockwise.
13. I didn't get a picture of the bulb, but once it's out, unplug the bulb, some might be melted ot the green base, some might not, i had a couple that were, you need to pull on the bulb(just like you did with the ones changing the door lights) you could try wiggling it back and forth side to side while pulling up.
14. with that bulb out, take a look at the contacts inside the base, you might need to bend them closer together. this isn't hard, you just have to be carefull not to break them:
notice the gap between the contacts in the first and last pictures:
( i used a base from the shifter just for an example for the pictures)


15. Slide the new LED wedge based bulb into the place where the old bulb was, then re-insert into gauges, repeat till all 9 are changed.
16. This is where the trial and error comes into play. Since LED's are polarity sensitive (meaning they only work one way), you need to assemble the whole thing back together and plug it into your car, turn the lights on, and see how they look, find out where you think a dim spot is, and reverse the bulb. I'll show you the easiest way to do that.
10. gently lift the top circuit board up, by grabbing the edges carefully lift up:
11. You will then be left with this:
12. The bulbs you need to change are the green ones, there is 9 that you need to change in total. Take each one at a time, and turn counter clockwise.
13. I didn't get a picture of the bulb, but once it's out, unplug the bulb, some might be melted ot the green base, some might not, i had a couple that were, you need to pull on the bulb(just like you did with the ones changing the door lights) you could try wiggling it back and forth side to side while pulling up.
14. with that bulb out, take a look at the contacts inside the base, you might need to bend them closer together. this isn't hard, you just have to be carefull not to break them:
notice the gap between the contacts in the first and last pictures:
( i used a base from the shifter just for an example for the pictures)
15. Slide the new LED wedge based bulb into the place where the old bulb was, then re-insert into gauges, repeat till all 9 are changed.
16. This is where the trial and error comes into play. Since LED's are polarity sensitive (meaning they only work one way), you need to assemble the whole thing back together and plug it into your car, turn the lights on, and see how they look, find out where you think a dim spot is, and reverse the bulb. I'll show you the easiest way to do that.
07-13-08, 04:42 PM
#3
Lead Lap
Thread Starter
Join Date: Jul 2008
Location: Canada
Posts: 797
Likes: 0
Received 0 Likes
on
0 Posts
17. Replace the circuit board, by:
a) Clipping it onto the 4 metal spikes, and pushing it onto them, don't push on anything to hard, cause if a component comes off, your screwed, so just push on the 4 metal boxes, just hard enough to get the metal spikes to poke through.
b) Then screw in the 2 screws that are on each side (one is under the ribbon that goes to the temp gauge, and the other is above the speedo cable you unplugged and goes to the gas gauge, and use the screws that have a post at the end of it, meaning no screw thread at the end, they'll be the only two that look different).
c) Then replace the ribbons into the black clips, and push down on the black clips, to the left and right of the ribbon, so you insert it back into place.
d) Then put in one screw on the circuit board where it's circled in yellow:
18. then put on the white plastic cover with one screw, where it's circled in yellow:

19. Don't worry about the odometer cable, you'll plug it back in at the end when your all done.
20. Being very careful, take the whole unit back out to your car, without the keys in the ignition, plug the 4 plugs back in that are in the back. Have a look to see where you think the dead spots are, once you locate them, or think you know where they are:
a) take the white cover off(1 screw)
b) unplug the ribbons by popping the black things up
c) unscrew the circuit board screw that's in yellow
d) unscrew the 2 screws that are on the very far edges that are going into the gas/temp gagues
e) take off the circuit board and turn the base 180 degrees(therefore causing the polarity for the LED to be flipped around, doing like so:
(once again i used the shifter lights just as an example):
21. once you think you have them all the right way, plug everything back in by reversing the order of step 20, plug everything back in, then go back out to the car, plug it in, turn the lights on, and see how they look. if your still not happy, and think they're "burnt out" repeat step 20 again, haha
22. I know it's a pain, but that's the only way there is to doing it, once you think they are all in right, and your happy, go back inside, take the white cover off by removing the one screw. Insert alll the other screws back in, then plug the odometer cable back in, make sure all the cables are plugged back in, and all screws are in there, then replace the white cover and put in the 4 screws you took out.
23. take it back out to your car, plug it in, and try it out for the final time before you get it back in there, then replace the 4 screws holding it in, then plug in the TRAC and dimmer switch, then pop it into place, simply by pushing it toward the gauges
24. Enjoy your new LED gauges:

i can also tell you how to customise the other little lights, to make it look like so:

a) Clipping it onto the 4 metal spikes, and pushing it onto them, don't push on anything to hard, cause if a component comes off, your screwed, so just push on the 4 metal boxes, just hard enough to get the metal spikes to poke through.
b) Then screw in the 2 screws that are on each side (one is under the ribbon that goes to the temp gauge, and the other is above the speedo cable you unplugged and goes to the gas gauge, and use the screws that have a post at the end of it, meaning no screw thread at the end, they'll be the only two that look different).
c) Then replace the ribbons into the black clips, and push down on the black clips, to the left and right of the ribbon, so you insert it back into place.
d) Then put in one screw on the circuit board where it's circled in yellow:
18. then put on the white plastic cover with one screw, where it's circled in yellow:
19. Don't worry about the odometer cable, you'll plug it back in at the end when your all done.
20. Being very careful, take the whole unit back out to your car, without the keys in the ignition, plug the 4 plugs back in that are in the back. Have a look to see where you think the dead spots are, once you locate them, or think you know where they are:
a) take the white cover off(1 screw)
b) unplug the ribbons by popping the black things up
c) unscrew the circuit board screw that's in yellow
d) unscrew the 2 screws that are on the very far edges that are going into the gas/temp gagues
e) take off the circuit board and turn the base 180 degrees(therefore causing the polarity for the LED to be flipped around, doing like so:
(once again i used the shifter lights just as an example):
21. once you think you have them all the right way, plug everything back in by reversing the order of step 20, plug everything back in, then go back out to the car, plug it in, turn the lights on, and see how they look. if your still not happy, and think they're "burnt out" repeat step 20 again, haha
22. I know it's a pain, but that's the only way there is to doing it, once you think they are all in right, and your happy, go back inside, take the white cover off by removing the one screw. Insert alll the other screws back in, then plug the odometer cable back in, make sure all the cables are plugged back in, and all screws are in there, then replace the white cover and put in the 4 screws you took out.
23. take it back out to your car, plug it in, and try it out for the final time before you get it back in there, then replace the 4 screws holding it in, then plug in the TRAC and dimmer switch, then pop it into place, simply by pushing it toward the gauges
24. Enjoy your new LED gauges:
i can also tell you how to customise the other little lights, to make it look like so:
 07-13-08, 04:51 PM
#5
Lead Lap
Thread Starter
Join Date: Jul 2008
Location: Canada
Posts: 797
Likes: 0
Received 0 Likes
on
0 Posts
yea i know, tell me about it, i was blessed by the needle gods, i have not yet started to tackle that yet, since mine are working fine,
all the DIY guides i'm posting, are involved in a kit that i can sell for 60CAD shipped to USA, in your choice of white, blue, red or green. if you want, i can make a kit just like the white and red to include a choice of colors.
all the DIY guides i'm posting, are involved in a kit that i can sell for 60CAD shipped to USA, in your choice of white, blue, red or green. if you want, i can make a kit just like the white and red to include a choice of colors.
07-13-08, 05:05 PM
#6
Lead Lap
Thread Starter
Join Date: Jul 2008
Location: Canada
Posts: 797
Likes: 0
Received 0 Likes
on
0 Posts
I should mention, that all of these DIY guides i made up, were ment for a Toyota Aristo from Japan, hence the RHD steering. As far as i'm aware everything should be the same, except for the front dome light, as the cars with sunroofs vary from the ones without sunroofs, the gauges i'm not to sure about if they are the same or not, cause i fitted all the LED's in an Aristo, not a GS300. I have a guy that bought a kit off me, with a GS300, and i'm just waiting on him to install them.
I have taken the time to gather some plug and play LED bulbs together, and assemble a kit that I am selling. I am not sure if it breaks any rules or not, but I have assembled a kit together to replace the lights in:
footwells
courtesy lights in doors
climate control
gauges
transmission shifter/ECT
front dome
rear domes
key ring light
I am selling these kits in your choice of blue, white, red or green, and are being sold for 60CAD, and that includes 5-10 business day shipping to USA.
i can set up a group buy if need be if there is enough interest.
thanks guys, and hope these guides can help ya out a bit
Trending Topics
07-13-08, 06:39 PM
#8
Lead Lap
Thread Starter
Join Date: Jul 2008
Location: Canada
Posts: 797
Likes: 0
Received 0 Likes
on
0 Posts
actually, it's not that hard at all, the hardest part, is trying to get all the LED's to light up at the same time since they are + and - unlike incadescent bulbs. I can do every bulb listed here in an hour or so.
and yea, i didn't know how to post in that thread with links, so i just decided to post here
and yea, i didn't know how to post in that thread with links, so i just decided to post here


