
Hardwiring Valentine One Radar Detector in a GS430
 05-18-04, 04:49 PM
#1
Racer
Thread Starter
"Hardwire Valentine One Radar Detector in 2001 GS430"
Or "Busting the Fuzz in Style"
Tools:
- V1
- V1 Satellite display (optional, but this is such an awesome item)
- Philips screwdriver
- 10mm socket wrench
- Multitester (I needed this, you probably won't)
Preface: if you own the shop manuals or have the wiring diagrams, you can probably do this without removing the instrument panel, choosing a live wire from the driver side footwell.
Step 1: Remove instrument panel
This is surprisingly easy.
The front panel is held in with four snaps and comes right out with gentle pulling.
Reach down inside the gauge holes, insert a finger between the gauge and the panel and pull (gently) towards you.
The instrument panel is held in with four screws (exactly like the '92 and '98 Camry, the last cars I did this to).
Hint: position the steering wheel all the way down and all the way towards you for extra work room.

Unplug the two wiring harness connectors and remove.
While you have the instrument panel out, this is a great time to clean it.
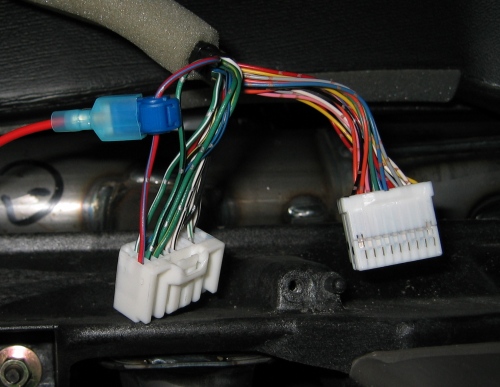
Step 2: Install Direct-Wire Tap
Now, I had to spend some time to find a live wire that was only on when the car was on.
This way, you never have to turn the detector on or off, it�s simply on when the car is on. Neato.
I used the Maroon wire with the Blue Stripe on the corner of the larger connector.
Install the tap at some distance from the connector itself to avoid problems when reinstalling the instrument panel.
I have no idea what this wire does.
Step 3: Route Direct-Wire Power Cable
This was also surprisingly easy. Unscrew the fuse in the middle of the live wire; this makes it easy to route.
The floor illumination lamp makes it very easy to see the foot well, and the cable is stiff enough for easy routing.
Step 4: Route V1 Detector Cable
I installed the detector on the passenger visor, tucking the power cable between the windshield and ceiling.
A thin piece of cardboard (a piece of the V1 box, for example) works great to tuck the cable in.
Hint: avoid kinks and bends to ensure easy tucking.

Routing down the corner post used the same method and was just as easy.
I ran the cable down the left side of the dash, right next to the drivers door, all the way to the foot well.
The cable supplied with the V1 is exactly the right length. Mr. Valentine is the bomb.
Step 4: (Optional) Route Satellite Display Cable
I chose to position mine on the dash, above the instrument panel.
It's important to put it somewhere you can reach the mute button.
Just like the power cable, I followed the edge of the dash down to the drivers foot well.

Step 5: Remove Foot Well Cover
The black cover for the foot well is held in place with two phillips screws and a snap right in front of the adjustable foot well vent.
Step 6: Install Ground
I chose the bolt in the image below for its accessibility.

Now is a really good time to test your installation.
Does the V1 come on when you start the car (or turn the key to ON)? Does it go off again when you remove the key?
This is rather importation as it is the whole point of this installation.
Step 7: Hide Cables
I routed all the cables carefully, following existing wiring harnesses wherever possible since things under the dash do move.
Step 8: Reinstall Foot Well Cover
Make sure you insert the metal tab in the back correctly.
You�ll see what I mean when you get there.
Step 9: Reinstall Instrument Panel
Step 8: Enjoy the Ride!
Or "Busting the Fuzz in Style"
Tools:
- V1
- V1 Satellite display (optional, but this is such an awesome item)
- Philips screwdriver
- 10mm socket wrench
- Multitester (I needed this, you probably won't)
Preface: if you own the shop manuals or have the wiring diagrams, you can probably do this without removing the instrument panel, choosing a live wire from the driver side footwell.
Step 1: Remove instrument panel
This is surprisingly easy.
The front panel is held in with four snaps and comes right out with gentle pulling.
Reach down inside the gauge holes, insert a finger between the gauge and the panel and pull (gently) towards you.
The instrument panel is held in with four screws (exactly like the '92 and '98 Camry, the last cars I did this to).
Hint: position the steering wheel all the way down and all the way towards you for extra work room.
Unplug the two wiring harness connectors and remove.
While you have the instrument panel out, this is a great time to clean it.
Step 2: Install Direct-Wire Tap
Now, I had to spend some time to find a live wire that was only on when the car was on.
This way, you never have to turn the detector on or off, it�s simply on when the car is on. Neato.
I used the Maroon wire with the Blue Stripe on the corner of the larger connector.
Install the tap at some distance from the connector itself to avoid problems when reinstalling the instrument panel.
I have no idea what this wire does.
Step 3: Route Direct-Wire Power Cable
This was also surprisingly easy. Unscrew the fuse in the middle of the live wire; this makes it easy to route.
The floor illumination lamp makes it very easy to see the foot well, and the cable is stiff enough for easy routing.
Step 4: Route V1 Detector Cable
I installed the detector on the passenger visor, tucking the power cable between the windshield and ceiling.
A thin piece of cardboard (a piece of the V1 box, for example) works great to tuck the cable in.
Hint: avoid kinks and bends to ensure easy tucking.
Routing down the corner post used the same method and was just as easy.
I ran the cable down the left side of the dash, right next to the drivers door, all the way to the foot well.
The cable supplied with the V1 is exactly the right length. Mr. Valentine is the bomb.
Step 4: (Optional) Route Satellite Display Cable
I chose to position mine on the dash, above the instrument panel.
It's important to put it somewhere you can reach the mute button.
Just like the power cable, I followed the edge of the dash down to the drivers foot well.
Step 5: Remove Foot Well Cover
The black cover for the foot well is held in place with two phillips screws and a snap right in front of the adjustable foot well vent.
Step 6: Install Ground
I chose the bolt in the image below for its accessibility.
Now is a really good time to test your installation.
Does the V1 come on when you start the car (or turn the key to ON)? Does it go off again when you remove the key?
This is rather importation as it is the whole point of this installation.
Step 7: Hide Cables
I routed all the cables carefully, following existing wiring harnesses wherever possible since things under the dash do move.
Step 8: Reinstall Foot Well Cover
Make sure you insert the metal tab in the back correctly.
You�ll see what I mean when you get there.
Step 9: Reinstall Instrument Panel
Step 8: Enjoy the Ride!
Last edited by jonathancl; 05-25-04 at 06:12 PM.
 05-18-04, 04:56 PM
#2
Forum Administrator

iTrader: (2)
Great first post Jonathan, welcome to ClubLexus!
I didn't hardwire my own, but when the stereo shop did it I think they just tapped right into the power for the mirror so they didn't have to run all the line up/down the windshield, just pop off the headliner panel at the mirror. There is a supposedly a ground wire there as well.
Edit - TomTNC did a nice writeup (not as good as yours with all the great pics (sorry Tom )) on tapping the mirror power here for a V1 install.
https://www.clublexus.com/forums/sho...threadid=55215
I didn't hardwire my own, but when the stereo shop did it I think they just tapped right into the power for the mirror so they didn't have to run all the line up/down the windshield, just pop off the headliner panel at the mirror. There is a supposedly a ground wire there as well.
Edit - TomTNC did a nice writeup (not as good as yours with all the great pics (sorry Tom
)) on tapping the mirror power here for a V1 install.https://www.clublexus.com/forums/sho...threadid=55215
Last edited by DaveGS4; 05-18-04 at 05:00 PM.
05-18-04, 04:58 PM
#3
Lexus Champion

Join Date: Apr 2002
Location: Kentucky
Posts: 2,970
Likes: 0
Received 0 Likes
on
0 Posts
excellent post, could become a sticky if the darn thing wasn't so expensive...i went the cheaper route w/ the solo2 by passport. if you wanna call that cheap!!! great post. excellent way for someone to save some money, with a diy.
05-18-04, 05:06 PM
#4
Racer
Thread Starter
See this is what happens when you get used to Camrys...which don't have power mirrors.
I didn't even think of it...
I wonder if there's enough room for the Direct-Wire assembly; the mirror solution may not work if you want the Satellite Display.
I didn't even think of it...
I wonder if there's enough room for the Direct-Wire assembly; the mirror solution may not work if you want the Satellite Display.
 05-18-04, 09:26 PM
#6
Originally posted by jonathancl
See this is what happens when you get used to Camrys...which don't have power mirrors.
I didn't even think of it...
I wonder if there's enough room for the Direct-Wire assembly; the mirror solution may not work if you want the Satellite Display.
See this is what happens when you get used to Camrys...which don't have power mirrors.
I didn't even think of it...
I wonder if there's enough room for the Direct-Wire assembly; the mirror solution may not work if you want the Satellite Display.
Great job contributing to the forums on your very 1st post.
Speaking of where to put the Satellite Display, here's what I did. The orignal clock buttton on the left side is now the V1 mute.
Not meaning to hi-jack your thread, so any Q's on my set up, just respond Here: https://www.clublexus.com/forums/sho...ight=valentine
Last edited by RMMGS4; 05-18-04 at 09:28 PM.
05-18-04, 11:44 PM
#7
Lead Lap
Join Date: Feb 2002
Location: New Jersey
Posts: 420
Likes: 0
Received 0 Likes
on
0 Posts
I just purchased the Valentine 1 radar/laser detector today, and will recieve it in a few days. My question is why doesn't anyone just mount the radar in the middle of the windshield and use the cigarette lighter adapter to power it? Only for the Valentine 1, i'm seeing everyone doing hardwiring.
Trending Topics
05-19-04, 06:59 AM
#8
Racer
Thread Starter
Originally posted by the hustler07
...why doesn't anyone just mount the radar in the middle of the windshield and use the cigarette lighter adapter to power it?
...why doesn't anyone just mount the radar in the middle of the windshield and use the cigarette lighter adapter to power it?
2: You have to constantly remove it and put it back again.
3: That springy cable looks icky.
4: Normal people use the cigarette lighter.
Last edited by jonathancl; 05-25-04 at 06:37 PM.
05-19-04, 07:33 AM
#9
i always put the v1 in the middle of the windshield. i can careless if people think it's ugly. i want the v1 to find cops, not to look nice. but the wiring is just nasty, horrible, i hate stuff hanging inside my car, so hardwire is the only solution to me. plus it's easy. also, cigarette lighter sometimes don't have really good and persistent power supply. at least on mine, the power might go in and out sometimes
05-19-04, 07:57 AM
#10

I like leaving NOTHING visible when I leave the car--we have too many meth' users around here who like to smash 'n grab whatever's handy.
I really like the replace-the-clock-with-the-display tactic. I didn't think that one up when I was doing my V1 hardwire installation. Instead, being a non-smoker, I hid my remote display in the ashtray. It just barely fit in the ash receptacle, and it's just a matter of shutting the ashtray when I leave the car.
In the ashtray, the display is low enough that no one behind me can "mooch" off of my el-int, and it's a very discreet hand motion to the ashtray to hit the mute button.
05-19-04, 08:09 AM
#11
Lexus Test Driver
Great writeup, I need to hardwire my V1 this spring as well.
I don't think I'll be taking the dash apart though, I'll just somehow tap into a wire around the rear-view mirror and mount the V1 right around the rear-view mirror. Ulgy? Maybe, but looking pretty isn't the V1's intended purpose.
I take the V1 out everytime I get out of the car.
I don't think I'll be taking the dash apart though, I'll just somehow tap into a wire around the rear-view mirror and mount the V1 right around the rear-view mirror. Ulgy? Maybe, but looking pretty isn't the V1's intended purpose.
I take the V1 out everytime I get out of the car.
05-19-04, 08:53 AM
#12
Forum Administrator
iTrader: (2)
Originally posted by redgs400
I like leaving NOTHING visible when I leave the car--we have too many meth' users around here who like to smash 'n grab whatever's handy.
I really like the replace-the-clock-with-the-display tactic. I didn't think that one up when I was doing my V1 hardwire installation. Instead, being a non-smoker, I hid my remote display in the ashtray. It just barely fit in the ash receptacle, and it's just a matter of shutting the ashtray when I leave the car.
05-19-04, 09:11 AM
#13
Racer
Thread Starter
Originally posted by redgs400
I like leaving NOTHING visible when I leave the car--we have too many meth' users around here who like to smash 'n grab whatever's handy.
...I hid my remote display in the ashtray. It just barely fit in the ash receptacle, and it's just a matter of shutting the ashtray when I leave the car. ..., and it's a very discreet hand motion to the ashtray to hit the mute button.
But aren't you driving really fast and not looking at the road?

 05-19-04, 12:34 PM
#15
Originally posted by DaveGS4
Red - even with the remote display don't you still have the main V1 unit sitting up on the windshield to get the radar signal? That's still the big risk item for theft (being the victim of a smash and grab on the V1 I had in my LS400 at the airport), not the remote display unit.
Red - even with the remote display don't you still have the main V1 unit sitting up on the windshield to get the radar signal? That's still the big risk item for theft (being the victim of a smash and grab on the V1 I had in my LS400 at the airport), not the remote display unit.