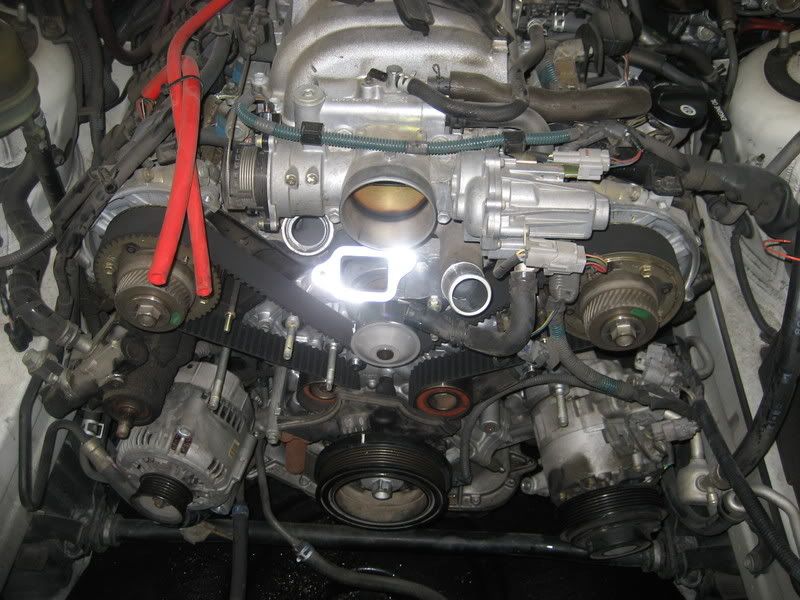
Pictures: GS400 timing belt parts and part #'s. How-to soon.
 09-27-07, 12:25 PM
#46
Driver

Join Date: Oct 2006
Location: texas
Posts: 108
Likes: 0
Received 0 Likes
on
0 Posts
Aliga has posted two wrong posts that WILL cause you to bend valves. DO NOT align the marks to the |. I invite anyone who hasn't replaced the Timing belt personally on the gs400 VVTI to please shut the hell up. 
When I did mine, I had my 0 mark on the crank pointed at the idler pulley...about 50 degrees ATDC. The reason WHY you do this, boys & girls, is so that when you DO take the belt off..there's no pressure from the valve springs to turn the cams & bend valves. The most important thing when removing the belt is for nothing to rotate. The cam gears and crank must stay in a perfect relationship with each other.
If you're scared, which I was, then get two 19mm wrenches & have people hold the cam gears still while you take the belt off. when the belt is off, they can SLOWLY release the wrenches, making sure they don't want to rotate. If you have the crank at 50 degrees, like it says in the book, then they won't want to rotate.
It's actually REALLY easy to do the timing belt on this car as long as you dont read mis-information by people that like to add their unneeded two cents. I was amazed at how every bolt was placed in a location that allowed easy access with a basic set of extensions. The hardest part was removing & installing the coolant bypass pipe. that took me like 3 hours of wiggling, for a total of 10 hours of really slow careful work & washing the timing covers. And for the record I slightly scratched the crank doing the front seal & I dont have any leaks. Moral of the story DON'T BE SCARED
I've got some pictures of the dissassembled engine ill have to add to this so we can make a proper how to.
 09-27-07, 01:04 PM
#47

I did the timing belt on a 4.7L tundra non VVTI and did not have any issues. It seems intuitive to me that you would use the "T" and not the "I" or what was called a hash mark. The service manual for the Tundra is very specific. I am still really confused. I would like to see all the marks lined up from crank to cams.
Sorry for causing such a fuss but I think this detail is REALLY important.
B
Sorry for causing such a fuss but I think this detail is REALLY important.
B
09-27-07, 01:12 PM
#48
Aliga has posted two wrong posts that WILL cause you to bend valves. DO NOT align the marks to the |. I invite anyone who hasn't replaced the Timing belt personally on the gs400 VVTI to please shut the hell up.
When I did mine, I had my 0 mark on the crank pointed at the idler pulley...about 50 degrees ATDC. The reason WHY you do this, boys & girls, is so that when you DO take the belt off..there's no pressure from the valve springs to turn the cams & bend valves. The most important thing when removing the belt is for nothing to rotate. The cam gears and crank must stay in a perfect relationship with each other.
If you're scared, which I was, then get two 19mm wrenches & have people hold the cam gears still while you take the belt off. when the belt is off, they can SLOWLY release the wrenches, making sure they don't want to rotate. If you have the crank at 50 degrees, like it says in the book, then they won't want to rotate.
It's actually REALLY easy to do the timing belt on this car as long as you dont read mis-information by people that like to add their unneeded two cents. I was amazed at how every bolt was placed in a location that allowed easy access with a basic set of extensions. The hardest part was removing & installing the coolant bypass pipe. that took me like 3 hours of wiggling, for a total of 10 hours of really slow careful work & washing the timing covers. And for the record I slightly scratched the crank doing the front seal & I dont have any leaks. Moral of the story DON'T BE SCARED
I've got some pictures of the dissassembled engine ill have to add to this so we can make a proper how to.
you should shut the hell up, a master tech on here posted saying it should line up with the |. I think he has done a few more than you have.
edit: I guess all my valves are bent since I have been driving the car for about a week now after the job was done with my own two hands.
Last edited by aliga; 09-27-07 at 01:22 PM.
09-27-07, 06:04 PM
#49
Lexus Champion

Aliga has posted two wrong posts that WILL cause you to bend valves. DO NOT align the marks to the |. I invite anyone who hasn't replaced the Timing belt personally on the gs400 VVTI to please shut the hell up.
When I did mine, I had my 0 mark on the crank pointed at the idler pulley...about 50 degrees ATDC. The reason WHY you do this, boys & girls, is so that when you DO take the belt off..there's no pressure from the valve springs to turn the cams & bend valves. The most important thing when removing the belt is for nothing to rotate. The cam gears and crank must stay in a perfect relationship with each other.
If you're scared, which I was, then get two 19mm wrenches & have people hold the cam gears still while you take the belt off. when the belt is off, they can SLOWLY release the wrenches, making sure they don't want to rotate. If you have the crank at 50 degrees, like it says in the book, then they won't want to rotate.
It's actually REALLY easy to do the timing belt on this car as long as you dont read mis-information by people that like to add their unneeded two cents. I was amazed at how every bolt was placed in a location that allowed easy access with a basic set of extensions. The hardest part was removing & installing the coolant bypass pipe. that took me like 3 hours of wiggling, for a total of 10 hours of really slow careful work & washing the timing covers. And for the record I slightly scratched the crank doing the front seal & I dont have any leaks. Moral of the story DON'T BE SCARED
I've got some pictures of the dissassembled engine ill have to add to this so we can make a proper how to.
When I did mine, I had my 0 mark on the crank pointed at the idler pulley...about 50 degrees ATDC. The reason WHY you do this, boys & girls, is so that when you DO take the belt off..there's no pressure from the valve springs to turn the cams & bend valves. The most important thing when removing the belt is for nothing to rotate. The cam gears and crank must stay in a perfect relationship with each other.
If you're scared, which I was, then get two 19mm wrenches & have people hold the cam gears still while you take the belt off. when the belt is off, they can SLOWLY release the wrenches, making sure they don't want to rotate. If you have the crank at 50 degrees, like it says in the book, then they won't want to rotate.
It's actually REALLY easy to do the timing belt on this car as long as you dont read mis-information by people that like to add their unneeded two cents. I was amazed at how every bolt was placed in a location that allowed easy access with a basic set of extensions. The hardest part was removing & installing the coolant bypass pipe. that took me like 3 hours of wiggling, for a total of 10 hours of really slow careful work & washing the timing covers. And for the record I slightly scratched the crank doing the front seal & I dont have any leaks. Moral of the story DON'T BE SCARED
I've got some pictures of the dissassembled engine ill have to add to this so we can make a proper how to.
Let me ask you a simple question. I know all the lexus T-belts come with marks. What if you get a wrong part? Are you going to stretch the belt and try to make it to fit? It does sound funny, but you do 10 + t-belt job a week on these VVT-i motor you will know what I'm trying to say. Please keep this in mind, when you remove the vvt-i sprocket it doesn't mean the cam will move. VTT-I control by the OCV(Oil control Valve), that Oil Control Valve controls the direction of the oil flow.
JPI
Last edited by JPI Racing; 09-27-07 at 06:17 PM.
09-28-07, 04:30 AM
#50
Can someone post some pics out of the service manual to clearify this. I am not trying to get everyone upset but, a picture is worth a thousand words. Just seems odd to me that they would put a "T" on the cast when they mean for you to use the "I" is "T" for timing and I for something else? I have a CD manual on the 07 tundra with VVTI would it be the same for the GS400? I can post some of those manual pages when I get some time. I have not looked at it.
To me intuitivly it seems right to use the "T". Just my pennys worth.
B
To me intuitivly it seems right to use the "T". Just my pennys worth.
B
09-28-07, 04:41 AM
#51
Is a special puller required?
Thanks,
B
09-28-07, 05:09 AM
#52

Just curious, What is the "T" mark for If the "l" is used for aligning the camshaft pulley for proper timing??
I noticed when I took off my cam covers to polish them (no other work done) there was a yellow alignment mark on the camshaft pulley to the "T" mark.
My Gs430 manual does state what Jason (JPI) and aliga says, crank pulley mark on "0" and camshaft pulley mark on "l" mark. Wondering why factory marked the yellow marks

Last edited by GILLEXUS; 10-11-07 at 04:15 AM.
09-28-07, 09:06 AM
#53
Just curious, What is the "T" mark for If the "l" is used for aligning the camshaft pulley for proper timing??
I noticed when I took off my cam covers to polish them (no other work done) there was a yellow alignment mark on the camshaft pulley to the "T" mark.
My Gs430 manual does does states what Jason (JPI) and aliga say, crank pulley mark on "0" and camshaft pulley mark on "l" mark. Wondering why factory marked the yellow marks
09-28-07, 10:31 AM
#54
I found in my 2UZ-FE that they want the crank at 0 deg TDC. I have attached several pics from the manual.
I have a few more pics.. I think I aggree with JPI about the timing marks now. Not that I ever disagreed but, here is some pics from the manual.
I am a little confused about the VVTI camshaft pulleys are they spring loaded and when you remove a non-broken belt will they move on you? I am expecting it to stay there and not move when I take the belt off.
B
09-28-07, 10:34 AM
#56
I found in my 2UZ-FE that they want the crank at 0 deg TDC. I have attached several pics from the manual.
I have a few more pics.. I think I aggree with JPI about the timing marks now. Not that I ever disagreed but, here is some pics from the manual.
I am a little confused about the VVTI camshaft pulleys are they spring loaded and when you remove a non-broken belt will they move on you? I am expecting it to stay there and not move when I take the belt off.
B
I have a few more pics.. I think I aggree with JPI about the timing marks now. Not that I ever disagreed but, here is some pics from the manual.
I am a little confused about the VVTI camshaft pulleys are they spring loaded and when you remove a non-broken belt will they move on you? I am expecting it to stay there and not move when I take the belt off.
B
09-28-07, 10:35 AM
#57
I am a little confused about the VVTI camshaft pulleys are they spring loaded and when you remove a non-broken belt will they move on you? I am expecting it to stay there and not move when I take the belt off.
09-28-07, 10:38 AM
#58
09-28-07, 10:40 AM
#59