
KiPod's GS Pic & Mod thread
 11-25-10, 09:27 AM
#151
Lexus Test Driver
Thread Starter
iTrader: (31)
Join Date: Aug 2006
Location: All Around Our Nation's Capital
Posts: 1,354
Likes: 0
Received 6 Likes
on
6 Posts
Well, I never finished the redwood with a clear polyurethane coating, so the paint cracked in the heat. I'm working on another set but haven't got around to it yet.
And the # on the plaque is 0007 so no Bond for me.
And the # on the plaque is 0007 so no Bond for me.

 12-19-10, 05:20 AM
#153
Lexus Test Driver
Thread Starter
iTrader: (31)
Join Date: Aug 2006
Location: All Around Our Nation's Capital
Posts: 1,354
Likes: 0
Received 6 Likes
on
6 Posts
Latest mod. I removed the ignition cylinder and installed this...

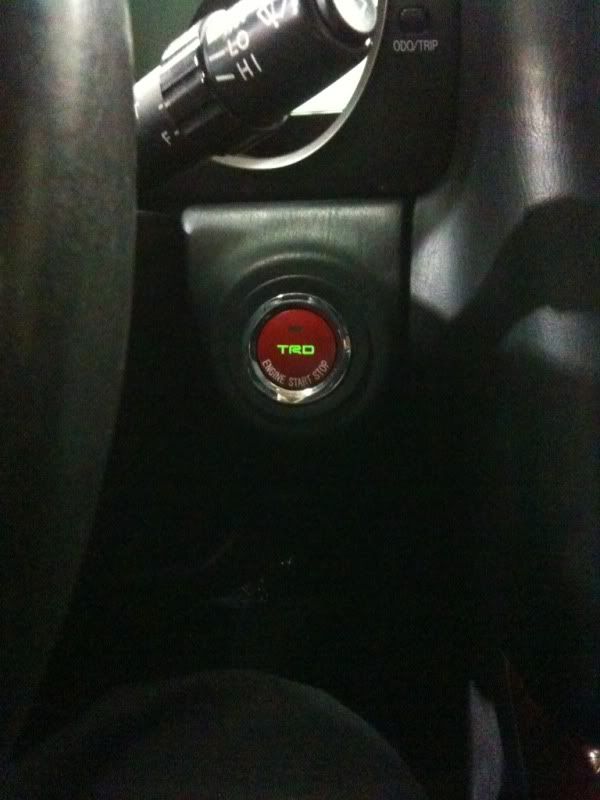
I had been planning this for a long time. I got the TRD push button about a year ago from a place in the UK (I think they might be discontinued now). Recently, my ignition cylinder started acting up and I thought it was time. I knew Supra guys had done it with a kit from DreSpec but I think he vanished or something. I did more searching and found http://advancedkeys.com/. Since their kit uses a factory Toyota/Lexus button it was a perfect match for my previously purchased TRD button. Since I did the Aristo swap already, the factory immobilizer was disconnected & it just made it that much easier. So, now after almost 2 years of thinking about it, I have a push button start.
I had been planning this for a long time. I got the TRD push button about a year ago from a place in the UK (I think they might be discontinued now). Recently, my ignition cylinder started acting up and I thought it was time. I knew Supra guys had done it with a kit from DreSpec but I think he vanished or something. I did more searching and found http://advancedkeys.com/. Since their kit uses a factory Toyota/Lexus button it was a perfect match for my previously purchased TRD button. Since I did the Aristo swap already, the factory immobilizer was disconnected & it just made it that much easier. So, now after almost 2 years of thinking about it, I have a push button start.
 03-31-11, 08:08 PM
#156
Driver School Candidate
Join Date: Mar 2011
Location: Vic
Posts: 25
Likes: 0
Received 0 Likes
on
0 Posts
just read through your whole build, fkn love all the custom work you have done. ill def be attempting the DIY head light intake and hidden gauges!
expect heaps of pm's when i get stuck :P
expect heaps of pm's when i get stuck :P
04-01-11, 03:47 AM
#157
Lexus Test Driver
Thread Starter
iTrader: (31)
Join Date: Aug 2006
Location: All Around Our Nation's Capital
Posts: 1,354
Likes: 0
Received 6 Likes
on
6 Posts
Thanks a lot. I had tons of fun with the GS but the time has come to move on. I have a part out thread here https://www.clublexus.com/forums/2ge...risto-etc.html if you're interested in anything.
 05-29-14, 05:11 AM
#163
Driver School Candidate
I have been searching for a car with this conversion for a while, and damn if I did not find this exact car at a salvage auction for sale. Just some dents and dings and they say it does not have power. I figure it has to be due to push button start. We shall see, I won the auction and it will be at my house next week! Fingers crossed!
05-29-14, 09:25 AM
#164
Driver

Join Date: Aug 2012
Location: Illinois
Posts: 103
Likes: 0
Received 0 Likes
on
0 Posts
Okay, here is the info for what ECU pins I moved for the swap. If the pins were in the same spot I left them alone & will skip them on the list. I only listed the wires that need to be moved to a different location or removed from the connector. I will list the connector w/ pin where it was for the 98 GS400 then where it needs to be for the Aristo.
Connectors E2, E3, & E4 run from the engine to the ECU so they should all be in the correct place alreay (if your swap came with ECU & harness together). Connectors E5, E6, & E7 are from the vehicle body to the ECU so these need to be moved to match the new ECU. On my Aristo ECU there was no slot for the E7 connector so I listed those as "remove" as well.
If I say "remove" it's because it is either already in the correct location on the Aristo harness (in connector E2, E3, or E4) or you don't need this wire. You should remove it from the connector and tape it off. The list should read like this,
98 GS400 location (Wire Color) - Aristo location
So, you would move pin 2 on connector E5 on the GS400 harness (Red wire with Black stripe) to pin 16 on connector E5 for the Aristo ECU.
E5 pin 2 (RED/black) - E5 pin 16
E5 pin 3 (GREEN/black) - remove
E5 pin 4 (GREEN) - remove
E5 pin 7 (GREY/black) - remove
E5 pin 8 (GREY) - remove
E5 pin 10 (WHITE/red) - remove
E5 pin 15 (RED/white) - E5 pin 26
E5 pin 16 (BLACK/yellow) - connect to ignitor for tach signal (you will need a tach adapter to get it to work with a 400 cluster)
E5 pin 17 (BLACK) - E5 pin 2
E5 pin 18 (WHITE) - E5 pin 8
E5 pin 19 (WHITE/green) - remove
E5 pin 20 (GREEN/red) - remove
E5 pin 22 (BLUE/yellow) - E5 pin 18
E5 pin 25 (RED/white) - remove
E5 pin 26 (WHITE/black) - E6 pin 22
E5 pin 27 (RED) - remove
E5 pin 28 (YELLOW/red) - remove
E6 pin 3 (BLUE/black) - E3 pin 8
E6 pin 22 (GREEN/red) - E6 pin 15
If your Aristo ECU is like mine & doesn't have a slot for the E7 connector, you don't have to remove these wires. Since the connector is left hanging loose it will not interfere with anything.
E7 pin 1 (YELLOW/black) - E5 pin 17
E7 pin 2 (BLUE/yellow) - remove
E7 pin 3 (VIOLET or Purple) - remove
E7 pin 4 (WHITE/black) - remove
E7 pin 11 (WHITE) - E5 pin 28
E7 pin 14 (BLACK/blue) - E5 pin 11
E7 pin 15 (RED/green) - remove
E7 pin 16 (RED/yellow) - remove
E7 pin 17 (BLUE/red) - remove
E7 pin 18 (GREEN/black) - remove
E7 pin 19 (BLACK/white) - remove
E7 pin 20 (YELLOW) - remove
E7 pin 21 (GREY) - remove
E7 pin 22 (LIGHT GREEN/red) - E5 pin 10
E7 pin 23 (BLUE/black) - E5 pin 21
E7 pin 24 (BLACK) - E5 pin 27
E7 pin 25 (YELLOW/green) - E5 pin 7
E7 pin 26 (PINK/blue) - E2 pin 26
Sorry, if it's confusing. Sometimes things make sense in my mind but they don't come out as coherent. I think there were 1 or 2 other wires I had to move to get the shift indicator & shift lock to work. I think they were in the grey junction block beside the ECU & next to the orange junction block. I can't remember for sure though. If someone does this and runs into a problem with them I can check to see what mine look like.
I have a question about this, when moving the wires do i solder them together or replace? like E7 pin 25 to E5 pin 7, does that mean i solder the wires together? or does that mean i move E7 pin 25 and move it to where E5 pin 7 was? Please help! thank you!
Last edited by 99GS400HP; 05-29-14 at 09:53 AM.
05-29-14, 10:43 AM
#165
Driver School Candidate
Move e7 25 to e5 7. No soldering. Keeps it factory looking.