
DIY Repairing Air Mix Servomotors
 05-17-10, 02:00 PM
#16

Thanks for posting these pics. It looks like your servomotor is different from mine. On mine the big gear and white arm are attached to one half of the case, and they spin freely when the case is open. The other half of the case contains the motor, small gears, and copper contact. Also, the striped sensor disc (on the big gear) is facing outward on mine, with the stripes visible, but on yours it looks to be facing inward.
I'm not sure why you say this is a time consuming repair. Is 30 to 60 minutes too long for a diy repair? On my 2000 GS300, doing this fix on the driver side was very straight forward, with just one small panel to remove, and five screws total. I can post an update once I pass the month mark, but so far my servo is working perfectly.
I'm not sure why you say this is a time consuming repair. Is 30 to 60 minutes too long for a diy repair? On my 2000 GS300, doing this fix on the driver side was very straight forward, with just one small panel to remove, and five screws total. I can post an update once I pass the month mark, but so far my servo is working perfectly.
does your servo look like the one sitting on the floor mat in this picture below?
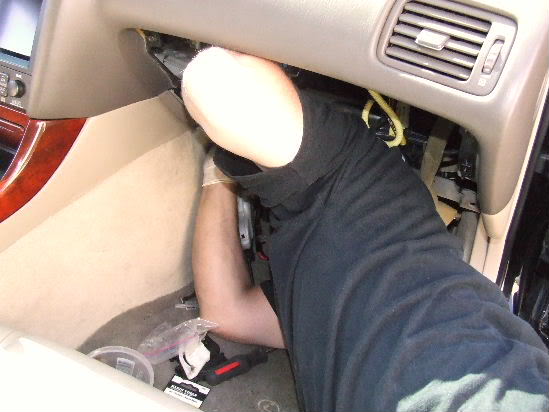
if not, it should look like mine, just reversed.which servo did u replace? the drivers side temp servo you posted in the first post....its also the same temp servo, just reversed
Last edited by sakataj; 05-17-10 at 02:26 PM.

 05-18-10, 08:17 AM
#18


 05-20-10, 05:10 PM
#20
Racer
Thank you, fingershop, for saving me $160. I was about to order the servo until I read the description of the problem with the lubricant and potentiometer.
If I had cycled through the air flow modes, it would function normally again, but the tapping or clicking would always return.
My servo was as described in this thread: the potentiometer disk very much covered by the gear lubricant.
I wiped it clean, reassembled and tested. All fixed.
The hardest part is getting the servo out; the rear screw is nigh inaccessible.
Getting the servo back in is a little tricky, too.
This is a much easier DIY than the door lock actuator since you can actually open the servo assembly, unlike the door lock.
It's the same labor whether you replace or repair. Opening and cleaning the servo is by far the easiest part.
Last edited by jonathancl; 05-20-10 at 05:16 PM.
05-20-10, 06:22 PM
#21
Driver School Candidate
Thread Starter

Thank you, fingershop, for saving me $160. I was about to order the servo...
My servo was as described in this thread: the potentiometer disk very much covered by the gear lubricant. I wiped it clean, reassembled and tested. All fixed.
The hardest part is getting the servo out; the rear screw is nigh inaccessible.
My servo was as described in this thread: the potentiometer disk very much covered by the gear lubricant. I wiped it clean, reassembled and tested. All fixed.
The hardest part is getting the servo out; the rear screw is nigh inaccessible.
I will guess that the lubricant is applied to the disc at the factory, to keep the potentiometer's stripes from wearing too quickly. I'm not sure which is better, to leave some un-contaminated lubricant on the disc, or to wipe it clean. I left some on mine, just to be safe.
I used my shortest 3" phillips driver to get that one screw out, my longer ones just wouldn't fit in the cramped space near there.
05-22-10, 05:41 AM
#22
Racer
That's great! Glad you got yours working again.
I will guess that the lubricant is applied to the disc at the factory, to keep the potentiometer's stripes from wearing too quickly. I'm not sure which is better, to leave some un-contaminated lubricant on the disc, or to wipe it clean. I left some on mine, just to be safe.
I will guess that the lubricant is applied to the disc at the factory, to keep the potentiometer's stripes from wearing too quickly. I'm not sure which is better, to leave some un-contaminated lubricant on the disc, or to wipe it clean. I left some on mine, just to be safe.
Three totally different things with exactly the same problem fixed exactly the same way...
05-22-10, 10:05 AM
#23
Driver School Candidate
Thread Starter
Its interesting that you've seen the same issue in other items. I wonder though. If heat caused the lubricant to flow then I should have seen a puddle of it at the bottom of the servo case. But no puddles. All the lubricant was right on the gear teeth, and in a big blob at the screw gear, and on the copper contact. On the disc there were a few small circles of the lubricant that looked to me like they were applied that way at the factory. And no drip marks anywhere.
06-08-10, 03:40 PM
#25
Driver
I dont know if this is relevent to the post but it is possible that this failure in design has alot to do with the temperature that these cars are driven in. If you have a car whos owner keeps the temperature at or near the outdoor temp, then more wear would occur in a smaller area.
06-08-10, 06:00 PM
#26

So, I am curious, can someone post a photo of how they got to the potentiometer without breaking off the arm?


Last edited by lyonkster; 06-08-10 at 06:03 PM.
06-08-10, 06:16 PM
#27
Racer
No need for a photo. The gear stays attached to the side of the housing to which the gear and arm are attached. It appears just as in your photos...except that the arm is not broken.
06-08-10, 06:26 PM
#28
Well, on mine the arm was fused to the gear, there was no way to get it off without breaking it (believe me, I tried). Without getting off the arm, I could not get to the contacts. Are you saying you were able to get the arm off the gear without breaking it off?
06-08-10, 07:18 PM
#29
Driver School Candidate

Join Date: Nov 2009
Location: FL
Posts: 6
Likes: 0
Received 0 Likes
on
0 Posts
The mode servo is different from the temp servos. When you open a mode servo, you will see the contacts. On the temp servos, you will see the opposite side of the potentiometer contacts. I wasn't having a problem with my mode servo, but I opened it up and cleaned it anyway.
My passenger temp servo was making a lot of noise. I opened it up, greased the gears, and noticed that there was quite a bit of slack in the big gear. The contact fingers press on the gear like springs and I surmised that over time they had lost solid contact. I took out a bit of slack by gluing two washers between the outer case and the shoulder of the plastic arm. This pulled the contact fingers tighter against the potentiometer contacts and seems to have fixed the problem for me.
My passenger temp servo was making a lot of noise. I opened it up, greased the gears, and noticed that there was quite a bit of slack in the big gear. The contact fingers press on the gear like springs and I surmised that over time they had lost solid contact. I took out a bit of slack by gluing two washers between the outer case and the shoulder of the plastic arm. This pulled the contact fingers tighter against the potentiometer contacts and seems to have fixed the problem for me.
06-08-10, 09:19 PM
#30
My passenger temp servo was making a lot of noise. I opened it up, greased the gears, and noticed that there was quite a bit of slack in the big gear. The contact fingers press on the gear like springs and I surmised that over time they had lost solid contact. I took out a bit of slack by gluing two washers between the outer case and the shoulder of the plastic arm. This pulled the contact fingers tighter against the potentiometer contacts and seems to have fixed the problem for me.