Big 3 done
 02-14-11, 12:32 AM
#1

i finally did the big three.
it took me about 15 feet to do it all.
i will post some pictures in the next couple of days. so far ive only ran the wires and tied everything down. im waiting for battery terminals to come in this week so i can connect everything up to the battery and hopefully see a differance.
im excited to see results and im pretty damn happy with the work i did. ran everything very nicely and i conceiled it all with black tubing and electrical tape so you cant even tell theres any extra 0 gauge in there. everything just looks completely oem (except for the extra 0 gauge wires that will soon be connected to the battery) but other than that. it looks very clean.
thanks to brian and jokster for the help!!!!! hopefully this will solve some of my voltage problems! will post pics and results for everyone to use this week.
total length of 0 gauge used for big 3 (actually did 4) was 15 ft.

 02-14-11, 07:59 AM
#3

glad u got this done.....BUT why make a new post for this instead of adding it to the ones were we BEEN talking about this my friend?
i guess i'll post up my pics in here also since this will become the Big 3 page....as it is alot easier to find this when searching then our other ones
so here is a summary of MY measurements
Battery To Frame Is 25"
Engine To Frame Is 25"
Battery To Strut Bar is 32"
Frame/Chassis To Intake Manifold Is 12"
Negative Battery To Negative Alternator Is 61"
Positive Battery To Positive Alternator Is 61"
i did a BIG 5 though and DONT have a pic from the positive battery post to the positive side of the alternator.keep in mind some of these are a little longer than needed but figured it would be better to have longer ones than shorter ones to make it easier to run the wire to the alternator and under the air intake i removed the oem intake temporarily
these are all the gounds, either the wire or the actual grounding spot EXCEPT on the alternator

the battery to frame is 25" and i used the oem grounding spot

the engine to frame is also 25" i used this mounting tab (its hidden in this pic but i have a better one)

Close Up


this bolts up right in front of the other oem ground, it used the mount where the horn bolts up

battery to strut bar is 32" (lengthened to hide the cable behind the fuse boxes and the battery) i removed the fuse box,strut bar to mount this stealthy


cable wrapped around the back side of the battery

chassis/frame to intake manifold 12" (look how puny the oem wire looks compared to the 0 gauge wire)

the battery to alternator is 61".u can see the oem ground in the lower right corner in this pic if u need a idea of how i routed this check the pic above with the red arrows (2nd Pic)


AND HERE IS WHERE THE POSITIVE BATTERY GOES TO THE POSITIVE ALTERNATOR, I HAVE A CABLE ON HERE BUT NO PIC OF IT. ty nathaniel for the pics
i guess i'll post up my pics in here also since this will become the Big 3 page....as it is alot easier to find this when searching then our other ones
so here is a summary of MY measurements
Battery To Frame Is 25"
Engine To Frame Is 25"
Battery To Strut Bar is 32"
Frame/Chassis To Intake Manifold Is 12"
Negative Battery To Negative Alternator Is 61"
Positive Battery To Positive Alternator Is 61"
i did a BIG 5 though and DONT have a pic from the positive battery post to the positive side of the alternator.keep in mind some of these are a little longer than needed but figured it would be better to have longer ones than shorter ones
to make it easier to run the wire to the alternator and under the air intake i removed the oem intake temporarily these are all the gounds, either the wire or the actual grounding spot EXCEPT on the alternator
the battery to frame is 25" and i used the oem grounding spot
the engine to frame is also 25" i used this mounting tab (its hidden in this pic but i have a better one)
Close Up
this bolts up right in front of the other oem ground, it used the mount where the horn bolts up
battery to strut bar is 32" (lengthened to hide the cable behind the fuse boxes and the battery) i removed the fuse box,strut bar to mount this stealthy
cable wrapped around the back side of the battery
chassis/frame to intake manifold 12" (look how puny the oem wire looks compared to the 0 gauge wire)
the battery to alternator is 61".u can see the oem ground in the lower right corner in this pic if u need a idea of how i routed this check the pic above with the red arrows (2nd Pic)
AND HERE IS WHERE THE POSITIVE BATTERY GOES TO THE POSITIVE ALTERNATOR, I HAVE A CABLE ON HERE BUT NO PIC OF IT. ty nathaniel for the pics


Last edited by sakataj; 02-14-11 at 08:23 AM.
02-14-11, 09:56 AM
#4
i can not thank you guys enough for posting this. last week i got this http://www.prostreetonline.com/x/cyb...age-system.asp but was wondering what someone with a little more expirence with grounding wires would chime in. there is not to much info on this type of kit here. thanks in advance


 yes....
Trending Topics
02-14-11, 03:49 PM
#8
Lead Lap
iTrader: (25)
Join Date: May 2009
Location: CA
Posts: 483
Likes: 0
Received 0 Likes
on
0 Posts
You guys did great jobs on blending the wires in the engine bay... I’ve been kind of skeptical about this... I understand the obvious that the thicker gauge will transfer electricity better, but are the OEM grounds not sufficient?
02-14-11, 07:02 PM
#9
they are odviously sufficient or else the factory would not have used them. this is for people with after market systems, high preformance engines, people who want there car to preform at its peak. over all the car's electronics will "flow" better, with less interfence. not mandatiry but a cheap way to get a few extra hp's also.
 02-15-11, 12:54 AM
#12
ok so here comes my pics. but i might need some help.
im positive i have:
1. battery - to chasis
2. battery + to alt
and i have two that i did. one was based off brians diy and another that i did based on my own findings.
1. chasis to manifold? it was simple and short so i did it.
2. i followed a ground that lead from my battery to idk if its the engine or transmition? but i ran another from my battery ground to it, seemed like the transmtition to me? someone tell me based off my pics if you know please
also, i found NO ground on my alternator. if there is one or if anyone knows where its at, then please tell me! the only wire that i have off my alternator, i checked with a meter and its giving off 12 volts so im sure its not the ground.
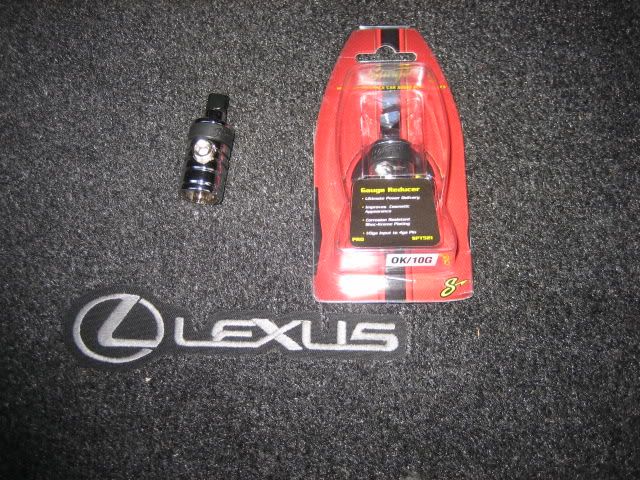
anyways, i only ran the big three wires and im waiting for some battery terminals and gauge reducers to come in so someone correct me if im wrong on my connections or if i missed/did something wrong.
here comes some pics up next
im positive i have:
1. battery - to chasis
2. battery + to alt
and i have two that i did. one was based off brians diy and another that i did based on my own findings.
1. chasis to manifold? it was simple and short so i did it.
2. i followed a ground that lead from my battery to idk if its the engine or transmition? but i ran another from my battery ground to it, seemed like the transmtition to me? someone tell me based off my pics if you know please
also, i found NO ground on my alternator. if there is one or if anyone knows where its at, then please tell me! the only wire that i have off my alternator, i checked with a meter and its giving off 12 volts so im sure its not the ground.
anyways, i only ran the big three wires and im waiting for some battery terminals and gauge reducers to come in so someone correct me if im wrong on my connections or if i missed/did something wrong.
here comes some pics up next
02-15-11, 02:12 AM
#13
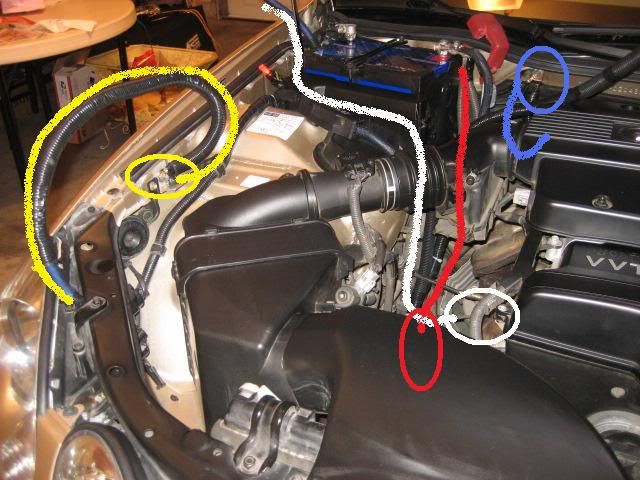
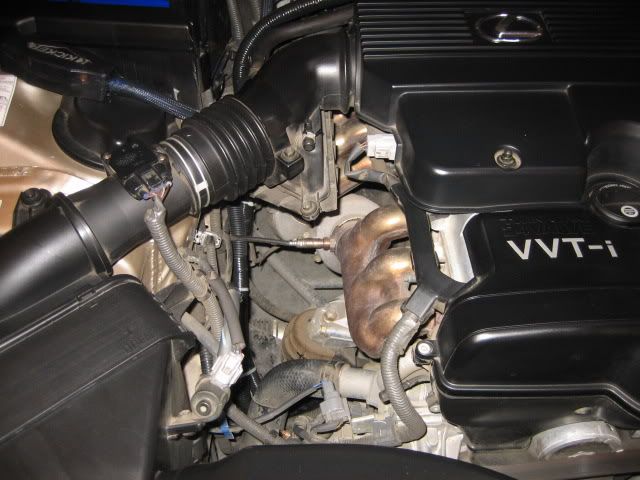
first off. here is a full view of the engine bay with markings of where or near where i did my connections, just to give you an idea of where to look or view if your going to do big three:
for referance and for easier referance:
1. battery ground to chasis= yellow
2. battery positive to alt positive= red
3. battery ground to engine ground= white
4. intake manifold to chasis ground= blue
now step by step:
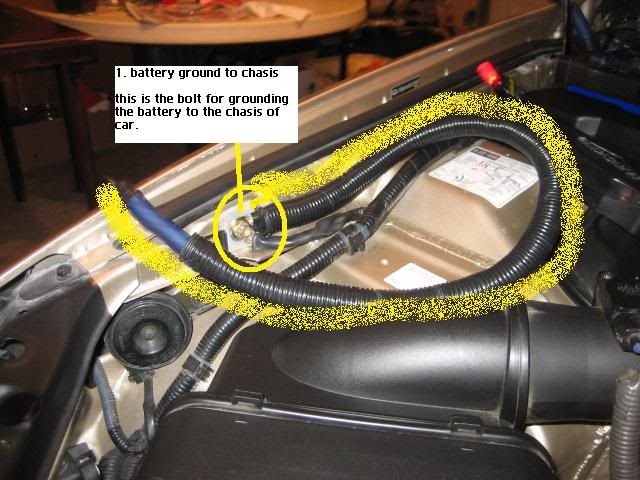
1. battery ground to chasis
this is the easiest and quickest to do of the big three. took off the bolt and sanded it down, placed the wire back in and bolted it back on.
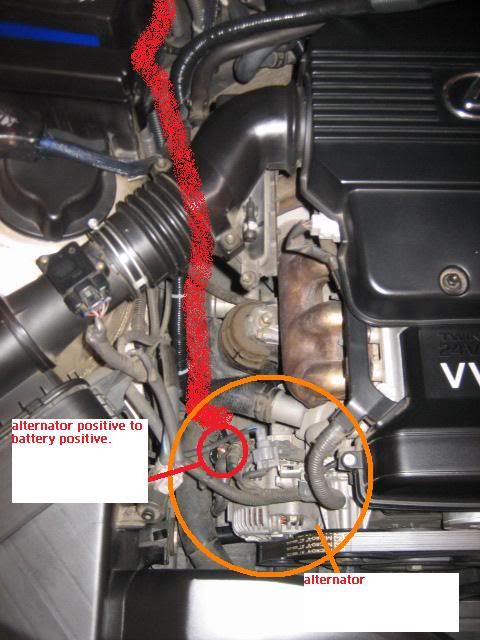
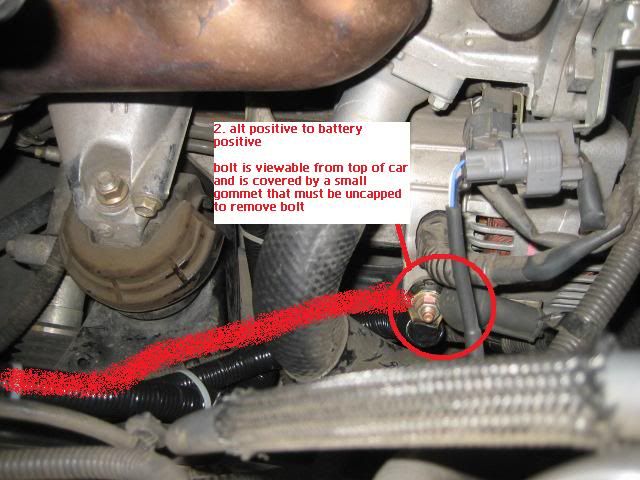
2. battery positive to alt positive
this one was a little more work. i found the best way to do it was to lift the car up on ramps. take off the black plastic cover right under neath the engine and work both above and under car. but it could probably be done with out unscrewing the bottom plastic cover.
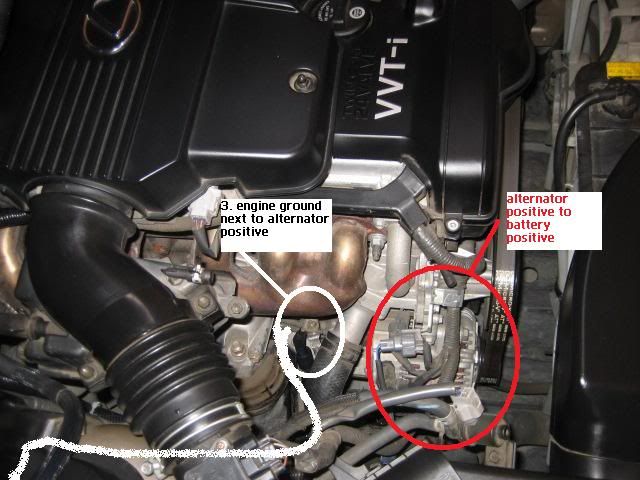
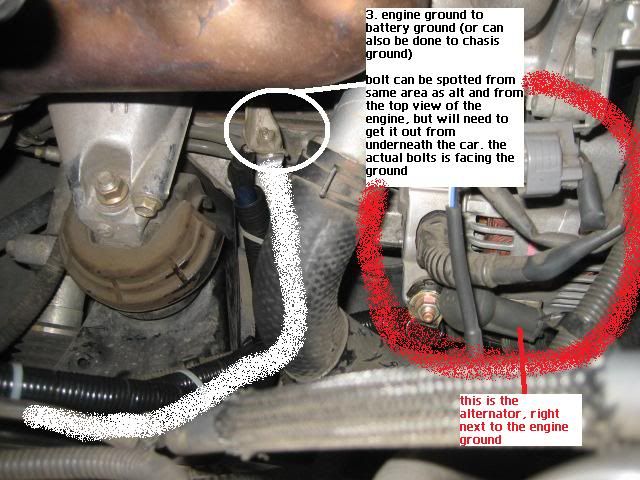
3. battery ground to engine ground
pretty simple also. bolt and wire are pretty easy to spot. pretty much right next to alternator. also did it while i had the plastic cover right underneath engine cover taken off. this bolt is facing down towards the ground when your looking down on the engine standing up. so you'll have to get underneath the car and take the plastic covering off to get to it.
full shot:
close up:
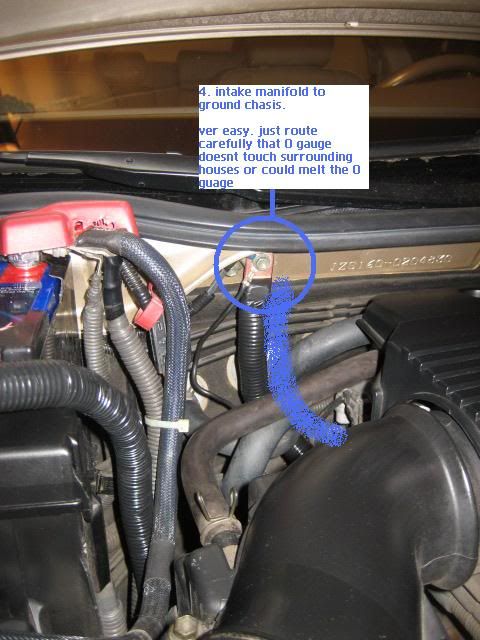
4. intake manifold to chasis ground
second to easiest connection to do. just have to make sure to route carefully, because the hoses around it get extremely hot and we dont want the 0 gauge to melt or cause a possible fire.

summary with all wires in view (color coded):
so this was the big three. hope it helps. tried to do it step by step and did some color codding. i know a bunch of wires that look like the rest of the other wires can b a little confusing to follow in the mess of an engine bay. hope it helps. il post a few more later of my finished product once my wires are connected witht he battery terminals and not just sitting there.
heres a before and after i had the zero gauge ran:
before:
after:
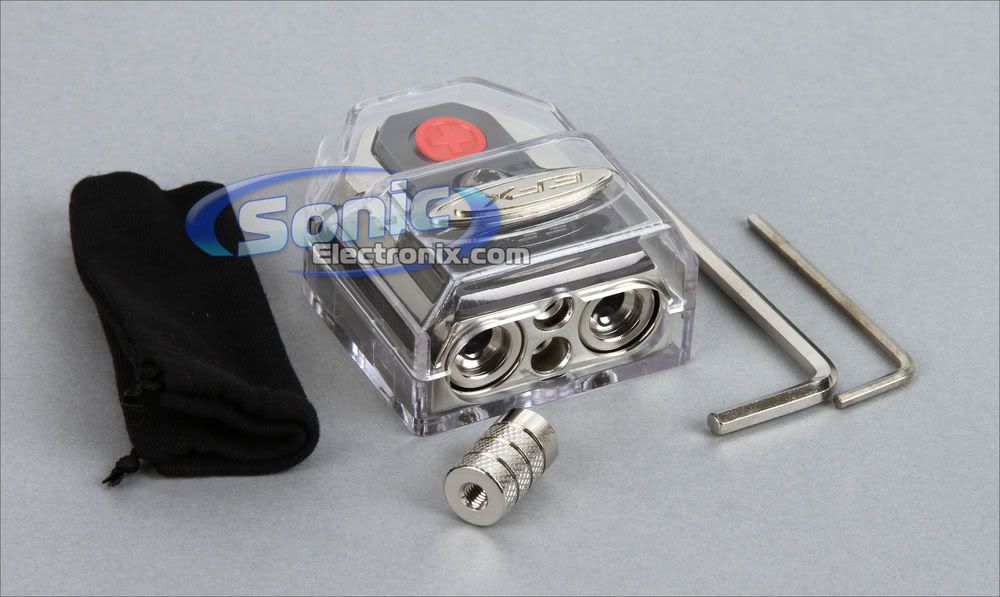
gauge reducers/ battery terminals il use to finalize conenctions and make it a solid and good looking big three:
for referance and for easier referance:
1. battery ground to chasis= yellow
2. battery positive to alt positive= red
3. battery ground to engine ground= white
4. intake manifold to chasis ground= blue
now step by step:
1. battery ground to chasis
this is the easiest and quickest to do of the big three. took off the bolt and sanded it down, placed the wire back in and bolted it back on.
2. battery positive to alt positive
this one was a little more work. i found the best way to do it was to lift the car up on ramps. take off the black plastic cover right under neath the engine and work both above and under car. but it could probably be done with out unscrewing the bottom plastic cover.
3. battery ground to engine ground
pretty simple also. bolt and wire are pretty easy to spot. pretty much right next to alternator. also did it while i had the plastic cover right underneath engine cover taken off. this bolt is facing down towards the ground when your looking down on the engine standing up. so you'll have to get underneath the car and take the plastic covering off to get to it.
full shot:
close up:
4. intake manifold to chasis ground
second to easiest connection to do. just have to make sure to route carefully, because the hoses around it get extremely hot and we dont want the 0 gauge to melt or cause a possible fire.
summary with all wires in view (color coded):
so this was the big three. hope it helps. tried to do it step by step and did some color codding. i know a bunch of wires that look like the rest of the other wires can b a little confusing to follow in the mess of an engine bay. hope it helps. il post a few more later of my finished product once my wires are connected witht he battery terminals and not just sitting there.
heres a before and after i had the zero gauge ran:
before:
after:
gauge reducers/ battery terminals il use to finalize conenctions and make it a solid and good looking big three:
Last edited by robertoyou; 02-15-11 at 02:15 AM.
02-16-11, 12:06 AM
#15
wtf that kinda pisses me off. well i have one more long piece so i can still probably do it. but idk where the alt ground is. i thought i did every ground you showed.
can you tell from my pics, if i missed it?
i just went and checked my engine. my battery ground has only ONE wire that runs into it. and i actually followed it and thats the one that ran into what seemed like the transmission/engine (pics on number 3). let me know if u see anything brian. id really like to fix this before i connect everything this week.
Last edited by robertoyou; 02-16-11 at 12:20 AM.