Wheel spacers are poopy doopy and make me loopy


 07-07-13, 08:31 PM
#17
Well looking from the photo it actually does appear to be hubcentric. Being in the wheel industry for a number of years you definitely pick up a few things.
Here's the thing. There are 3 types of hubcentric spacers
Type-1
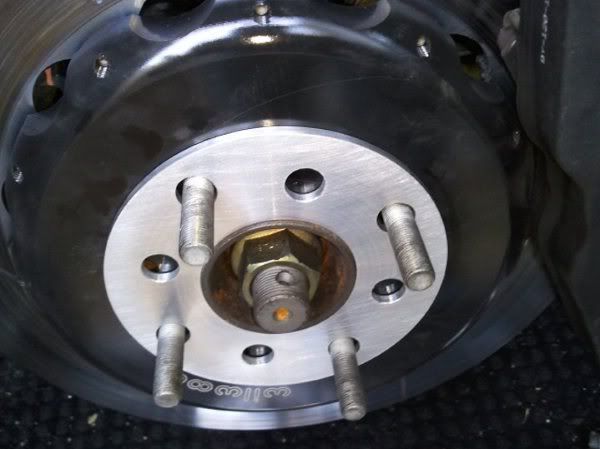
Thin (10mm or less) "slip on" hubcentric spacer (this is the one it appears you have)
This type is hubcentric to the car but not hubcentric to the wheel. The bore of the spacer judging from your photo looks like its 60.1mm (Lexus hub size) so when you slip this on to your hub it should fit over the hub nice and snug. Now the average wheel hub protrudes about 8-10mm. So with your 3mm spacer this leaves you with about 5-7mm of hub for the wheel to sit on. Now if you look on the back of your Lexus wheel you will notice the hub bore has a 45degree chamfered edge around the center bore. This is approximately 5mm wide and 5mm height.

This area does not actually sit on your hub. It is designed to put the wheel on a little easier as opposed to having just a straight hole. So with this being said you have about 0-2mm which is nothing. This will certainly cause vibrations. Unfortunately any spacer 8mm or less will cause this issue. Because the factory wheel hub sticks out past the spacer it is physically impossible for this spacer to have a hub of its own. There is no way around it.
Type-2

Thick (12mm or thicker) "slip on" hubcentric spacer
If you choose to run a slip on type spacer this is definitely the way to go, but unfortunately but it involves a lot more work. This is the same type of spacer as SorrGwa posted in his second photo. You will notice that this type of spacer will have its own extended hub. This will definitely make the spacer hubcentric to the car as well as being hubcentric to the OEM wheel. But here's the catch! Say for example you get a 15mm slip on spacer. Well now you've lost 15mm amount of threads. Since Lexus uses a M12x1.5 thread pitch, this means you loose 10 threads of your stud for your nut to grab onto. And the only way to fix this is to remove the studs from your hub and press in extended studs. So if your spacer is 15mm then your new studs should be 15mm longer than stock. This definitely is a lot more work but it is the safest way to go about it.
Type-3

Thick (15mm or thicker) "bolt on" hubcentric spacer
This is by far the easiest no fuss spacer to install. This spacer bolts directly to the car and has its own set of studs sticking out the spacer is hubcentric to the car and has a hub that sticks out for the wheel. The only catch is that you have to make sure you have enough room as this can get quite thick. And another thing you need to watch out for. If you get a bolt on spacer that is thinner than the length of your factory stud, obviously the factory stud will stick out past the spacer. Like in this photo
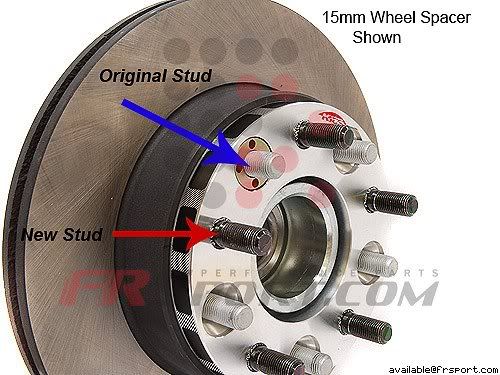
In a case like this you will need to look on the backside of the wheel and see if there are cavities between the bolt holes so it can properly bolt onto the new spacer. If the wheel does not have cavities then you will need to cut the factory stud so that it is flush with the spacer.

F*** I can't believe I typed all that from my iPhone. I sure hope you guys find this info useful.
Here's the thing. There are 3 types of hubcentric spacers
Type-1
Thin (10mm or less) "slip on" hubcentric spacer (this is the one it appears you have)
This type is hubcentric to the car but not hubcentric to the wheel. The bore of the spacer judging from your photo looks like its 60.1mm (Lexus hub size) so when you slip this on to your hub it should fit over the hub nice and snug. Now the average wheel hub protrudes about 8-10mm. So with your 3mm spacer this leaves you with about 5-7mm of hub for the wheel to sit on. Now if you look on the back of your Lexus wheel you will notice the hub bore has a 45degree chamfered edge around the center bore. This is approximately 5mm wide and 5mm height.
This area does not actually sit on your hub. It is designed to put the wheel on a little easier as opposed to having just a straight hole. So with this being said you have about 0-2mm which is nothing. This will certainly cause vibrations. Unfortunately any spacer 8mm or less will cause this issue. Because the factory wheel hub sticks out past the spacer it is physically impossible for this spacer to have a hub of its own. There is no way around it.
Type-2
Thick (12mm or thicker) "slip on" hubcentric spacer
If you choose to run a slip on type spacer this is definitely the way to go, but unfortunately but it involves a lot more work. This is the same type of spacer as SorrGwa posted in his second photo. You will notice that this type of spacer will have its own extended hub. This will definitely make the spacer hubcentric to the car as well as being hubcentric to the OEM wheel. But here's the catch! Say for example you get a 15mm slip on spacer. Well now you've lost 15mm amount of threads. Since Lexus uses a M12x1.5 thread pitch, this means you loose 10 threads of your stud for your nut to grab onto. And the only way to fix this is to remove the studs from your hub and press in extended studs. So if your spacer is 15mm then your new studs should be 15mm longer than stock. This definitely is a lot more work but it is the safest way to go about it.
Type-3
Thick (15mm or thicker) "bolt on" hubcentric spacer
This is by far the easiest no fuss spacer to install. This spacer bolts directly to the car and has its own set of studs sticking out the spacer is hubcentric to the car and has a hub that sticks out for the wheel. The only catch is that you have to make sure you have enough room as this can get quite thick. And another thing you need to watch out for. If you get a bolt on spacer that is thinner than the length of your factory stud, obviously the factory stud will stick out past the spacer. Like in this photo
In a case like this you will need to look on the backside of the wheel and see if there are cavities between the bolt holes so it can properly bolt onto the new spacer. If the wheel does not have cavities then you will need to cut the factory stud so that it is flush with the spacer.
F*** I can't believe I typed all that from my iPhone. I sure hope you guys find this info useful.
Last edited by Sonic_RC; 07-08-13 at 10:18 AM.
07-08-13, 01:00 PM
#18
Lead Lap
Join Date: May 2007
Location: where it's f*#%ing cold
Posts: 628
Likes: 0
Received 0 Likes
on
0 Posts
Factory hub lips are wide enough to allow for 3mm spacers and for the wheels to remain hub centric. I've ran 3mm spacers with no issues.
Food for thought, are you using the correct lugs with your wheels? Factory wheels use flat washer lug bolts, ball seats and conical seats don't really place nice with factory wheels.

Food for thought, are you using the correct lugs with your wheels? Factory wheels use flat washer lug bolts, ball seats and conical seats don't really place nice with factory wheels.
07-08-13, 04:04 PM
#19

Yakuza is absolutely correct. That is exactly what happen to me with my spacers and rims. It didn't sit flush because there was no cavities behind my rim. The stud was sticking out about an 1/8 of an inch and it was wobbly. So its either cut your factory studs or add another smaller spacer in there to make it sit flush or just get the correct spacer you need. Totally up to you, but those are your options

Thread
Thread Starter
Forum
Replies
Last Post
sleepybobcat
RX - 1st Gen (1999-2003)
2
05-14-01 07:35 AM