Cool "hidden" features about the GS that are not very known
#256
OK thanks. I have read this entire thread, and will continue to read it as new posts are made. However before everyone concluded that we cannot do this to the stock navagation system.
Check post 242 to see what I mean. I guess WE GOT IT!!!

-------------------------
On another note, anyone knows what each one stands for?
-P1
-P2
-L
-F (front?)
-R (rear?)
-W
Check post 242 to see what I mean. I guess WE GOT IT!!!

-------------------------
On another note, anyone knows what each one stands for?
-P1
-P2
-L
-F (front?)
-R (rear?)
-W
#258
OK thanks. I have read this entire thread, and will continue to read it as new posts are made. However before everyone concluded that we cannot do this to the stock navagation system.
Check post 242 to see what I mean. I guess WE GOT IT!!!

-------------------------
On another note, anyone knows what each one stands for?
-P1
-P2
-L
-F (front?)
-R (rear?)
-W
Check post 242 to see what I mean. I guess WE GOT IT!!!

-------------------------
On another note, anyone knows what each one stands for?
-P1
-P2
-L
-F (front?)
-R (rear?)
-W


#259
I got my hands on the service manual for the amp, here are the numbers you want:
When FM button is pressed these adjustments are for adjusting the frequency characteristic of the amplifier.
P1 - This is to set the EQ1 point. This number is from from 000 (default) to 286.
P2 - This is to set the EQ2 point. This number is from from 000 (default) to 176.
L - This is to set the attenuation value (Tel mute) point from 0 to -20db.
When TAPE is pressed these adjustments are for adjusting the speaker level values.
F - Front, values from 0 (default) to -80db
R - Rear, values from 0 (default) to -80db
W - Woofer, values from 0 (default) to -80db
Enjoy your tweaks !!!
#261
0 to -80? If I remember correctly off the top of my head, you can't seem to adjust it lower than 0 for the settings.
#264
Will someone figure out a Cool hidden way to disable the auto-dimming of the gauges at night! Please!
I offer $25 paypalled to the first person that can tell me exactly how to accomplish this! It has to work for me before the money is sent, but I am good for it I assure you.
I offer $25 paypalled to the first person that can tell me exactly how to accomplish this! It has to work for me before the money is sent, but I am good for it I assure you.
#265
Will someone figure out a Cool hidden way to disable the auto-dimming of the gauges at night! Please!
I offer $25 paypalled to the first person that can tell me exactly how to accomplish this! It has to work for me before the money is sent, but I am good for it I assure you.
I offer $25 paypalled to the first person that can tell me exactly how to accomplish this! It has to work for me before the money is sent, but I am good for it I assure you.
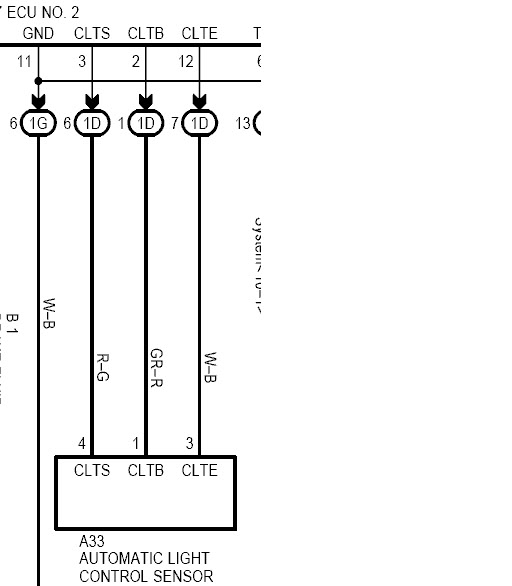
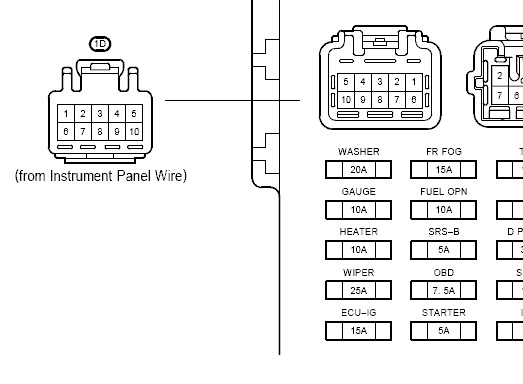
According to my copy of the GS electronics, the light sensor is connected to a connector A33 behind dash, this in turn connects to pins 6,1 and 7 of connector D1 of the Body ECU 2.
Body ECU2 is at the driver kick panel and this connector is directly above the 20A fuse for the washer and should be a 9 pin connector. The colours of the wires *should* be:
Pin 6 CLTS-Red with Green stripe
Pin 1 CLTB-Grey with Red Stripe
Pin 7 CLTE-White with Black stripe.
These 3 wires should be on the bottom right clumped together on this connector.
You will need to disconnect one of these wires and it does not say which one so it is a trial and error.
Please bear in mind these colours/connectors are of a RHD GS300.
Hope this helps
GS-Ireland


Last edited by gs-ireland; 01-22-07 at 05:08 PM.
#267
#268
#269
Will someone figure out a Cool hidden way to disable the auto-dimming of the gauges at night! Please!
I offer $25 paypalled to the first person that can tell me exactly how to accomplish this! It has to work for me before the money is sent, but I am good for it I assure you.
I offer $25 paypalled to the first person that can tell me exactly how to accomplish this! It has to work for me before the money is sent, but I am good for it I assure you.
Just take it to the dealer and they can change it for you dude.
#270


