Tips, Tricks, DIY's, & How-To's
#16
Originally Posted by SGT
Are you getting the OIL MAINT RESET message? If so, here's how to get rid of it:
1. Push the “ODO TRIP” switch in the switch box to
change the display to blank.
2. Turn the engine switch off.
3. Turn the engine switch on with the trip meter “RESET”
switch held down.
4. Keep pushing the “RESET” switch for longer than 7
seconds after the engine switch is turned on.
After the above operation, the master warning light comes
on, a warning tone sounds and the above message
appears to inform you that the engine oil maintenance
data has been reset.
#17
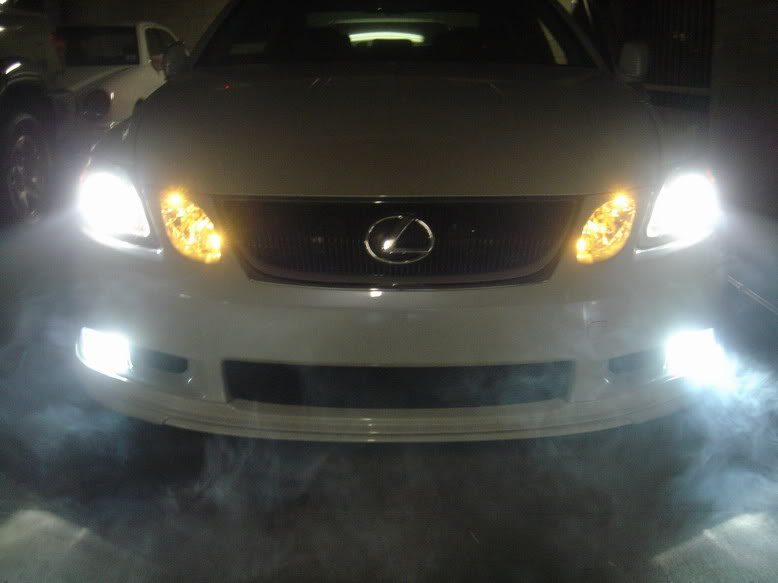
Here's how to change the inner bulb (parking/driving light - whatever it's called) Keep in mind, the day-time running lights are acutally the high-beams running at a lower wattage. This mod only changes the color of the lights when the actual headlights are on.
1) Follow steps in previous "How-to" to remove engine covers.
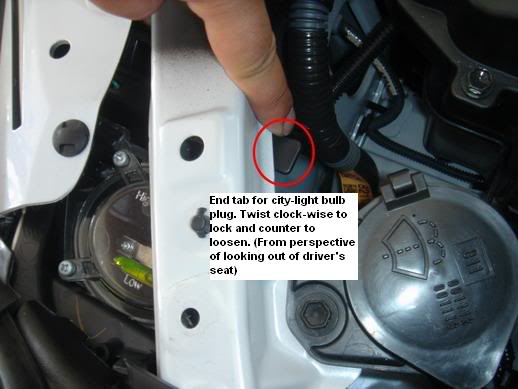
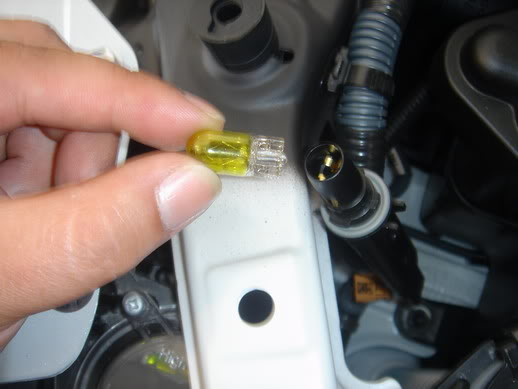
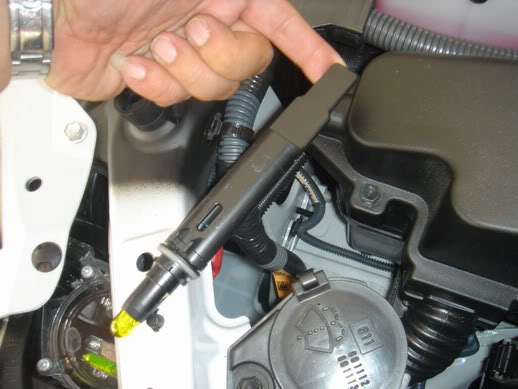
2) Locate light socket housing. You can locate the mini-wedge 168 style bulb in the inner set of circle lights from the outside of the light and follow the bulb back to get to the socket. It's SUPER long.

3) Once you find the socket, twist to loosen and pull out.

4) Remove bulb and replace with new bulb (small wedge/168-style)

5) Re-insert socket and twist to tighten.
6) Replace engine cover and -Done-!

(Smoky effect is secret cancer stick trick.. do at your own risk)
1) Follow steps in previous "How-to" to remove engine covers.
2) Locate light socket housing. You can locate the mini-wedge 168 style bulb in the inner set of circle lights from the outside of the light and follow the bulb back to get to the socket. It's SUPER long.

3) Once you find the socket, twist to loosen and pull out.

4) Remove bulb and replace with new bulb (small wedge/168-style)

5) Re-insert socket and twist to tighten.
6) Replace engine cover and -Done-!

(Smoky effect is secret cancer stick trick.. do at your own risk)

The following users liked this post:
jtwong007 (01-07-23)
#18
Originally Posted by Eternity3G
Here's how to change the inner bulb (parking/driving light - whatever it's called) Keep in mind, the day-time running lights are acutally the high-beams running at a lower wattage. This mod only changes the color of the lights when the actual headlights are on.
1) Follow steps in previous "How-to" to remove engine covers.
2) Locate light socket housing. You can locate the mini-wedge 168 style bulb in the inner set of circle lights from the outside of the light and follow the bulb back to get to the socket. It's SUPER long.
1) Follow steps in previous "How-to" to remove engine covers.
2) Locate light socket housing. You can locate the mini-wedge 168 style bulb in the inner set of circle lights from the outside of the light and follow the bulb back to get to the socket. It's SUPER long.

#20
The Nav/GPS system allows you to assign audible icons to places you mark while driving around... One of the audible icons is directional, i.e. it can make a sound if you approach the Mark in a certain direction, but makes no sound if you approach the mark from the opposite direction.
1) while driving, exactly as you pass the speed camera, press the Mark button on your Nav screen. Mark all the cameras you pass that you feel need an audible warning in future. Each speed camera will be marked with a flag.
2) when you get home, access all your Marks via the navigation Menu, My Places screen.
3) for each mark in your system, select Change Icon and choose one of the audible icons from the 3rd screen.
4) if the speed camera was on one side of the road, i.e. covering only a single direction, then choose the directional icon. If the speed camera was in the middle and could swivel to cover both sides of the road, then choose one of the other 3 audible icons.
5) done
You will find that as you approach the speed camera in the future, you will hear a chime about 100 m before you pass the speed camera. This even works if you are on a different display or if the display is turned off. It does not work (obviously) if your NAV volume is muted. Also, if you have not pressed on the I Agree button before you set off - it will also not work.
Good Luck!

#22
Credit goes to VVT-i:
The driver side headrest will move up or down automatically when you adjust the driver seat forward or backward. But you can adjust the driver seat manaully by press this little button on the right hand side of the seat.

The driver side headrest will move up or down automatically when you adjust the driver seat forward or backward. But you can adjust the driver seat manaully by press this little button on the right hand side of the seat.

Last edited by SGT; 05-15-06 at 11:33 AM.
#23
Credit goes to VVT-i:
The DVD for the Navigation system is located in the glove box, but you will not see the " Eject " buttom anywhere.
You will have to press the " Menu" buttom on the right side of the Nav screen. You wil see the " Map DVD" at the top corner.

After you touch on the " Map DVD". The next screen is the " Eject " buttom icon. Press that.

Here is your Navigation DVD.

The DVD for the Navigation system is located in the glove box, but you will not see the " Eject " buttom anywhere.
You will have to press the " Menu" buttom on the right side of the Nav screen. You wil see the " Map DVD" at the top corner.

After you touch on the " Map DVD". The next screen is the " Eject " buttom icon. Press that.

Here is your Navigation DVD.

#24
Credit goes to VVT-i:
1. Press the start bottom twice( foot off the brake pedal) and headlight adjuster to " off "
2. While pressing on the " Info " buttom with your right index. Use your right hand turn the headlight from " Off" to " Headlight"( not AUTO), Off-Head, Off-Head, three times. This will lead you to the " Diagnostic Menu". You can touch on the top right screen " Menu"
3. For those that have Bluetooth phone you can touch the BT on the buttom of the screen.

This will lead you to the BT voice quality set. You have to play with it and see which setting is suit you best both for " Incoming call " and " Outgoing call". But hey, you can do it yourself and adjust it anytime you wanted. Enjoy.

1. Press the start bottom twice( foot off the brake pedal) and headlight adjuster to " off "
2. While pressing on the " Info " buttom with your right index. Use your right hand turn the headlight from " Off" to " Headlight"( not AUTO), Off-Head, Off-Head, three times. This will lead you to the " Diagnostic Menu". You can touch on the top right screen " Menu"
3. For those that have Bluetooth phone you can touch the BT on the buttom of the screen.

This will lead you to the BT voice quality set. You have to play with it and see which setting is suit you best both for " Incoming call " and " Outgoing call". But hey, you can do it yourself and adjust it anytime you wanted. Enjoy.

#25
Originally Posted by SGT
Credit goes to VVT-i:
1. Press the start bottom twice( foot off the brake pedal) and headlight adjuster to " off "
2. While pressing on the " Info " buttom with your right index. Use your right hand turn the headlight from " Off" to " Headlight"( not AUTO), Off-Head, Off-Head, three times. This will lead you to the " Diagnostic Menu". You can touch on the top right screen " Menu"
3. For those that have Bluetooth phone you can touch the BT on the buttom of the screen.

This will lead you to the BT voice quality set. You have to play with it and see which setting is suit you best both for " Incoming call " and " Outgoing call". But hey, you can do it yourself and adjust it anytime you wanted. Enjoy.

1. Press the start bottom twice( foot off the brake pedal) and headlight adjuster to " off "
2. While pressing on the " Info " buttom with your right index. Use your right hand turn the headlight from " Off" to " Headlight"( not AUTO), Off-Head, Off-Head, three times. This will lead you to the " Diagnostic Menu". You can touch on the top right screen " Menu"
3. For those that have Bluetooth phone you can touch the BT on the buttom of the screen.

This will lead you to the BT voice quality set. You have to play with it and see which setting is suit you best both for " Incoming call " and " Outgoing call". But hey, you can do it yourself and adjust it anytime you wanted. Enjoy.

Even though it says to see the service manual, there is no mention of how to change the setting of the voice quality type anywhere in the entire service manual.
#28
Originally Posted by BobsGX
I wonder what the voice quality type number refers to? Is it adjustable? Mine is on 7.
Even though it says to see the service manual, there is no mention of how to change the setting of the voice quality type anywhere in the entire service manual.
Even though it says to see the service manual, there is no mention of how to change the setting of the voice quality type anywhere in the entire service manual.

#29
I have a 2007 gs450h with dvd , I would really like to know how to make it so we can watch a movie on the nav screen , I am told this is possiable, however I need the "magic trick" how, can anybody help, thanks 

#30
Originally Posted by BobsGX
I wonder what the voice quality type number refers to? Is it adjustable? Mine is on 7.
Even though it says to see the service manual, there is no mention of how to change the setting of the voice quality type anywhere in the entire service manual.
Even though it says to see the service manual, there is no mention of how to change the setting of the voice quality type anywhere in the entire service manual.


