
How-To: STi-R Clear Lens Swap for 4G Lexus GS Bi-xenon Headlights (w/ detailed pics)
 08-11-14 | 01:57 PM
#1
Thread Starter
Driver School Candidate
Joined: Jun 2014
Posts: 28
Likes: 0
From: GA
I've had a handful of guys ask me how the projector lens swap works on the OEM Bi-xenon headlights for the 4th Gen GS. It's honestly not that complicated given how much "stuff" goes on inside these AFS bi-xenon headlights, and even if you've never taken apart a headlight before - with the guide below, if you can follow directions, you can do this mod.
Performance wise, the clear lens really helps unleash the maximum potential from the projector. The stock lens is made of frosted glass, and as you can imagine; less clarity = less light output. Since the STi-R clear lenses are 100% optically clear, they will project the maximum available amount of light on the road in front of you, rather than watering it down a bit like the stock ones do. Just like any other OEM part on your car, even the factory headlights are de-tuned a bit.
The beam pattern is also much sharper, with a nice band of colorful light across the top - giving the GS's headlights that exotic color flicker effect when viewed from afar as it drives down the road.
Here we go:
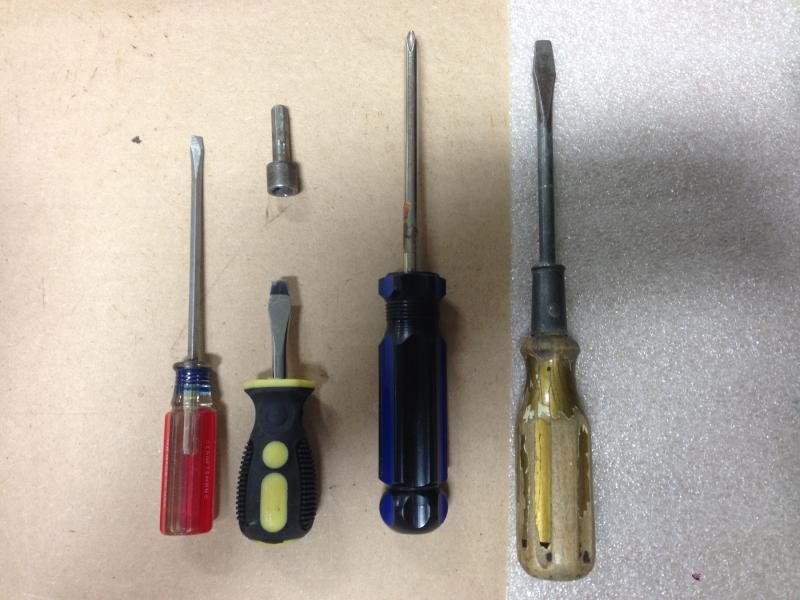
What you need, tool wise, is pretty basic. A few flat blade screw drivers, a Philips head, and a hex driver. Not pictured is a dremel tool with a cutoff disc, but that’s important. Also good to have a soft surface to work on so you don’t scratch the lenses when handling the headlights.
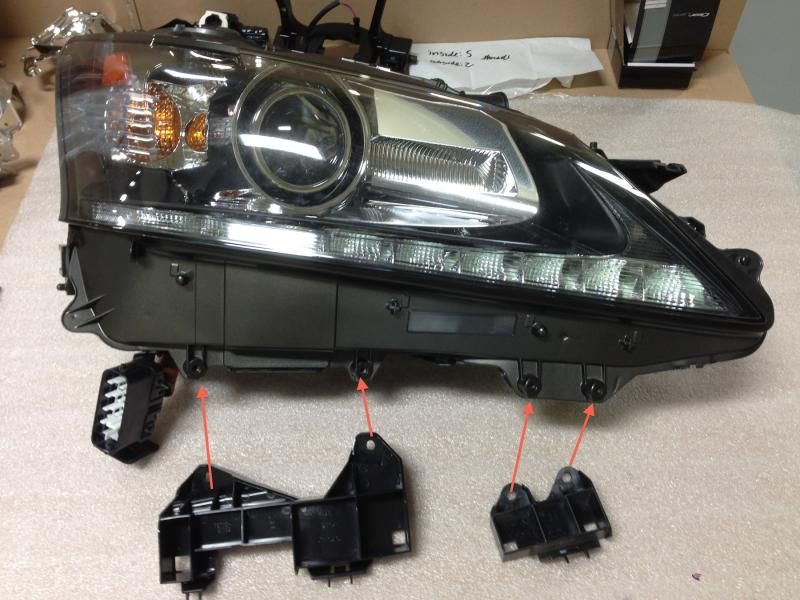
First, take the little brackets off the bottom of the housing. Two screws each:
There are a handful of Philips screws around the perimeter of the housing. Take em out, put them somewhere safe.
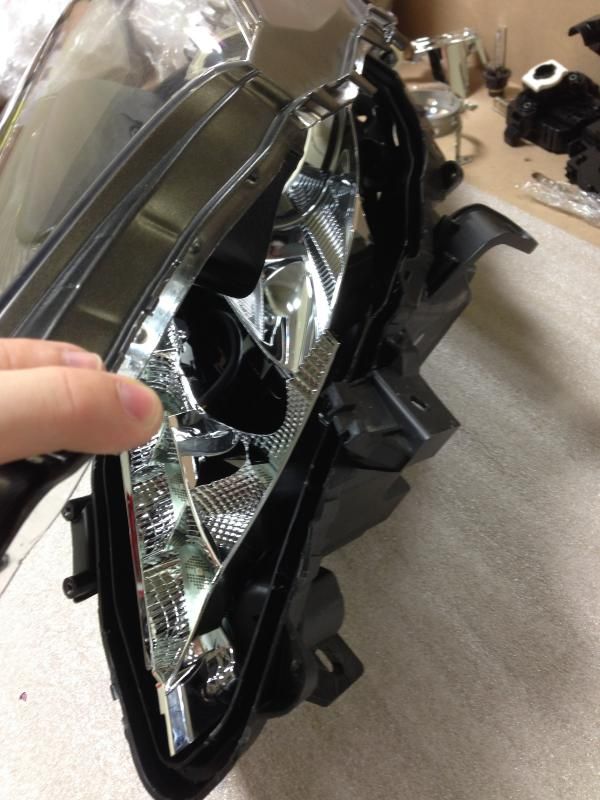
Then, use one of the flat-blades to start prying around the edges of the housing. I like to start in a corner since that usually works best. You can get enough of the perimeter “unlocked” and then leave one flat blade wedged in about �” then work with the other one to keep it going. NOTE: unlike most headlights, the 4G GS headlights are sealed with glue that doesn’t even need to be heated to pry apart. It’s some weird ****, and once you get the lens off – you can actually just pull it all out of the channel between the housings in one piece.
There are several clips around the edges that you’ll need to be mindful of. Just pop em up as you get to them while going around the edge of the housing.
Anddddd Lens is coming off! (see, corner first!)
Next, you need to unplug the LED DRL strip. There are two plugs under it, just push on the clips and pull out, easy.
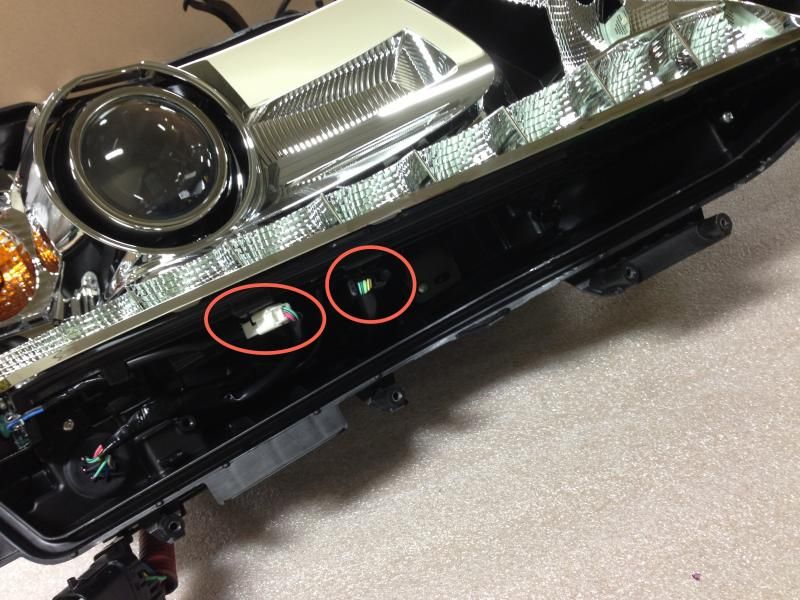
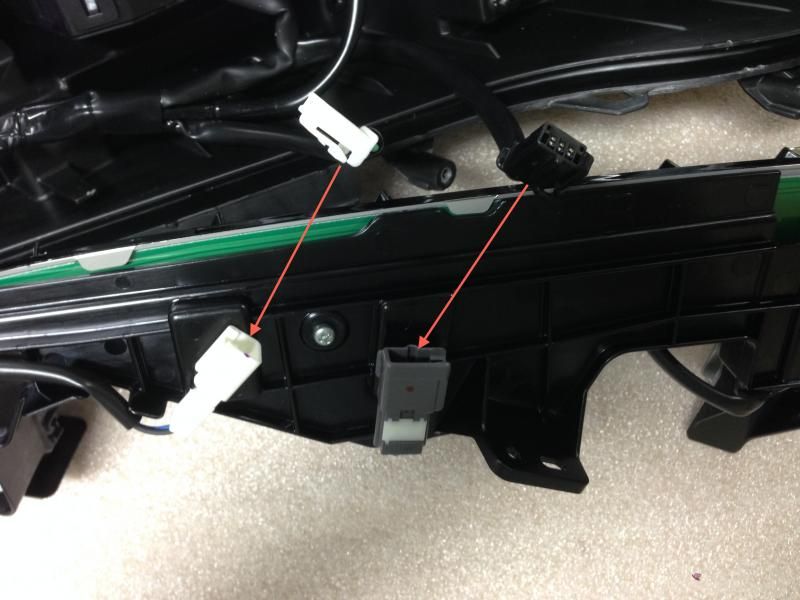
The housing is now opened and the DRL is removed. Now you need to remove this Chrome trim piece. There are a couple basic Philips screws and a clip I believe, its easy to take off.
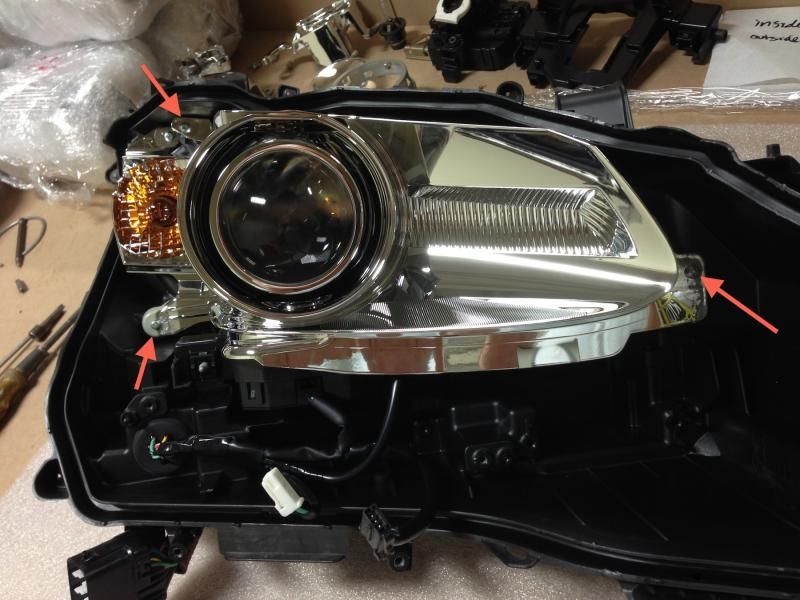
First remove the two plugs underneath the projector. This controls the AFS and auto leveling motor….don’t worry, none of the plugs that you’re removing can be mixed up when you re-assemble since they’re all different shapes.
Now you need to remove the projector assembly from the aiming adjusters. First thing, depress the clips in the round ball joint type socket shown here, and then pull forward on the assembly once they’re “in” to release it the bracket from the “barrel”
You then just need to basically “unscrew” the other two adjuster mounts, which are really just long screws. As shown below, just loosen them all the way and the bracket/projector assembly will just drop out of the headlight shell.

So that I didn’t have to re-aim my headlights, I took note of the position of this adjuster. I had 5 threads exposed before I touched it, so when I put it back in, I made sure I screwed it in enough to see 5 threads again. When the headlights were back on the car, no adjustment was needed, so that worked really well.
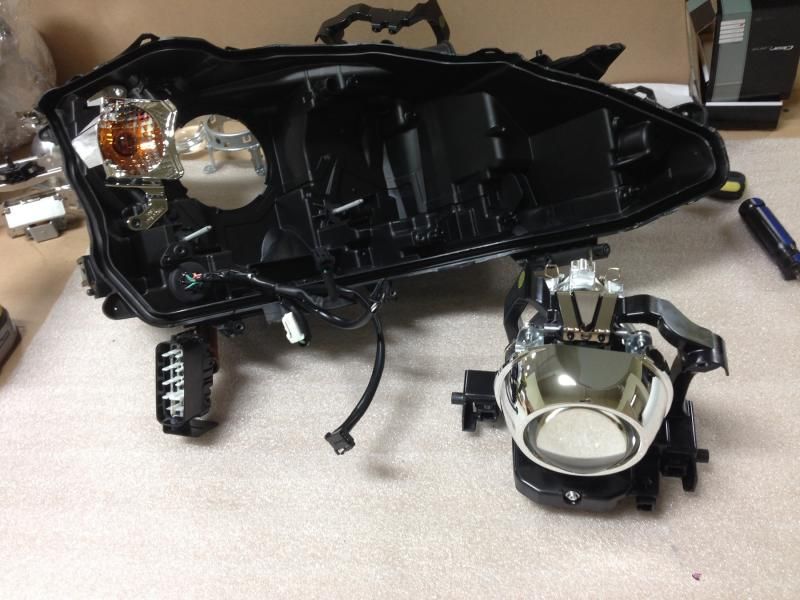
Projector is now out:
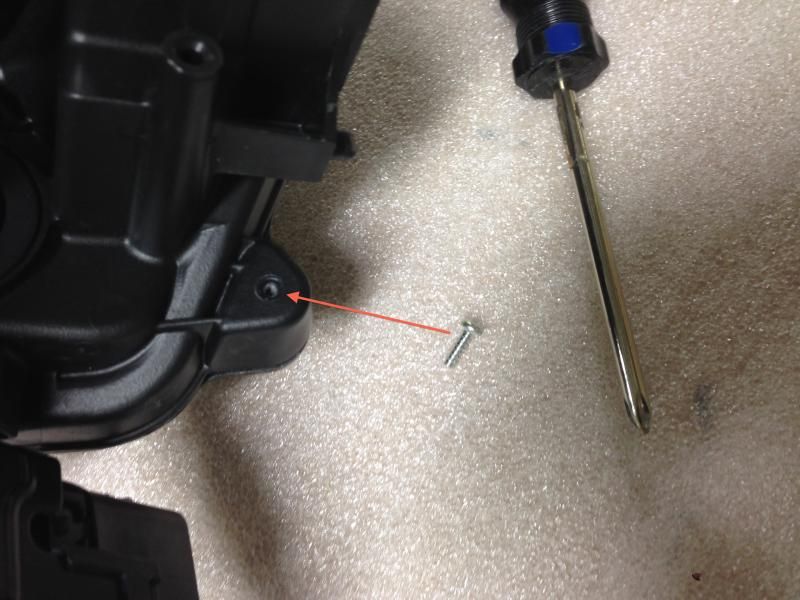
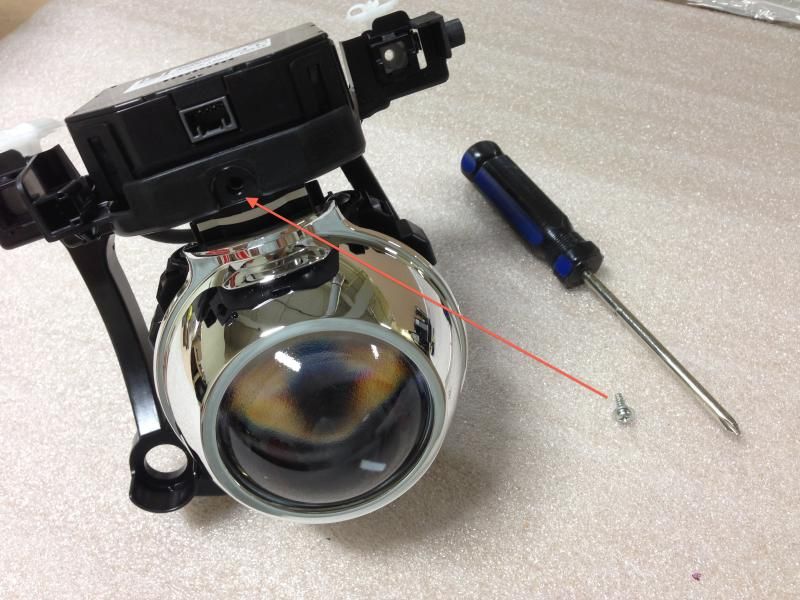
Now, you really have to disassemble the AFS/Projector mechanism. First, just remove the Philips screw on the front:
Then, slide the motor on the bottom out the back, it just pushes out like a cartridge.
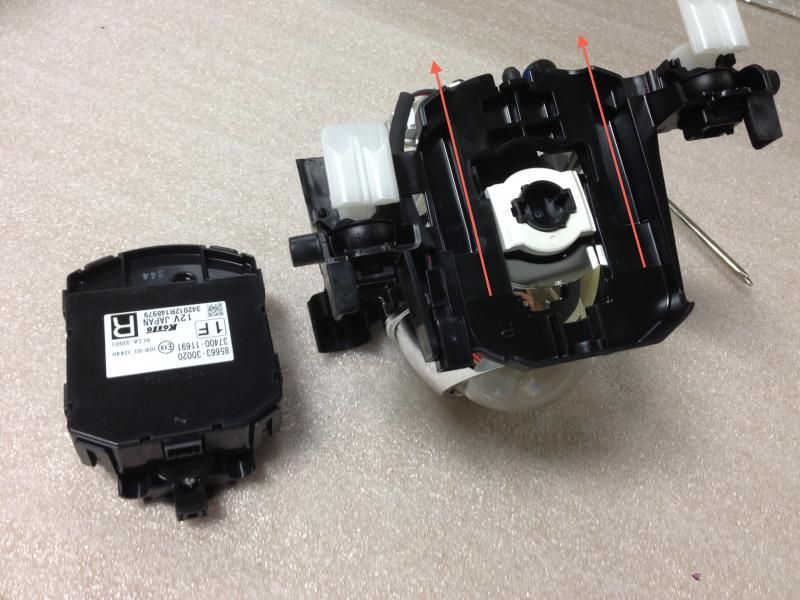
This one is a little trickier, but not all that hard. Use a flat blade screw-driver to rotate the top clip backwards and up, so it pops off the clips that’s holding it. If you just look at how its installed, that will give you the best idea how it comes off. A flat blade screw driver is definitely the best tool.
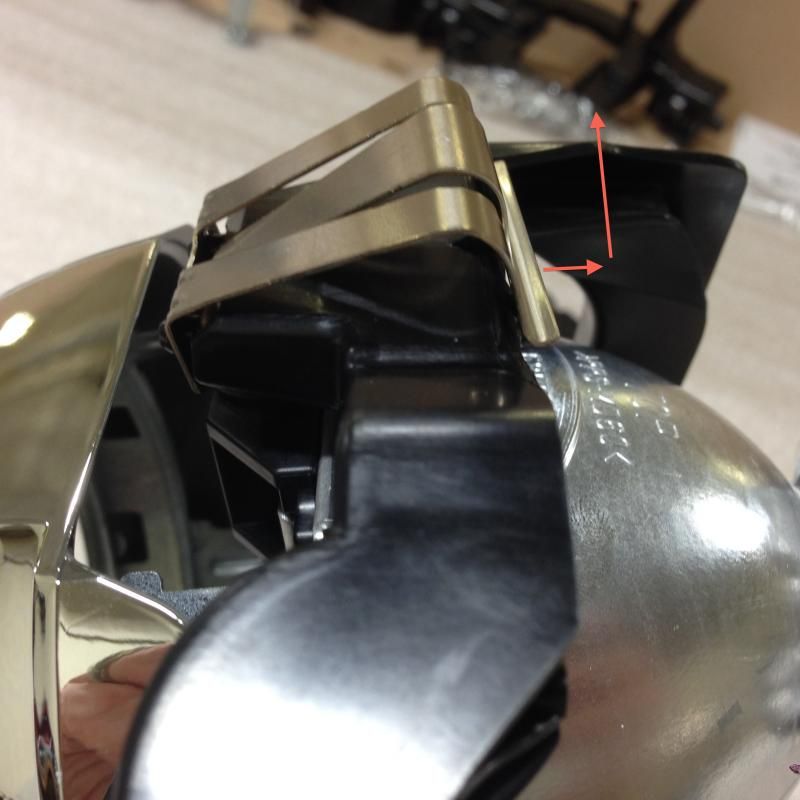
Note, there is a little bearing on top of the projector that’s underneath that clip. Don’t lose it:
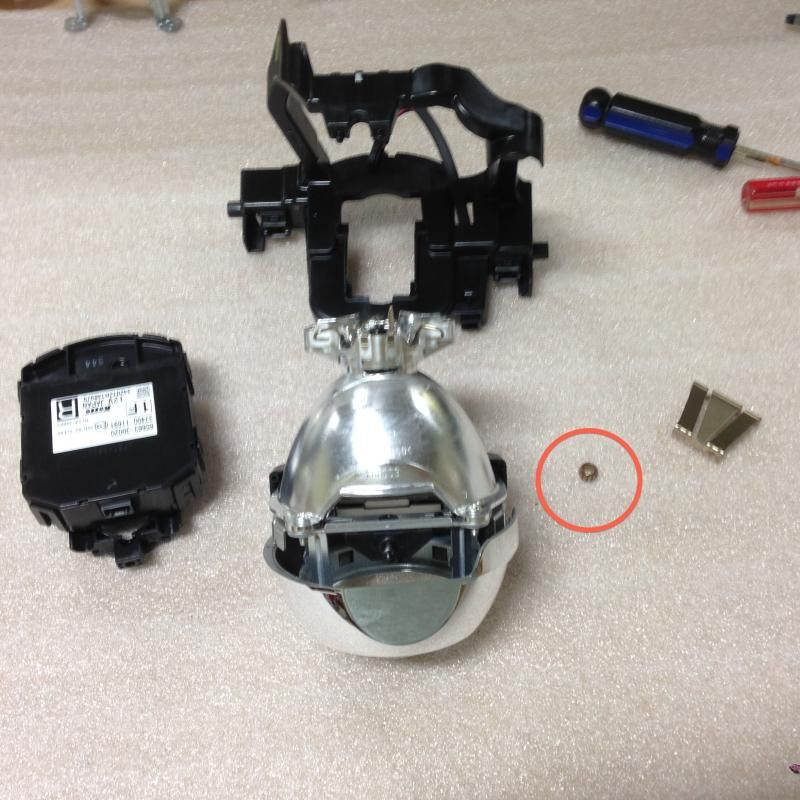
Next, remove this part from the bottom of the projector. Two Philips screws, easy.
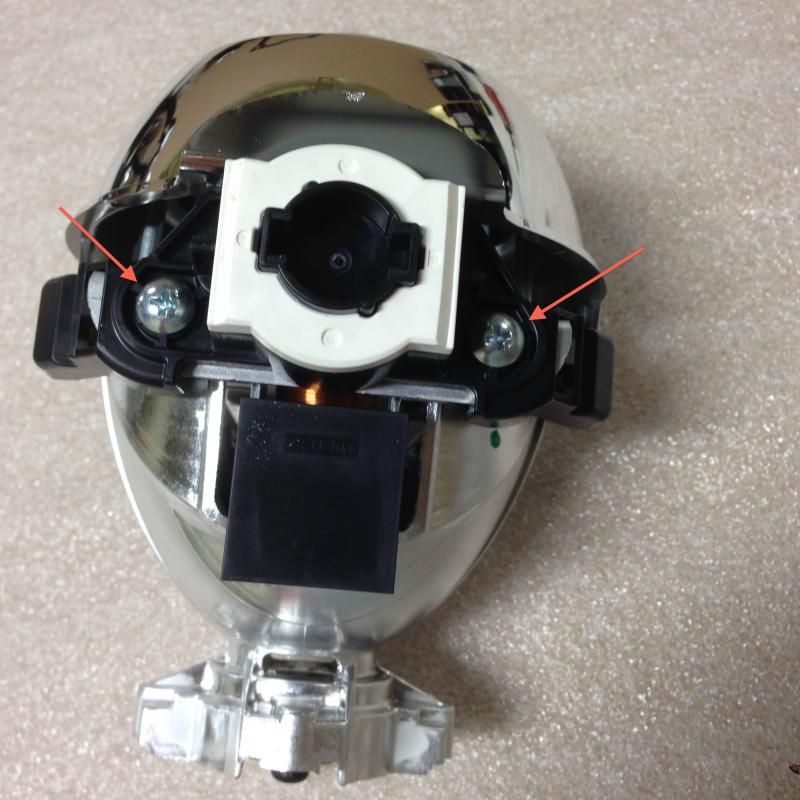
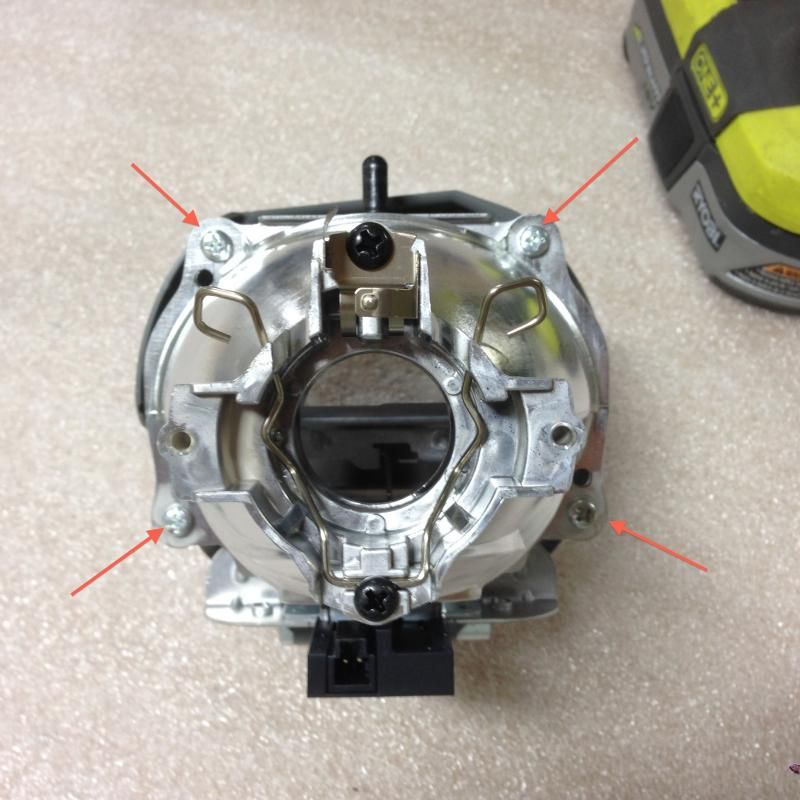
Now we actually have to take apart the projector, which also is pretty simple. Start with the 4 screws holding the two halves together:
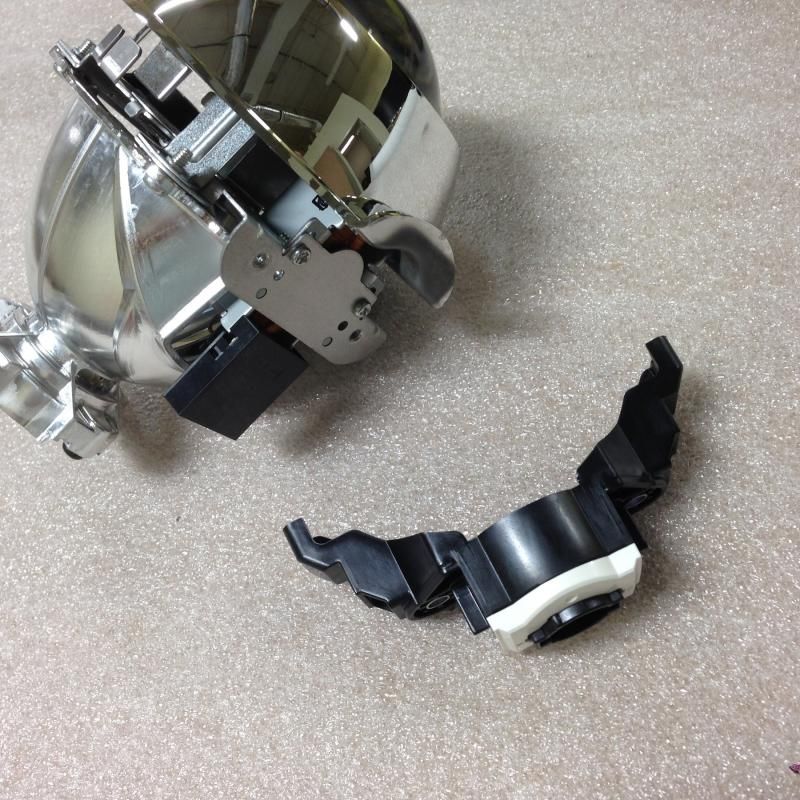
All apart:
Performance wise, the clear lens really helps unleash the maximum potential from the projector. The stock lens is made of frosted glass, and as you can imagine; less clarity = less light output. Since the STi-R clear lenses are 100% optically clear, they will project the maximum available amount of light on the road in front of you, rather than watering it down a bit like the stock ones do. Just like any other OEM part on your car, even the factory headlights are de-tuned a bit.
The beam pattern is also much sharper, with a nice band of colorful light across the top - giving the GS's headlights that exotic color flicker effect when viewed from afar as it drives down the road.
Here we go:
What you need, tool wise, is pretty basic. A few flat blade screw drivers, a Philips head, and a hex driver. Not pictured is a dremel tool with a cutoff disc, but that’s important. Also good to have a soft surface to work on so you don’t scratch the lenses when handling the headlights.

First, take the little brackets off the bottom of the housing. Two screws each:

There are a handful of Philips screws around the perimeter of the housing. Take em out, put them somewhere safe.

Then, use one of the flat-blades to start prying around the edges of the housing. I like to start in a corner since that usually works best. You can get enough of the perimeter “unlocked” and then leave one flat blade wedged in about �” then work with the other one to keep it going. NOTE: unlike most headlights, the 4G GS headlights are sealed with glue that doesn’t even need to be heated to pry apart. It’s some weird ****, and once you get the lens off – you can actually just pull it all out of the channel between the housings in one piece.
There are several clips around the edges that you’ll need to be mindful of. Just pop em up as you get to them while going around the edge of the housing.

Anddddd Lens is coming off! (see, corner first!)

Next, you need to unplug the LED DRL strip. There are two plugs under it, just push on the clips and pull out, easy.


The housing is now opened and the DRL is removed. Now you need to remove this Chrome trim piece. There are a couple basic Philips screws and a clip I believe, its easy to take off.

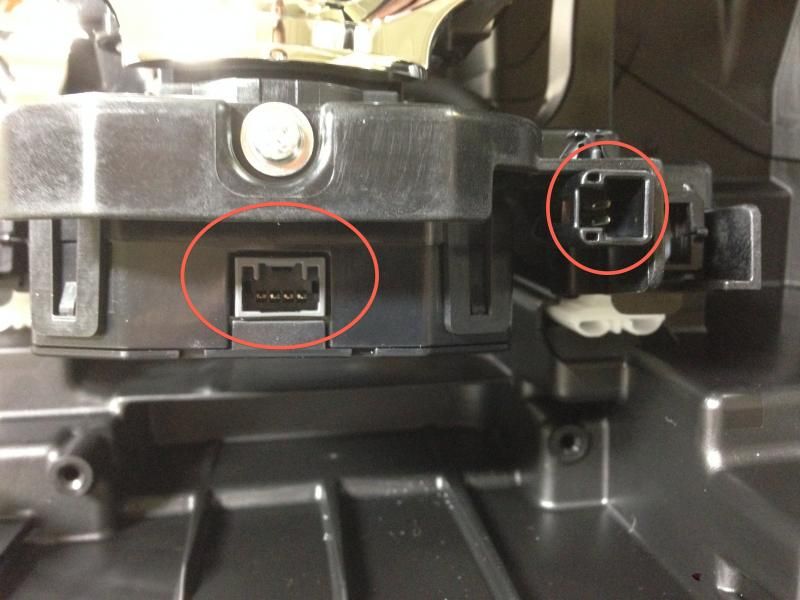
First remove the two plugs underneath the projector. This controls the AFS and auto leveling motor….don’t worry, none of the plugs that you’re removing can be mixed up when you re-assemble since they’re all different shapes.

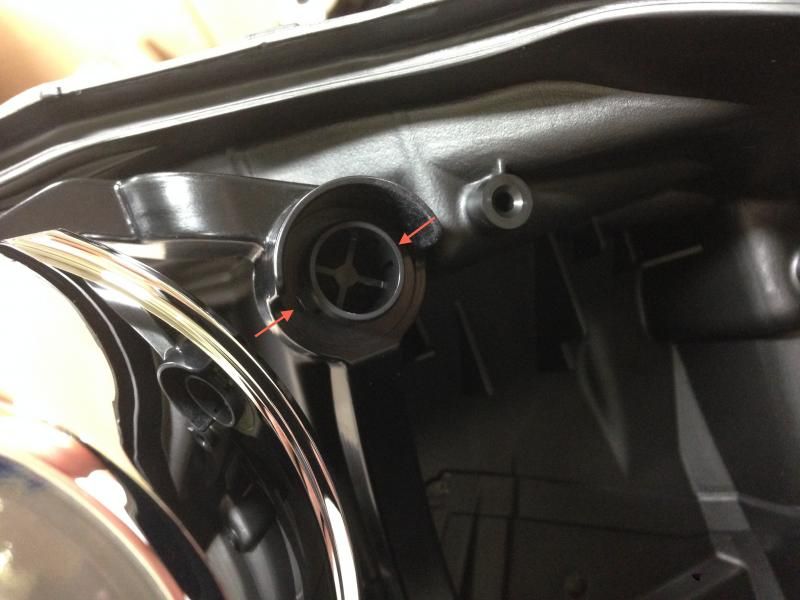
Now you need to remove the projector assembly from the aiming adjusters. First thing, depress the clips in the round ball joint type socket shown here, and then pull forward on the assembly once they’re “in” to release it the bracket from the “barrel”


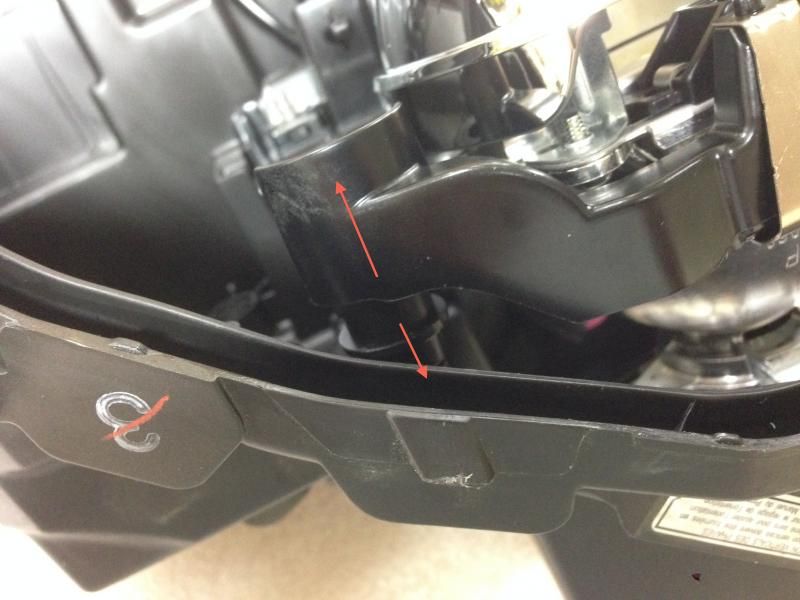
You then just need to basically “unscrew” the other two adjuster mounts, which are really just long screws. As shown below, just loosen them all the way and the bracket/projector assembly will just drop out of the headlight shell.

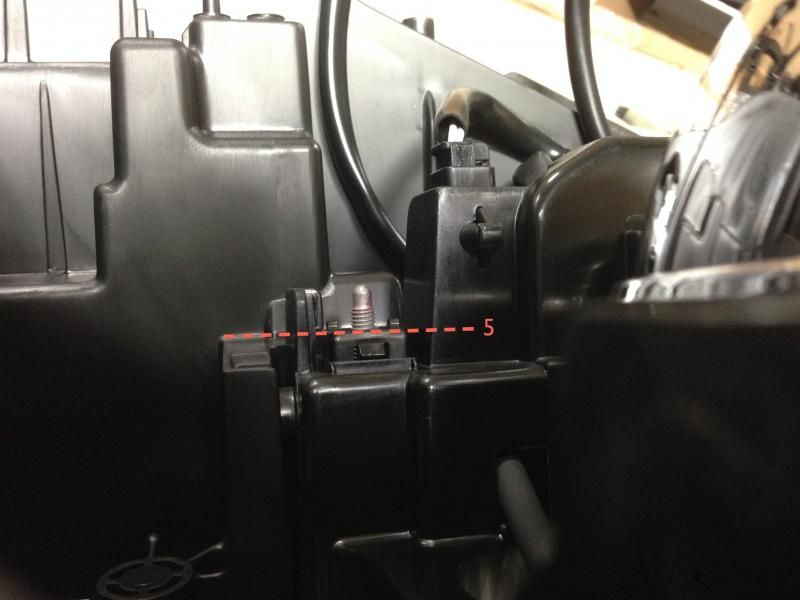
So that I didn’t have to re-aim my headlights, I took note of the position of this adjuster. I had 5 threads exposed before I touched it, so when I put it back in, I made sure I screwed it in enough to see 5 threads again. When the headlights were back on the car, no adjustment was needed, so that worked really well.

Projector is now out:

Now, you really have to disassemble the AFS/Projector mechanism. First, just remove the Philips screw on the front:

Then, slide the motor on the bottom out the back, it just pushes out like a cartridge.

This one is a little trickier, but not all that hard. Use a flat blade screw-driver to rotate the top clip backwards and up, so it pops off the clips that’s holding it. If you just look at how its installed, that will give you the best idea how it comes off. A flat blade screw driver is definitely the best tool.

Note, there is a little bearing on top of the projector that’s underneath that clip. Don’t lose it:

Next, remove this part from the bottom of the projector. Two Philips screws, easy.


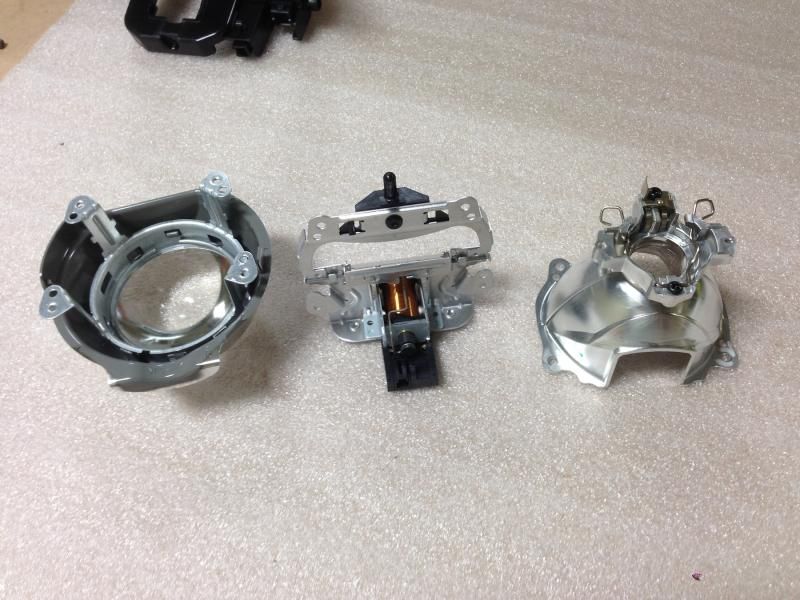
Now we actually have to take apart the projector, which also is pretty simple. Start with the 4 screws holding the two halves together:

All apart:

Last edited by TRSMatt; 08-11-14 at 02:23 PM.
08-11-14 | 01:58 PM
#2
Thread Starter
Driver School Candidate
Joined: Jun 2014
Posts: 28
Likes: 0
From: GA
Time to remove the chrome shroud from the front of the projector. If you look closely, there are 3 (I think 3) clips that can be accessed from this angle. Just put a small flat blade in, rotate it a little bit to flex the plastic and pop out each clip, one at a time. Make sure to work on a soft, clean surface so you don’t scratch the front side of the shroud in this process.
Shroud removed:
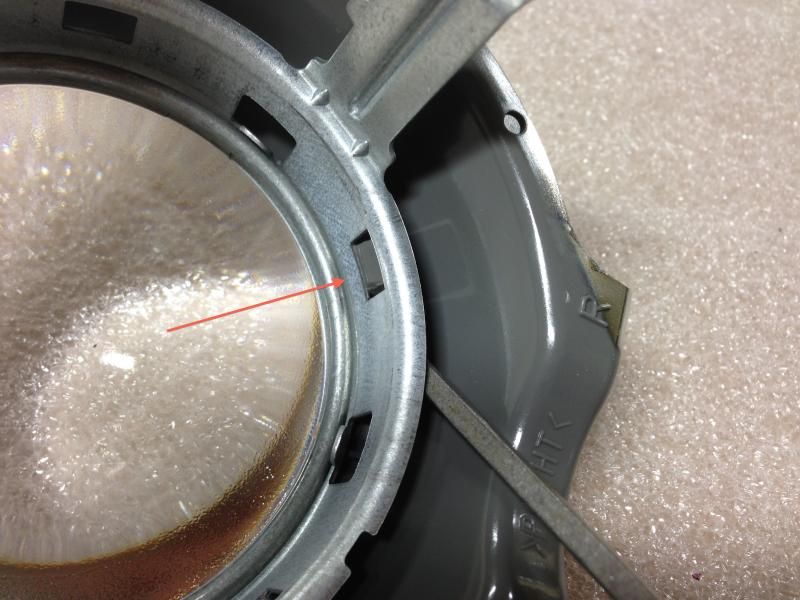
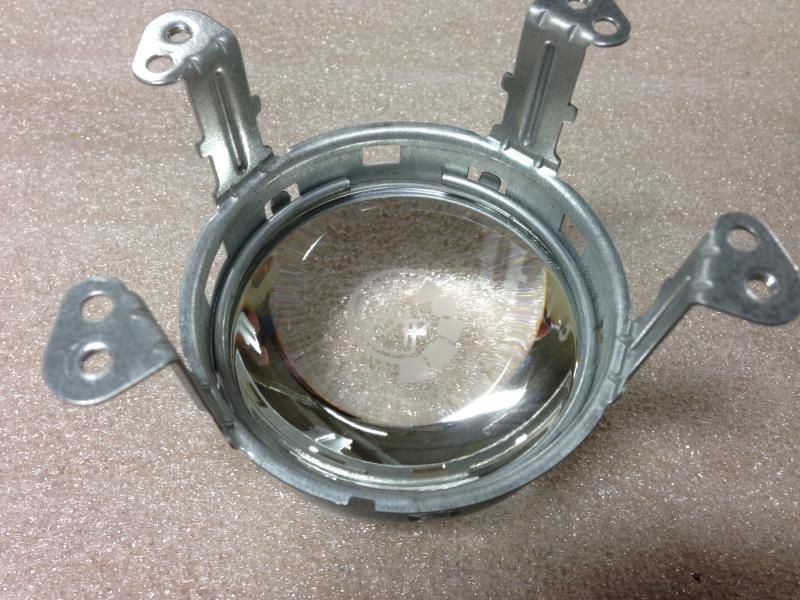
And now, we’re finally able to remove the factory, de-tuned, foggy, crappy projector lens. There are several metal clips all the way around the edge of the lens holder. If you use a flat blade and just bend them upwards, the lens will just come right out.
Lens removed. Note the metal clips push on a metal ring which sits behind the lens. That helps to spread the force of the clips evenly, preventing the glass from cracking, etc.
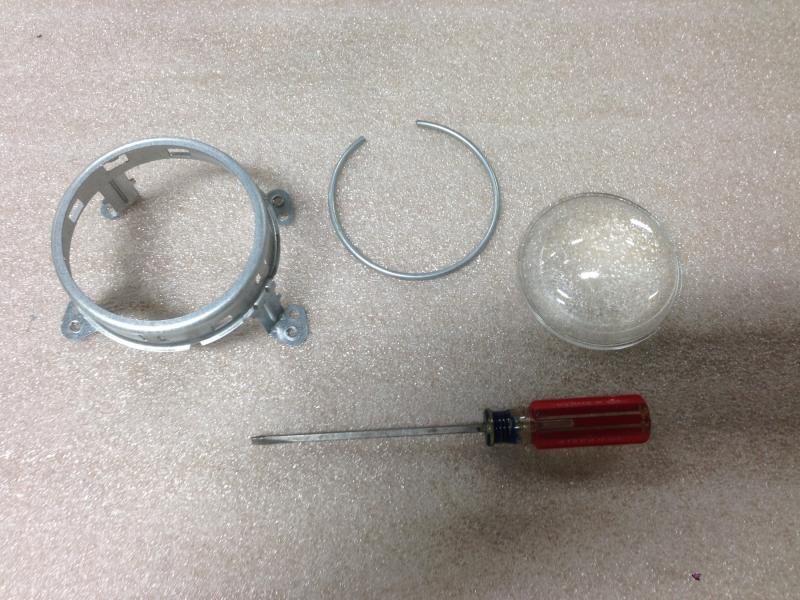
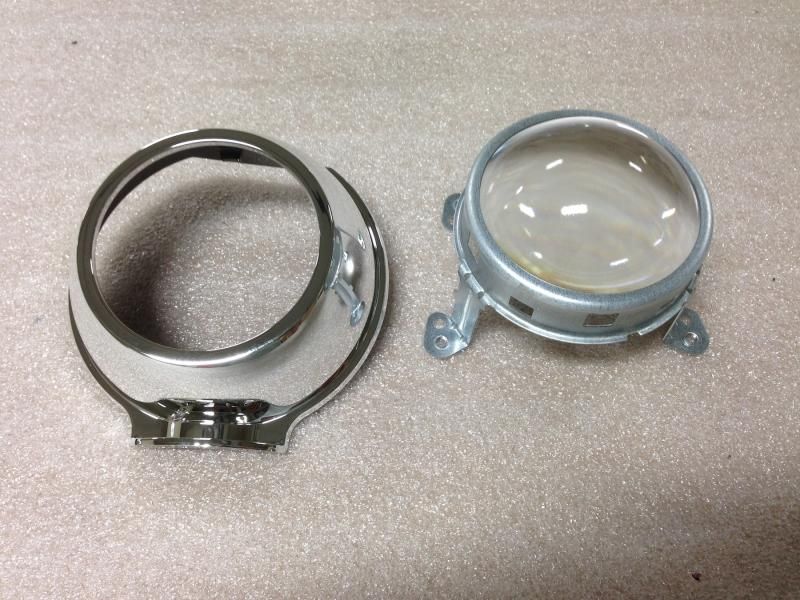
Re-install your new STi-R clear lens directly in place of the stock one. Just the same process, in reverse:
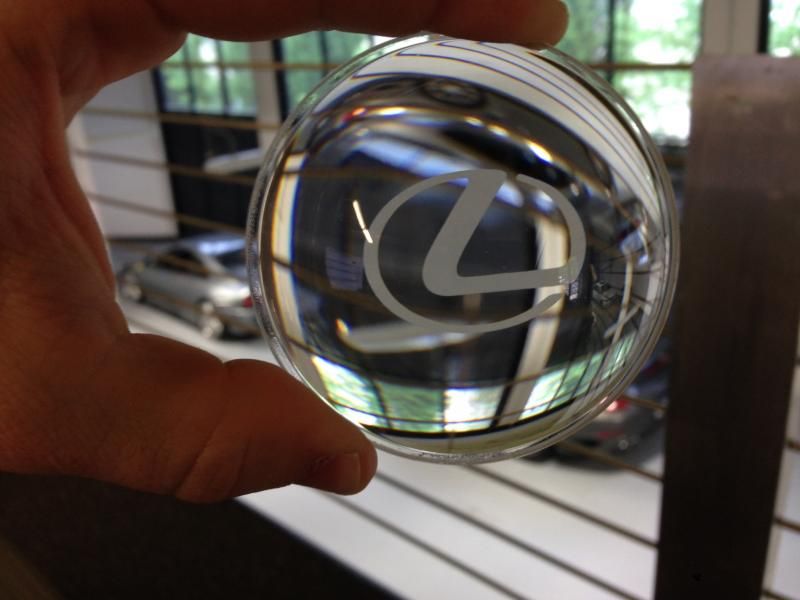
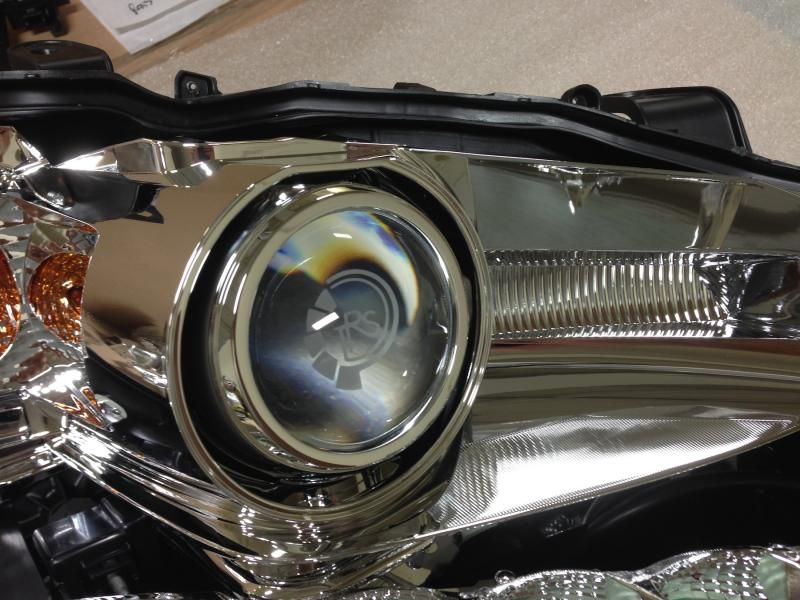
Originally, I was going to use these lenses, but ended up going for a set that’s engraved with our company logo instead. Of course the engraving is all for looks, has nothing to do with performance (nor does it affect it)
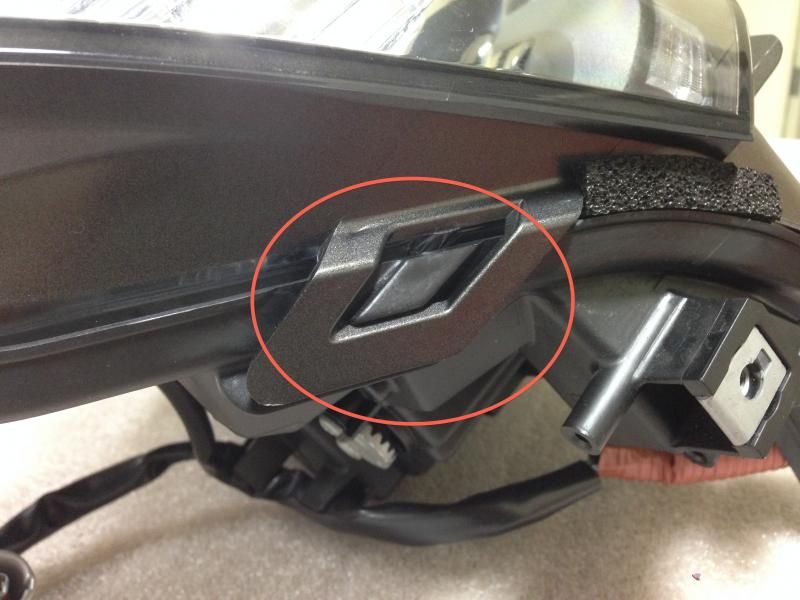
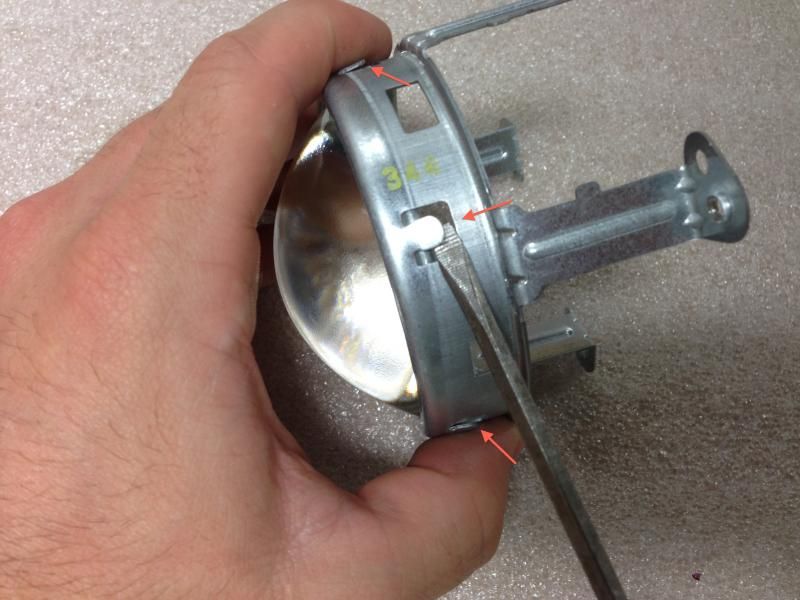
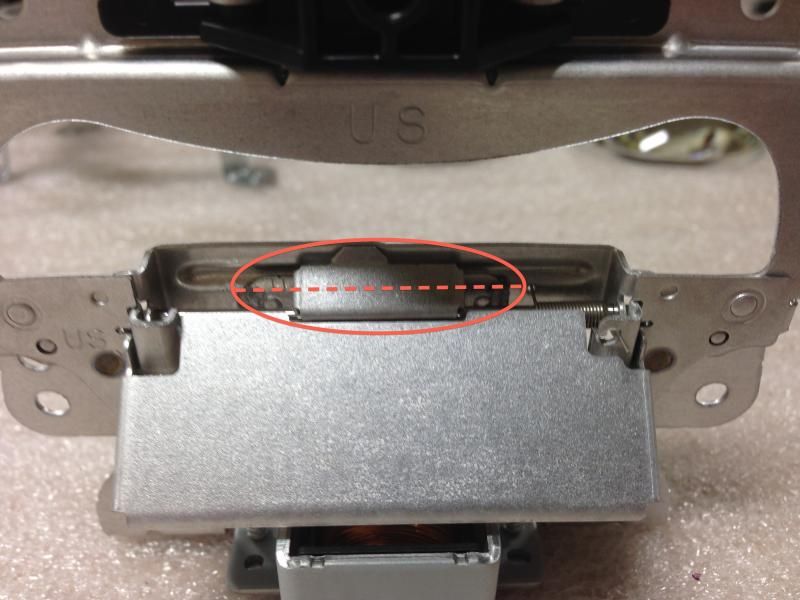
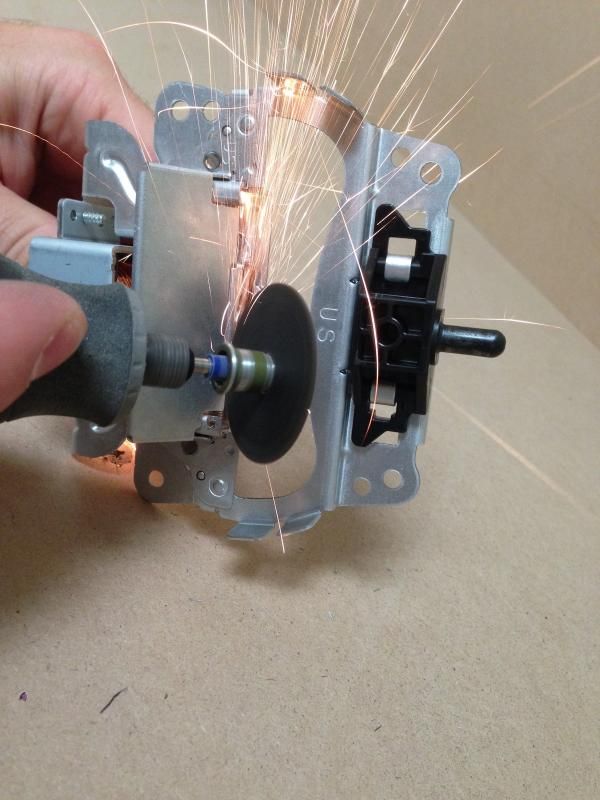
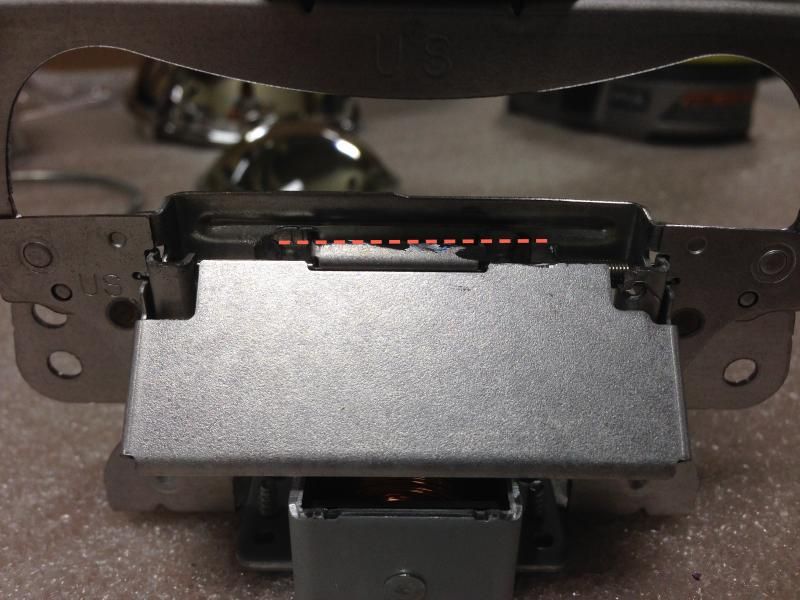
Next, you will need a dremel tool with a cutoff wheel (for metal) that you can use to shave off the top half of this little shield that’s a part of the projector. The shield is also partially responsible for softening the cutoff line that’s projected through the lens, so if you want the light output to look as good as it will perform, you’ll want to slice this thing off. Just be delicate and hold on with a steady hand, the metal is pretty thin. Be careful not to cut/nick the main upper shield or any of the surrounding mechanism though. The dotted line shows you where you want to cut on the part that’s circled.
Bzzzzzzzzzz
Shield removed:
And voila! Re-assemble everything in reverse order. For tips on resealing headlights, here's a good video:
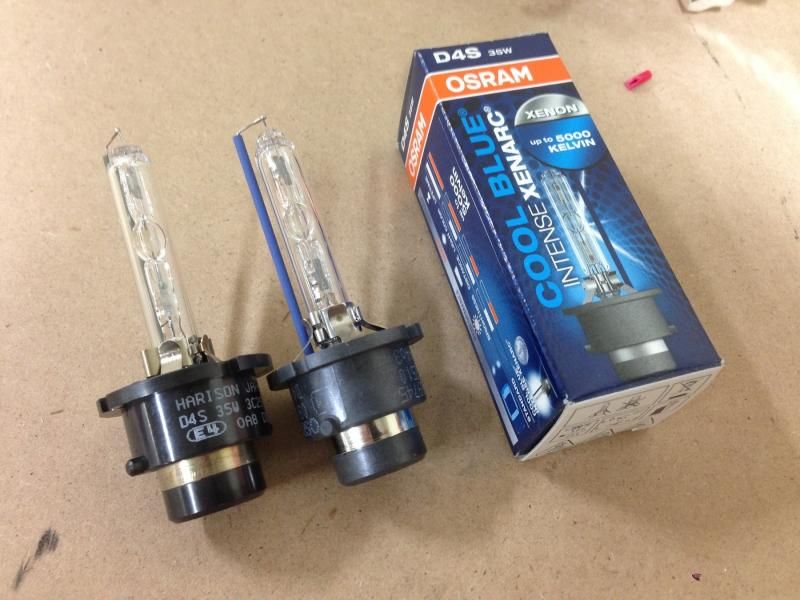
To complete the upgrade, I installed the new Osram D4S CBI bulbs in place of the stock Harrison/Toshiba bulbs. The Osram CBI is a 5000K, meaning it’s light output is whiter compared to stock. It also produces more lumens compared to stock. The whiter light offers better contrast while driving at night, and since the bulbs are also physically brighter – these were the perfect compliment to the lens swap for this upgrade.
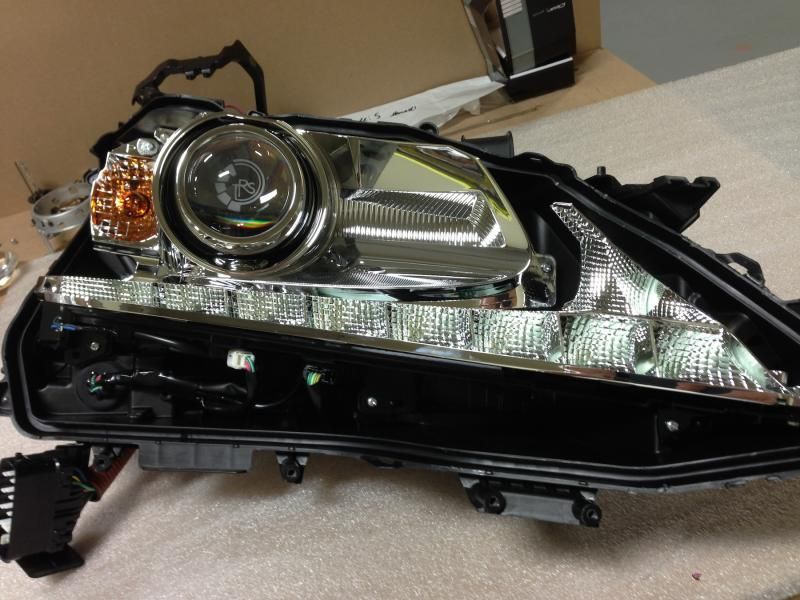
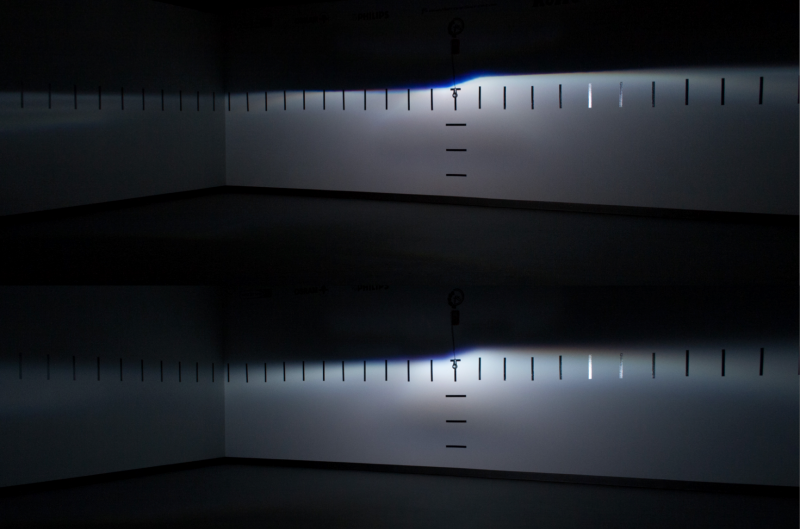
Quick before/after pic…note, I didn’t have the new bulbs installed for this picture – but you can see the intensity is better, the cutoff much sharper, and the more pronounced color within the cutoff line here. This is just 1 projector lit up.
Cheers guys! Hope this was a helpful write-up for you.
TRSMatt

Shroud removed:

And now, we’re finally able to remove the factory, de-tuned, foggy, crappy projector lens. There are several metal clips all the way around the edge of the lens holder. If you use a flat blade and just bend them upwards, the lens will just come right out.

Lens removed. Note the metal clips push on a metal ring which sits behind the lens. That helps to spread the force of the clips evenly, preventing the glass from cracking, etc.

Re-install your new STi-R clear lens directly in place of the stock one. Just the same process, in reverse:

Originally, I was going to use these lenses, but ended up going for a set that’s engraved with our company logo instead. Of course the engraving is all for looks, has nothing to do with performance (nor does it affect it)

Next, you will need a dremel tool with a cutoff wheel (for metal) that you can use to shave off the top half of this little shield that’s a part of the projector. The shield is also partially responsible for softening the cutoff line that’s projected through the lens, so if you want the light output to look as good as it will perform, you’ll want to slice this thing off. Just be delicate and hold on with a steady hand, the metal is pretty thin. Be careful not to cut/nick the main upper shield or any of the surrounding mechanism though. The dotted line shows you where you want to cut on the part that’s circled.

Bzzzzzzzzzz

Shield removed:

And voila! Re-assemble everything in reverse order. For tips on resealing headlights, here's a good video:


To complete the upgrade, I installed the new Osram D4S CBI bulbs in place of the stock Harrison/Toshiba bulbs. The Osram CBI is a 5000K, meaning it’s light output is whiter compared to stock. It also produces more lumens compared to stock. The whiter light offers better contrast while driving at night, and since the bulbs are also physically brighter – these were the perfect compliment to the lens swap for this upgrade.

Quick before/after pic…note, I didn’t have the new bulbs installed for this picture – but you can see the intensity is better, the cutoff much sharper, and the more pronounced color within the cutoff line here. This is just 1 projector lit up.

Cheers guys! Hope this was a helpful write-up for you.
TRSMatt


Trending Topics
08-12-14 | 06:05 AM
#11
Thread Starter
Driver School Candidate
Joined: Jun 2014
Posts: 28
Likes: 0
From: GA
Thanks guys! admittedly headlights are my specialty so I don't have to think about what I am doing much while I am working on them, making it easy to snap pics of whatevers happening on the bench.
There are a handful of companies out there that will do this work for you, like LightWerkz, Black Flame Customs, 180Customs, its just that for the $500 or whatever you'd be paying them in labor would probably be worthwhile to save and do this yourself in a few hours on a Sunday.
Course while the headlights are open many people will also take the opportunity to black out parts, color match this that or the other, etc. I just opted to keep mine OEM looking aside from the etched lens.
08-12-14 | 03:11 PM
#12
Nice job, I did not know that its that easy to take these headlights apart. I thought just like others, you have to bake them first?
Anyways, I was wondering if I could easily change my JDM spec cut off to USDM?
Anyways, I was wondering if I could easily change my JDM spec cut off to USDM?
08-13-14 | 07:34 AM
#13
Thread Starter
Driver School Candidate
Joined: Jun 2014
Posts: 28
Likes: 0
From: GA
Yeah you can change the JDM cutoff to USDM, you would just need new cutoff shields (which is the part that I was cutting in the tutorial)
If you're in Japan though, you dont want to do this as it would change the beam pattern, making it inappropriate for the traffic pattern there. If you're here in the US though and have JDM shields, then yes, I would recommend it so you can aim your headlights higher without risking glare to oncoming traffic
If you're in Japan though, you dont want to do this as it would change the beam pattern, making it inappropriate for the traffic pattern there. If you're here in the US though and have JDM shields, then yes, I would recommend it so you can aim your headlights higher without risking glare to oncoming traffic
Last edited by DaveGS4; 08-21-14 at 01:06 PM.