When you click on links to various merchants on this site and make a purchase, this can result in this site earning a commission. Affiliate programs and affiliations include, but are not limited to, the eBay Partner Network.
I was able to make power trunk working on my 2014 GS F-sport. Had to run a bunch of additional wires, the rest was the same as in the thread. If someone is interested, I can make a DIY with step by step description
Please do @DeneAlex! For at least the sake of the community of DIYers here - it would be immensely appreciated.
I was able to make power trunk working on my 2014 GS F-sport. Had to run a bunch of additional wires, the rest was the same as in the thread. If someone is interested, I can make a DIY with step by step description
So basically you had to wire up the plug for the power trunk motor? That harness/plug seemed to be the only thing missing in the f-sport.
So basically you had to wire up the plug for the power trunk motor? That harness/plug seemed to be the only thing missing in the f-sport.
The Motor plug was missing, but making it is pretty straightforward, as soon as you have a bunch of spare wire terminals. But the issue is not the plug solely. I had to modify trunk lid harness, but adding missing wires to close switch button and new latch. I have purchased a Japanese trunk lid harness as you mentioned above, but it did not work. Several wires were in the wrong pins and lights did not work completely. However, I have all the wires between aT1 and UT1 connectors in place, which is fascinating
The Motor plug was missing, but making it is pretty straightforward, as soon as you have a bunch of spare wire terminals. But the issue is not the plug solely. I had to modify trunk lid harness, but adding missing wires to close switch button and new latch. I have purchased a Japanese trunk lid harness as you mentioned above, but it did not work. Several wires were in the wrong pins and lights did not work completely. However, I have all the wires between aT1 and UT1 connectors in place, which is fascinating
Your right that is a mystery why they had the wires between those terminals. Honestly you would think Lexus would make one wiring harness with all the connections instead of multiple part numbers, but I guess the cost of unused wiring adds up.
Not sure what diy your going to make but basically just need to post pics of the terminals and the wiring diagrams and tell people to make all the missing connections.
Please ask.
I installed the motor. And all equipment is done But the system doesn't work.
Check the wiring according to the circuit and everything is correct.
Can be opened from the front of the car and at the button on the rear cover Can't press the button to turn off.
And the Trunk Open warning light on the dashboard won't go out.
How can I use the system?
All right, finally I’ve got some time to sum up wiring modifications for power trunk installation in GS F-Sport.
Disclaimer:
I’ve performed the work on 2014 US Lexus F-sport. Starting Fall 2015 some wiring differences might exist. Also, I think that 2013 GS lacks several wires (between aT1-UT1 connectors) compared to 2014 model (see previous posts in the thread).
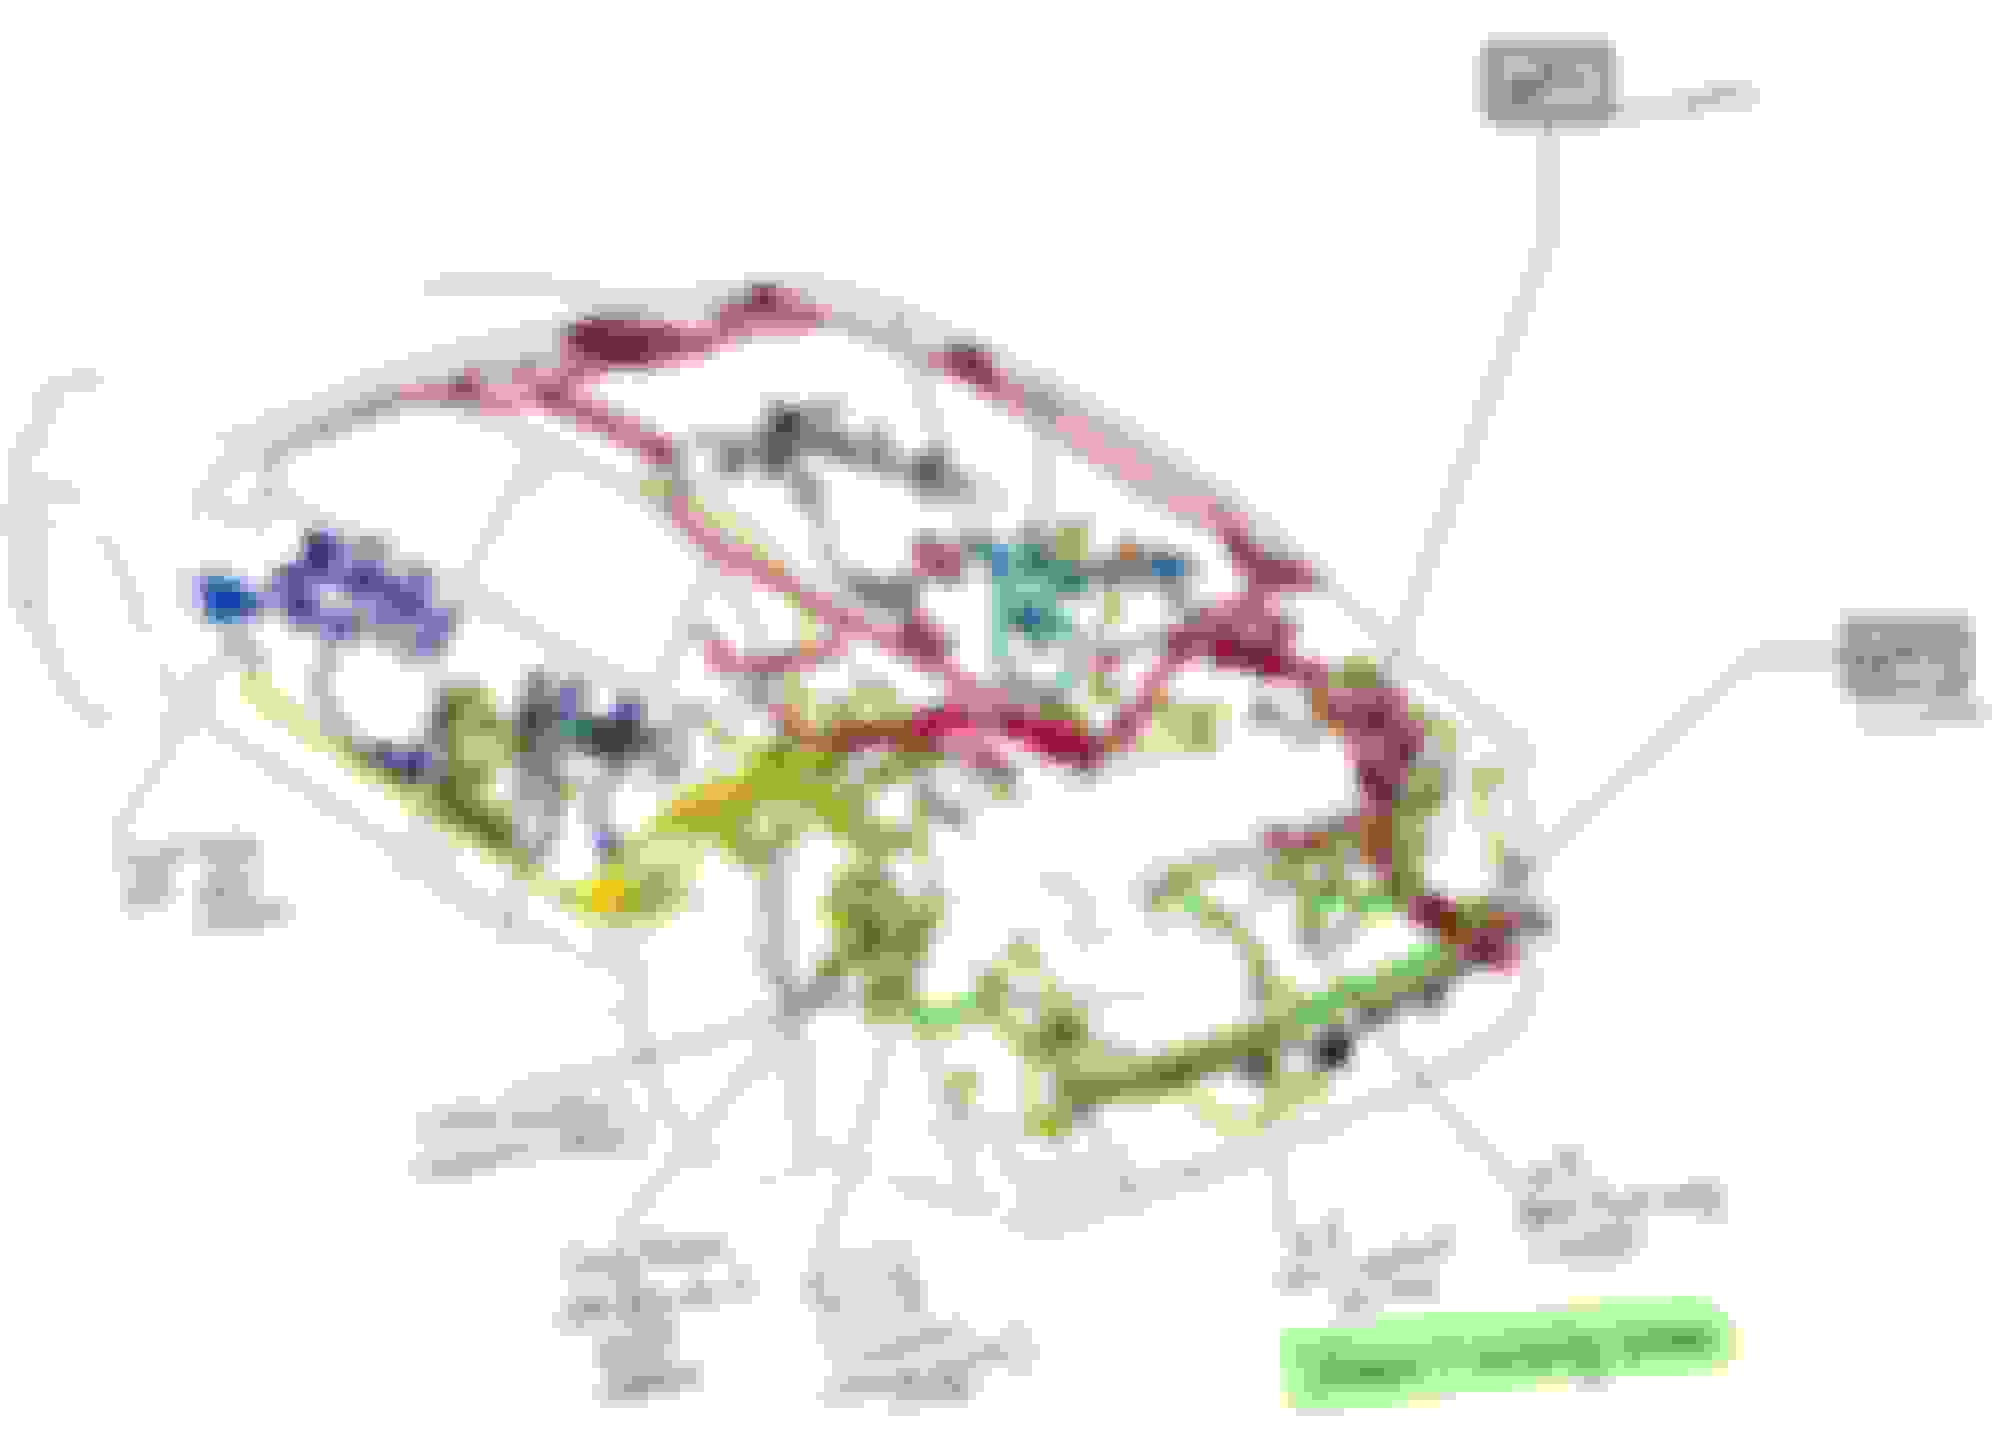
Overall description.
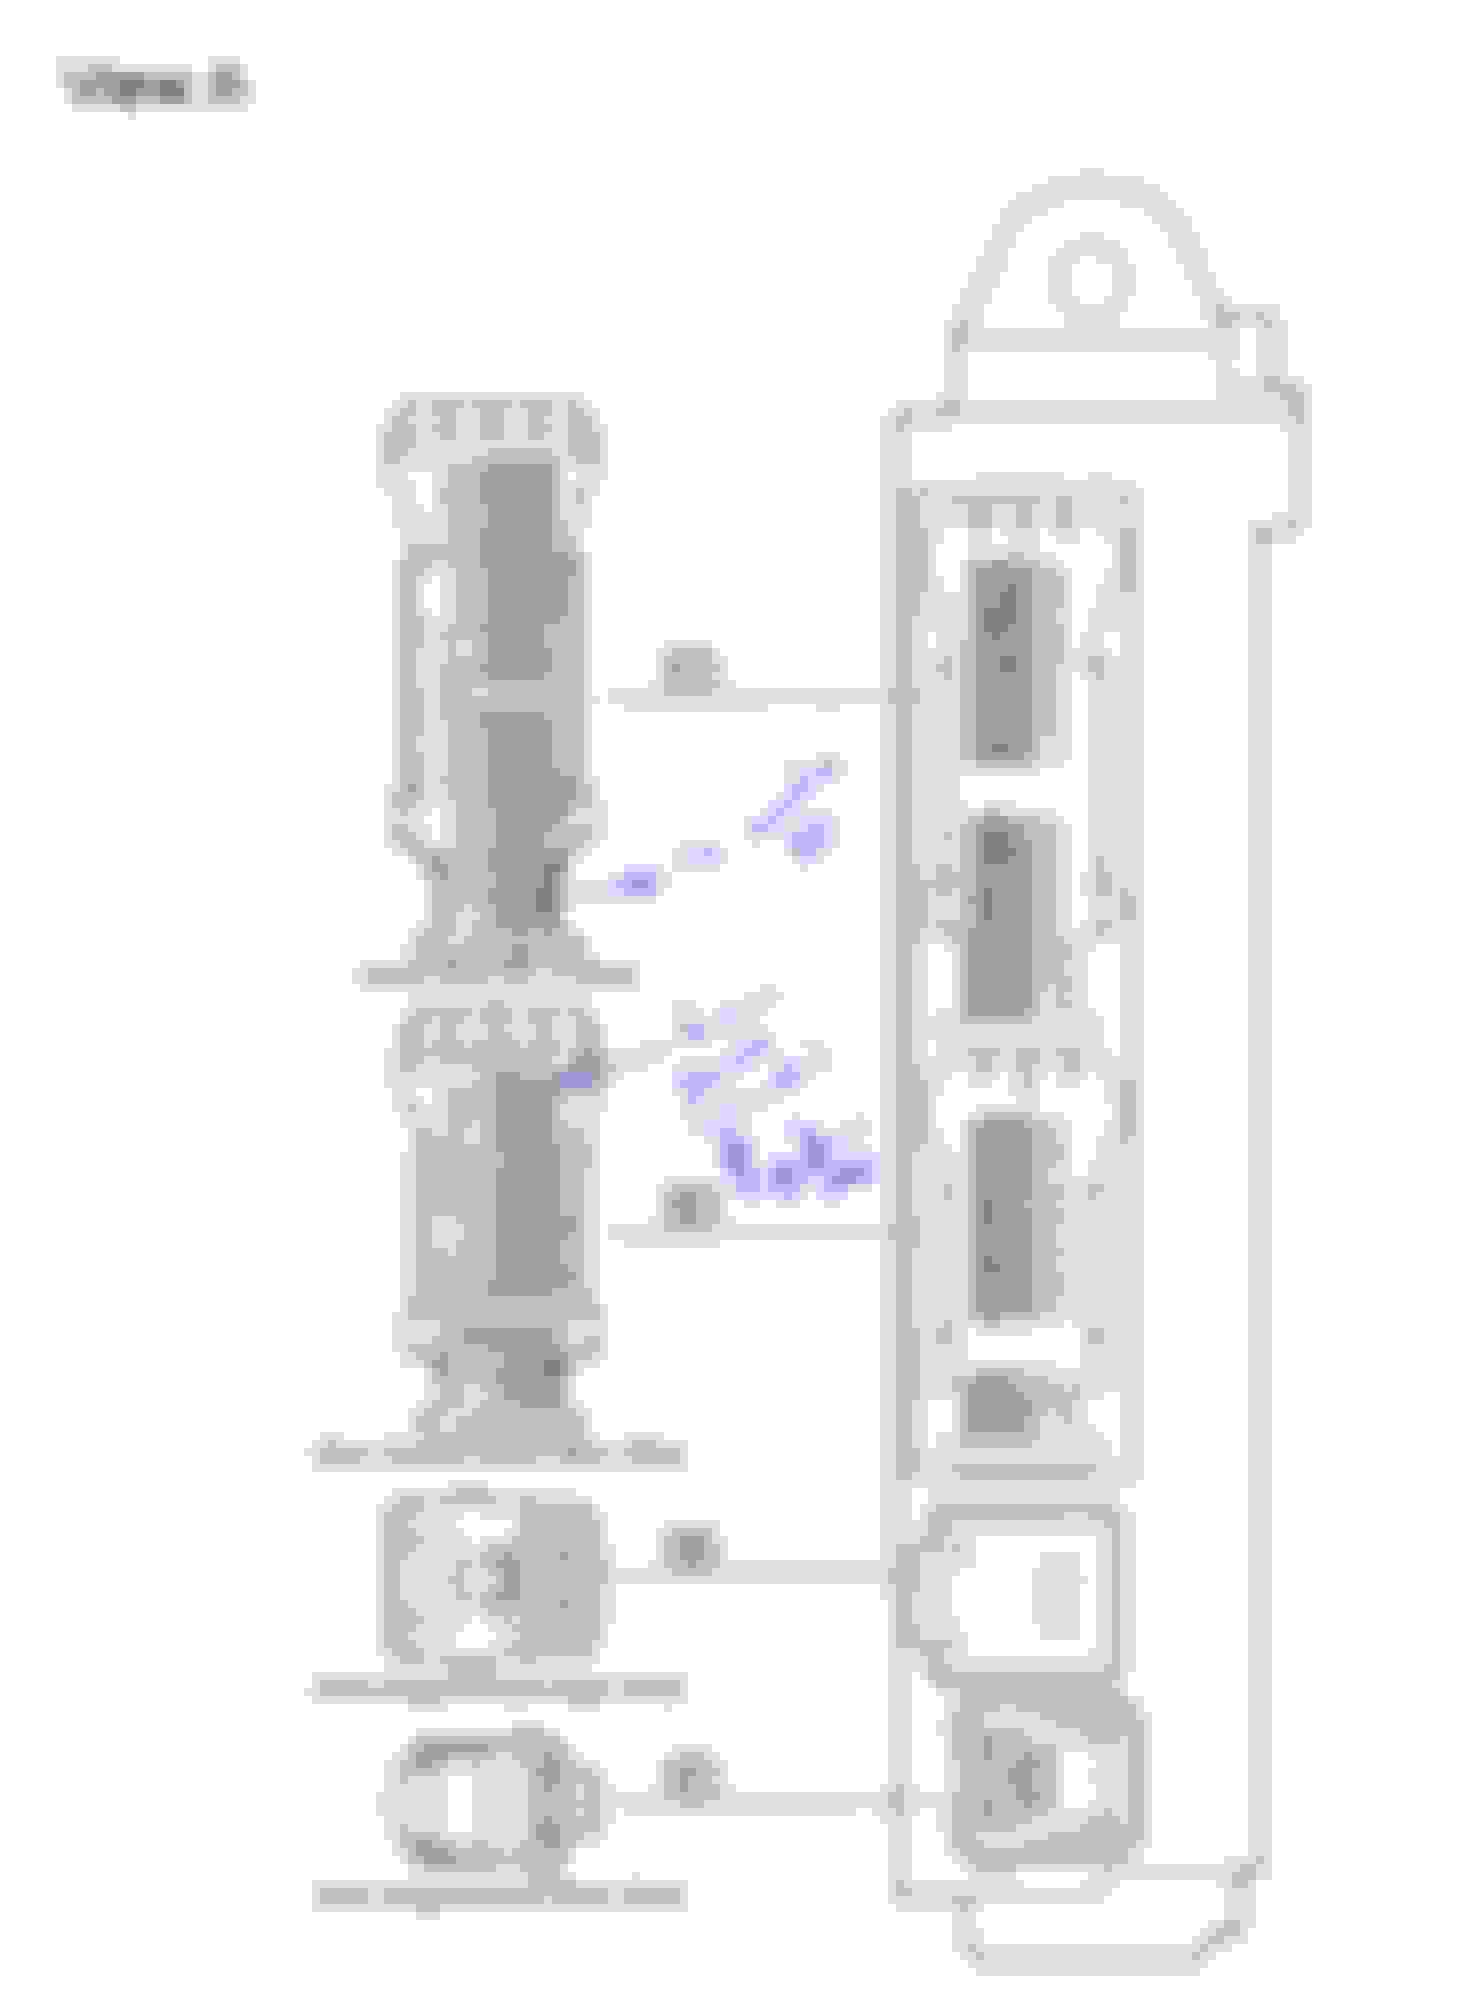
This is the schematic of the power trunk wire routing. Connectors and blocks are indicated, and here you can see all of the points where the work was performed. I will be referring to these in the text. Green marker highlights missing wires.
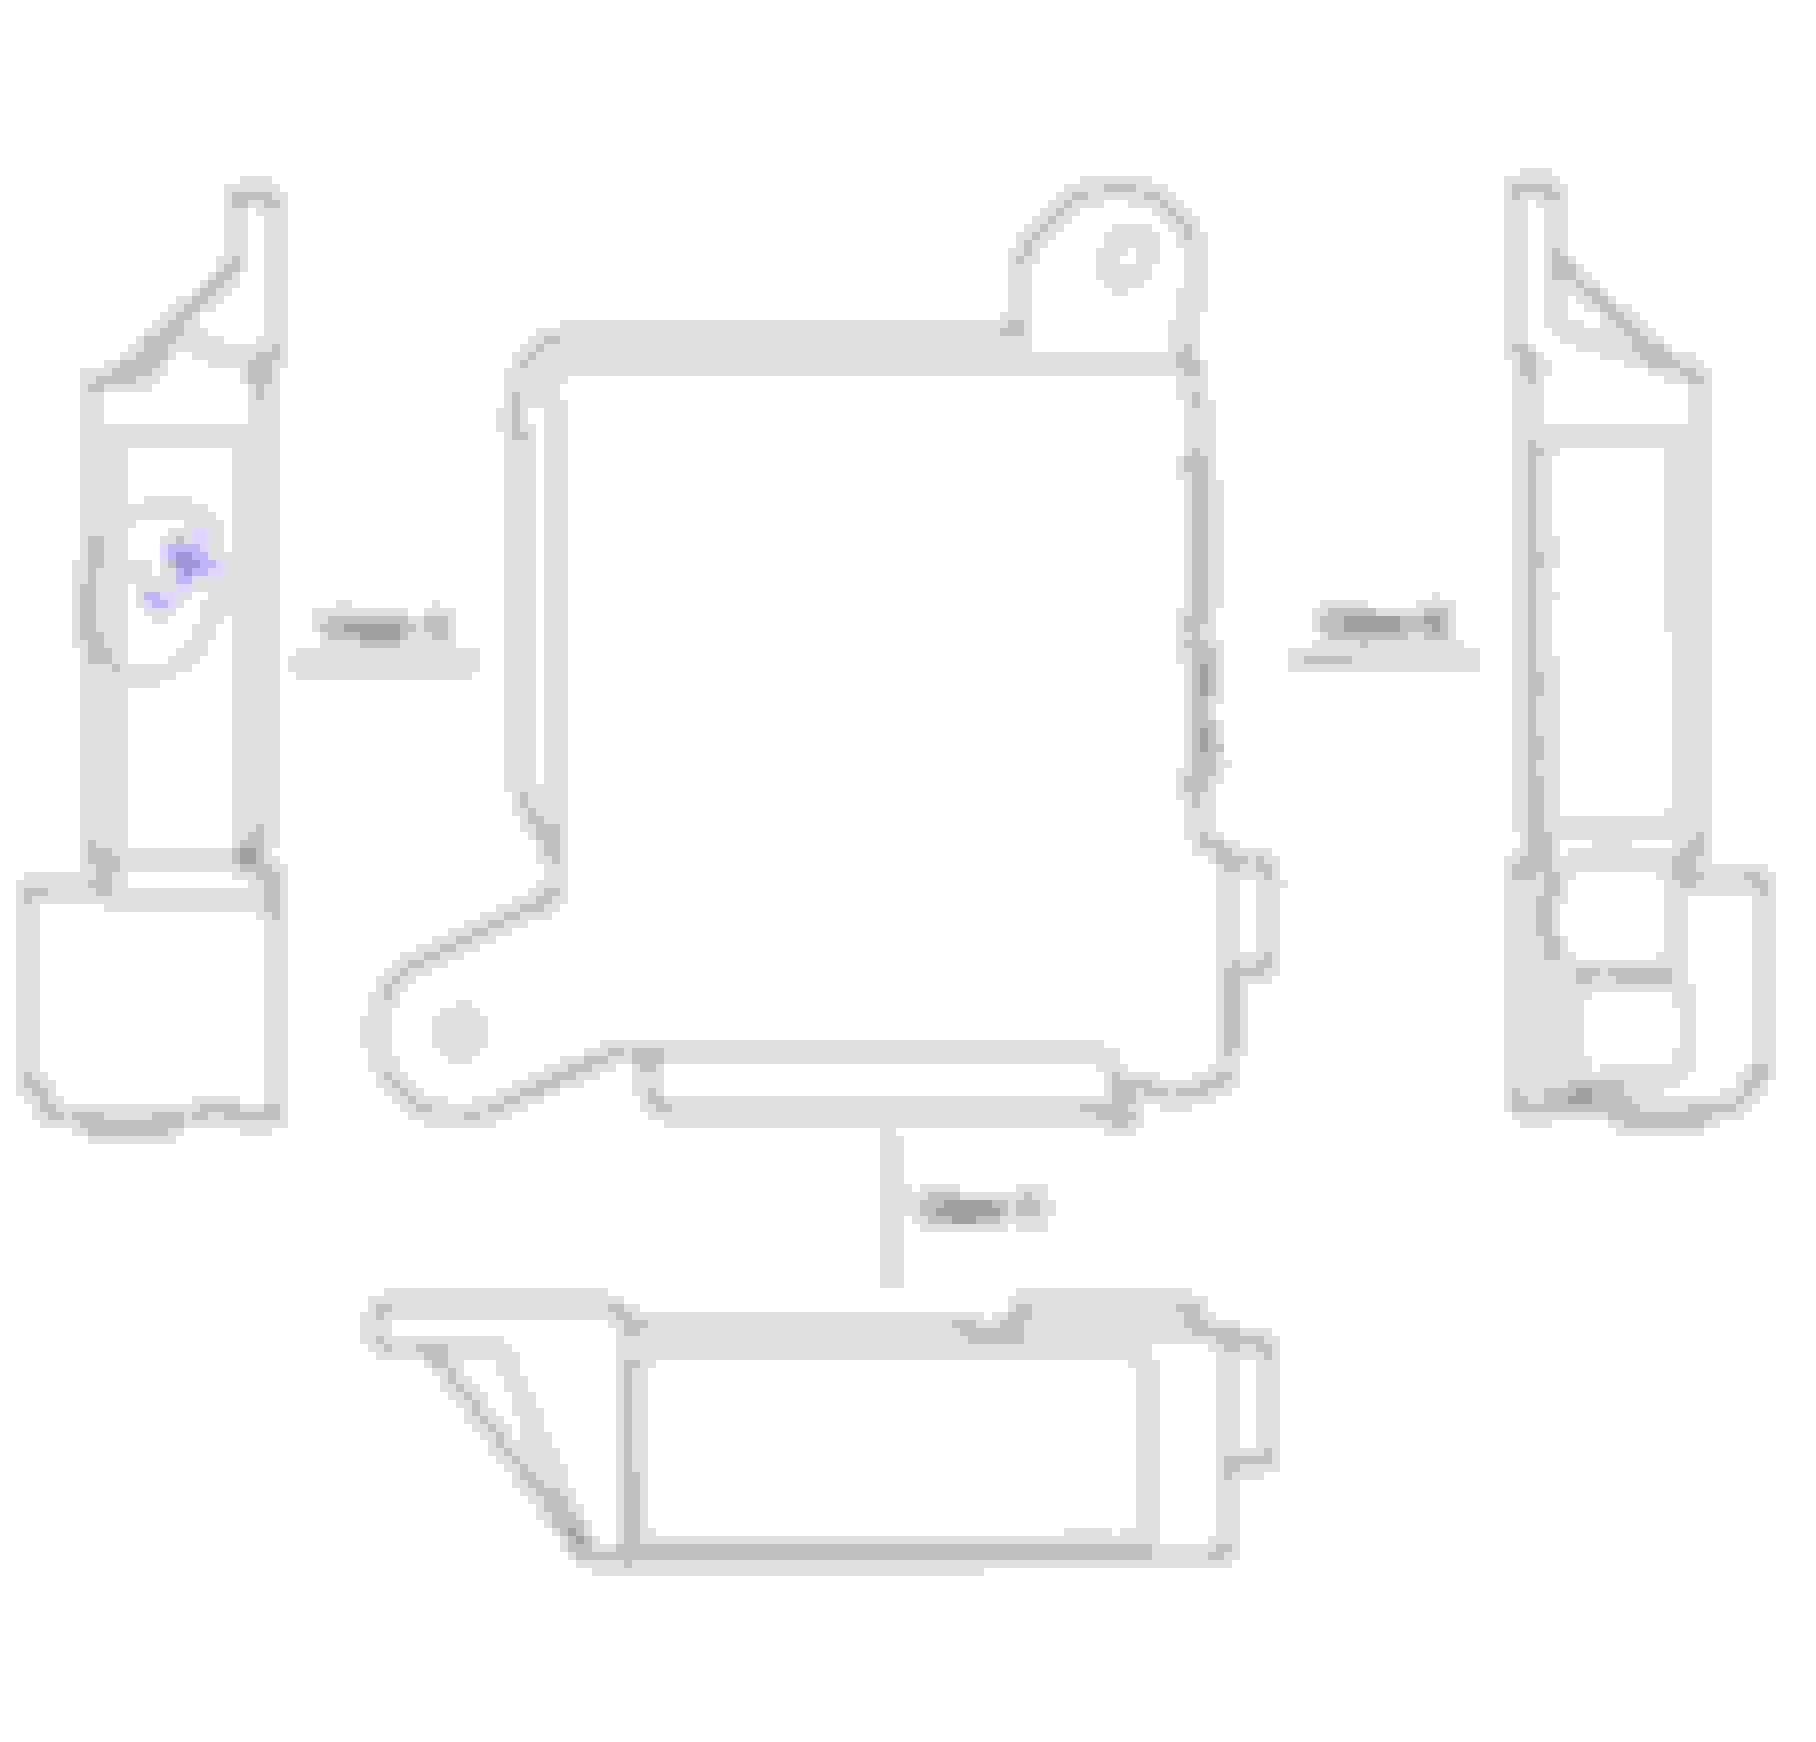
Here is overall system diagram.
As a sum up from the thread, here is a list of parts to purchase:
1. Trunk Close Button (Door control switch) 84930-50050 + bezel 84656-30110
2. Screws and screw housings for the Door Control Switch (x2) 90159-50327/90189-05003
3. Trunk lid lock actuator 64650-30070/64650-30060 with cables (old lock cables are shorter).
4. Trunk opener motor assy 85790-30050
5. Trunk opener motor connector (U33) 90980-12444.
6. Bolts for trunk opener motor (x3) 90119-06864
7. Left trunk lid hinge mark “0” if you had no rear body work 64520-30290.
8. Power trunk harness 82181-30320. I had to modify this harness, because of numerous issues. The list of modifications is described below. Alternatively, you can make your own trunk lid harness (simply add missing wires). Described below as well. If you are making your own trunk lid harness, you need to buy Door Ctrl switch a2 connector (part # 90980-11986), and trunk lid Latch connector a9 (#90980-12812)
9. Also getting some spare Toyota/Lexus harness to get wire terminals from.
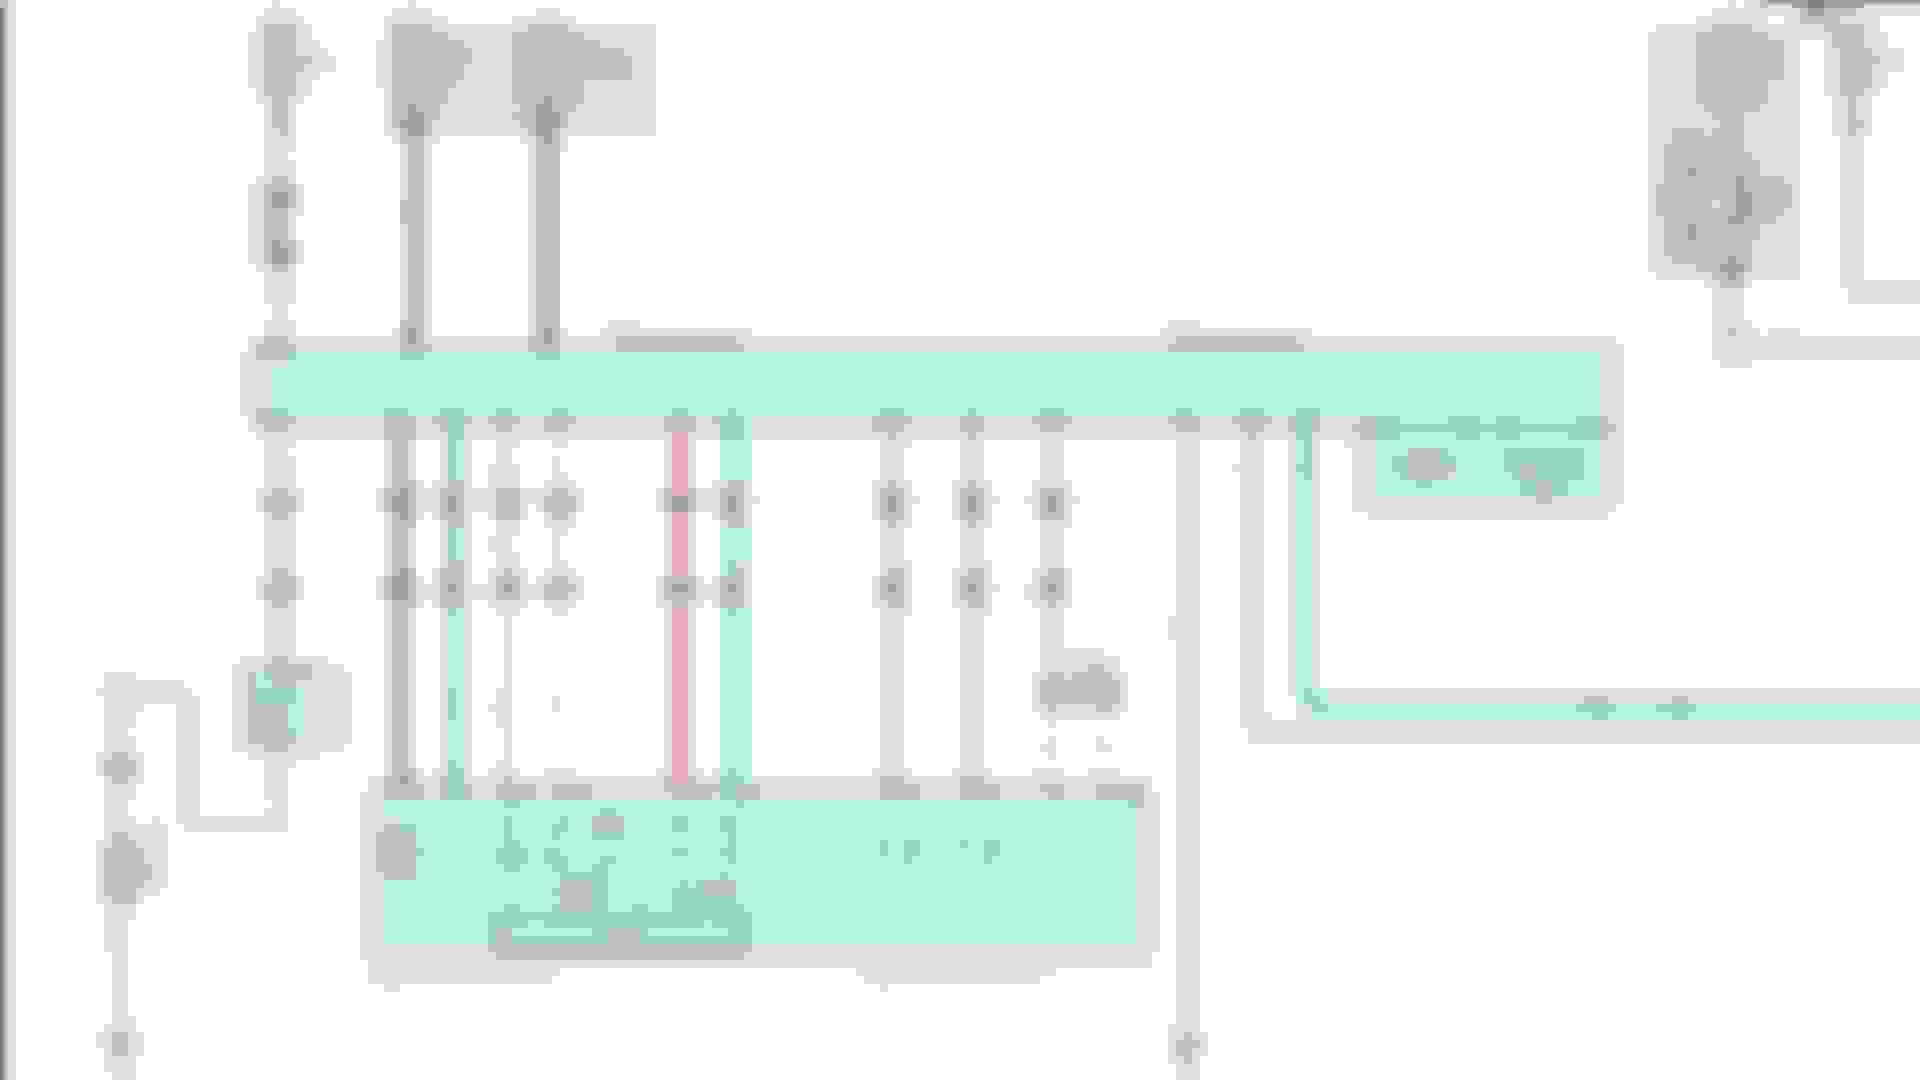
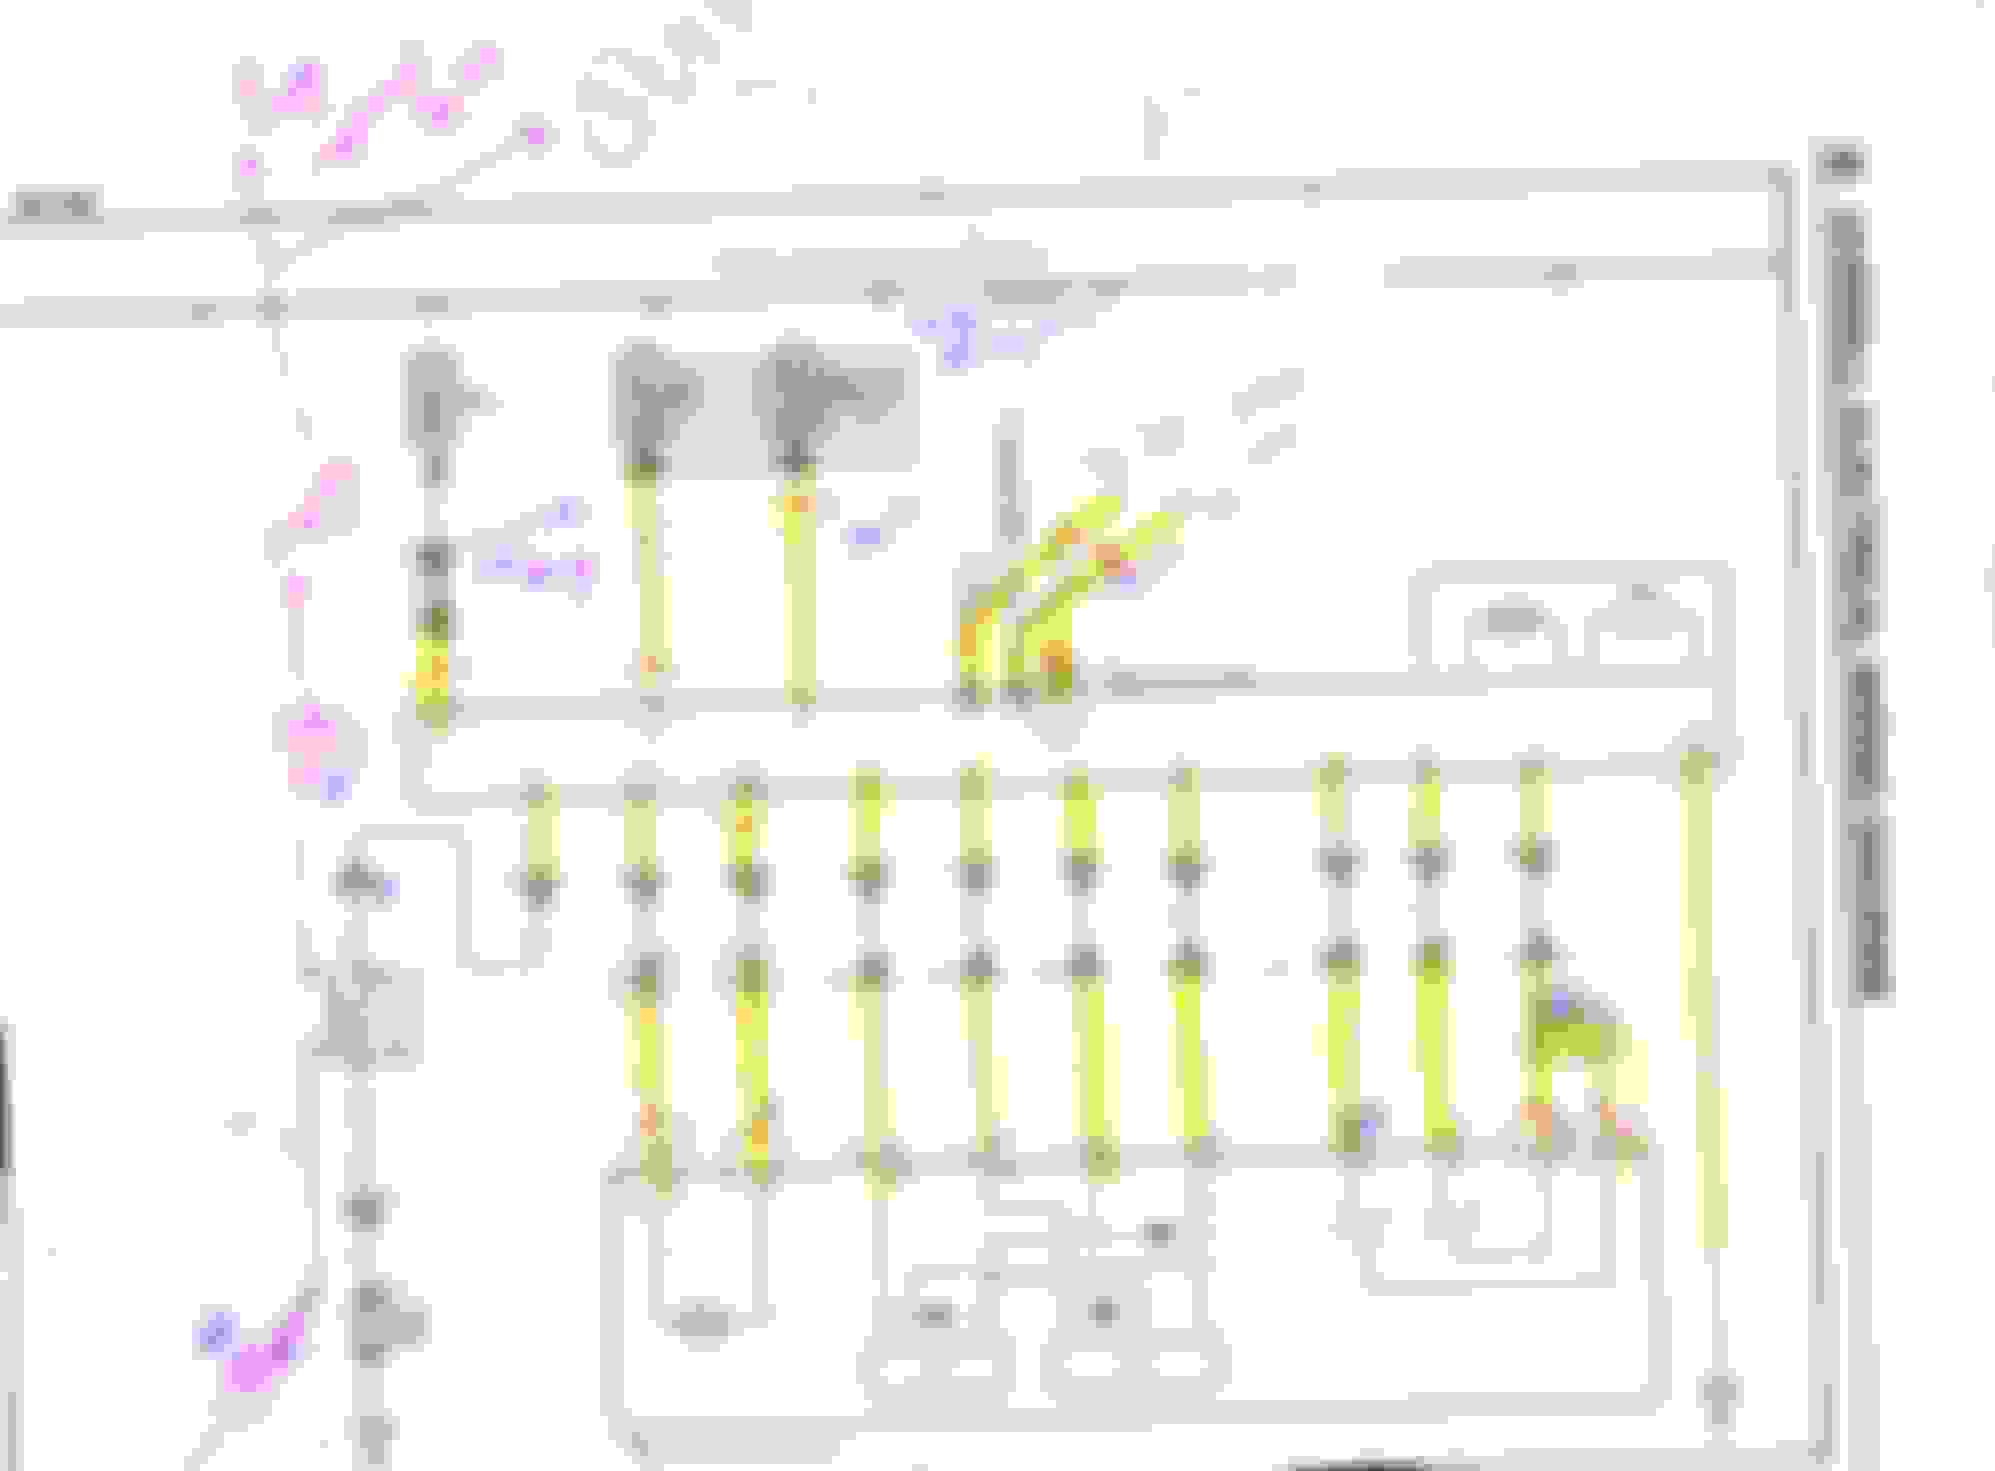
Basic description of the wire routing – refer to Pic 1.
Power trunk system works by CAN bus, and power trunk motor has its own ECU that is communicating with Main Body MPX, number of other ECUs and is sending signals to the trunk lid latch. Power trunk motor has U33 connector, which is absent in 2014-2015 F-sport GS350. So, you have to add:
1. Cowl Side J/B. Connector 5C. (Connector 5D had all the necessary wires in place). This block is located above driver’s kick panel in the dash. You have to add pin 32 on connector 5C and wire it to the luggage compartment closer motor plug U33, pin 10. This will be the longest wire, and the only one that needs to be routed from the cabin.
2. Luggage Room J/B Assy No. 1. You have to add 2 pins to connector 6A Add image 25 inches long wires should be enough.
a. Pin 6. Wire to Closer motor plug U33, pin 12.
b. Pin 54. Wire to Closer motor plug U33, pin 8.
3. Add Ground wire from Pin 11 on U33 to chassis
4. You have to add can bus wires from U54 connector (blue color) to trunk motor plug U33. Here is the list of pins # on U54 -> # on U33. ~20 inches of wires is enough.
a. 11 -> 5
b. 22 -> 6
5. Wires between UT1 and U33 (closer motor) connectors are all missing. You have to add all wires according to the diagram. Each wire length is about 83 inches. Here is the full list of pins # on UT1 -> # on U33 (name)
a. 16 -> 4 (LDDN)
b. 1 -> 2 (LCM+)
c. 15 -> 1 (LCM-)
d. 4 -> 17 (CS2)
e. 3 -> 16 (CSG)
f. 5 -> 18 (CS1)
g. 6 -> 19 (CSV)
h. 2 -> 20 (PAWL)
i. 7 -> 7 (HAF)
j. 8 -> 21 (SWG)
k. 9->3 (ILL)
6. Make sure you have correct trunk lid wire harness 82181-30320. You can swap the old trunk lid harness with a new one, but most likely you have to modify new harness. In my case some of the wires going from the latch to aT1 were not matching the diagram. Wire CLS was going prom pin 11 to pin 16 (instead of pin 9) and wires 7&12 that are connected together were in the pin 9 on aT1 instead of pin 10. Also, after direct harness swap, plate lights, inner tail lights, and backup lights did not work. I ended up with splicing out the wires I only needed (to the Door control switch and trunk lid latch wires) from the new harness and integrating them into the old wire harness.
Alternatively, you can simply add new wires according to the system diagram. If you are going this way, you have to tap wire 13 into existing wire 13 on aT1 connector
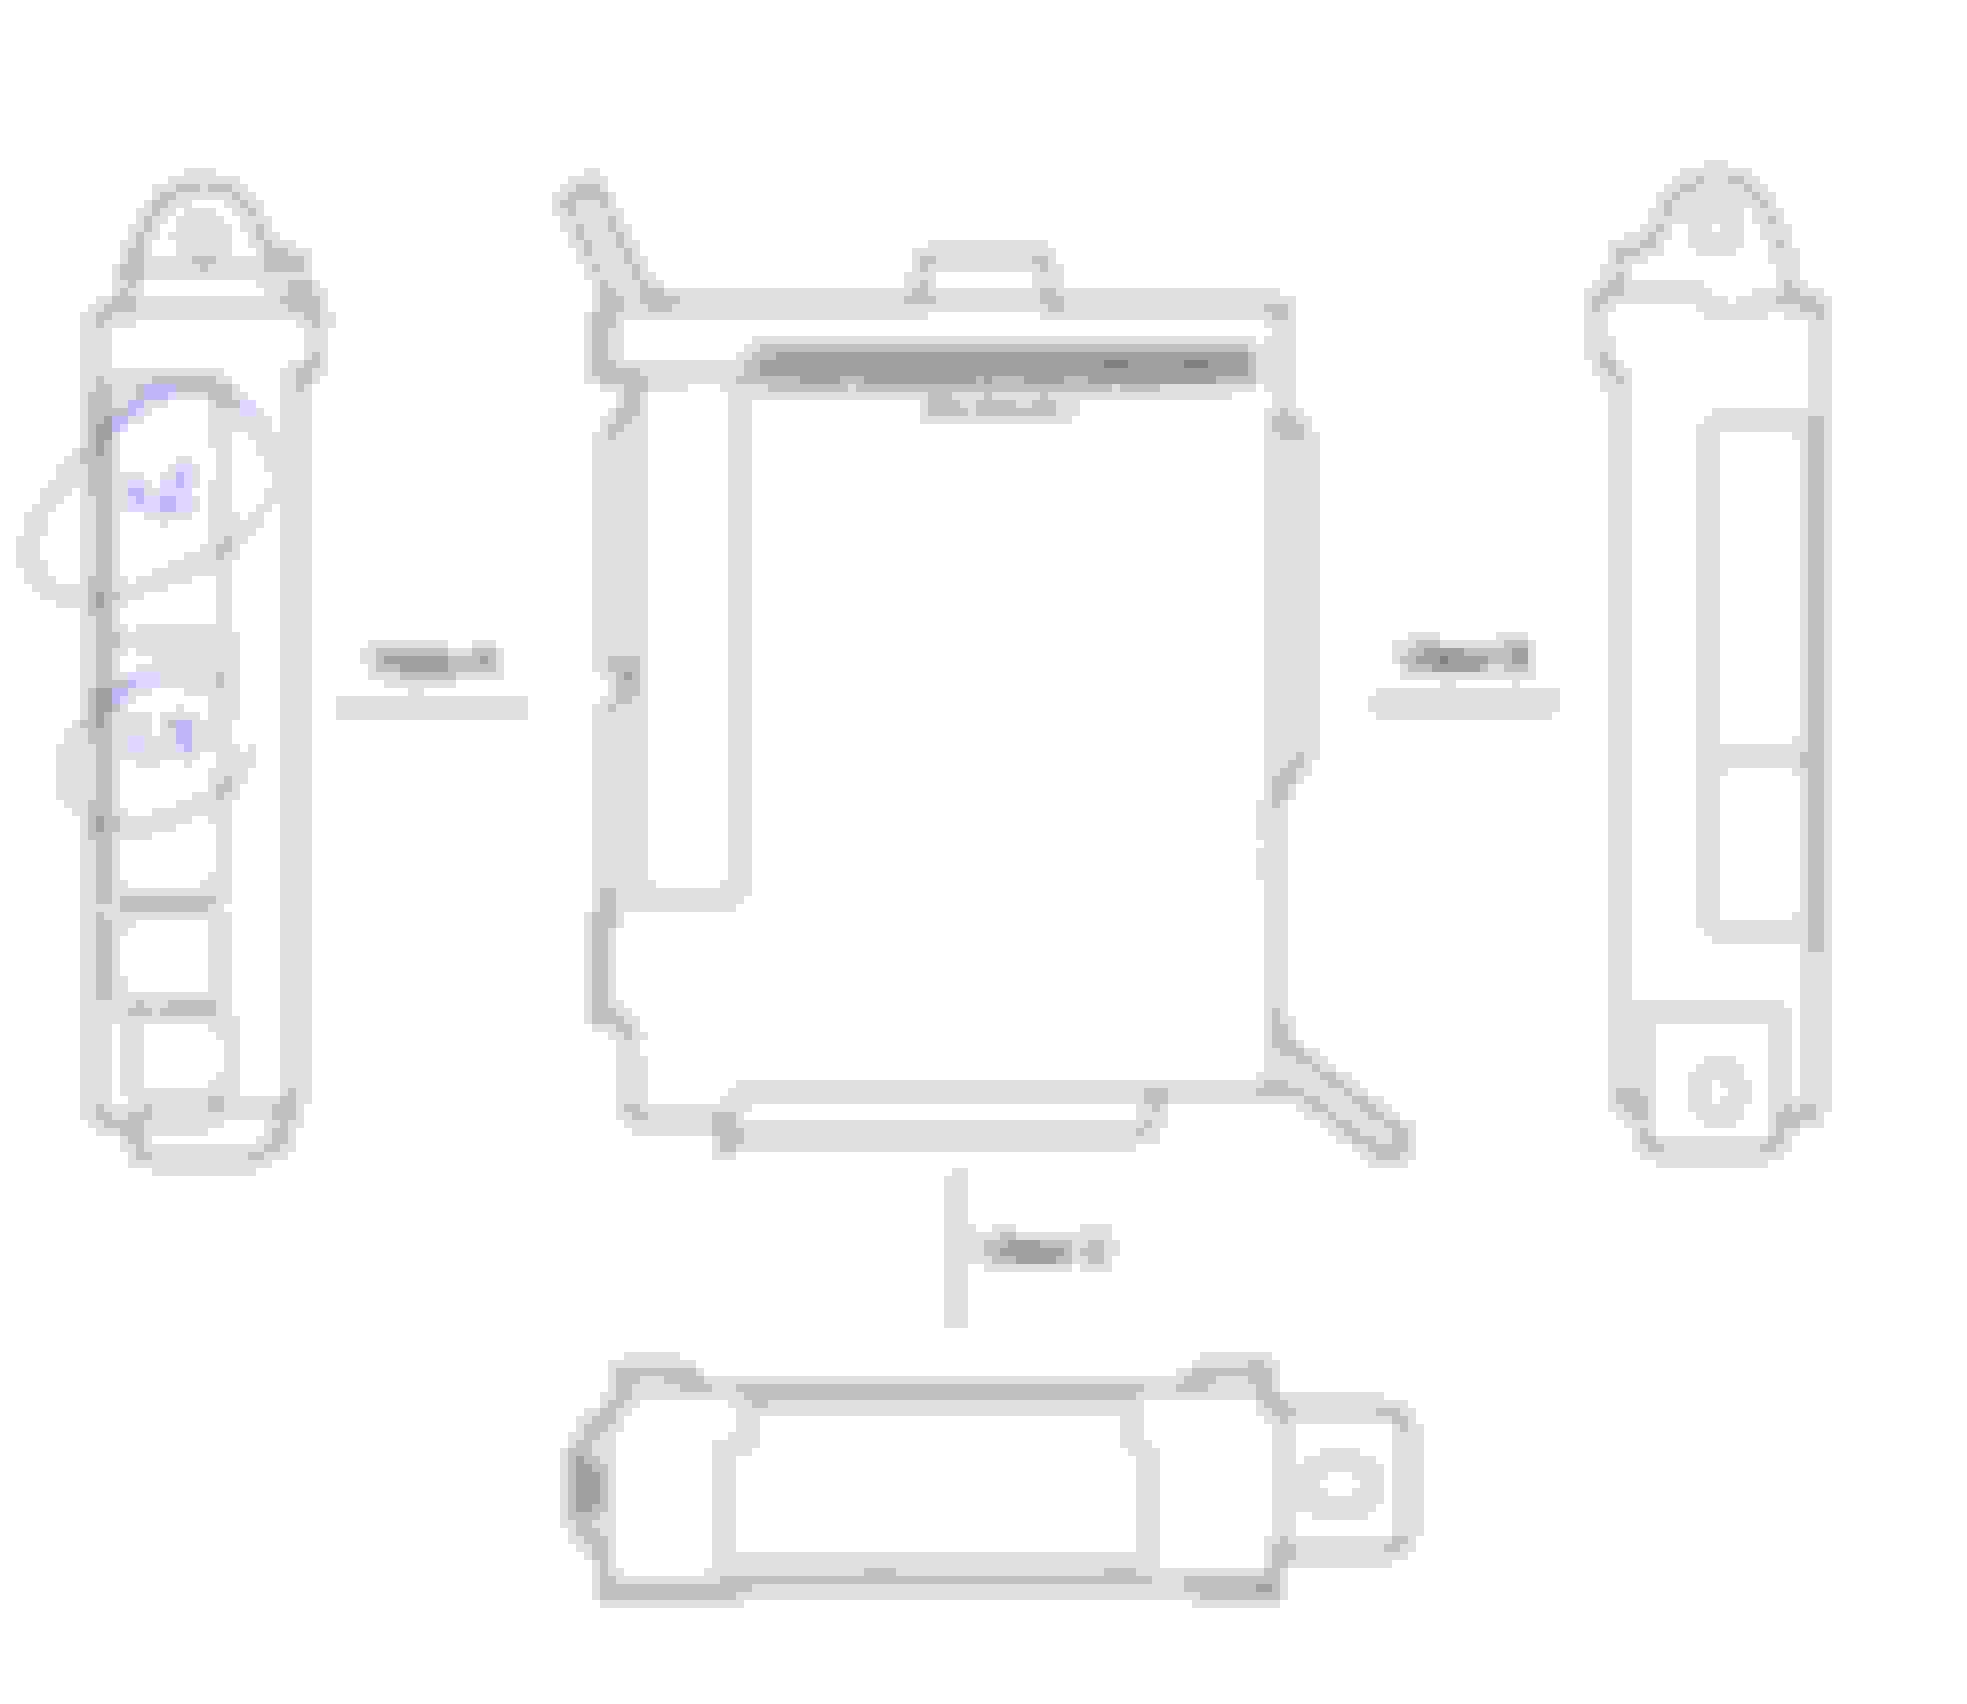
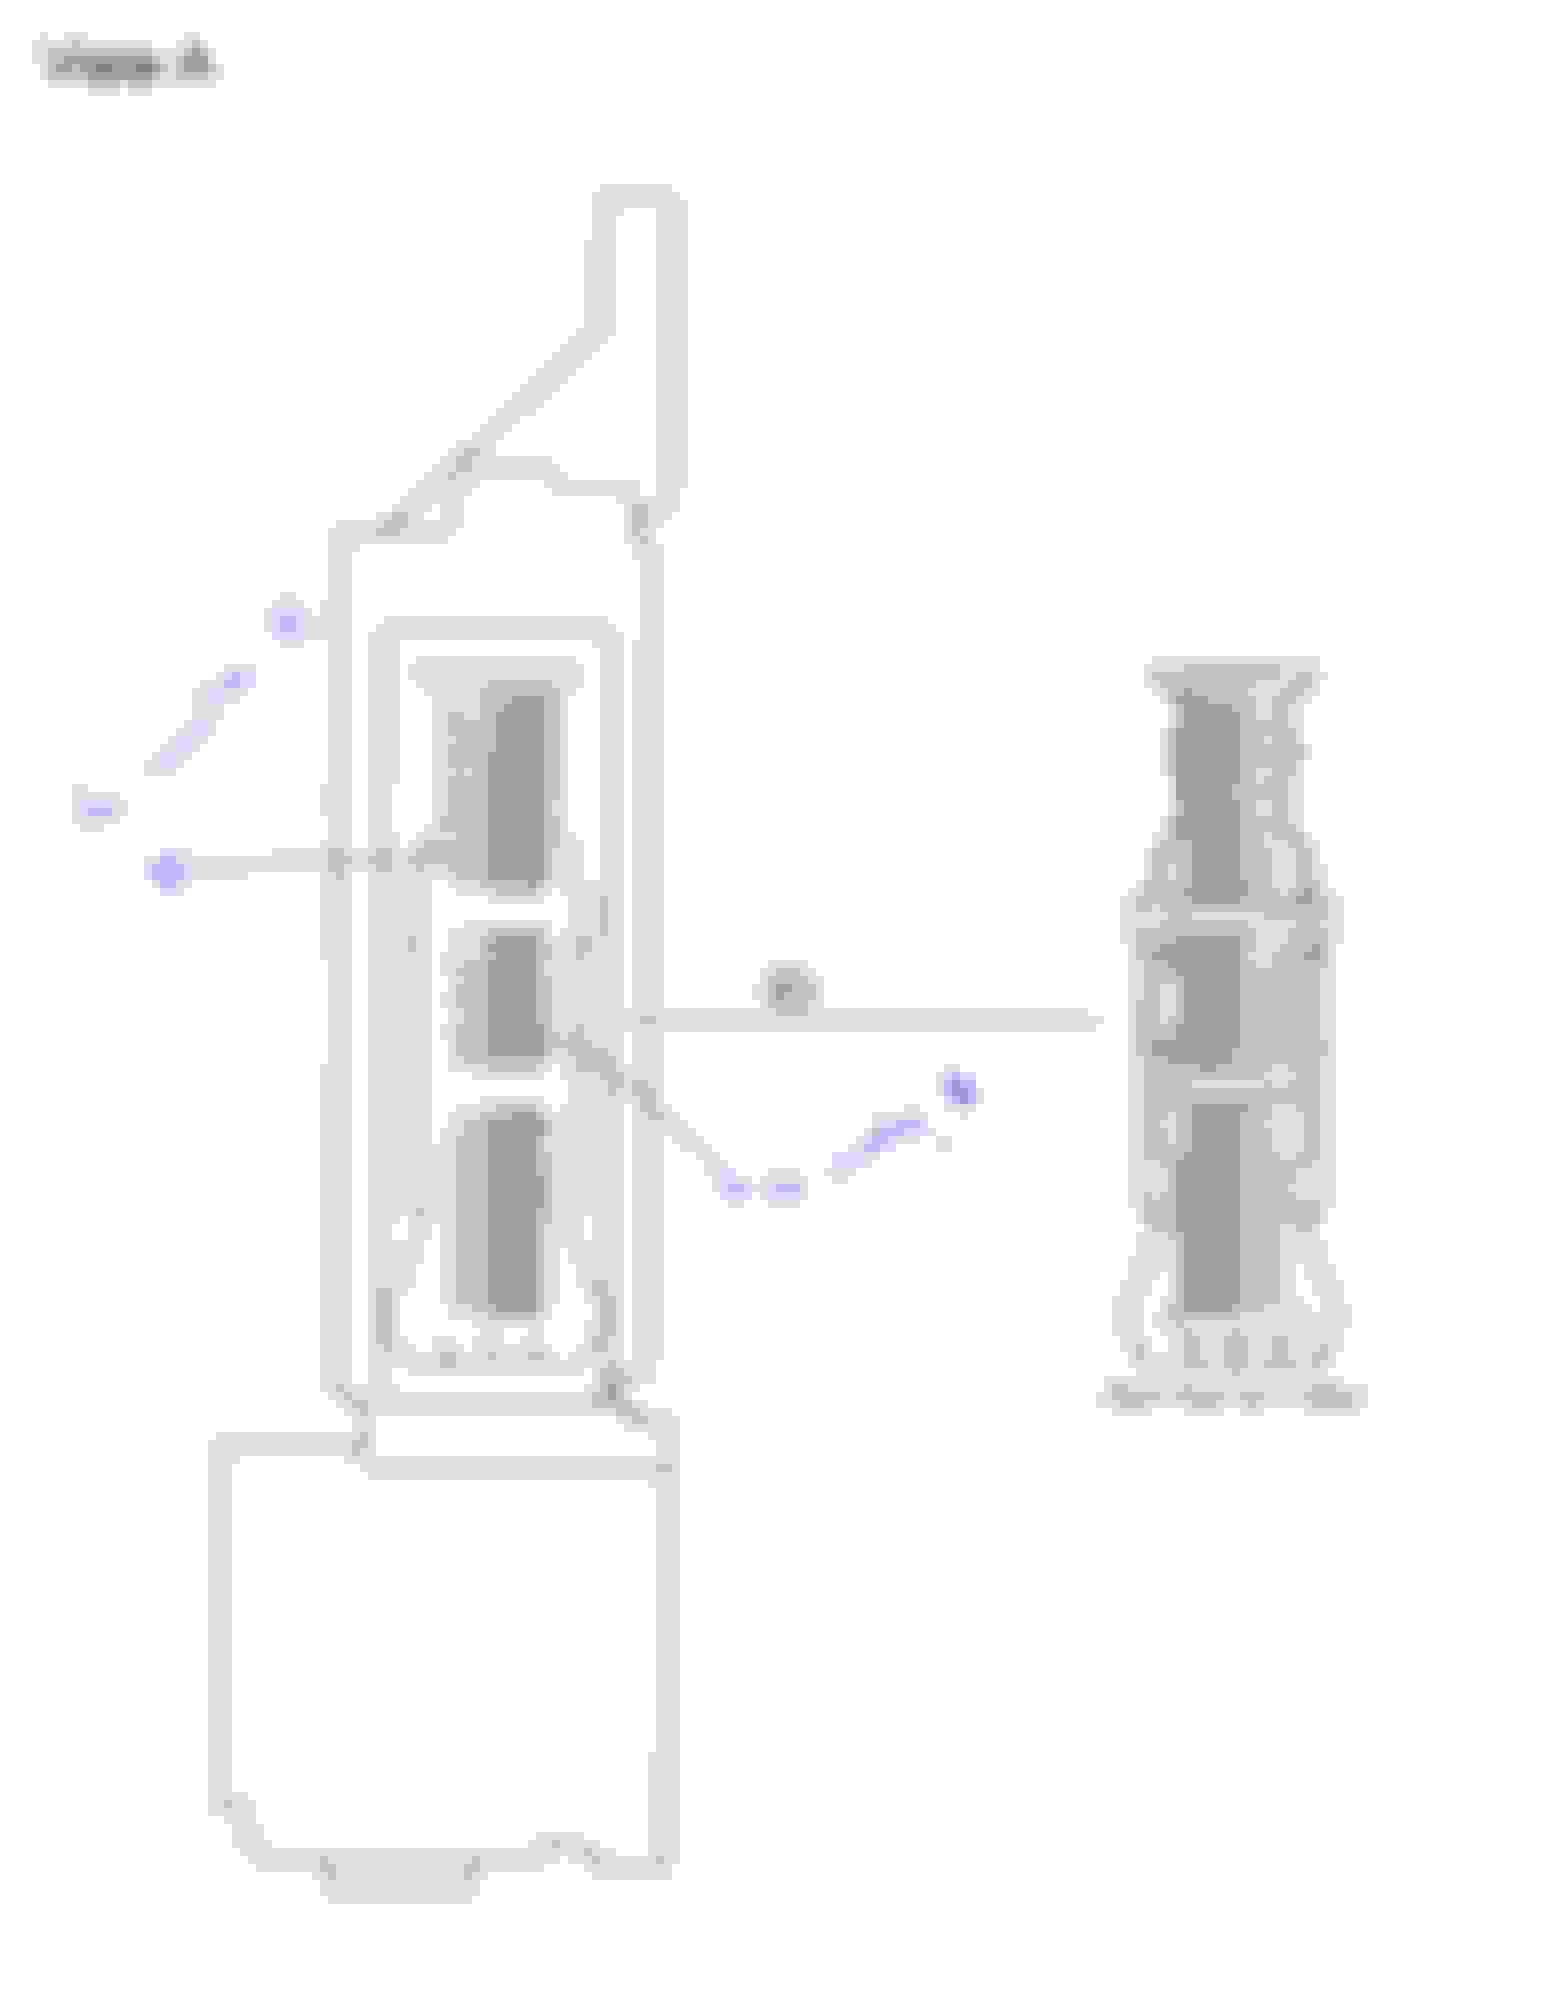
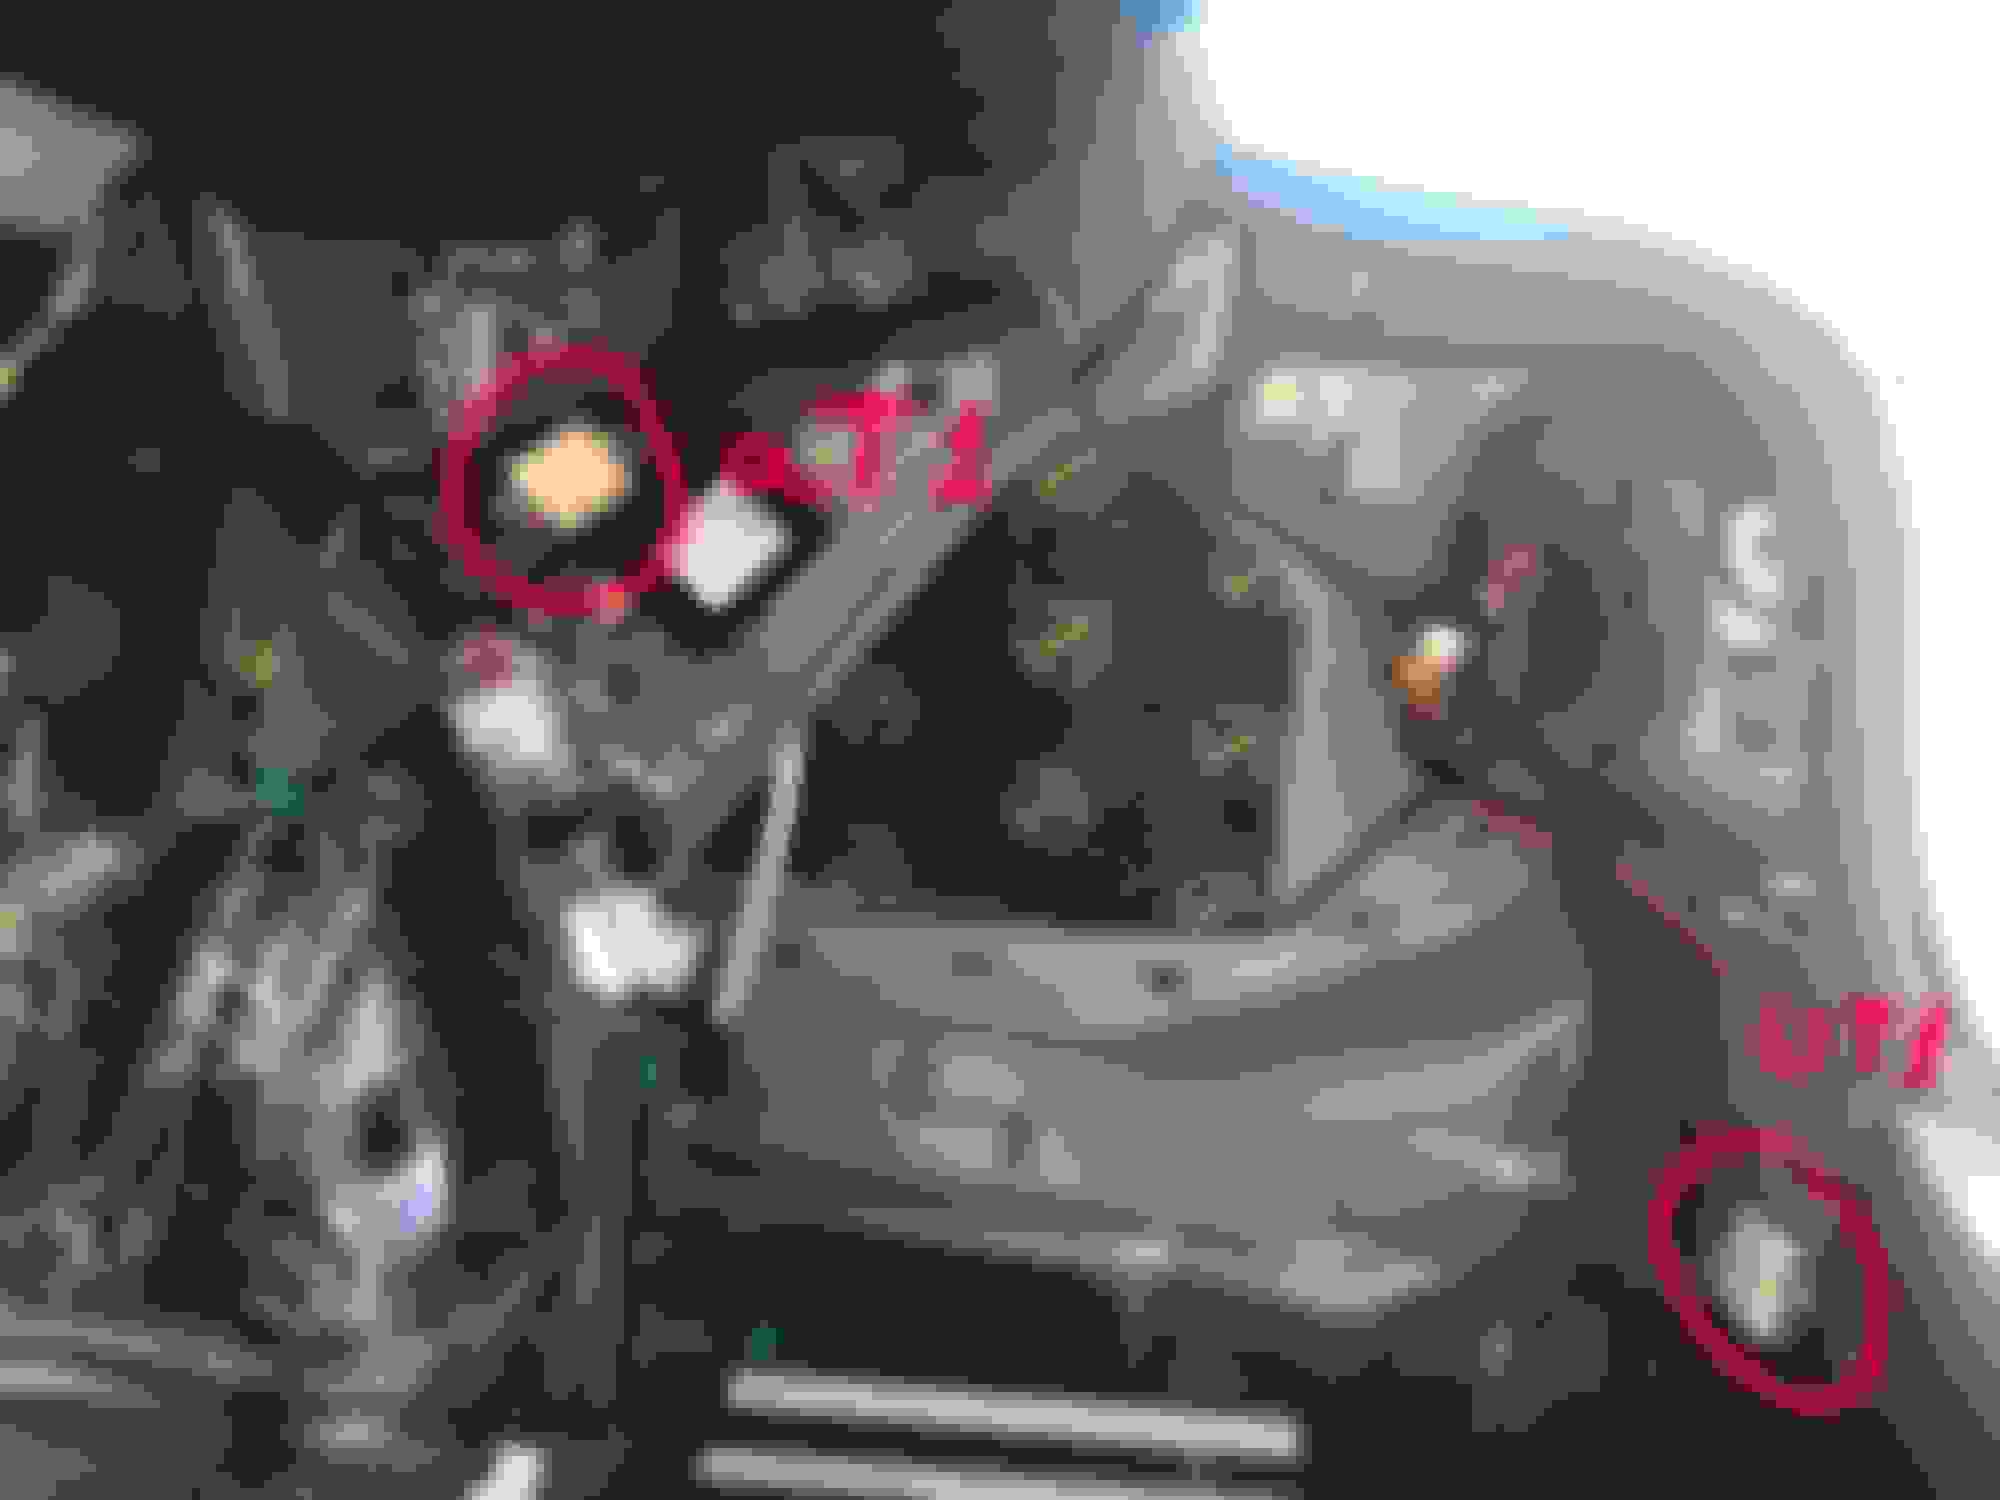
Here is location of aT1 and UT1 connectors in the luggage compartment:
7. I swapped the left trunk hinge, some folks ended up doing aftermarket brackets. I wanted everything to be as OEM as possible so I ended up swapping the old hinge with the new one. Honestly, this was the most difficult part. I had to remove back seat etc.
I’ve also routed the wire from the cabin to the trunk while swapping the hinge. If you are putting the aftermarket bracket, you don’t need to remove the seat. All you have to do is to remove left plastic seal and route the wire along with the existing LH harness.
Finally, replace door lock latch and install the door close switch.
After all connections are made, you have to close/open trunk lid manually before if starts operating automatically.
Now its time to fix the trunk light issue. As you might have noticed, it doesn’t work anymore. You have to cut the black wire going to the trunk light plug and tap it into pin 12 wire on aT1 plug.


 09-19-20, 08:42 AM


 Regardless, if it helps someone down the road, more than glad!