When you click on links to various merchants on this site and make a purchase, this can result in this site earning a commission. Affiliate programs and affiliations include, but are not limited to, the eBay Partner Network.
I am installing a rear power sunshade in my GSF. I have researched and purchase all the parts for a fraction of what it would cost. Anyone interested to see the end results, I will post my completed work. Please feel free to make respectable comments or criticism. I will post all the parts, still waiting on couple pieces.
seen that post a while ago and for my 16 GSF it won't work. I took apart my trunk and the taped off connector on the left side of the trunk is not there.
Okay guys, I did the rear sunshade install and it worked awesome. It is real simple. I will outline the steps below to include the pic of the parts required. I would recommend buying the parts from ebay as the dealers prices may not be cost effective.
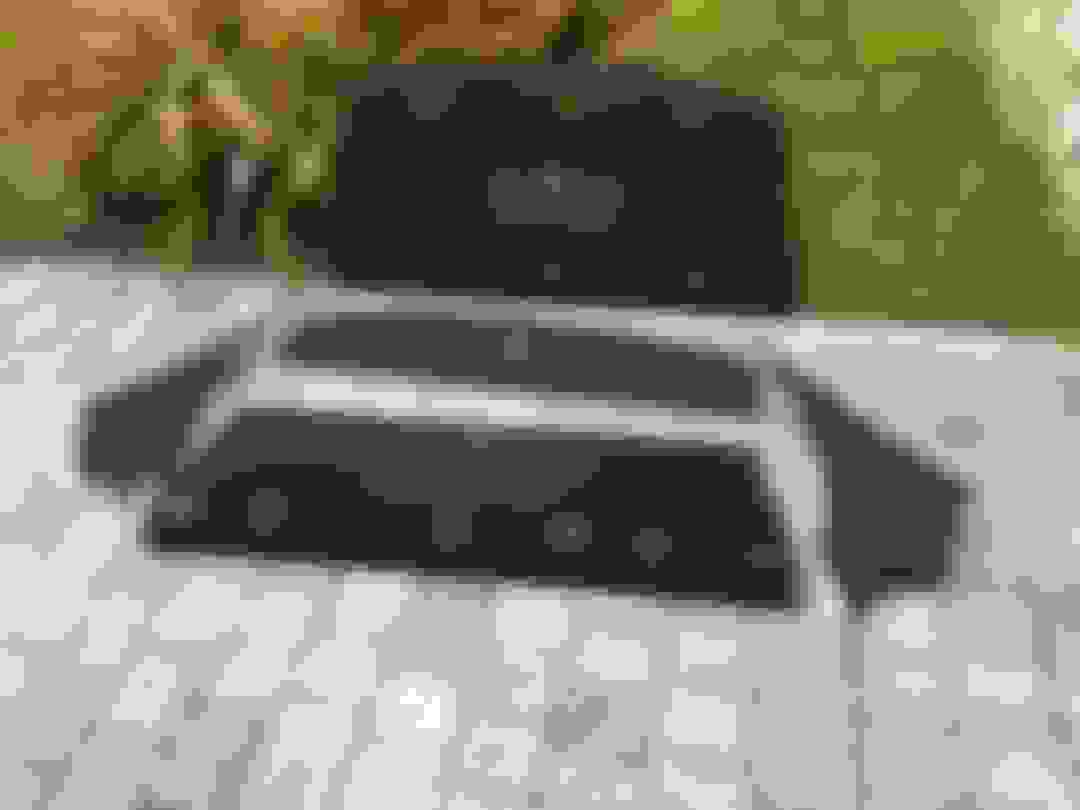
Sunshade have a total of 7 holes.
1 in the front (sunshade will be forward facing as seen in pic. SCREW 90119-A0255 Qty 1 for install
5 in the rear (Rear of sunshade have 5 holes, the 3 upper are for the plastic clips for the rear deck cover, just remove from original deck
There is 2 brackets far left and far right and that is where the screws will go 901-A0098 and the other screw will go by the round grommet hole by the motor.
. I will outline the steps below to include the pic of the parts required. I would recommend buying the parts from ebay as the dealers prices may not be cost effective. This is the right rear windscreen area, Remove the black round sticker to reveal the screw hole and guide hole. Same rear right as seen after removal of round sticker This is the center, right behind the woofer, same round sticker being remove This is the left rear, round sticker being remove
Installation Instructions:
1.) Remove lower seat by pulling mid section on each side, (center of each passenger left and right . The seat will come loose from the snap ins.
2.) You will need a 14mm for 3 seat belt harness bolts (left ,middle and right) and 12mm for 4 seat bolts (1far left, 2 center, 1 far right)
3.) Remove bolts in any order
4.) Remove the seat belt clip ins on the rear deck BEFORE removing seats. This will make it easy so you wont scratch anything and make the back rest portion of the seat removal flawless
5.) Remove the seat belt with a pin like screwdriver by the pushing the inner part of the seat guide and you will be able to remove the belt from the guides, UNPLUG MIDDLE SEAT BELT SENSOR PLUG upon then remove seat backrest.
6.) Remove door rubber by rear inner pillar and remove left and right pillar held by 3 clips, pull out then forward and then remove rear deck cover by lifting far left, middle and far right to release clips of rear deck and the pull forward. CAUTION and unplug brake light by the brake cover first then unplug light.
7.) Locate the holes in pics above and after install Power shade, Power Shade plug is located behind the woofer more over to the right. Attach power plug before bolting screws. Remember, 2 screws, far left, Far right (10mm, used 1/4 drive socket and careful not to hit rear windscreen (protect with hand a barrier) take time as the rotation of the socket is about 35 degrees swing.AGAIN..2 screws left and right and middle rear in grommet and 1 middle front.
8.) After shade is secured with 4 screws, install rear cover (shown with 2 speaker covers) Snap down the 3 clips on shade bracket.
9.) Put next shade (SHADE WITH SUBWOOFER COVER) on also 3 clips (left, middle and right) REMEMBER TO ROUTE SEAT BELTS BEFORE SNAPPING CLIPS DOWN. Seat belt guides for deck cover, left, right and center.
10.) Replace seat backrest ( up and down to hook/secure seat and secure seat with 4 (10 mm bolts), Don't bang bolts, just normal tight.
11.)REMEMBER to replace 3 (14mm bolts) for seat belts..left, middle and right.
12.) Pop out blank cover by Parking sensor switch (by the toogle menu joystick after sliding back the console cover) and put in Sunshade switch (NOT SHOWN IN PICS). The 2 side left and right pieces pop out by holding firmly and pull up gently and slide to the rear after the cover for the shift area pops up easily by just gently lifting up.
13.) The plug is sitting in the cover just remove and plug in shade switch
14.) Start car or when car is put in reverse, the shade will go down and placed in park, shade will goes up. Switch can be used to turn off shade operation.
NOTE:
The power sunshade can be from any 4th generatin GS, Fsport models. I DID THIS IN 2-3 Hours, no rush and I CAN ONLY GUARANTEE THE OPERATION FOR A GSF BEING THAT IS THE CAR I DID.
I WILL BE INSTALLING THE DOOR SHADES NEXT AND WILL COMMMENT ON THE STEPS UPON COMPLETION. THANKS ALL FOR LOOKING. COMMENTS AND QUESTIONS WELCOME.
seen that post a while ago and for my 16 GSF it won't work. I took apart my trunk and the taped off connector on the left side of the trunk is not there.
Someone with an f-sport that didn't have the taped off connector did the power trunk retrofit. He basically had to wire up the missing connector and run some other wires. F-sport and GS F both are missing the same wires/connectors: https://www.clublexus.com/forums/gs-...l#post10917918
Happy to see you do this as I have been trying to get this project rolling. I want to do this as well as the auto trunk - I have bought a motor already. thank you for putting this up.
82176-30010 $32.88
This is for the rear sunshade switch in the rear seat power console. The sunshade switch by the parking sensor in the front should have the pre wire on all GSF. Just buy the switch.
 10-19-20, 12:35 PM