Installing chrome door handles?? please help

 01-08-10, 04:28 AM
#108


Ok got the handles and installed them yesterday. Took me all friggin afternoon/evening. I might not cover some of what has already been covered earlier in this thread.
A few notes: Member beez43 claims he had problems because the parts were different. The fronts seem to be for the most part identical but the rears are definetley different. With that said, all 4 handles worked just fine for me without any bending/modification. I have the toyota japan chrome handles from l-tunedparts if that matters.
Before you get started make sure you have the Torx size 30 screw bit. I found the single bit at ace hardware for 3 bucks
So here we go.
For the fronts:
-Remove the screws at the bottom and around the side of the door pannel. I think theres 8 or 9 screws. (several along the bottom, one by the edge of the door by the latch, one in the air tube where the dash meets the door, one at the top of the large door pocket, and the hidden one by the chrome inside door handle) To access this last screw you will need to pop out the plastic piece behind the handle with a flat head screwdriver.
-then proceed to pull along the bottom of the panel, poping out the clips that hold it to the door metal.
-Once the panel seems to be seperated at the bottom and along the sides (make sure you got all the screws) you can lift up the whole panel which is clipped on to the edge of the window. You have to use some force to get it to pop off.
-At this point the panel will be still attached to the door by connectors for the puddle light at the bottom, two connectors by the window controls, and also by the two cables that the inside door handle operates. For this step i suggest getting a stool or someone to hold the door panel up while you unclip these various things.
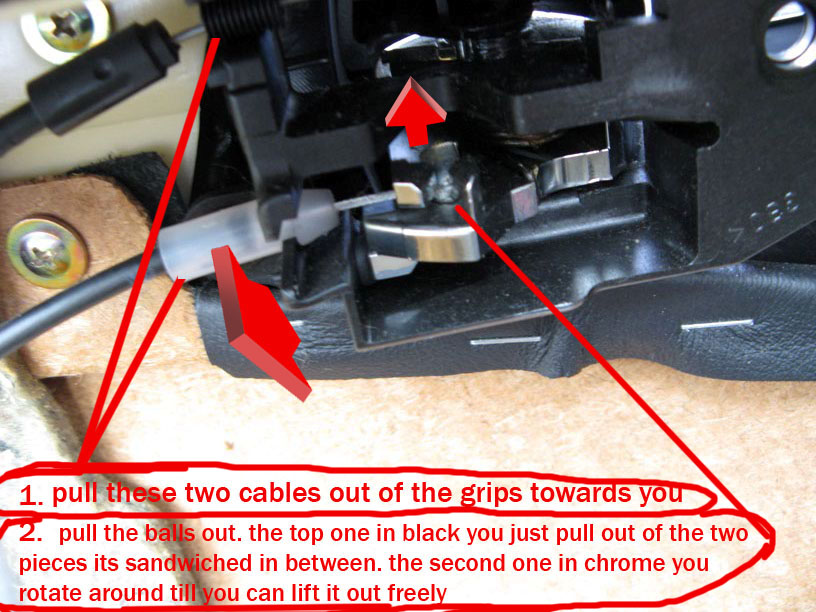
-Unclip the connectors and for the two cables, (one has a silver end and one a black end) look at the pic for directions.

-Now you have the door panel off and its time to get at the bolts holding on the door handle from the inside.

-There are i believe three 10mm bolts holding on the handle to the door and one holding the lock cylinder to the handle
-You will need to cut through the plastic piece to gain access to at least one of the bolts.

-The other two are behind the circular black plastic stickers by the edge of the door by the latch. Peel these off and get at the bolts behind there.

-Once you have the three bolts unscrewed the handle will still be attached to the door by a long rod or bar clipped in to the handle and by the lock cylinder mechanism. At this point you should be able to pull the handle away from the door a little bit with a little jiggling as in the pic.

 01-08-10, 04:34 AM
#109
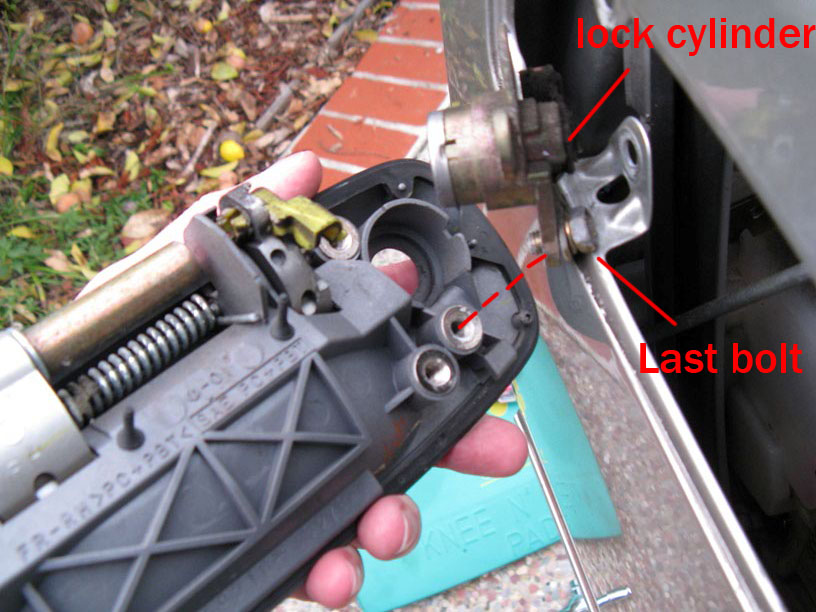
-I suppose you could also detach the rod from the plastic handle part and unscrew the last bolt holding on the lock cylinder with your ratchet from the inside of the door through the holes but this did not work for me, my ratchet was too short
-With handle pulled out away from door pop out metal rod and unscrew last bolt, see pic for visual.
-Go in reverse order to put new handle back


For the rears:
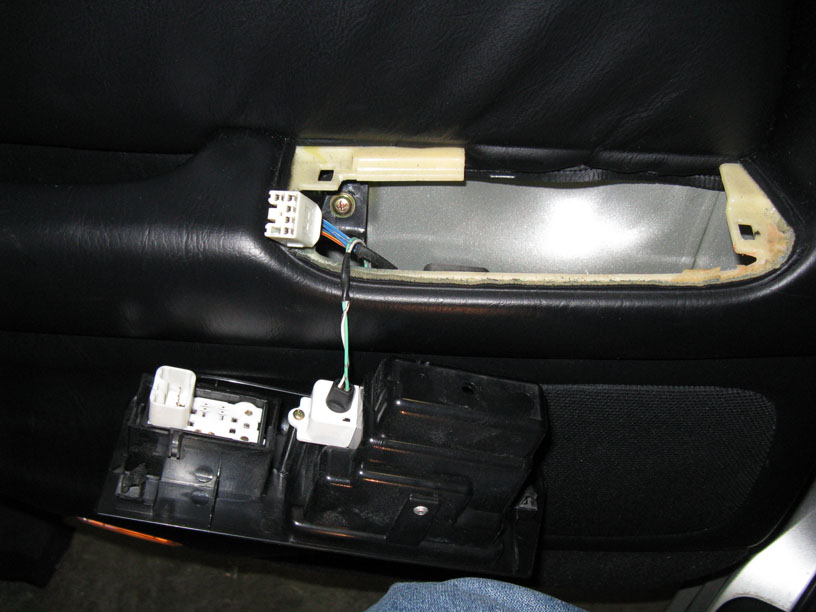
-Unscrew the screws (there are less than in the fronts), there is one screw hiding behind the inside door handle like the fronts, and also a hidden screw underneath the window controls. The plastic control panel just pops out, held in by clips at either end if you lift it up. There is one connector and one light bulb. Disconnect the connector and pull the light bulb straight out.
-Disconnect the two cables, and all connectors just as you did with the fronts
-Now you should have the panel off the door and be ready to start the fun part
-There are only two bolts holding on the back door handles.
-The first one you will see if you slice through the plastic, nab this easy one first.
-The second one unfortunatley is located behind the door latch mechanism.
-You access this one through the child saftey lock hole. Just pull off the rubber surround to get things started

-To get the door latch out of the way of the saftey lock hole start by using your torx t-30 screw driver to unscrew three screws by the latch and one t-30 screw behind the plastic.
-Once you unscrew these four screws the whole latch mechanism should be movable with your hand if you reach in there

-At this point If you just try to yank the mechanism out towards you, there is a protruding metal part (its like a flat piece of yellowish metal) that will catch on the inside of the plastic door handle and you wont be able to move it out of the way to access the last bolt.
-Reach your hand in there and feel around. stick your hand all the way back there to get familiar with the problem. At the very far side of the latch mechanism You should feel the metal part of the latch mechanism making contact with the backside of the door handle. If you put your head right up against the door you should be able to see it too.
-The pic here with the red arrow unfortunatley doesnt show the metal part i'm talking about because its way in the back
-So what you need to do is push down on this part while your pulling and get it to go under and clear where its making contact with the backside of the stock door handle. I cant remember if i was lifting up the door handle from the outside to help it clear or not but you can try that too.
The first side it did was kinda just miraculous and came out in 5 mins and i wasnt really sure what i did, the other one took about 25 minutes of figuring out exactly what needed to be done.
-Once you get the latch mechanism to clear the door handle it will drop down lifeless and defeated and you can gain access to the glorious final bolt


Hope this has helped
Last edited by ProfesrLEX; 01-08-10 at 04:47 AM.
01-08-10, 07:34 AM
#110
great write up!! i want to mention that my parts were from toyota as well and the rears ARE different. It is missing that little plastic piece and some older cars may have their little parts worn out a little. That is why i bent the thing that is pushed down by the plastic piece on the stock handle upwards so it creates more contact and the latch moves when the door handle is pulled.. I wonder if this may be a bit confusing or not but yeah.. I think it is because someone must have been tugging at the rear handles a bit hard and thats why it needs to be a little modified. Its nothing major and it is so much easier if i had the pics of it... sorry I am not much of any help but i hope someone gets the idea.. 
 01-09-10, 11:36 PM
#113
Lexus Test Driver
iTrader: (7)
Join Date: Mar 2009
Location: Southern CA, 714
Posts: 1,510
Likes: 0
Received 0 Likes
on
0 Posts
Hopefully i have time tomorrow to put them on. NFL wildcard weekend is here. Can't miss that. BBQ & football. That's a big distraction.
07-12-13, 01:54 PM
#115
Im updating this thread to clarify some of the mystery behind the rear door handle and related issues.
Namely getting the actuator unit out of the car, and also bending the metal contact on the actuator that touches the door handle.
This write up is for people that are just installing their chromies for the first time and are concerned about the difficulty of doing the rears, or members that have installed chrome door handles in the rear doors that do not open properly.
Thanks to GSoup, Beez43, and [ant] for originally contributing to the techniques discussed earlier in this thread.
So yesterday, I replaced the actuator in my rear door and decided that while I have the damn thing out I should try as other users suggested to bend the metal contact to get the rear door handle to open like stock. I decided to take some pictures for this thread.

1.
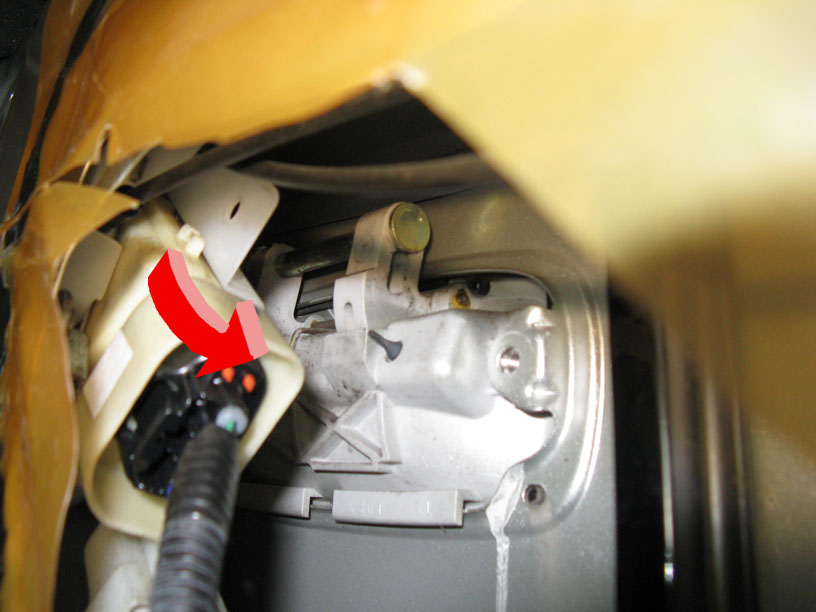
When you open up your door, and stick your head in there this is the situation. You can see the actuator housing attached to the inside of the door and where it should be making contact with the door handle attached to the outside of the door. When you pull on the door handle from the outside, the rod (outlined in blue) presses down on the movable lever which im calling the "metal contact" (outlined in red) and this is how the door opens.

2.
This is a close up of the metal contact that protrudes from actuator and how the rod from the chrome door handle is elevated slightly above it (this gap is what causes the doors to fail to open correctly) Later we will pimp slap this piece of metal into submission.
So as for the first issue that has given myself and others a great deal of distress, we need to get the actuator out of door. Obviously unplug the two plugs and unscrew the four screws and pull out the child safety lock rubber grommet so that the whole unit is loose and your able to wiggle it around with your hand. The problem is that the metal contact will be caught against the door handle and also the child safety switch will be caught in the circular hole in the door it protrudes from.
You will need to push the metal contact down below and out of the way of the door handle so that you can wiggle it downwards and to a place where you can push the child safety switch through its hole. Some users have suggesting reaching in there with your hand. Since its a tight fit the best way is to simply get a lengthy screwdriver or something similar, place it on top of the metal contact (where the arrow is pointing in my picture) and push down. Like I said earlier, the metal contact is a lever and apparently it needs to be pushed to its down position to be able to clear the door handle. While pressing down this you need to have your other hand holding the whole actuator unit and wiggling it downwards until it clears the door handle. If the child safety switch is still popping out of it's hole push it through.

3.
Now the actuator unit is freed and pulled out of the door. Here we see through the child safety lock hole. A clear shot of the door handle rod which when engaged, presses down on the metal contact. Also you can see the second screw on the door you will need to access if your replacing the handles.

4.
Another shot of the back of the handle with the actuator out of the way

5.
Mr actuator out of his hiding spot

6.
Another clear shot of the actuator and its metal contact lever. This is the fun part
As suggested earlier in this thread, we will need to bend that metal contact from its current 45 degree angle to a 90 degree angle. Doing this will ensure that the door handle's rod not float above the metal contact but instead, will rest on it when reassembled in its position. Again, this will eliminate the unwanted gap seen in picture 2

7.
The metal is thick but relatively pliable. Get a wrench to hold one part and another to bend the angled part to 90 degrees. I was a little concerned at first about doing this, but after doing both rear actuators, it seems pretty fool proof.

8.
Showing before and after here. The metal contact is now effectively pimp slapped into its new resting position.
Re install your actuator. And before you put the door trim back on, poke your head in there again. You can pull up on the door handle to observe that there will no longer be a gap between the handle's rod and the actuator. The handle rod and actuator have much increased contact. This means you wont have to yank hard on the handles every time you want to open the back door.
If you are installing chrome door handles for the first time or have them already and have not bent the metal contact, trust me it is worth the time. My rear handles were funky for three years and now they work flawlessly like they should.

Namely getting the actuator unit out of the car, and also bending the metal contact on the actuator that touches the door handle.
This write up is for people that are just installing their chromies for the first time and are concerned about the difficulty of doing the rears, or members that have installed chrome door handles in the rear doors that do not open properly.
Thanks to GSoup, Beez43, and [ant] for originally contributing to the techniques discussed earlier in this thread.
So yesterday, I replaced the actuator in my rear door and decided that while I have the damn thing out I should try as other users suggested to bend the metal contact to get the rear door handle to open like stock. I decided to take some pictures for this thread.
1.
When you open up your door, and stick your head in there this is the situation. You can see the actuator housing attached to the inside of the door and where it should be making contact with the door handle attached to the outside of the door. When you pull on the door handle from the outside, the rod (outlined in blue) presses down on the movable lever which im calling the "metal contact" (outlined in red) and this is how the door opens.
2.
This is a close up of the metal contact that protrudes from actuator and how the rod from the chrome door handle is elevated slightly above it (this gap is what causes the doors to fail to open correctly) Later we will pimp slap this piece of metal into submission.
So as for the first issue that has given myself and others a great deal of distress, we need to get the actuator out of door. Obviously unplug the two plugs and unscrew the four screws and pull out the child safety lock rubber grommet so that the whole unit is loose and your able to wiggle it around with your hand. The problem is that the metal contact will be caught against the door handle and also the child safety switch will be caught in the circular hole in the door it protrudes from.
You will need to push the metal contact down below and out of the way of the door handle so that you can wiggle it downwards and to a place where you can push the child safety switch through its hole. Some users have suggesting reaching in there with your hand. Since its a tight fit the best way is to simply get a lengthy screwdriver or something similar, place it on top of the metal contact (where the arrow is pointing in my picture) and push down. Like I said earlier, the metal contact is a lever and apparently it needs to be pushed to its down position to be able to clear the door handle. While pressing down this you need to have your other hand holding the whole actuator unit and wiggling it downwards until it clears the door handle. If the child safety switch is still popping out of it's hole push it through.
3.
Now the actuator unit is freed and pulled out of the door. Here we see through the child safety lock hole. A clear shot of the door handle rod which when engaged, presses down on the metal contact. Also you can see the second screw on the door you will need to access if your replacing the handles.
4.
Another shot of the back of the handle with the actuator out of the way
5.
Mr actuator out of his hiding spot
6.
Another clear shot of the actuator and its metal contact lever. This is the fun part
As suggested earlier in this thread, we will need to bend that metal contact from its current 45 degree angle to a 90 degree angle. Doing this will ensure that the door handle's rod not float above the metal contact but instead, will rest on it when reassembled in its position. Again, this will eliminate the unwanted gap seen in picture 2
7.
The metal is thick but relatively pliable. Get a wrench to hold one part and another to bend the angled part to 90 degrees. I was a little concerned at first about doing this, but after doing both rear actuators, it seems pretty fool proof.
8.
Showing before and after here. The metal contact is now effectively pimp slapped into its new resting position.
Re install your actuator. And before you put the door trim back on, poke your head in there again. You can pull up on the door handle to observe that there will no longer be a gap between the handle's rod and the actuator. The handle rod and actuator have much increased contact. This means you wont have to yank hard on the handles every time you want to open the back door.
If you are installing chrome door handles for the first time or have them already and have not bent the metal contact, trust me it is worth the time. My rear handles were funky for three years and now they work flawlessly like they should.
07-12-13, 03:18 PM
#116

Fml I wrapped more tape around the handle pole that activates the latch I never tought hey bend it, but tat geaneous now my tape is starting to mush and starting to have to yank the door handle to open the door nicely done
07-15-13, 10:50 PM
#118
the problem is the metal round bar on the handle isn't long enough to touch down on the actuator metal handle. as in the picture, bent it to 90 degree. but then i noticed the lip was now too long, i ended up dremelling the length down just a tad so that when the actuator arches down, it doesn't run the risk of wedging itself to the inside door metal skin.
also noted that there was a plastic tab just around the door lock actuator for which the inside door panel can screw into to stay in place. i removed it off of the inside door skin just to get me a little more clearance to put the door lock actuator back in place.
also noted that there was a plastic tab just around the door lock actuator for which the inside door panel can screw into to stay in place. i removed it off of the inside door skin just to get me a little more clearance to put the door lock actuator back in place.
06-25-14, 11:40 AM
#120
I know I'm kinda bumping an old thread but this was SUPER useful. Thanks ProfesrLEX for posting up the pics. Everything was pretty straight forward except the rear door actuators. Bent the level just like the photo and worked like a charm first shot on both sides.