Notes from a Daizen bushing install
 10-05-10, 04:17 PM
#1
Driver School Candidate
Thread Starter

Join Date: Sep 2010
Location: California
Posts: 7
Likes: 0
Received 0 Likes
on
0 Posts
Here are pics and notes from my install of the Daizen front bushing kit. I also swapped in new factory lower ball-joints and the Daizen steering bushing kit which are both covered well by others.
I don't care to do a step-by-step. Anyone who undertakes this install should already know basic wrenching. So this just covers the non-obvious.
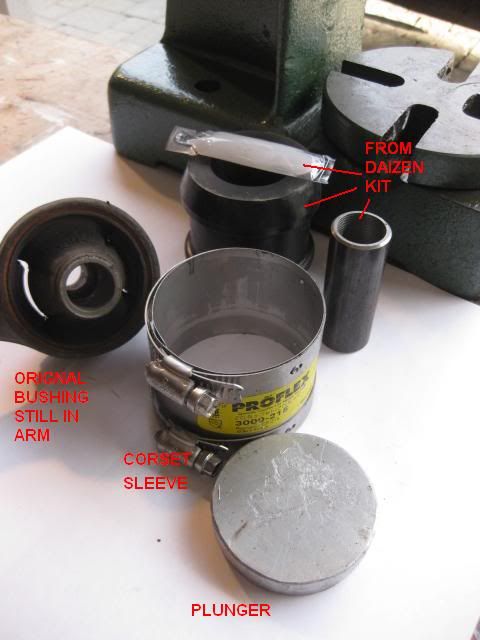
First, the Daizen instructions mentioned having to press out the original bushings using a hydraulic press. I brought in an arbor press, fooled around for a day looking for die, didnt find any thing of the exact size, and couldn't get the press to do anything. A workable Plan B was to slice the bushing bushing sleeves according to the pics below and tap them out. It turned out the the sleeves of the original bushings were lightly rusted into the arms making extraction by my press impossible.
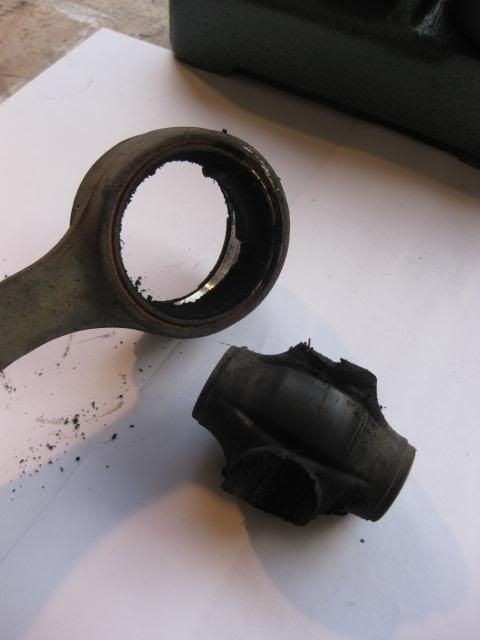
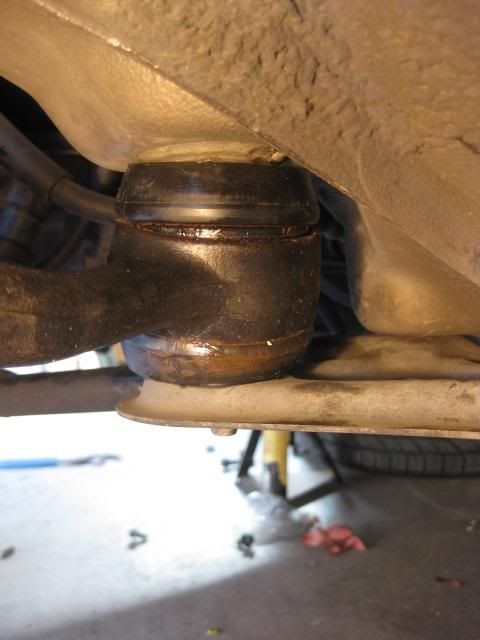
A final difficulty was the install of the front suspension rear bushing. While the other three locations per side are implemented as a split pair, the rear bushing is a single piece that must be pressed into place.
So using this most complicated bushing as an example, here is how to remove original factory bushings and install the Daizen replacement.
*********
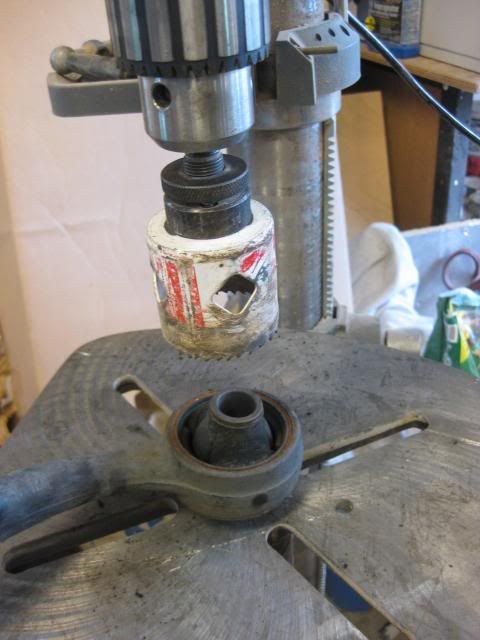
Drill out the bushing core using a wood coring bit.
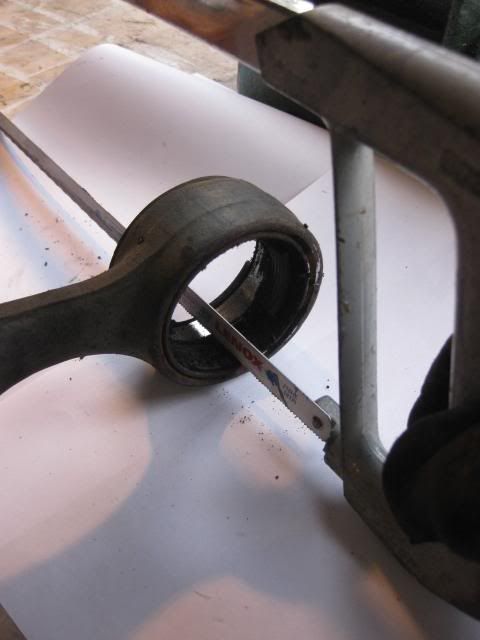
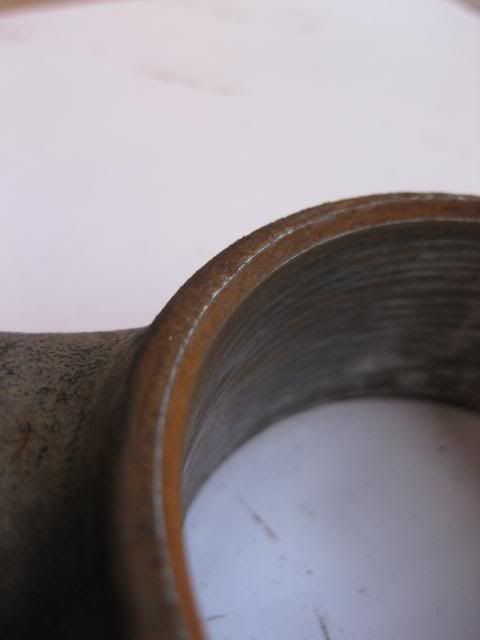
Use a hack saw to make parallel SHALLOW cuts in the bushing sleeve, CAREFUL NOT TO CUT THROUGH INTO THE CONTROL ARM.
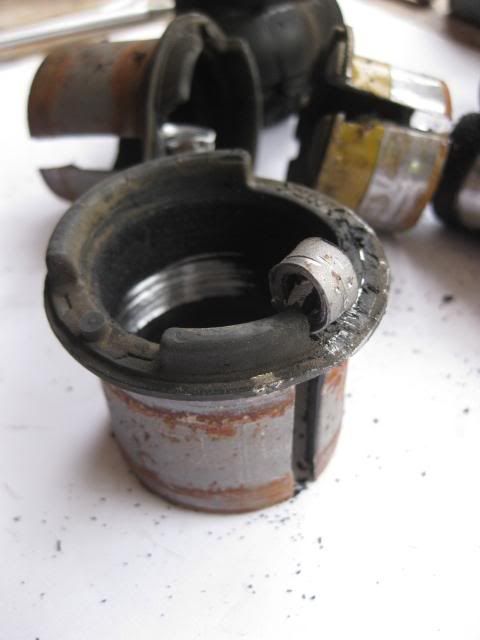
Pry the strip out with hammer and screwdriver. The sleeve is then easily tapped out of the arm.
Three of the four locations, Daizen employees split bushings. On the upper mount, note that a split pair consists of a short bushing on the inside of the wish bone coupled with a slightly longer one on the outside.

For the rear bushing, first observe that the arm is chamfered on one side, straight cut on the other. Guess in which direction you will press in the Daizen replacement.
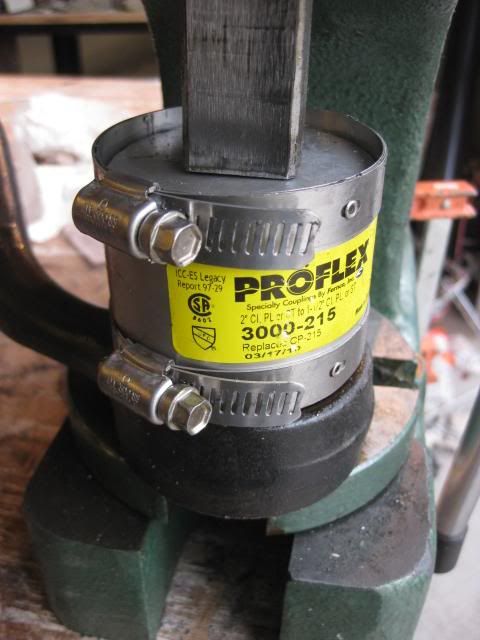
To press in the rear Daizen bushing I first wrapped the bushing in a metal corset that looks suspiciously like a sleeve off of an sewer pipe coupling found at Home Depot. This keeps the bushing from expanding as the arbor press bears down on the 2-1/4 inch diameter aluminum plunger. My first mistake was to grease up the bushing prior to pressing it in. This caused the bushing to squirm around uncontrollably as the metal corset was tightened. Its best to leave it dry.
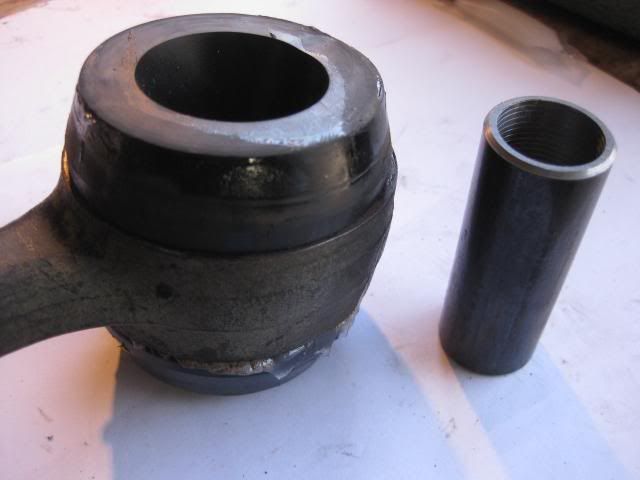
Rear installed. Because the urethane is less compliance than the original rubber, re-bolting the arm is a challenge.
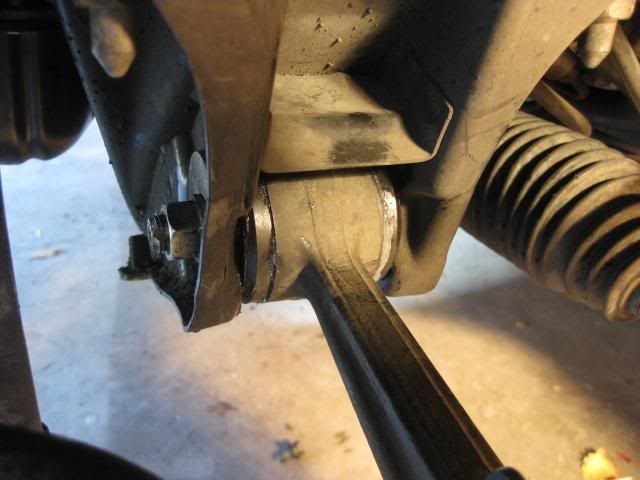
Lower installed. Nothing noteworthy here.
I don't care to do a step-by-step. Anyone who undertakes this install should already know basic wrenching. So this just covers the non-obvious.
First, the Daizen instructions mentioned having to press out the original bushings using a hydraulic press. I brought in an arbor press, fooled around for a day looking for die, didnt find any thing of the exact size, and couldn't get the press to do anything. A workable Plan B was to slice the bushing bushing sleeves according to the pics below and tap them out. It turned out the the sleeves of the original bushings were lightly rusted into the arms making extraction by my press impossible.
A final difficulty was the install of the front suspension rear bushing. While the other three locations per side are implemented as a split pair, the rear bushing is a single piece that must be pressed into place.
So using this most complicated bushing as an example, here is how to remove original factory bushings and install the Daizen replacement.
*********
Drill out the bushing core using a wood coring bit.
Use a hack saw to make parallel SHALLOW cuts in the bushing sleeve, CAREFUL NOT TO CUT THROUGH INTO THE CONTROL ARM.
Pry the strip out with hammer and screwdriver. The sleeve is then easily tapped out of the arm.
Three of the four locations, Daizen employees split bushings. On the upper mount, note that a split pair consists of a short bushing on the inside of the wish bone coupled with a slightly longer one on the outside.
For the rear bushing, first observe that the arm is chamfered on one side, straight cut on the other. Guess in which direction you will press in the Daizen replacement.
To press in the rear Daizen bushing I first wrapped the bushing in a metal corset that looks suspiciously like a sleeve off of an sewer pipe coupling found at Home Depot. This keeps the bushing from expanding as the arbor press bears down on the 2-1/4 inch diameter aluminum plunger. My first mistake was to grease up the bushing prior to pressing it in. This caused the bushing to squirm around uncontrollably as the metal corset was tightened. Its best to leave it dry.
Rear installed. Because the urethane is less compliance than the original rubber, re-bolting the arm is a challenge.
Lower installed. Nothing noteworthy here.
 10-05-10, 05:46 PM
#2
Pole Position

Join Date: May 2009
Location: CA Bay Area
Posts: 218
Likes: 0
Received 0 Likes
on
0 Posts
Great notes and pictures! I will be doing it this weekend!
Did you remove sleeves on upper control arms and lower control arms (#1) by using the same method (cutting them across with a hack saw)? How long did it take you?
Did you remove sleeves on upper control arms and lower control arms (#1) by using the same method (cutting them across with a hack saw)? How long did it take you?
10-05-10, 10:43 PM
#4

welcome to the club queen although we do have a DIY post already that you coulda added this into
https://www.clublexus.com/forums/sus...s-of-pics.html
or this one by the same member
https://www.clublexus.com/forums/gs-...s-of-pics.html
https://www.clublexus.com/forums/sus...s-of-pics.html
or this one by the same member
https://www.clublexus.com/forums/gs-...s-of-pics.html
10-06-10, 05:06 AM
#6
Driver School Candidate
Thread Starter
Join Date: Sep 2010
Location: California
Posts: 7
Likes: 0
Received 0 Likes
on
0 Posts
Thanks, now I even more glad I didn't do the step-by-step. That would have been embarassing. My limited contribution was intended to document the alternative to the 12-ton press shown in those other threads (which look like duplicate content btw). You'll still need a 1-ton bench-top arbor press or maybe a large vice, but these won't soak up floor space in a tight garage.
Others...yes same strip removal on upper & lower. Afterward the ride seemed nervous, steering return is diminished and I'm detecting tire squeal, so today its off for computerized alignment. I'll report back.
Great forum.
Others...yes same strip removal on upper & lower. Afterward the ride seemed nervous, steering return is diminished and I'm detecting tire squeal, so today its off for computerized alignment. I'll report back.
Great forum.
10-06-10, 07:45 AM
#7
Thanks, now I even more glad I didn't do the step-by-step. That would have been embarassing. My limited contribution was intended to document the alternative to the 12-ton press shown in those other threads (which look like duplicate content btw). You'll still need a 1-ton bench-top arbor press or maybe a large vice, but these won't soak up floor space in a tight garage.
Others...yes same strip removal on upper & lower. Afterward the ride seemed nervous, steering return is diminished and I'm detecting tire squeal, so today its off for computerized alignment. I'll report back.
Great forum.
Others...yes same strip removal on upper & lower. Afterward the ride seemed nervous, steering return is diminished and I'm detecting tire squeal, so today its off for computerized alignment. I'll report back.
Great forum.
 , someone just had detailed it before you
 i still have my bushings sitting in my room to do....been there for months
Trending Topics
 10-06-10, 03:25 PM
#9
Driver School Candidate
Thread Starter
Join Date: Sep 2010
Location: California
Posts: 7
Likes: 0
Received 0 Likes
on
0 Posts
Back from alignment. Toe needed correction, possibly due to the new lower ball joint.
Before: Very nervous, lots of kickback, wandering, road noise, tires chirped over paint stripes. I even rejected a freeway on ramp.
After: None of the above, plus steering is firm, no play on center, quality feel.
Me: Pleased. Ready for on ramps.
You: Plan on professional alignment after suspension work.
***** Toe *****
Target: -0.03 -> 0.18
Before: -1.35, -1.57
After: 0.06, 0.10
**** Camber *****
Target: -0.8 -> 0.2
Before: -0.3, -0.7
After: -0.4, -0.8
***** Caster *****
Target: 7.1 -> 8.1
Before: 6.7, 7.0
After: 6.7, 7.0
10-07-10, 11:10 AM
#10
Instructor

I also have new Daizen bushing kit, along with a set of BC coilovers sitting on the bench.
I look forward to putting on a new suspension, your feedback helps me understand the scope of the work.
Thanks for the feedback QueensRide.
I look forward to putting on a new suspension, your feedback helps me understand the scope of the work.
Thanks for the feedback QueensRide.
10-07-10, 11:38 AM
#11
I have a press. I found a good way to get the sleeves out is to use an air saw to cut the line in the sleeve. Then use a normal chisel or flathead screwdriver to pull the sleeve outwards where the cut is. After that, use the press to drive down the chisel down into the groove you pulled out the sleeve falls right out. If it doesn't pop out with the press, use use an air chisel and the sleeve will just fall out.
Granted, it sounds easy with me just describing it here but it's still a HUUUGE pain in the butt.
Granted, it sounds easy with me just describing it here but it's still a HUUUGE pain in the butt.
10-10-10, 07:00 PM
#12

I appreciate the write-up QueensRide4. I used your hole-saw method on my upper and lower control arms and it worked like a charm. The only thing I added to your method was to add small amounts of water to the bushing as I drilled through it. Dry-drilling was creating a lot of heat and melting/smoking rubber. In addition the melted rubber was sticking to the hole saw and making everything a little bit harder. The water created some steam but the result was a clean hole with nothing sticking to the hole saw. I probably had to stop and add some additional water about 6 times as I drilled through the LCA and UCA bushings. Anyway, the hole-saw made quick work of those bushings.
10-12-10, 07:59 PM
#13
As I assembled the bushings into the upper and lower control arms I noticed that there is a space that remains between each pair of bushings. This gap remains after each pair of bushings are fully inserted. The Daizen instructions don't mention this space but I believe that it is best used as a substantial reservoir for grease and shouldn't be overlooked or left with just a wipe of grease. I recommend the following procedure:
Insert only one side of each bushing into place and then carefully squeeze almost the entire tube of grease onto the face of the inserted bushing. Now insert the other bushing half and any excess grease will simply squeeze out of the cavity. This excess can now be wiped around the inside hole of the bushing, the sleeve and ends.
With the cavity packed full of grease it should be a long time until they run dry and squeak.
10-12-10, 08:08 PM
#14
Pole Position
Join Date: May 2009
Location: CA Bay Area
Posts: 218
Likes: 0
Received 0 Likes
on
0 Posts
I just did this over the weekend and I have to say that it was GIANTIC pain in the a.. to remove inner sleeves if you don't have proper tools. It took me a while but it was well worth it.
P.S. I also recommend you do your front motor mounts at the same time (if they need replacing) as you have clear access to crossmember, which you can now easily drop since you have lower control arm out of way. It took me additional hour maybe two to remove and install new mounts and to put crossmember/steering rack back in place.
P.S. I also recommend you do your front motor mounts at the same time (if they need replacing) as you have clear access to crossmember, which you can now easily drop since you have lower control arm out of way. It took me additional hour maybe two to remove and install new mounts and to put crossmember/steering rack back in place.