When you click on links to various merchants on this site and make a purchase, this can result in this site earning a commission. Affiliate programs and affiliations include, but are not limited to, the eBay Partner Network.
I kinda figured that because if my key is a foot or so from the back door I can't use the lock button on the gate. I have to stand back from the door 2-3 feet to lock it.
GXOR member selling his 3rd row after installing this Goosegear plate system. Another option if you don't use 3rd row and want to reclaim space. They don't have a 460 pic on their website.
Hey thanks for sharing my video here... I remember this thread from way back when I was looking into how to do this myself!
Originally Posted by tigmd99
Those who have taken out the 3rd row, do you hear increased road noise (esp the 2nd row passengers)??
When I took them out and drove around with the back empty I instantly noticed the increased road noise. Now that I have some other stuff back there is seems to be about the same as before (at least from the driver's seat)
Originally Posted by tecman
I watched this video yesterday and even though it has been awhile since I have done this it looks like this guy removed more than needed.
Thanks for watching the video. I definitely took out as much as possible wanted as much possible space for the drawer system I'm putting back there... might end up putting some things back, like the little wing trim pieces, depending on how the whole thing shakes out... it's been quite the project, probably should have just bought the Goose Gear system. Oh well, learning new stuff!
Just finished building my rear deck, after finding this post (http://www.dewijn.net/preparation/ge...ms-boot-ready/). Ended up making it in two pieces since the side wings wouldn't fit while attached and this way I can reinstall one of the rear seats down the road, if needed. The passenger side is slightly wider than the driver to accommodate the plastic trim on the seat. Drawers will be next, but need to find some better carpet. I got this off Amazon but not very happy with it.
GXOR member selling his 3rd row after installing this Goosegear plate system. Another option if you don't use 3rd row and want to reclaim space. They don't have a 460 pic on their website.
Looking at doing this sytem myself, looks very clean. Curious, do you happen to know the height of the 2nd row seats folded down to the plate? I'd like to install their drawer modules, but would prefer it being as flat as possible when the 2nd row is folded.
Looking at doing this sytem myself, looks very clean. Curious, do you happen to know the height of the 2nd row seats folded down to the plate? I'd like to install their drawer modules, but would prefer it being as flat as possible when the 2nd row is folded.
Looking at doing this sytem myself, looks very clean. Curious, do you happen to know the height of the 2nd row seats folded down to the plate? I'd like to install their drawer modules, but would prefer it being as flat as possible when the 2nd row is folded.
7-8in will be about flat. But keep in mind the 2nd row still angles up when folded down
Started with a 2014 GX 460 Premium (yes, I took the roof-rack off but that's for another thread)
Reviewed "Getting Liam's Boot(y) Ready" for some inspiration
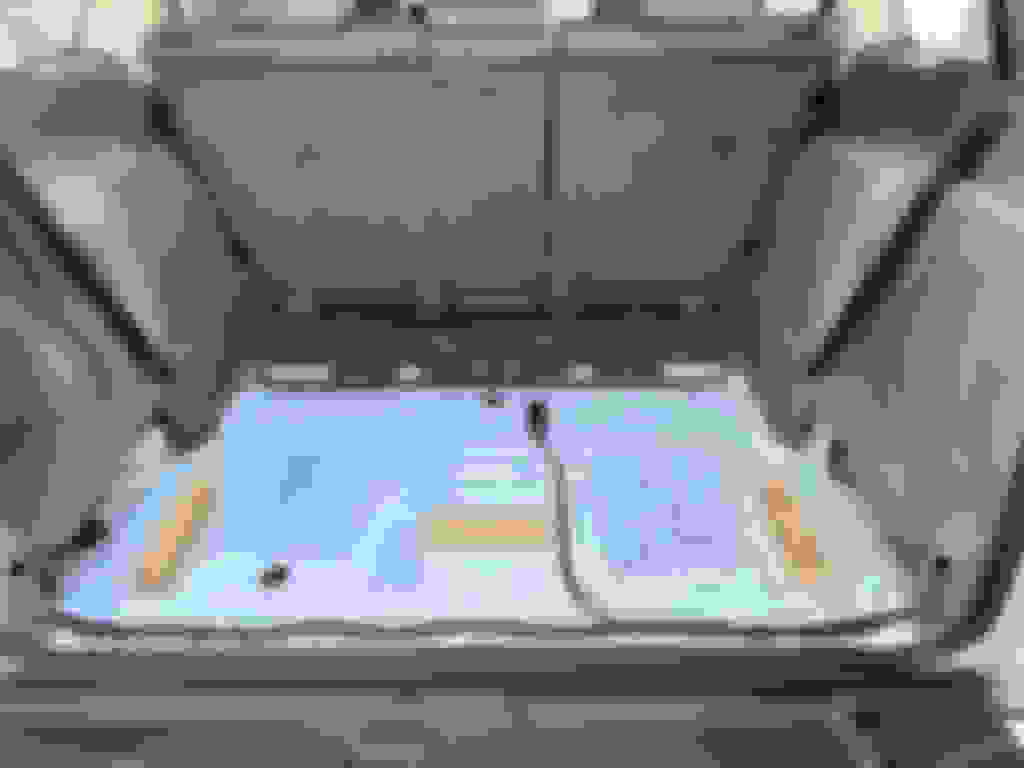
Removed the seats
Screwed three 2" x 2" support blocks to existing bolt holes originally for seats, so no new screw holes. Not pictured is a quarter-inch piece of wood running most of the width across the cargo entrance, just inside the lower threshold of the cargo door between the rubber door seals and the electrical bundle, for extra stability & to visually cover the gap at the back when the plywood board is on top.
Placed a half-inch thick 41" x 42" plywood board on top. Not pictured are the two small boards I cut to close the large gaps on the left & right next to the wheel wells, cutting the tops of the boards at a slight downward angle towards the rear to match the slight downward angle & height of the padded shelf next to them.
Covered all the wood, except the three already-screwed-in support blocks underneath, with inexpensive material from Home Depot using my staple gun. (I know the color doesn't match but it's easy to re-cover with something that does if it ever bothers me or gets trashed) THEN screwed both side boards to the side of the plywood board, THEN screwed the plywood board onto two of the back floor support blocks (left & right) with two additional screws towards the front (left & right) that fit & grip the pre-drilled holes on top of the small metal rise that stretches across the width.
Nothing fancy, just inexpensive, tough & practical. The dogs love it.
 10-16-18, 01:32 PM


 wanted as much possible space for the drawer system I'm putting back there... might end up putting some things back, like the little wing trim pieces, depending on how the whole thing shakes out... it's been quite the project, probably should have just bought the Goose Gear system. Oh well, learning new stuff!