When you click on links to various merchants on this site and make a purchase, this can result in this site earning a commission. Affiliate programs and affiliations include, but are not limited to, the eBay Partner Network.
Hi All, this maybe a dumb question but I�d still need the MTS computer to add this CC mode right? Or is it a built in function on regular computer (non MTS).
Hi All, this maybe a dumb question but I�d still need the MTS computer to add this CC mode right? Or is it a built in function on regular computer (non MTS).
Two are independent. You can add one of them if so choose. Neither require other to function.
This is amazing work and I was going to go down this route until I found a used CC switch 84970-60070 for $50.
However, knowing that my AVS will someday give up the ghost, i thought about what else I could use the AVS switch for. In the process, I discovered an answer to scautry's question and would be a much simpler and cleaner process than what John00 has gone through.
I plan to keep RAHC on my GX, but if you don't have/want it, the RAHC switches will take the place of the CC switch. There are plenty of orphaned 84970-60080 console switches out there, including mine, that can be used.
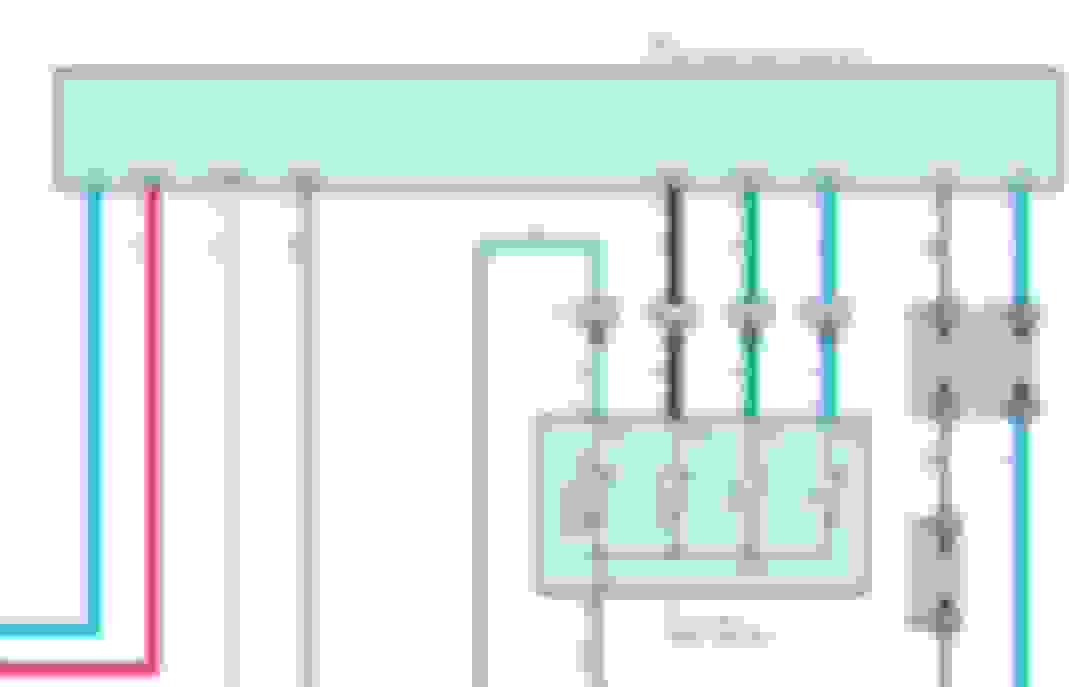
The RAHC controls are three momentary push-buttons just like what CC requires and they already have built-in illumination. There should be no need to pull out the Driving Support ECU since everything can be done in the console at the connector under the console switches. Basically you would just clip the wires on the back of the connector that would normally go to the CC switches and them splice them into the wires that go to the RAHC switches. The RAHC switches already share a ground, so it would only be three wires to splice.
After splicing the wires, go through the reset/ZPC process, and the the RAHC switch should work exactly like the CC switch, without spending $400.
Caveats:
- I HAVE NOT ACTUALLY DONE THIS, I just verified the switch functionality, traced the RAHC connector pins (see photo) and am extrapolating given John00's work.
- I have not verified the specific CC control pins on the wire connector. I would need to completely disassemble my install to determine this, which I'm not keen on doing. Maybe someone with an uninstalled 84970-60070 can trace those three CC pins? Or I guess you could splice into the driving support ECU as John00 did.
- The DAC switches will be dead, but can be similarly repurposed.
- The AVS switch will be dead, unless you have AVS. It can also be repurposed. I traced those pins and plan to eventually use mine for off-road lights, front and rear.
- The new "CC" switch will be labeled wrong. This can be corrected by spraying a matching paint over the switch face and then etching "SPEED" into the paint until you reach white plastic (if you want it to illuminate.)
thanks for doing all this research. What I'm trying to do is use the DAC on/off to activate CC but then use the AVS switch to adjust the speed of CC. I'm using my rear bags for the foreseeable future. I know the switch on the avs is not a momentary switch, but the center position seems to be the base according to the diagram. Do you think switching up-then-down to center, then up-down to center would act as a momentary pulse to cycle the CC speeds? Then down-center-down-center etc to cycle it down?
John00,
I have to admit, you have ***** as this is not a simple mod to tackle. Great job.
I was thinking the same thing. I'm very much against tapping into harnesses or making a modification that my right foot can easily handle. However I do enjoy watching the high tech and persistence of these members who make these modifications and share them with the community.
This version of mod often gets lost in the thread. This converts your DAC switch to the ON/OFF of Crawl at fixed Medium speed.
Originally Posted by John00
Earlier I showed a mod to use simple switches to add CC. Some might want simpler.
Here is the other end of the spectrum. Complexity, benefit, cost, logistics, detail, time and risk are reduced. No waiting for parts, no visible change, maybe 15 mins to complete.
How to convert the DAC switch to a CC switch.
once at the harness connector at the combo switch assy:
1 disconnect it and cut the CC ON/OFF wire position 6 BLK and cut the DAC ON wire position 15 LT GRN making sure to leave enough wire to reconnect.
2 connect the connector end DAC 15 LT GRN wire to the harness end CC BLK 6 wire. At this point there is a cut BLK wire at the connector, and also a cut LT GRN wire at the harness. These are not used and can be secured.
Now the switch is converted. still need to run the cal process to get the computer to control the CC properly.
operation after cal completion
to turn on CC, flip the DAC switch to on and then back off. It doesnt matter how long you take since the signal works on the flip on only. CC works at the medium speed.
to turn CC off, flip the DAC switch to on and then back off. It doesnt matter how long you take since the signal works on the flip on only. CC stops working.
This version of mod often gets lost in the thread. This converts your DAC switch to the ON/OFF of Crawl at fixed Medium speed.
Somewhere earlier it is mentioned that the enable/disable is separate from the speed selection. Whatever speed it is set to it will go to on the next enable.
I dont know if the speed selection is retained after a power loss. The speed can be adjusted with a jumper wire if needed. might be better to at least put a couple of speed switches under the dash tucked away if not wanting to permanently mount them. Ive never benefitted from adjusting the speed. i either get the traction or didnt (was the tires)
heres a general diagram to get an idea of the circuit to tie into the dimmer controlled output. its a good idea to use current limiting resistors with leds.
heres an example off the ODO button. Toed into a 12mm switch with a white led that is dimmed by the dimmer control.
this switch is actually used for a drl & fog auto control disconnect, to be able to disable the auto switch circuit that goes between switchback drls and the super modified high beam fogs https://www.clublexus.com/forums/gx-...ght-setup.html
excellent video and Im glad he added the end part covering the different results possible based on other modules and zerocal process.
oh i just read some comments on that video. someone in there saying that splicing in a switch will ruin something and to add a relay.
i didnt watch in detail the actual wiring of that video but i will add $.02.
the oem switch for activating the feature goes straight to the ecu just like the others. none of those use relays. i think that Acrad put some diagram above that shows an example of this.
a relay is the exact same as a switch on the contact side except many times the relay has a higher current capability. these switches only send the signal to activate and do not need high current.
adding a relay has its own risks. the 3 most noteworthy are relay failure, back emf and incorrect installation. relay fails and you are stuck in whatever mode, same as a failed switch. infrequent but happens. back emf every time you de-energize the coil if you dont have a diode on the coil you send a voltage spike through the weakest path. 100% of the time. and this WILL damage something eventually. as for incorrect installation yeah you know, can fry things.
all this being said, whenever you need to use a small switch to control a high current, then do use a relay. and make sure to have a diode in there as well.


 03-27-22, 11:26 AM