Xenon Depot Grommets, Top notch
 09-07-06, 07:30 PM
#1
Rookie
Thread Starter

Join Date: Aug 2006
Location: Fl
Posts: 90
Likes: 0
Received 0 Likes
on
0 Posts
Hey guys and gals, here is a few lazy pictures of my HID install, I'll post more pictures when I take them, but as you can see the Xenon Depot kit comes with very nice grommets, I've gone through some heavy rain, those of you in Miami, now what I'm talking about, and no condensation.
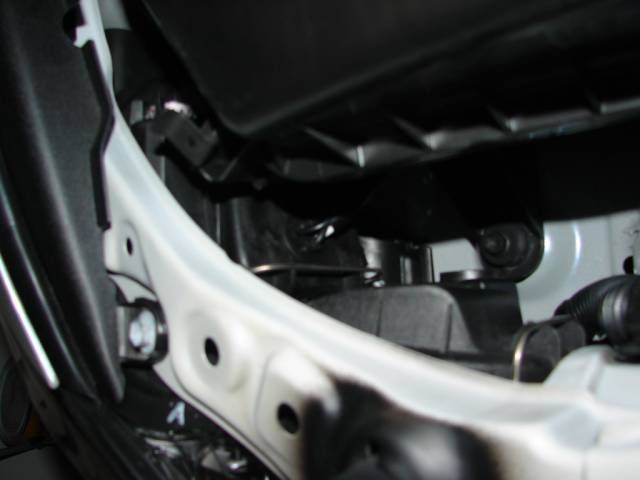
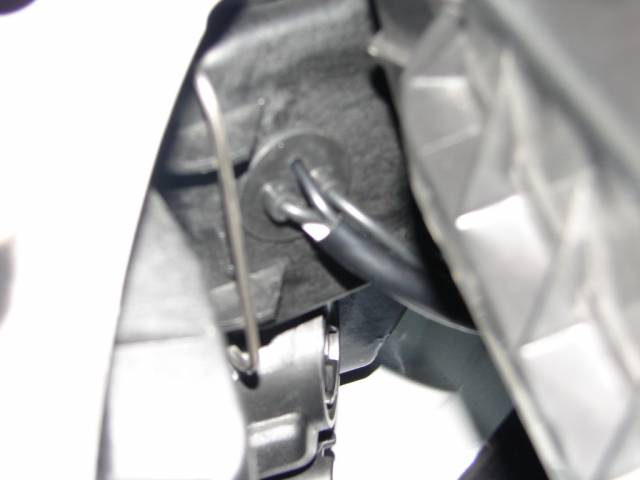
All the wires go through one grommet, only one hole, no huge drilling of the dust cap.
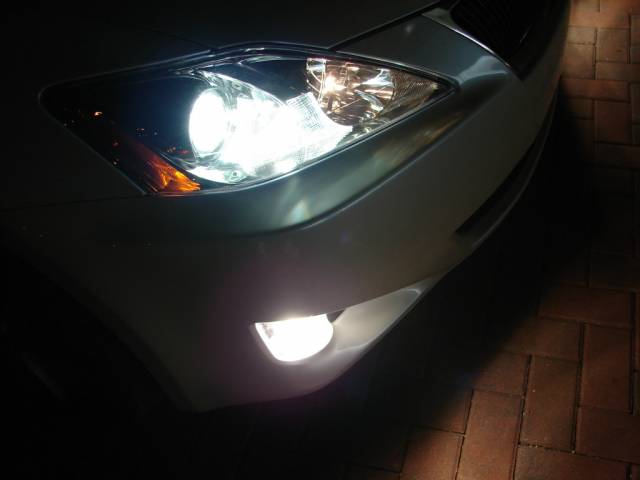
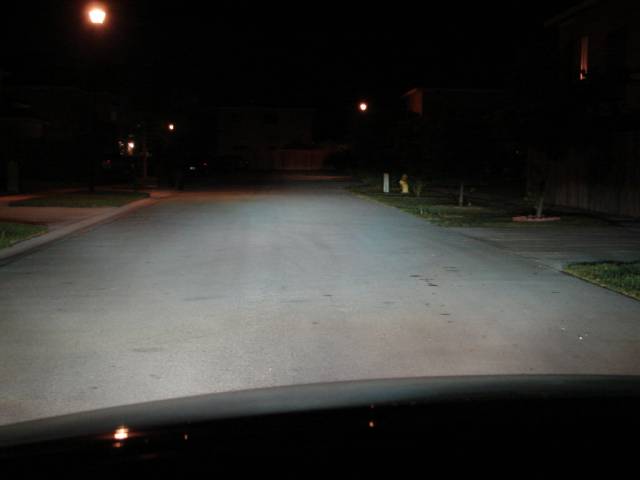
The result, very pleased, very high output of light
All the wires go through one grommet, only one hole, no huge drilling of the dust cap.
The result, very pleased, very high output of light
Last edited by StockIS350; 09-08-06 at 08:24 PM. Reason: linked pics

 09-07-06, 07:53 PM
#4
Lead Lap
Join Date: Jan 2006
Location: NorCal
Posts: 403
Likes: 0
Received 0 Likes
on
0 Posts
yah they look nice from the pics I've seen 
My xenon depot kit was missing the grommets...when Imaputz and I installed ours he put alot of silcon around the hole to seal it up. I didn't do mine when we installed and got some condensation so I just sealed mine up this week and think it should be ok now.
My xenon depot kit was missing the grommets...when Imaputz and I installed ours he put alot of silcon around the hole to seal it up. I didn't do mine when we installed and got some condensation so I just sealed mine up this week and think it should be ok now.
09-08-06, 07:38 AM
#5
My XD kit did not come with the grommets as well.
Steve from Xenon Depot did mentioned that even with the gommets, you will need to drill 2 holes on each dust cap. (One BIG hole for the bulb wires and one smaller hole for the ignitor wires). The XD kit only comes with one grommet for the bulb wires right? You still need to "seal' the other smaller hole with either silicon sealant or small grommets from home depot.
This is what I did:
I bought 2 grommets from Home Depot with 0.5" ID.
I drilled just 1(one) hole with 0.5" diameter on each of the dust cap.
Then, I removed the plastic connectors from the kit wires (bulb connectors were grey and ignitor connectors were white) per Steve's instruction and run the wires through the holes and the 0.5" grommets.
Then I wrapped all the wires with heatshrink tubing. The heatshrink material filled up the hole really well and make it snug fit, rubbing with the wall of the rubber grommets. Then I applied silicon sealant to any visible gap between them.
Finally, re-installed the plastic connectors to the wire-ends.
So far so good, no condensation after 2 tropical storms , 5 carwashes, and countless days with high humidity in Maryland Eastern Shore climate.
Last edited by SugarRush; 09-08-06 at 07:45 AM.
09-08-06, 09:05 AM
#6
Lead Lap
Join Date: Jan 2006
Location: NorCal
Posts: 403
Likes: 0
Received 0 Likes
on
0 Posts
My XD kit did not come with the grommets as well.
Steve from Xenon Depot did mentioned that even with the gommets, you will need to drill 2 holes on each dust cap. (One BIG hole for the bulb wires and one smaller hole for the ignitor wires). The XD kit only comes with one grommet for the bulb wires right? You still need to "seal' the other smaller hole with either silicon sealant or small grommets from home depot.
This is what I did:
I bought 2 grommets from Home Depot with 0.5" ID.
I drilled just 1(one) hole with 0.5" diameter on each of the dust cap.
Then, I removed the plastic connectors from the kit wires (bulb connectors were grey and ignitor connectors were white) per Steve's instruction and run the wires through the holes and the 0.5" grommets.
Then I wrapped all the wires with heatshrink tubing. The heatshrink material filled up the hole really well and make it snug fit, rubbing with the wall of the rubber grommets. Then I applied silicon sealant to any visible gap between them.
Finally, re-installed the plastic connectors to the wire-ends.
So far so good, no condensation after 2 tropical storms , 5 carwashes, and countless days with high humidity in Maryland Eastern Shore climate.
Steve from Xenon Depot did mentioned that even with the gommets, you will need to drill 2 holes on each dust cap. (One BIG hole for the bulb wires and one smaller hole for the ignitor wires). The XD kit only comes with one grommet for the bulb wires right? You still need to "seal' the other smaller hole with either silicon sealant or small grommets from home depot.
This is what I did:
I bought 2 grommets from Home Depot with 0.5" ID.
I drilled just 1(one) hole with 0.5" diameter on each of the dust cap.
Then, I removed the plastic connectors from the kit wires (bulb connectors were grey and ignitor connectors were white) per Steve's instruction and run the wires through the holes and the 0.5" grommets.
Then I wrapped all the wires with heatshrink tubing. The heatshrink material filled up the hole really well and make it snug fit, rubbing with the wall of the rubber grommets. Then I applied silicon sealant to any visible gap between them.
Finally, re-installed the plastic connectors to the wire-ends.
So far so good, no condensation after 2 tropical storms , 5 carwashes, and countless days with high humidity in Maryland Eastern Shore climate.
09-08-06, 09:46 AM
#7
Driver
Join Date: Oct 2005
Location: New Jersey
Posts: 195
Likes: 0
Received 0 Likes
on
0 Posts
im just about ready to purchase the 6000k kit from xenon depot but im still trying to find a good shop here on north jersey to install them. i really dont wnat any problems with the lights going out or wires hanging from the engine bay. if anyone knows of a good shop id appreciate the tip 
Trending Topics
09-08-06, 10:44 AM
#8
ahh thats a great way to do it! I had to drill the big hole to get the grey connector through...would have been nice to use a .5 hole saw, those wires are really small. I tried to remove the connectors but couldn't really figure it out and didn't want to snap or break the plastic.
Steve from Xenon Depot have put together a writeup including photos on how to remove the plastic connector of his XD HID kit. He did offer to email the details to 2IS Club Lexus members who want to go this route when installing the XD kit.
Please email him at steve@xenondepot.com
He will send it to you for sure.
This may be useful for those who do not want to drill two holes on each dust cap in order to fish the wire through.
Last edited by SugarRush; 09-08-06 at 10:53 AM.
09-08-06, 03:35 PM
#10
For a how to, go here (I used method B to attach multiple pics):
https://www.clublexus.com/forums/sho...362#post971362
09-08-06, 04:15 PM
#11
Rookie
Thread Starter
Join Date: Aug 2006
Location: Fl
Posts: 90
Likes: 0
Received 0 Likes
on
0 Posts
Went ahead and linked the pics into your first post.
For a how to, go here (I used method B to attach multiple pics):
https://www.clublexus.com/forums/sho...362#post971362
For a how to, go here (I used method B to attach multiple pics):
https://www.clublexus.com/forums/sho...362#post971362

Thread
Thread Starter
Forum
Replies
Last Post
MyIS350G
Northern California Lexus Club
31
06-22-12 10:12 PM
pimplux808
GS - 2nd Gen (1998-2005)
34
09-21-07 03:00 PM