
Pics of my '06 IS250 with 2011MY headlights w/ LED Strip
 02-04-12 | 10:37 AM
#316
After taking the black plastic housing apart (after the removal of the chrome housing...pictured above) with the mini flat screwdriver, you can GENTLY pry the wire pins so it is easier to pull out. Apply small amount of pulling pressure on wire as you pry the wire pins with mini screw driver. They should pull out easy.
 02-04-12 | 12:56 PM
#318

Just cut the wires, as long as you attach it back secure it shouldnt be a problem......its like trying to help someone over the phone with their computer, you know how to do it, just cant explain it the way they understand or the other person doesnt get it right
02-04-12 | 04:22 PM
#319
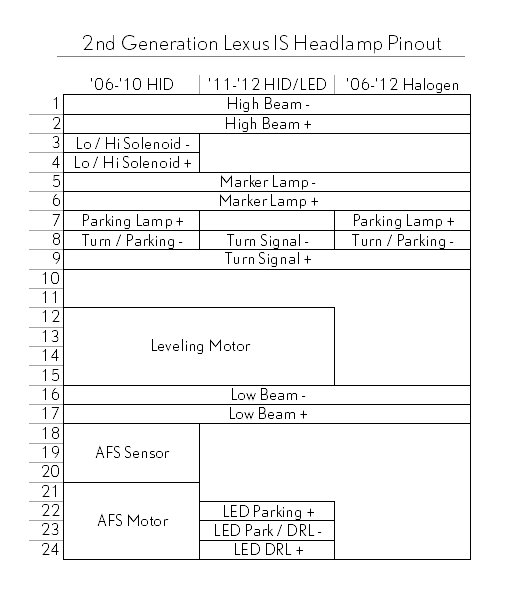
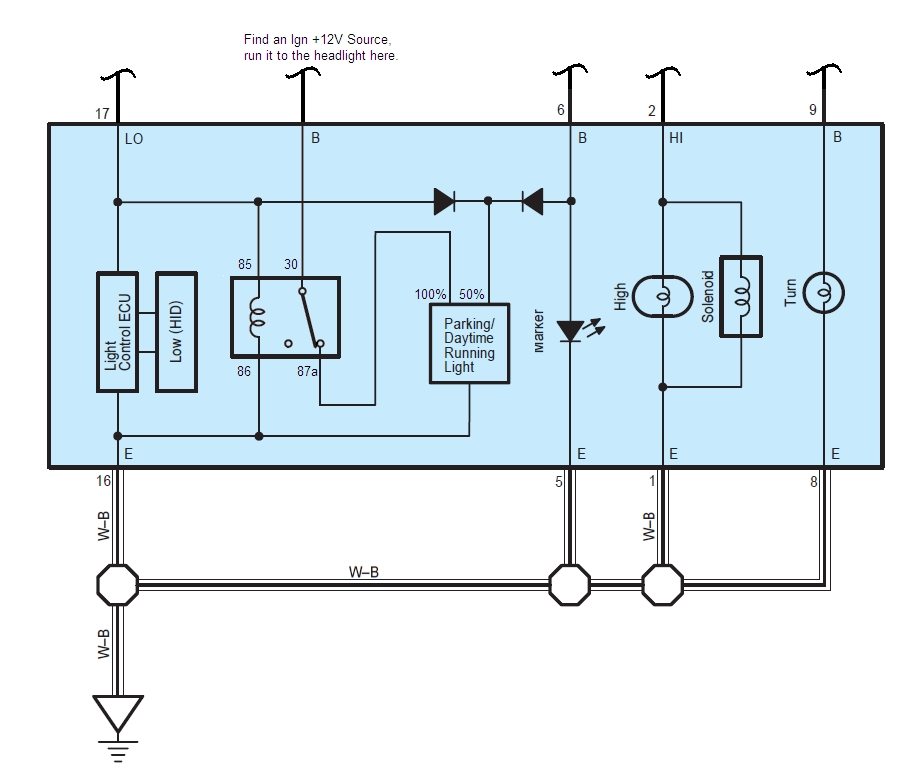
So I've been researching different setups, and here are a couple of images, the first one is the pinout listing I've put together for all types of North-American 2IS headlights, the second is how I would wire the 2011 headlights if I were doing it. It requires a couple of relays and diodes, as well as bringing an ignition power source to the headlights which isn't there now, but as far as I can tell, it's the best way to get the headlights functioning as close as you can to the way they do from the factory on 2011 models that come with them:

This way has the LED's on at 100% brightness when the ignition is on. and at 50% with the marker lights or headlights on (whether the ignition is on or off). The LED's do not change if you flash the high beams (whether they are at 100%, 50% or off).
EDIT: This is one of the simplest ways to get things working almost correctly. See some of my later posts in this thread for diagrams that will more accurately replicate the factory function of the LED's.
Jeff
Last edited by Jeff Lange; 02-04-12 at 09:47 PM.
02-04-12 | 05:16 PM
#321
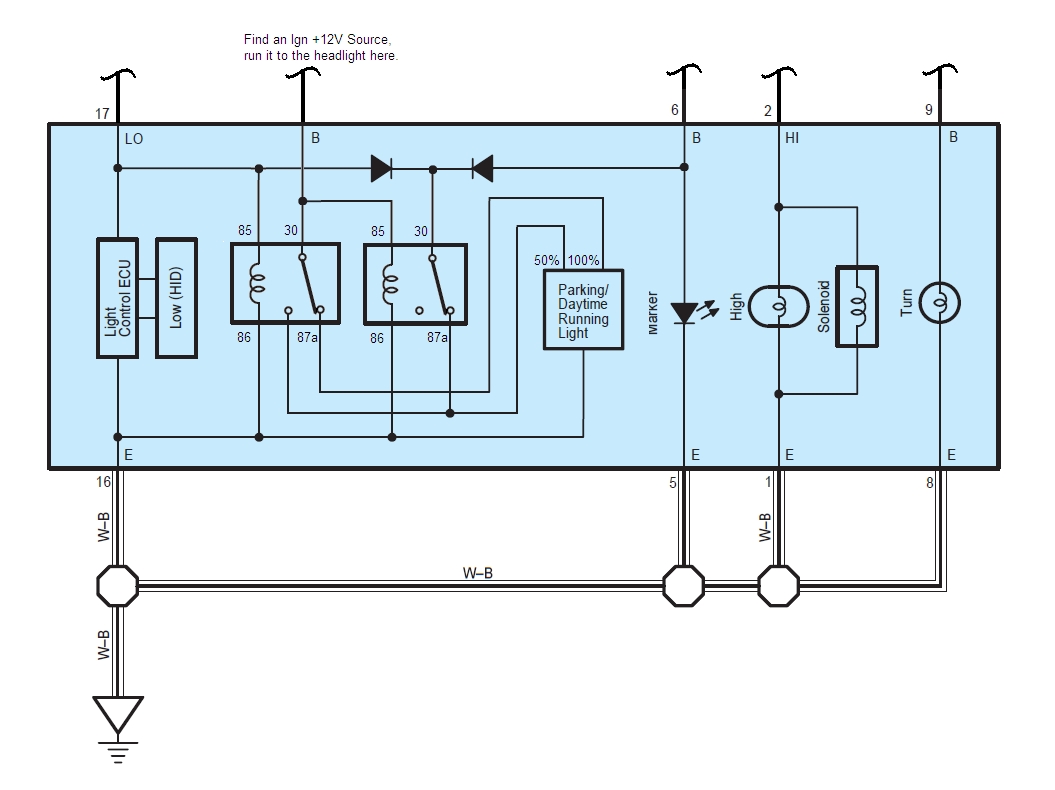
Following up on my wiring diagram, there is one way to make it perform even more like the factory setup, but without making the wiring extremely complicated, it would end up in some situations applying +12V to both the 50% and 100% inputs on the LED's. Has anyone tried doing that (applying power to both)? I'd actually like to do it that way, but I am concerned about how it would react. I would think that it should be at full brightness with power applied to both, but I don't want to damage anything.
What this would do is when the DRL's are at 100% brightness, it wouldn't drop them down to 50% brightness until the headlights turn on, just like factory, but it would turn them on at 50% if the DRL's are off (car off), just like factory.
Like this:
EDIT: So I decided to draw up the more complicated version, using 2 relays per side, in case the LED strip doesn't like having power applied to both inputs at the same time. If for some reason it doesn't, this would provide (what I think) is maximum functionality of the LED strips:
Jeff
Last edited by Jeff Lange; 02-04-12 at 06:57 PM.
02-04-12 | 07:47 PM
#323
Lead Lap
Joined: Sep 2009
Posts: 465
Likes: 9
From: il
Following up on my wiring diagram, there is one way to make it perform even more like the factory setup, but without making the wiring extremely complicated, it would end up in some situations applying +12V to both the 50% and 100% inputs on the LED's. Has anyone tried doing that (applying power to both)? I'd actually like to do it that way, but I am concerned about how it would react. I would think that it should be at full brightness with power applied to both, but I don't want to damage anything.
What this would do is when the DRL's are at 100% brightness, it wouldn't drop them down to 50% brightness until the headlights turn on, just like factory, but it would turn them on at 50% if the DRL's are off (car off), just like factory.
Like this:
EDIT: So I decided to draw up the more complicated version, using 2 relays per side, in case the LED strip doesn't like having power applied to both inputs at the same time. If for some reason it doesn't, this would provide (what I think) is maximum functionality of the LED strips:
Jeff
What this would do is when the DRL's are at 100% brightness, it wouldn't drop them down to 50% brightness until the headlights turn on, just like factory, but it would turn them on at 50% if the DRL's are off (car off), just like factory.
Like this:
EDIT: So I decided to draw up the more complicated version, using 2 relays per side, in case the LED strip doesn't like having power applied to both inputs at the same time. If for some reason it doesn't, this would provide (what I think) is maximum functionality of the LED strips:
Jeff
 ) and when i compared them with the pre-'11 diagram, the only change was the location of the two drl's wires. Since i'm not great with figuring out wiring diagrams, i don't know where to go from here. All i know is that the '11 front controller differs from pre-'11, and i think that's where the problem lies.
02-04-12 | 08:24 PM
) and when i compared them with the pre-'11 diagram, the only change was the location of the two drl's wires. Since i'm not great with figuring out wiring diagrams, i don't know where to go from here. All i know is that the '11 front controller differs from pre-'11, and i think that's where the problem lies.
02-04-12 | 08:24 PM
#324
Even if you changed the front controller, the wiring harness is different. I've checked.
So just to be clear, with both the 50% and 100% wires connected, it stays at 100%? If so, that is quite good, and what I expected.
The first diagram in my last post with some low forward voltage diodes would work almost perfectly.
Jeff
So just to be clear, with both the 50% and 100% wires connected, it stays at 100%? If so, that is quite good, and what I expected.
The first diagram in my last post with some low forward voltage diodes would work almost perfectly.
Jeff
02-04-12 | 08:40 PM
#325
Lead Lap
Joined: Sep 2009
Posts: 465
Likes: 9
From: il
Even if you changed the front controller, the wiring harness is different. I've checked.
So just to be clear, with both the 50% and 100% wires connected, it stays at 100%? If so, that is quite good, and what I expected.
The first diagram in my last post with some low forward voltage diodes would work almost perfectly.
Jeff
So just to be clear, with both the 50% and 100% wires connected, it stays at 100%? If so, that is quite good, and what I expected.
The first diagram in my last post with some low forward voltage diodes would work almost perfectly.
Jeff
Well depends which setting you're gonna be powering first. If you pwr 50% first, attaching the 100% pwr wire wouldn't override it. I don't know how that reflects the idea you illustrated on the above diagram, since i can't read those things
 02-04-12 | 10:15 PM
#328
Lexus Fanatic
iTrader: (10)
Joined: Nov 2004
Posts: 13,441
Likes: 1,064
From: Under an IS F since 2008

Here's something better..!!!
http://www.youtube.com/watch?v=3txVEXAiHjk
Raw & Real time video sent from my iPad.
If you don't get it apart after this, I don't want to know about it...
Joe Z
 02-04-12 | 11:02 PM
#329
Okay, so after thinking about this, and the possibility of using transistors instead of relays, etc. I figured it's probably easiest to just post it with the relays. If anyone wants to use a transistor, the MOSFET IRF5305 transistor can be used for a normally closed setup like this, and should be able to handle the current without issue. I swapped out the diodes in the diagram for schottky diodes as they will have a lower forward voltage drop (basically insignificant to this application) than a regular diode. I figure with 12 LED's per side, you're looking at around 400mA, so it's pretty small current for these LED's.
Verbose functionality listing with this wiring:
Ignition Off, Headlight Switch Off: All Off
Ignition Off, Headlight Switch Flash: LED's at 50%, Low Beams + High Beams On
Ignition Off, Headlight Switch 1 Click: LED's at 50%, Markers On
Ignition Off, Headlight Switch 2 Clicks: LED's at 50%, Markers On, Low Beams On
Ignition Off, Headlight Switch 2 Clicks, Pushed Forward: LED's at 50%, Markers On, Low Beams + High Beams On
Ignition Off, Headlight Switch 3 Clicks: All Off
Ignition On, Headlight Switch Off: LED's at 100%, All Others Off
Ignition On, Headlight Switch Flash: LED's at 50%, Low Beams + High Beams On
Ignition On, Headlight Switch 1 Click: LED's at 100%, Markers On
Ignition On, Headlight Switch 2 Clicks: LED's at 50%, Markers On, Low Beams On
Ignition On, Headlight Switch 2 Clicks, Pushed Forward: LED's at 50%, Markers On, Low Beams + High Beams On
Ignition On, Headlight Switch 3 Clicks, Daylight: LED's at 100%, All Others Off
Ignition On, Headlight Switch 3 Clicks, Dark: LED's at 50%, Markers On, Low Beams On
Ignition On, Headlight Switch 3 Clicks, Dark, Pushed Forward: LED's at 50%, Markers On, Low Beams + High Beams On
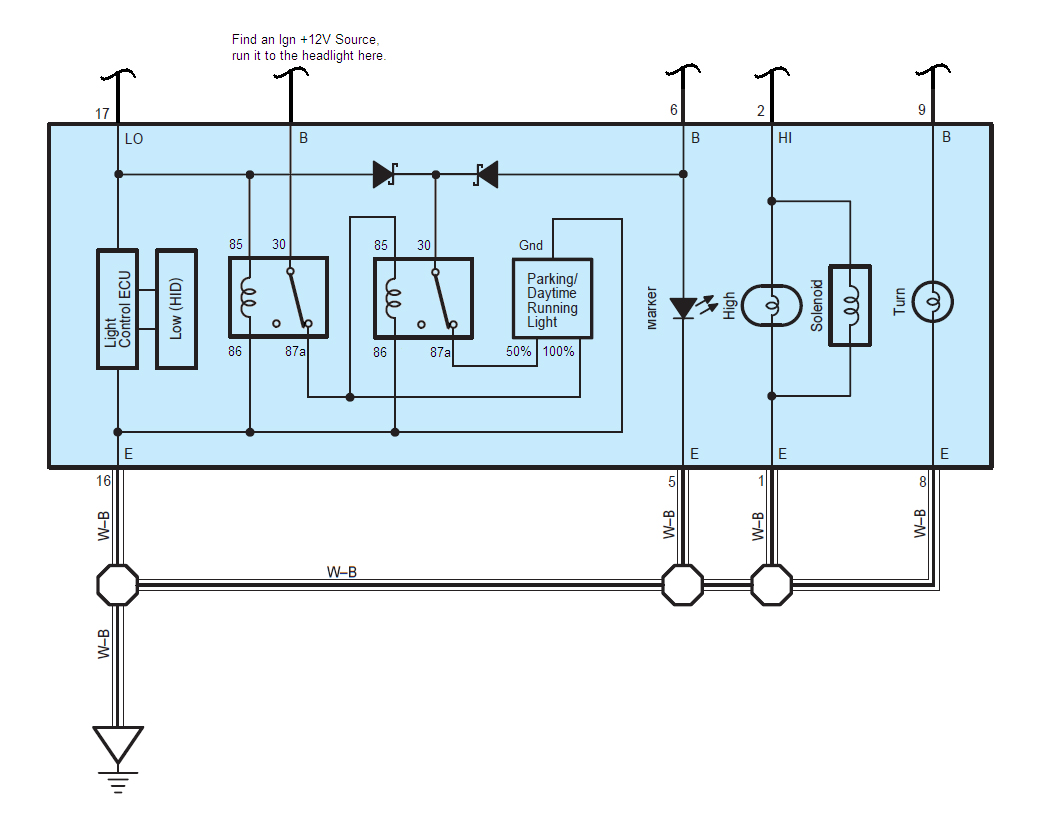
Okay, I think that's about the best I can do. I've spent too much time on this today, haha.
EDIT: I'd also like to say that it is certainly possible to do this in the car's wiring and just wire it into the correct spots on the headlight connector. That way you only need 2 diodes and 2 relays instead of 4 diodes and 4 relays (2 per side). It's just going to depend on whether or not you want to mess with the car's wiring more, or the headlight's wiring more.
Jeff
Verbose functionality listing with this wiring:
Ignition Off, Headlight Switch Off: All Off
Ignition Off, Headlight Switch Flash: LED's at 50%, Low Beams + High Beams On
Ignition Off, Headlight Switch 1 Click: LED's at 50%, Markers On
Ignition Off, Headlight Switch 2 Clicks: LED's at 50%, Markers On, Low Beams On
Ignition Off, Headlight Switch 2 Clicks, Pushed Forward: LED's at 50%, Markers On, Low Beams + High Beams On
Ignition Off, Headlight Switch 3 Clicks: All Off
Ignition On, Headlight Switch Off: LED's at 100%, All Others Off
Ignition On, Headlight Switch Flash: LED's at 50%, Low Beams + High Beams On
Ignition On, Headlight Switch 1 Click: LED's at 100%, Markers On
Ignition On, Headlight Switch 2 Clicks: LED's at 50%, Markers On, Low Beams On
Ignition On, Headlight Switch 2 Clicks, Pushed Forward: LED's at 50%, Markers On, Low Beams + High Beams On
Ignition On, Headlight Switch 3 Clicks, Daylight: LED's at 100%, All Others Off
Ignition On, Headlight Switch 3 Clicks, Dark: LED's at 50%, Markers On, Low Beams On
Ignition On, Headlight Switch 3 Clicks, Dark, Pushed Forward: LED's at 50%, Markers On, Low Beams + High Beams On
Okay, I think that's about the best I can do. I've spent too much time on this today, haha.
EDIT: I'd also like to say that it is certainly possible to do this in the car's wiring and just wire it into the correct spots on the headlight connector. That way you only need 2 diodes and 2 relays instead of 4 diodes and 4 relays (2 per side). It's just going to depend on whether or not you want to mess with the car's wiring more, or the headlight's wiring more.
Jeff
Last edited by Jeff Lange; 02-04-12 at 11:08 PM.
02-04-12 | 11:14 PM
#330

I don't think pictures are going to help you......
Here's something better..!!!
http://www.youtube.com/watch?v=3txVEXAiHjk
Raw & Real time video sent from my iPad.
If you don't get it apart after this, I don't want to know about it...
Joe Z
Here's something better..!!!
http://www.youtube.com/watch?v=3txVEXAiHjk
Raw & Real time video sent from my iPad.
If you don't get it apart after this, I don't want to know about it...
Joe Z
 but look like you have a hard time to just remove the metal shield
 , I took like 30sec to remove that shield, but anyway thanks for you help, so I got my headlights installed the only thing I don't like it too bright for me at night
 maybe I would find some solution like above wire diagram to see if it work, but 100% bright at night too much for me