
DIY - for an oops moment. Tried to replace cabin air filter without setting to circ.
 02-13-13, 01:05 AM
#31
Driver School Candidate

Join Date: Sep 2010
Location: ma
Posts: 22
Likes: 0
Received 0 Likes
on
0 Posts
Can someone help me please?? My heater/ac won't shift mode between floor and vents. Only defrost mode works. Any idea what motors or parts to replace? Dealer quoted $1500 to get it fix =(.
Last edited by xlinkx; 02-13-13 at 01:13 AM.
 03-19-13, 10:12 AM
#33
Driver School Candidate

I am in the middle of this diy on a 2006 GS 300 and the steps are slightly different. There is one screw and two clips at the top of the glove box. The knee air bag and glove box are loose but there is at least one connector holding it to the drivers side of the glove box seems it's right behind "trunk opener/cancel button". Anyone know how to free up the left side. I did reach up and feel a plastic piece that is broken off from my failure to put it in recyc mode.
I felt so dumb for doing it, but yes I didn't read the manual before attempting to change my cabin air filter for the first time. I popped the panel off in the glove box and tried to lift the cover, it made a snap noise. Knowing I may have made a mistake, I decided to research how much damage I had done. Most people claimed you have to remove the dash, and in some cases you may have to, but after seeing how mine broke I believe that most others in the same boat will have a similar failure.
This DIY will show you how to reattach a broken linkage arm to the air circulation hood and controlling motor. As usual, perform this DIY at your own risk.
First thing to establish is whether the motor is still working or not. Cycle the fresh air/ recirculate button with the car turned on but not running. You should be able to hear the faint whine of the motor working behind the glove box. I had to cycle a couple times before I was sure the motor was still operational because it's fairly quiet. If the motor is no longer working you can order a new one from Sewell for $125 with the CL discount (8710630430). Please double check with a Lexus parts tech to ensure that is the correct part number.
Since things were broken with your system in fresh air mode, please make sure to set the button to fresh air before proceeding. This will ensure the linkage and air hood will all line up properly when reaffixing.
Now your ready to fix! You will need:
a) philips screwdriver
b) 10mm socket and socket wrench
c) flashlight
d) loctite plastic epoxy
Start by disconnecting the negative battery terminal, and wait 90 seconds, as you have to remove the passenger side knee airbag, and you don't want that going of inadvertently.
Remove the passenger side dash side panel. It is held in by clips and pops out from the front.

Remove the kick panel at the bottom of the passenger side dash. It should just pull down. Disconnect the led attached.
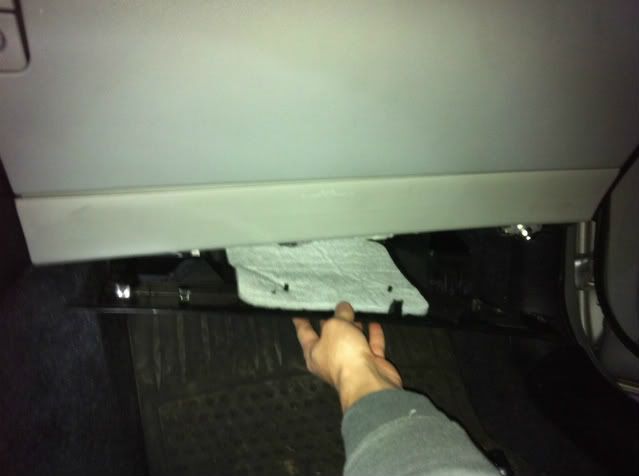
There are 3 10mm bolts holding the knee air bag in. Two on the lower right and one on the lower left. Remove them and drop down. I didn't disconnect this piece, just set it on the ground and it should not be in the way.
Open the glove box. There are 5 screws to remove. Three on the top and two on the bottom. In the picture bellow the screws are already removed so the holes are more visible. Once the screws are removed the glove box will still be held in by two tabs. I was able to give it a yank outwards to dislodge it. I did not disconnect the wiring from the glove box, I just set it down out of the way.
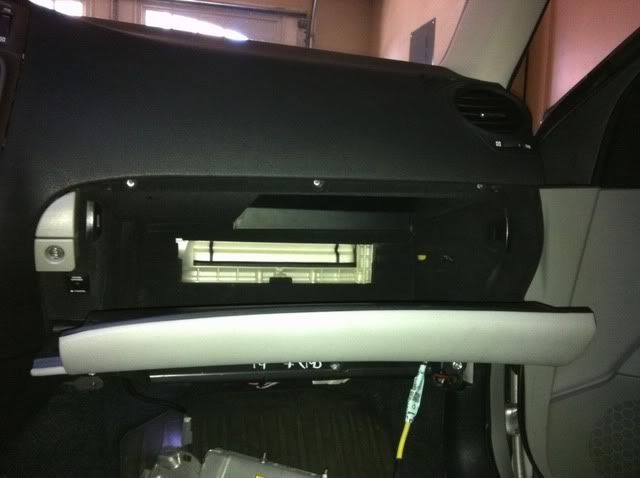
Next, remove the screw in the picture below connected to the air duct. Then drop it downwards to take it out.
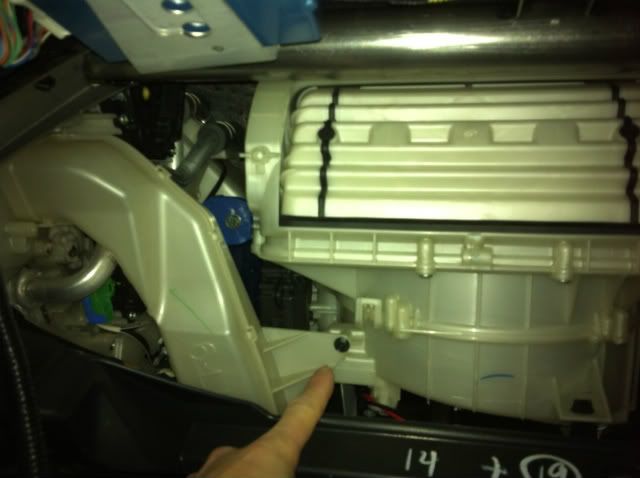
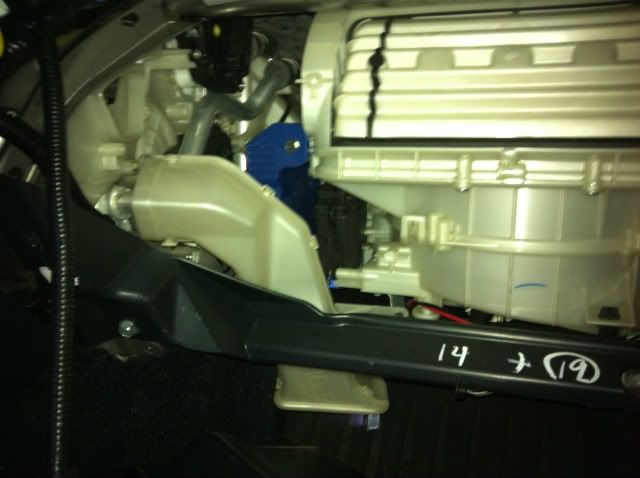
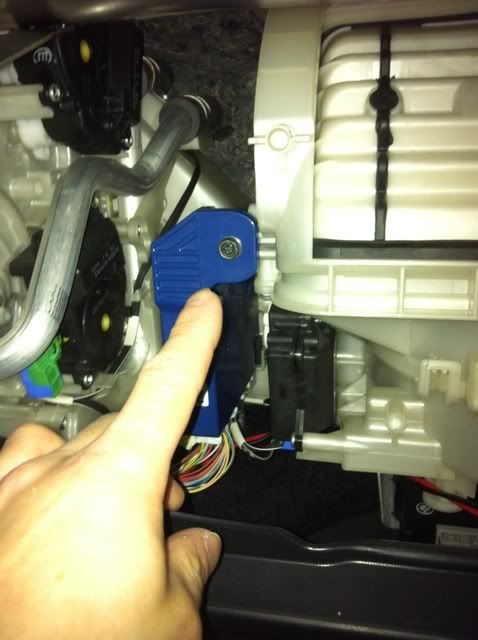
Remove the screw holding the blue box and move out of the way.
I wish I would have taken pictures of the actual damage, but I was unsure whether this fix would work so I had held off. The main body of the blower is made out of Polypropylene, which was a concern because there is really no glue that will stick to it. My only glimmer of hope was that the broken linkage arm was stamped with POM which is Polyoxymethylene and that is glue-able. It now appears that the hood that the linkage arm attaches to is POM as well so Loctite plastic epoxy will bond
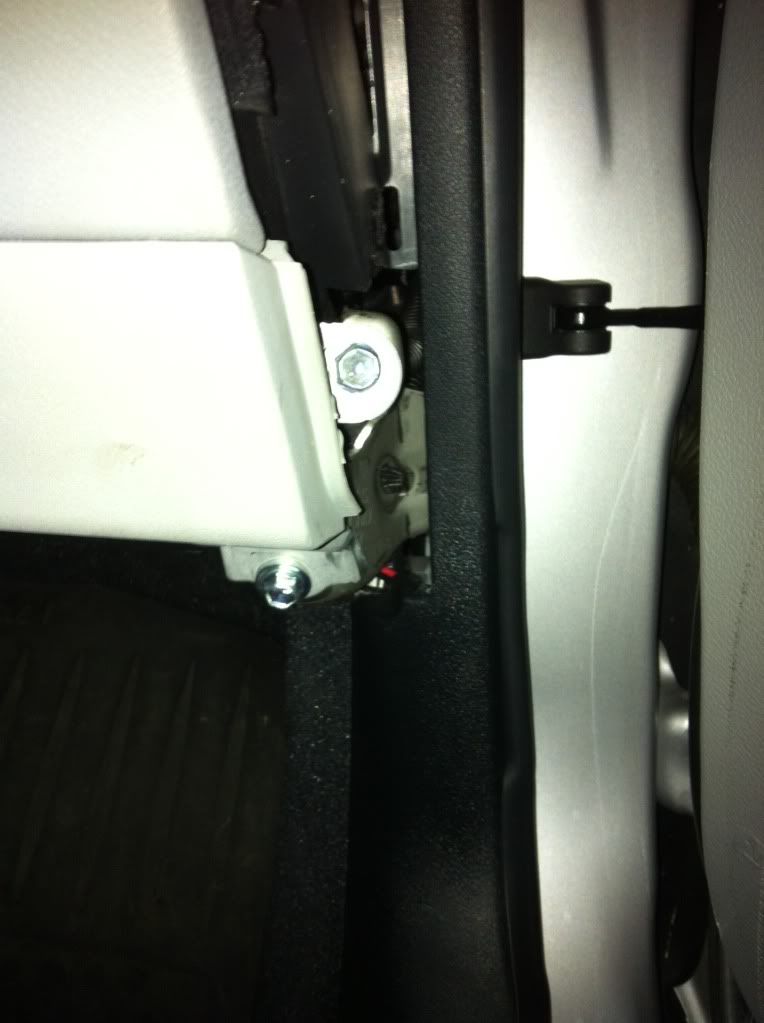
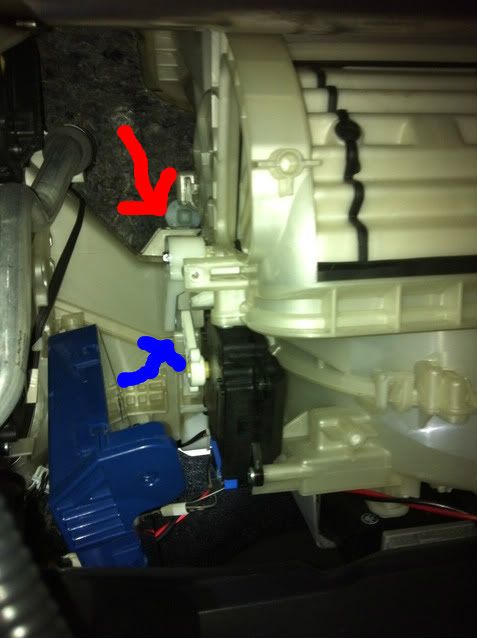
The red arrow points to the arm that was broken, I found the linkage arm fallen down below. It is attached captive to a peg coming off the hood to raise and lower it. The break was on the peg, and at a slight angle so I was able to put it back into proper position. The lower blue arrow shows where the other end of the linkage attaches to the servo motor linkage. This connection is a small peg that slides up and down in the "broken" linkage piece. If your motor is dead you will have to replace it now. It's the black box near the blue arrow.
After testing out this fix it seems that placing a screw into the linkage, as you see bellow, is unnecessary. I have since removed the screw and ensured proper functionality. If you want to still install the screw as well use a self tapping hex-headed screw. I used an 8x18 1.5" but be sure you bore out a hole through the center of the broken peg attached to the broken off linkage, this ensures you'll be able to drive it all the way into the other side by hand. I used a 1/4 socket wrench which worked fine.
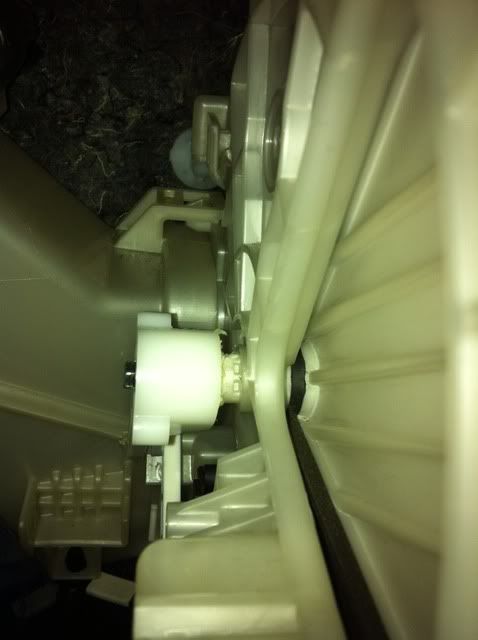
Mix up the plastic epoxy and apply to the broken areas. Set the linkage in its proper place, with the small servo arm peg in the slider, and press the broken halves of the hood peg together. I held it for about 5 minutes before letting go. In the picture bellow you can see the linkage piece freshly glued in (you can also see some extra glue which should be wiped away).
Let the epoxy dry for a full 24 hours before you even breathe on the thing! I reattached my battery for a moment after waiting 24 hours (careful of the airbag!) and turned the ignition on to test everything out. When you cycle the circ.-fresh button the hood should lift and lower without issue.
Reassemble everything in the exact opposite order you took it apart, and enjoy saving a butt load of $
I popped the panel off in the glove box and tried to lift the cover, it made a snap noise. Knowing I may have made a mistake, I decided to research how much damage I had done. Most people claimed you have to remove the dash, and in some cases you may have to, but after seeing how mine broke I believe that most others in the same boat will have a similar failure. This DIY will show you how to reattach a broken linkage arm to the air circulation hood and controlling motor. As usual, perform this DIY at your own risk.
First thing to establish is whether the motor is still working or not. Cycle the fresh air/ recirculate button with the car turned on but not running. You should be able to hear the faint whine of the motor working behind the glove box. I had to cycle a couple times before I was sure the motor was still operational because it's fairly quiet. If the motor is no longer working you can order a new one from Sewell for $125 with the CL discount (8710630430). Please double check with a Lexus parts tech to ensure that is the correct part number.
Since things were broken with your system in fresh air mode, please make sure to set the button to fresh air before proceeding. This will ensure the linkage and air hood will all line up properly when reaffixing.
Now your ready to fix! You will need:
a) philips screwdriver
b) 10mm socket and socket wrench
c) flashlight
d) loctite plastic epoxy
Start by disconnecting the negative battery terminal, and wait 90 seconds, as you have to remove the passenger side knee airbag, and you don't want that going of inadvertently.
Remove the passenger side dash side panel. It is held in by clips and pops out from the front.
Remove the kick panel at the bottom of the passenger side dash. It should just pull down. Disconnect the led attached.
There are 3 10mm bolts holding the knee air bag in. Two on the lower right and one on the lower left. Remove them and drop down. I didn't disconnect this piece, just set it on the ground and it should not be in the way.
Open the glove box. There are 5 screws to remove. Three on the top and two on the bottom. In the picture bellow the screws are already removed so the holes are more visible. Once the screws are removed the glove box will still be held in by two tabs. I was able to give it a yank outwards to dislodge it. I did not disconnect the wiring from the glove box, I just set it down out of the way.
Next, remove the screw in the picture below connected to the air duct. Then drop it downwards to take it out.
Remove the screw holding the blue box and move out of the way.
I wish I would have taken pictures of the actual damage, but I was unsure whether this fix would work so I had held off. The main body of the blower is made out of Polypropylene, which was a concern because there is really no glue that will stick to it. My only glimmer of hope was that the broken linkage arm was stamped with POM which is Polyoxymethylene and that is glue-able. It now appears that the hood that the linkage arm attaches to is POM as well so Loctite plastic epoxy will bond
The red arrow points to the arm that was broken, I found the linkage arm fallen down below. It is attached captive to a peg coming off the hood to raise and lower it. The break was on the peg, and at a slight angle so I was able to put it back into proper position. The lower blue arrow shows where the other end of the linkage attaches to the servo motor linkage. This connection is a small peg that slides up and down in the "broken" linkage piece. If your motor is dead you will have to replace it now. It's the black box near the blue arrow.
After testing out this fix it seems that placing a screw into the linkage, as you see bellow, is unnecessary. I have since removed the screw and ensured proper functionality. If you want to still install the screw as well use a self tapping hex-headed screw. I used an 8x18 1.5" but be sure you bore out a hole through the center of the broken peg attached to the broken off linkage, this ensures you'll be able to drive it all the way into the other side by hand. I used a 1/4 socket wrench which worked fine.
Mix up the plastic epoxy and apply to the broken areas. Set the linkage in its proper place, with the small servo arm peg in the slider, and press the broken halves of the hood peg together. I held it for about 5 minutes before letting go.
In the picture bellow you can see the linkage piece freshly glued in (you can also see some extra glue which should be wiped away). Let the epoxy dry for a full 24 hours before you even breathe on the thing! I reattached my battery for a moment after waiting 24 hours (careful of the airbag!) and turned the ignition on to test everything out. When you cycle the circ.-fresh button the hood should lift and lower without issue.
Reassemble everything in the exact opposite order you took it apart, and enjoy saving a butt load of $
03-19-13, 05:56 PM
#34
Driver School Candidate
In the process of this DIY for a gs300 2006. There are a couple things different. Will post pics Thursday. The third 10 mm bolt is under the passenger side side panel which means the center counsel overlay and shift **** need to come off. My lever was also broken. I'm trying the epoxy thing now. Will take more pics on the reassemble.
I felt so dumb for doing it, but yes I didn't read the manual before attempting to change my cabin air filter for the first time. I popped the panel off in the glove box and tried to lift the cover, it made a snap noise. Knowing I may have made a mistake, I decided to research how much damage I had done. Most people claimed you have to remove the dash, and in some cases you may have to, but after seeing how mine broke I believe that most others in the same boat will have a similar failure.
This DIY will show you how to reattach a broken linkage arm to the air circulation hood and controlling motor. As usual, perform this DIY at your own risk.
First thing to establish is whether the motor is still working or not. Cycle the fresh air/ recirculate button with the car turned on but not running. You should be able to hear the faint whine of the motor working behind the glove box. I had to cycle a couple times before I was sure the motor was still operational because it's fairly quiet. If the motor is no longer working you can order a new one from Sewell for $125 with the CL discount (8710630430). Please double check with a Lexus parts tech to ensure that is the correct part number.
Since things were broken with your system in fresh air mode, please make sure to set the button to fresh air before proceeding. This will ensure the linkage and air hood will all line up properly when reaffixing.
Now your ready to fix! You will need:
a) philips screwdriver
b) 10mm socket and socket wrench
c) flashlight
d) loctite plastic epoxy
Start by disconnecting the negative battery terminal, and wait 90 seconds, as you have to remove the passenger side knee airbag, and you don't want that going of inadvertently.
Remove the passenger side dash side panel. It is held in by clips and pops out from the front.
Remove the kick panel at the bottom of the passenger side dash. It should just pull down. Disconnect the led attached.
There are 3 10mm bolts holding the knee air bag in. Two on the lower right and one on the lower left. Remove them and drop down. I didn't disconnect this piece, just set it on the ground and it should not be in the way.
Open the glove box. There are 5 screws to remove. Three on the top and two on the bottom. In the picture bellow the screws are already removed so the holes are more visible. Once the screws are removed the glove box will still be held in by two tabs. I was able to give it a yank outwards to dislodge it. I did not disconnect the wiring from the glove box, I just set it down out of the way.
Next, remove the screw in the picture below connected to the air duct. Then drop it downwards to take it out.
Remove the screw holding the blue box and move out of the way.
I wish I would have taken pictures of the actual damage, but I was unsure whether this fix would work so I had held off. The main body of the blower is made out of Polypropylene, which was a concern because there is really no glue that will stick to it. My only glimmer of hope was that the broken linkage arm was stamped with POM which is Polyoxymethylene and that is glue-able. It now appears that the hood that the linkage arm attaches to is POM as well so Loctite plastic epoxy will bond
The red arrow points to the arm that was broken, I found the linkage arm fallen down below. It is attached captive to a peg coming off the hood to raise and lower it. The break was on the peg, and at a slight angle so I was able to put it back into proper position. The lower blue arrow shows where the other end of the linkage attaches to the servo motor linkage. This connection is a small peg that slides up and down in the "broken" linkage piece. If your motor is dead you will have to replace it now. It's the black box near the blue arrow.
After testing out this fix it seems that placing a screw into the linkage, as you see bellow, is unnecessary. I have since removed the screw and ensured proper functionality. If you want to still install the screw as well use a self tapping hex-headed screw. I used an 8x18 1.5" but be sure you bore out a hole through the center of the broken peg attached to the broken off linkage, this ensures you'll be able to drive it all the way into the other side by hand. I used a 1/4 socket wrench which worked fine.
Mix up the plastic epoxy and apply to the broken areas. Set the linkage in its proper place, with the small servo arm peg in the slider, and press the broken halves of the hood peg together. I held it for about 5 minutes before letting go. In the picture bellow you can see the linkage piece freshly glued in (you can also see some extra glue which should be wiped away).
Let the epoxy dry for a full 24 hours before you even breathe on the thing! I reattached my battery for a moment after waiting 24 hours (careful of the airbag!) and turned the ignition on to test everything out. When you cycle the circ.-fresh button the hood should lift and lower without issue.
Reassemble everything in the exact opposite order you took it apart, and enjoy saving a butt load of $
I popped the panel off in the glove box and tried to lift the cover, it made a snap noise. Knowing I may have made a mistake, I decided to research how much damage I had done. Most people claimed you have to remove the dash, and in some cases you may have to, but after seeing how mine broke I believe that most others in the same boat will have a similar failure. This DIY will show you how to reattach a broken linkage arm to the air circulation hood and controlling motor. As usual, perform this DIY at your own risk.
First thing to establish is whether the motor is still working or not. Cycle the fresh air/ recirculate button with the car turned on but not running. You should be able to hear the faint whine of the motor working behind the glove box. I had to cycle a couple times before I was sure the motor was still operational because it's fairly quiet. If the motor is no longer working you can order a new one from Sewell for $125 with the CL discount (8710630430). Please double check with a Lexus parts tech to ensure that is the correct part number.
Since things were broken with your system in fresh air mode, please make sure to set the button to fresh air before proceeding. This will ensure the linkage and air hood will all line up properly when reaffixing.
Now your ready to fix! You will need:
a) philips screwdriver
b) 10mm socket and socket wrench
c) flashlight
d) loctite plastic epoxy
Start by disconnecting the negative battery terminal, and wait 90 seconds, as you have to remove the passenger side knee airbag, and you don't want that going of inadvertently.
Remove the passenger side dash side panel. It is held in by clips and pops out from the front.
Remove the kick panel at the bottom of the passenger side dash. It should just pull down. Disconnect the led attached.
There are 3 10mm bolts holding the knee air bag in. Two on the lower right and one on the lower left. Remove them and drop down. I didn't disconnect this piece, just set it on the ground and it should not be in the way.
Open the glove box. There are 5 screws to remove. Three on the top and two on the bottom. In the picture bellow the screws are already removed so the holes are more visible. Once the screws are removed the glove box will still be held in by two tabs. I was able to give it a yank outwards to dislodge it. I did not disconnect the wiring from the glove box, I just set it down out of the way.
Next, remove the screw in the picture below connected to the air duct. Then drop it downwards to take it out.
Remove the screw holding the blue box and move out of the way.
I wish I would have taken pictures of the actual damage, but I was unsure whether this fix would work so I had held off. The main body of the blower is made out of Polypropylene, which was a concern because there is really no glue that will stick to it. My only glimmer of hope was that the broken linkage arm was stamped with POM which is Polyoxymethylene and that is glue-able. It now appears that the hood that the linkage arm attaches to is POM as well so Loctite plastic epoxy will bond
The red arrow points to the arm that was broken, I found the linkage arm fallen down below. It is attached captive to a peg coming off the hood to raise and lower it. The break was on the peg, and at a slight angle so I was able to put it back into proper position. The lower blue arrow shows where the other end of the linkage attaches to the servo motor linkage. This connection is a small peg that slides up and down in the "broken" linkage piece. If your motor is dead you will have to replace it now. It's the black box near the blue arrow.
After testing out this fix it seems that placing a screw into the linkage, as you see bellow, is unnecessary. I have since removed the screw and ensured proper functionality. If you want to still install the screw as well use a self tapping hex-headed screw. I used an 8x18 1.5" but be sure you bore out a hole through the center of the broken peg attached to the broken off linkage, this ensures you'll be able to drive it all the way into the other side by hand. I used a 1/4 socket wrench which worked fine.
Mix up the plastic epoxy and apply to the broken areas. Set the linkage in its proper place, with the small servo arm peg in the slider, and press the broken halves of the hood peg together. I held it for about 5 minutes before letting go.
In the picture bellow you can see the linkage piece freshly glued in (you can also see some extra glue which should be wiped away). Let the epoxy dry for a full 24 hours before you even breathe on the thing! I reattached my battery for a moment after waiting 24 hours (careful of the airbag!) and turned the ignition on to test everything out. When you cycle the circ.-fresh button the hood should lift and lower without issue.
Reassemble everything in the exact opposite order you took it apart, and enjoy saving a butt load of $
The following users liked this post:
Busajoe (11-28-17)
03-19-13, 07:23 PM
#36
Driver School Candidate
I'm doing this now on a 2006 GS300. Has anyone paid to have this done? How much did the stealer charge?
Anyone know the part number of the linkage arm and/or servo motor. It appears the linkage arm does detach fron the hood. I'm gluing it now but I may have to drop the whole blower assembly and fix it on the bench. My wife sent like seeing her dash in pieces
Anyone know the part number of the linkage arm and/or servo motor. It appears the linkage arm does detach fron the hood. I'm gluing it now but I may have to drop the whole blower assembly and fix it on the bench. My wife sent like seeing her dash in pieces
03-20-13, 12:45 PM
#37
Considering that most cabin air filters don't require the car to be in recirculate mode to change it they really should have; some time ago. I am glad I didn't break my door doing this. But Lexus should at least cover some of the costs if not all be cause they did not put the warning sticker on this.

 03-20-13, 07:44 PM
#39
Pole Position

Join Date: Mar 2013
Location: NJ
Posts: 249
Likes: 0
Received 0 Likes
on
0 Posts
Great Post thanks. I always change all the filters myself,and never had to set the recirc setting on the Camry, CR-V, Civic. I def don't want to mess up my Wife's new IS-250. Anyone know if it has to be changed with that setting on my 2012 RX-350?
Thanks.
Thanks.
05-22-13, 11:48 PM
#40
Driver School Candidate

Join Date: May 2013
Location: WA
Posts: 1
Likes: 0
Received 0 Likes
on
0 Posts

my recirc door is beyond fixable. i already ordered part# 87020A which include this door. the problem is that i can't get the door out of the car..all screws are losen, the whole box is moving, just not enough space to get it out. How did you get yours out? Thanks!
 07-01-13, 06:40 PM
#42
Driver School Candidate
This was an easy "in the garage" fix for me over a year ago. Just follow the instructions with the photos and you should be fine. I did not have luck with the plastic epoxy so I used a small drill bit and drilled a hole through the broken linkage piece. I found a long thin bolt in my spare parts drawer that originally came from the hardware for hanging a plant from the ceiling. This worked the same way as the picture in the post. Take your time. There is another post that shows you how to remove the center console and the radio/cd unit. That was a necessary removal for me. Total cost was around $5.00 for the epoxy and my time on a Saturday afternoon. Beats the heck out of $1769 which is mostly for the labor. It pays to be "handy".
LennGS
The following users liked this post:
NormzGS350 (07-22-22)
07-10-13, 11:25 AM
#43

Hey all,
So my car has been occassionally spewing out warm humid air from the AC. A simple push of the AC on/off switch would do the trick. Otherwise, the AC is still pretty cold with no other issues. I brought this up with a dealership and was told that I broke my cabin filter door... that is why my AC is having this problem. I don't buy it. I made sure to change the filters properly. Besides the warm air issue, I have no issues with the auto climatic control, recirc/fresh air modes.
I asked them to show me what broke and all they did was open up the glove compartment, took out the black shelf and black door. And just said the "door" was broken. I don't hear anything grinding when I switch from recirc to fresh air...
Any thoughts?
