

 12-15-14, 01:07 PM
Last edit by: IB Advertising
See related guides and technical advice from our community experts:
Browse all: Interior
- IS GS: How to install Radar Detector
Step by step instructions for do-it-yourself repairs
Browse all: Interior

DIY radar detector and Blackvue camera installation

 05-02-18, 04:45 PM
#92
Driver School Candidate

I had a OJOCAM installed a couple of years ago.... it cost me around $100 (Can) and $35. to install. It took about 20 minutes to a windshield replacement specialist to install and it works nicely..
A friend of mine used his MicroSD card to prove an accident to Police. The other car driver was caught and paid for all the repairs and had a big fine as he left the scene ... but his licence plate was so evident ... so I decided to go for the camera.
I haven't had an accident yet but it could hepl.
Good day.
05-03-18, 06:44 AM
#93
Is there any point in getting a battery pack vs the Power Magic Pro?
https://www.blackvue.com/product/pow...battery-b-124/
https://www.blackvue.com/product/pow...battery-b-124/
05-04-18, 02:40 PM
#94
I guess this allows you to still record in Parking Mode, but doesn't require as involved of an install where you have to wire it your fusebox like you do with a PMP. With the battery pack you plug it into a cigarette lighter and plug the Blackvue cam into the battery pack. I went with the PMP and it wasn't that hard of an install at all and was a lot more tidy as you don't have wires exposed.
05-07-18, 06:50 AM
#95
The whole point of the PMP is to prevent the blackvue from draining your battery to the point that the voltage drops below whatever voltage threshold that you set, so in theory this shouldn't cause more degradation than anything else drawing power from the car battery. Hardwiring the battery pack in place I guess would provide a dedicated power source just for the blackvue camera when the ignition is off. I've never had an issue with the the PMP shutting off the camera, and I've had the car parked with the ignition off for almost a week and the car still started. Perhaps if I were to park my car at the airport for an extended length of time, the battery pack would be extra piece of mind.
05-14-18, 07:42 AM
#96
I have a DR750 installed few weeks ago, I found that the parking mode did not work for the most of the time i.e. when I shut down the car the cam will also shut down immediately. I have tried to set it cut off at 11.8v or 12v and work for 12 hours. It only works occasionally but for sure not as long as 12 hours. After the parking mode worked once for 1-2 hrs, it won't work again even after I run the car for 20-30km. but after normal use the car for few days, the parking code will work once again. Is it normal?
I don't tend to think this is the wire problem because it has ever worked. I just wonder if the battery of my car is not strong enough to support the parking mode?
Any one experienced a similar issue?
I don't tend to think this is the wire problem because it has ever worked. I just wonder if the battery of my car is not strong enough to support the parking mode?
Any one experienced a similar issue?
I set mine to 12v and 12 hours but only got 30 mins in parking mode on a 64gb card
05-17-18, 03:17 AM
#97
Driver School Candidate

Join Date: May 2018
Location: Louisiana
Posts: 10
Likes: 0
Received 0 Likes
on
0 Posts
ok guys, after much requests i am posting my DIY for these 2 things.
so if you aren't doing both thats fine the process is similar for both.
i bought the 2 channel Blackvue so there are 2 cameras to install. keep in mind if you have a rear shade the shade will hit the rear camera. but it just barely touches and doesn't cause any problems. over time it might wear a mark on the mounting bracket and if that bothers you you can make a little ramp on either side of the rear glass for the wheels to roll over to lift the shade away from the glass as it reaches the top of it"s travel.
you could make them out of a couple erasers and some thin double side tape stick them to the glass if this bugs you.
if you want to do this let me know and i can probably make one to show as an example but for now I'm going to leave mine the way it is because it works just fine.
(if you have no clue what i am talking about look where the rear camera is located in this pic and then go to your car, roll the shade up then pull the top part away from the glass on 1 side you will see there are little rubber wheels that roll up along the glass using the spring tension of the arms that lift the shade to keep it against the glass.
then you'll understand where i mean to make a small ramp for the wheels to go over lifting the shade from the glass so it won't hit the camera)
anyway on to the install!
now this is the rear camera, keep in mind the lens is on the end of the camera no the center, so the camera needs to be mounted to the drivers side about an inch or so from center to the lens itself is centered.
keep in mind there is an antenna in the rear glass that has a line right in the middle. this will be in the view of the camera so if you don't want that obstruction just move the camera to 1 side or the other.
Attachment 426782
once you get the camera mounted all you need to do it tuck the wire up under the headliner over to the drivers side of the car and when you reach the corner of the glass continue tucking the wire under the edge of the headliner working your way to the front of the car.
Attachment 426783
work your way forward tucking the wire under the trim and work your way to the door opening around this corner. just carefully get the wire behind the lower panel and when you get to this point pull the wire down a little so it's coming from under the lower panel, this way you can make a 90 degree turn to head forward without kinking the wire and it will run over the top of the headliner and along the edge of the door jamb.
Attachment 426784
this is very easy to run the wires just life the rubber up to expose the edge of the headliner and stuff the wire just on top of the headliner as you go while the rubber pops back into place as you go.
this is as good of a pic as i could get, but you get the idea
Attachment 426785
just keep working your way forward, this section is a little tight and i needed a screw driver to carefully stuff the wire back there. be careful not to catch the headliner or you might tear it, you just need to carefully stuff the wire in this and around the corner again to the front door jamb and again under the rubber and along the top of the headliner
Attachment 426786
just run the wire all the way to the a pillar and stop for now..
next mount the front camera here is how mine looks from outside and inside
i mounted it using a row of dots on the glass to see it was straight. i had the tinted brow installed to hide my radar detector and most of the camera, also there is way too much light that comes from the top of the glass since Lexus did not use a tinted band at the top of the windshield.
turns out the tinted brow was just perfect height to install the camera without worry of it sticking to the tint and not the glass.
the lens of the camera sits just overtop of the mirror mount so its dead center of the glass and is totally hidden from the drivers view behind the mirror.
you can try a different location if you like but any other location you pick will leave the camera in plain sight. i don't like that idea..
Attachment 426787
Attachment 426788
now that the camera is mounted you need to remove the A pillar trim. this looks harder than it really is..
first remove the dash side trim by grabbing the bottom of it and pop it loose front he bottom and work your way to the top. you may need a screw driver and gently pry it off.
it should come out fairly easy
Attachment 426789
also there is a trim piece attached to the weather stripping that extends from the floor that the side piece is caught under. you just need to pull the rubber weather shipping forward to pull the plastic trim along with it. this will make removing the side piece easier and easier to reinstall.
Attachment 426790
if you pull the rubber part forward this piece will be loose enough to get the side piece out
Attachment 426791
now we remove the A pillar trim, all you need to do is gently pull the trim away by grabbing the edge at the door jamb with the left hand and the edge by the glass with the right and slowly pry it away. it will pop out about an inch like this and but before removing it fully look at the following pic.
Attachment 426792
to remove it fully look for this clip at the top end, there are 2 little toothpick tabs on top and bottom of this piece that you need to push 1 up front he bottom and the other down from the top using a screw driver you can get to the bottom easily if you just lift the airbag out of the way you can get a clear shot at it with the end of a screw driver, and get the top one from the other side. once both of the tabs have been pushed in the clip will easily come out of the hole in the A pillar and the trim can be removed. once the top is out just wiggle and lift the entire piece out of the edge of the dash. there are 2 tabs that slip into slots n the edge of the dash.
here is the little clip with the tabs, do not pry this away from the a pillar until you have both top and bottom tabs pushed in to release it or you will probably break it!.
Attachment 426793
once you get this part out make sure the 2 tabs are again extended to when you put it back it will snap back into place.
also you will note that this black clip does 2 things, 1 it holds the trim to the pillar and 2 it has this open position that you saw earlier, look at the clip closely and see that you need to push the clip back into the closed position it will snap back together. just push it back together on this trim piece you'll see exactly what i mean when you look at your part.
do both of these things now so when you go to reinstall it is already popped back in place when you install it.
now we are ready to run the rear camera wire into this location and over along the headliner to the camera.
you will have excess wire so i looped it into a little coil just like it was when it came out of the packaging to take up some slack, then ran the rest over to the camera. sorry i didn't get a pic of this but i made a coil about 3 inches in diameter and positioned it at the very bottom of the A pillar and stuffed it between the dash and the pillar. just a place to store the excess wire. you could stuff it on top of the headliner on the way to the camera if you like but running it down the piller to the coil and back up used some of the wire anyway. you could also run it under the dash if you like, coil the excess and run it back up the pillar and over to the camera if you like.
now onto the power wire..
sorry i didn't get a picture, but all you need to do is run the power wire from under the dash and up the A pillar, across the top of the windshield and along with the rear camera wire tuck everything up on top of the headliner, you can pull the headliner away from the windshield easily and stuff it up there. around the mirror mount and to the passenger side so you have enough slack to reach the camera.
then using some electrical tape or zip tiies secure all the wires running in that area to existing factory wires being sure not to wrap anything around or through the airbag. i stayed on top of the airbag along the drain tube that goes to the sunroof.
you can see it in this picture.
Attachment 426794
now i am going to switch to the radar detector install because all of whats taken apart now has to be taken apart to install the radar detector.
first off you have 2 cables, the radar detector itself is powered by a cable with a phone connector at each end. 1 end goes to the detector itself so this needs to be run from under the dash, up the pillar to the corner area of the windshield with enough slack to attach to the unit..
the other end goes along the underside of the dash to the center console area where i mounted the direct wire LIVE unit.
from the LIVE unit there is a smaller power wire that goes to the fusebox with e fuse installed on the positive lead. this plugs into the Live unit to power it and the radar detector.
remove the side trim near the radio by pulling it straight out just like the dash side trim piece you removed earlier. it just pops off by prying it out with your fingers.
Attachment 426795
once you get that out of the way you need to run the 2 wires up to the area just to the left of the heater controls and attach them to the direct wire LIVE unit, then after installing the plastic bracket to the top of the unit with the 2 side adhesive mounting tape on the top side of the LIVE unit.
carefully reinstall the side trim piece leaving a very short amount of wire visible to the live unit. in other words get the unit as close to the mounting location as you can while you reinstall the leather side cover with the 2 wires coming out over the top of it.
i made a tight bend in the 2 wires to the right behind the live unit so they would allow me to stuff the live unit as far back in the dash as i could get it.
once you popped the cover back to the side of the radio stick the live unit to the dash like this.
Attachment 426796
i like this location because its easy to reach, and the blue LED in the thing is distracting, i cannot see it at all behind the steering wheel so it works perfect in this location.
you could also mount it under the dash but i think it looks nice here.
at this point you just need to run the wires over to the fusebox under the dash to power the camera and the radar detector.
put all the trim panels back into place. the Ai pillar is a little tricky just make sure the 2 tabs at the bottom go into the slots on the dash, wiggle it a little and pop it back onto the pillar. if you ran your wires along wires already there you should have no interference issues.
now some many not like the way i wired mine. this is a leased vehicle for me so i do not want to cut any wires or do anything thats not easy to remove when it take everything out.
if you haven't figured it out by now so far we have used almost no tools and all the wires can be easily pulled right out and camera removed from their location.
to connect everything up the first suggestion i have is you tidy up some of the excess wire on the power magic pro. to do this take the wire bundle and get the long cigarette lighter socket wires untangled. chuck the wires in a drill like this. (just the red and black making sure they are equal length) chuck them by making a bend in them as seen here
Attachment 426797
now step on the socket on the floor and hold your drill up high enough to keep tension on the wires with the drill pointed down to the floor
like this
Attachment 426798
you get the idea!
now before you spin the drill full speed realize that the rest of the wires attached to the drill are going to start spinning and your likely to take it in the face! so spin the drill slowly until it twists the wires up like this
Attachment 426799
next make a bundle and tape it up and do the same for the camera power wire like this
Attachment 426800
stuff the excess wires behind the carpet way back in the corner like this
Attachment 426801
now all we need to do is wire it all up.
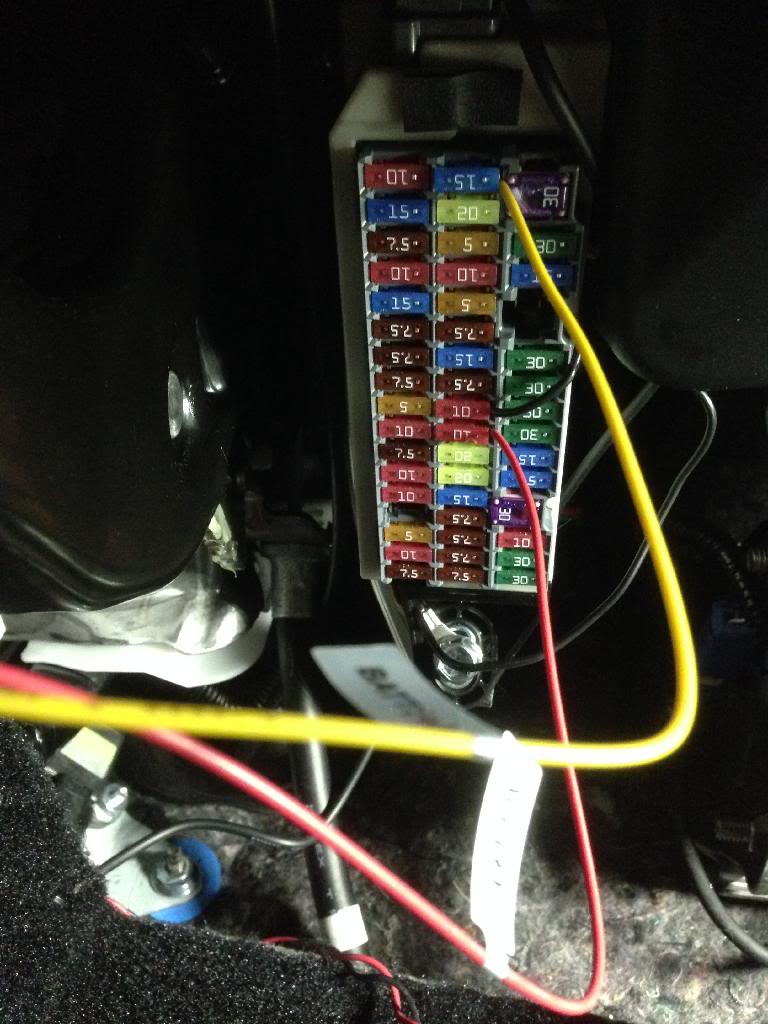
i choose ignition 1 and ignition 2 for mu connection points. just take a needle nose pliers and pull out the fuse, strip enough wire so you have enough to run alongside the fuse and make a 90degree bend in the wire. stick the wire in the slot where the fuse came out and stuff the fuse in on top of the wire.
i would not recommend this method for high current applications, but we are using some really thin wire here and nothing in this install uses more than 1 amp. so this may look ghetto but works fine and doesn't damage the car in any way.
the red wire is ignition under the 10 amp fuse, the black is the power to the radar detector and it is also under another ignition fuse, the yellow wire is the battery power and it is under the hazard fuse that is powered all the time.
the other 2 wires are under the 10mm nut at the back of the fuse box that holds the fusebox to a bracket.
Attachment 426802
once you have those 3 wires and 2 ground wires attached you can snap the cover back on and tidy up the remaining wires.
this is what it looks like with the fuse cover reinstalled, i used a couple wire ties to secure the wires up high and way from moving parts.
also twisting up the wires on this connector keeps them neat and tidy.
Attachment 426803
next we just have to install the power magic pro control box.
if you haven't figured it out by now this little guy makes sure the power stays on to the comers while the car is parked.
just stick it to the underside of the dash using the double sided tape provided and done!
now we need to program the settings.
these are my settings 11.8 volts and 12 hours you can choose a different setting if you like but this says to keep the camera running for 12 hours or if the battery voltage falls below 11.8 volts so you don't end up with a dead battery.
if you don't want to use this device it is optional, but why have the ability to record while parked and risk your battery going dead?
Attachment 426804
and just match the switch settings like this
Attachment 426805
and mount the radar detector like this.
Attachment 426806
DONE!
so if you aren't doing both thats fine the process is similar for both.
i bought the 2 channel Blackvue so there are 2 cameras to install. keep in mind if you have a rear shade the shade will hit the rear camera. but it just barely touches and doesn't cause any problems. over time it might wear a mark on the mounting bracket and if that bothers you you can make a little ramp on either side of the rear glass for the wheels to roll over to lift the shade away from the glass as it reaches the top of it"s travel.
you could make them out of a couple erasers and some thin double side tape stick them to the glass if this bugs you.
if you want to do this let me know and i can probably make one to show as an example but for now I'm going to leave mine the way it is because it works just fine.
(if you have no clue what i am talking about look where the rear camera is located in this pic and then go to your car, roll the shade up then pull the top part away from the glass on 1 side you will see there are little rubber wheels that roll up along the glass using the spring tension of the arms that lift the shade to keep it against the glass.
then you'll understand where i mean to make a small ramp for the wheels to go over lifting the shade from the glass so it won't hit the camera)
anyway on to the install!
now this is the rear camera, keep in mind the lens is on the end of the camera no the center, so the camera needs to be mounted to the drivers side about an inch or so from center to the lens itself is centered.
keep in mind there is an antenna in the rear glass that has a line right in the middle. this will be in the view of the camera so if you don't want that obstruction just move the camera to 1 side or the other.
Attachment 426782
once you get the camera mounted all you need to do it tuck the wire up under the headliner over to the drivers side of the car and when you reach the corner of the glass continue tucking the wire under the edge of the headliner working your way to the front of the car.
Attachment 426783
work your way forward tucking the wire under the trim and work your way to the door opening around this corner. just carefully get the wire behind the lower panel and when you get to this point pull the wire down a little so it's coming from under the lower panel, this way you can make a 90 degree turn to head forward without kinking the wire and it will run over the top of the headliner and along the edge of the door jamb.
Attachment 426784
this is very easy to run the wires just life the rubber up to expose the edge of the headliner and stuff the wire just on top of the headliner as you go while the rubber pops back into place as you go.
this is as good of a pic as i could get, but you get the idea
Attachment 426785
just keep working your way forward, this section is a little tight and i needed a screw driver to carefully stuff the wire back there. be careful not to catch the headliner or you might tear it, you just need to carefully stuff the wire in this and around the corner again to the front door jamb and again under the rubber and along the top of the headliner
Attachment 426786
just run the wire all the way to the a pillar and stop for now..
next mount the front camera here is how mine looks from outside and inside
i mounted it using a row of dots on the glass to see it was straight. i had the tinted brow installed to hide my radar detector and most of the camera, also there is way too much light that comes from the top of the glass since Lexus did not use a tinted band at the top of the windshield.
turns out the tinted brow was just perfect height to install the camera without worry of it sticking to the tint and not the glass.
the lens of the camera sits just overtop of the mirror mount so its dead center of the glass and is totally hidden from the drivers view behind the mirror.
you can try a different location if you like but any other location you pick will leave the camera in plain sight. i don't like that idea..
Attachment 426787
Attachment 426788
now that the camera is mounted you need to remove the A pillar trim. this looks harder than it really is..
first remove the dash side trim by grabbing the bottom of it and pop it loose front he bottom and work your way to the top. you may need a screw driver and gently pry it off.
it should come out fairly easy
Attachment 426789
also there is a trim piece attached to the weather stripping that extends from the floor that the side piece is caught under. you just need to pull the rubber weather shipping forward to pull the plastic trim along with it. this will make removing the side piece easier and easier to reinstall.
Attachment 426790
if you pull the rubber part forward this piece will be loose enough to get the side piece out
Attachment 426791
now we remove the A pillar trim, all you need to do is gently pull the trim away by grabbing the edge at the door jamb with the left hand and the edge by the glass with the right and slowly pry it away. it will pop out about an inch like this and but before removing it fully look at the following pic.
Attachment 426792
to remove it fully look for this clip at the top end, there are 2 little toothpick tabs on top and bottom of this piece that you need to push 1 up front he bottom and the other down from the top using a screw driver you can get to the bottom easily if you just lift the airbag out of the way you can get a clear shot at it with the end of a screw driver, and get the top one from the other side. once both of the tabs have been pushed in the clip will easily come out of the hole in the A pillar and the trim can be removed. once the top is out just wiggle and lift the entire piece out of the edge of the dash. there are 2 tabs that slip into slots n the edge of the dash.
here is the little clip with the tabs, do not pry this away from the a pillar until you have both top and bottom tabs pushed in to release it or you will probably break it!.
Attachment 426793
once you get this part out make sure the 2 tabs are again extended to when you put it back it will snap back into place.
also you will note that this black clip does 2 things, 1 it holds the trim to the pillar and 2 it has this open position that you saw earlier, look at the clip closely and see that you need to push the clip back into the closed position it will snap back together. just push it back together on this trim piece you'll see exactly what i mean when you look at your part.
do both of these things now so when you go to reinstall it is already popped back in place when you install it.
now we are ready to run the rear camera wire into this location and over along the headliner to the camera.
you will have excess wire so i looped it into a little coil just like it was when it came out of the packaging to take up some slack, then ran the rest over to the camera. sorry i didn't get a pic of this but i made a coil about 3 inches in diameter and positioned it at the very bottom of the A pillar and stuffed it between the dash and the pillar. just a place to store the excess wire. you could stuff it on top of the headliner on the way to the camera if you like but running it down the piller to the coil and back up used some of the wire anyway. you could also run it under the dash if you like, coil the excess and run it back up the pillar and over to the camera if you like.
now onto the power wire..
sorry i didn't get a picture, but all you need to do is run the power wire from under the dash and up the A pillar, across the top of the windshield and along with the rear camera wire tuck everything up on top of the headliner, you can pull the headliner away from the windshield easily and stuff it up there. around the mirror mount and to the passenger side so you have enough slack to reach the camera.
then using some electrical tape or zip tiies secure all the wires running in that area to existing factory wires being sure not to wrap anything around or through the airbag. i stayed on top of the airbag along the drain tube that goes to the sunroof.
you can see it in this picture.
Attachment 426794
now i am going to switch to the radar detector install because all of whats taken apart now has to be taken apart to install the radar detector.
first off you have 2 cables, the radar detector itself is powered by a cable with a phone connector at each end. 1 end goes to the detector itself so this needs to be run from under the dash, up the pillar to the corner area of the windshield with enough slack to attach to the unit..
the other end goes along the underside of the dash to the center console area where i mounted the direct wire LIVE unit.
from the LIVE unit there is a smaller power wire that goes to the fusebox with e fuse installed on the positive lead. this plugs into the Live unit to power it and the radar detector.
remove the side trim near the radio by pulling it straight out just like the dash side trim piece you removed earlier. it just pops off by prying it out with your fingers.
Attachment 426795
once you get that out of the way you need to run the 2 wires up to the area just to the left of the heater controls and attach them to the direct wire LIVE unit, then after installing the plastic bracket to the top of the unit with the 2 side adhesive mounting tape on the top side of the LIVE unit.
carefully reinstall the side trim piece leaving a very short amount of wire visible to the live unit. in other words get the unit as close to the mounting location as you can while you reinstall the leather side cover with the 2 wires coming out over the top of it.
i made a tight bend in the 2 wires to the right behind the live unit so they would allow me to stuff the live unit as far back in the dash as i could get it.
once you popped the cover back to the side of the radio stick the live unit to the dash like this.
Attachment 426796
i like this location because its easy to reach, and the blue LED in the thing is distracting, i cannot see it at all behind the steering wheel so it works perfect in this location.
you could also mount it under the dash but i think it looks nice here.
at this point you just need to run the wires over to the fusebox under the dash to power the camera and the radar detector.
put all the trim panels back into place. the Ai pillar is a little tricky just make sure the 2 tabs at the bottom go into the slots on the dash, wiggle it a little and pop it back onto the pillar. if you ran your wires along wires already there you should have no interference issues.
now some many not like the way i wired mine. this is a leased vehicle for me so i do not want to cut any wires or do anything thats not easy to remove when it take everything out.
if you haven't figured it out by now so far we have used almost no tools and all the wires can be easily pulled right out and camera removed from their location.
to connect everything up the first suggestion i have is you tidy up some of the excess wire on the power magic pro. to do this take the wire bundle and get the long cigarette lighter socket wires untangled. chuck the wires in a drill like this. (just the red and black making sure they are equal length) chuck them by making a bend in them as seen here
Attachment 426797
now step on the socket on the floor and hold your drill up high enough to keep tension on the wires with the drill pointed down to the floor
like this
Attachment 426798
you get the idea!
now before you spin the drill full speed realize that the rest of the wires attached to the drill are going to start spinning and your likely to take it in the face! so spin the drill slowly until it twists the wires up like this
Attachment 426799
next make a bundle and tape it up and do the same for the camera power wire like this
Attachment 426800
stuff the excess wires behind the carpet way back in the corner like this
Attachment 426801
now all we need to do is wire it all up.
i choose ignition 1 and ignition 2 for mu connection points. just take a needle nose pliers and pull out the fuse, strip enough wire so you have enough to run alongside the fuse and make a 90degree bend in the wire. stick the wire in the slot where the fuse came out and stuff the fuse in on top of the wire.
i would not recommend this method for high current applications, but we are using some really thin wire here and nothing in this install uses more than 1 amp. so this may look ghetto but works fine and doesn't damage the car in any way.
the red wire is ignition under the 10 amp fuse, the black is the power to the radar detector and it is also under another ignition fuse, the yellow wire is the battery power and it is under the hazard fuse that is powered all the time.
the other 2 wires are under the 10mm nut at the back of the fuse box that holds the fusebox to a bracket.
Attachment 426802
once you have those 3 wires and 2 ground wires attached you can snap the cover back on and tidy up the remaining wires.
this is what it looks like with the fuse cover reinstalled, i used a couple wire ties to secure the wires up high and way from moving parts.
also twisting up the wires on this connector keeps them neat and tidy.
Attachment 426803
next we just have to install the power magic pro control box.
if you haven't figured it out by now this little guy makes sure the power stays on to the comers while the car is parked.
just stick it to the underside of the dash using the double sided tape provided and done!
now we need to program the settings.
these are my settings 11.8 volts and 12 hours you can choose a different setting if you like but this says to keep the camera running for 12 hours or if the battery voltage falls below 11.8 volts so you don't end up with a dead battery.
if you don't want to use this device it is optional, but why have the ability to record while parked and risk your battery going dead?
Attachment 426804
and just match the switch settings like this
Attachment 426805
and mount the radar detector like this.
Attachment 426806
DONE!
which model blackvue was this?
11-12-18, 03:05 PM
#98
Driver School Candidate

Hey, Do you mind sharing what fuses you hooked up to for your battery and acc? I'm having a bear of a time getting mine to work in parking mode, and at this point, I don't think it's my fuses.
Looks like you're in an IS as well?
Looks like you're in an IS as well?
07-25-20, 02:06 AM
#100
Lead Lap


used to seeing Mini Fuses and adding to these, space is really tight
instead of putting wires up in there, where there is a small possibility of a wire touching or tapping into the fuse really close to it and more so with our 3IS "Low Profile Fuses" - added a double mini fuse holder with butt connector on the end to get it away from the Fuses
for Rear Dash Cam, i used one of the same slot as CL Member: wycy


Last edited by GR3Y5H3ART; 07-25-20 at 02:12 AM.
The following users liked this post:
kj07xk (07-26-20)

Thread
Thread Starter
Forum
Replies
Last Post