JoeZ Exhaust + Intake Dyno = +26 RWHP +19 RWTQ SAE
 02-21-09, 03:24 PM
#76
Pole Position

You can pick up the tool at any auto parts store. It looks like a deep well socket with a slot cut in it from the end up to the hub where you insert your ratchet. Mine had a 3/8" drive.
Pat
Pat
 02-21-09, 09:37 PM
#77
 02-22-09, 12:09 AM
#78
Lexus Fanatic
iTrader: (10)
Join Date: Nov 2004
Location: Under an IS F since 2008
Posts: 13,441
Received 1,063 Likes
on
586 Posts
I have a question for Joe Z and others who have done this. How do you disconnect the O2 sensor from it's connector. There is a rubber boot where it goes into the underside of the vehicle. When I pulled this boot down the wiring went further up into the body cavity. It would have been much easier if I could have disconnected each of the sensors. Luckly I had my son and my grandson helping so they could hold the exhaust up after it was disconnected from the CATs while I disconnected the O2 sensors.
One reason it may have galled is that the exhaust was a little warm. I would suggest letting the exhaust get totally cooled or you could run water over the O2 sensor and exhaust pipe until it is totally cool.
The only other thing that was not too obvious is the way that the original exhaust is removed from the hangers. There is a conical cap on the end of each hanger where the rubber hangers slide on and are retained. We ended up spraying the rubber and hanger with lubricant and then prying the rubber hanger off the rod with the cap. Joe Z can probably tell us if there is an easier way than what we did. We essetially "brute forced" it.
Pat
Hello Pat,
I hope you received the "Installation Tips" document inside the hardware bag?
Everything you mentioned is on it....

Originally Posted by Installation Tips for IS-F / PTS Exhaust - Joe Z Series
- Please consider bringing this exhaust to a professional installer, if you have never done this type of work or install.
- Please be sure to work on a cool exhaust system, before removing OEM sections.
- Please be sure not to attempt to remove O2 Sensors while still hot or warm.
- Please be sure to have the proper O2 Sensor removal tool.
- Please be sure to use some WD-40 on hangers or bolts when removing or installing the OEM or replacement exhaust system sections.
- Rear Axle Section Installation (2 of them)
Please be sure to install Drivers Side Rear Axle Section second to last.
Then followed by the Passenger Side Axle Section as the last section installed.
Thank You
The sensor plug connection goes all the way to under the front seats carpet. In the event it needs to be unplugged, the front seats would have to come out.
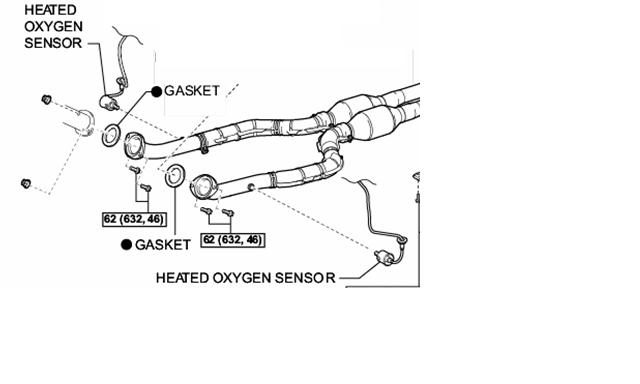
The O2 sensors should be removed before disconnecting the mid-pipe bolts or attempting to remove the exhaust sections.
Also, I would NOT recommend using water on the O2 sensor areas or exhaust components to cool it down.
WD-40, pry bar tool or thick long flat head screwdriver usually does the trick to pop off the oem hangers..
"Brute Force" helps along the way...

Below is a visual of the mid-pipe and sensor area. (IS350 Shown)
Below is a visual of the O2 sensor removal tool design I use, which works perfectly.


I'm still very glad to hear you got the exhaust installed DIY & all is good..

Joe Z
02-22-09, 04:43 AM
#79
Lead Lap
iTrader: (2)
Join Date: Oct 2008
Location: Ontario, Canada
Posts: 599
Likes: 0
Received 0 Likes
on
0 Posts
I've not delved into my exhaust package yet but the install instructions included sure spells it out well. Thanks
One further question Joe: Would anti-seize on the 02 sensor threads do any good on their re-install, as on spark plugs, or is that atmosqhere too harsh for it?
Cheers,
Colin.
One further question Joe: Would anti-seize on the 02 sensor threads do any good on their re-install, as on spark plugs, or is that atmosqhere too harsh for it?
Cheers,
Colin.
Last edited by ISFer; 02-22-09 at 08:04 AM.
02-22-09, 07:33 AM
#80
Pole Position
Joe Z,
Got the wrong O2 sensor tool. The one I have looks like a deep well socket. It was too long to remove the O2 sensor without removing the bolts between the midpipes and the cats. Luckly I had two strong helpers that held the midpipes up while I unscrewed the O2 sensors.
I wouldn't think that water cooling the O2 sensor would damage anything since the outside is exposed to rain and water from the road all the time.
One suggestion: Add another half coupling upstream of the secondary cats so that we can take exhaust samples during dyno runs to determine the air/fuel ratio. Shouldn't cost near as much in the fab stage as it costs post installation. Most dyno shops believe you get a more accurate reading at the coupling compared to the exhaust tips.
Again, a very easy DIY installation. Well made and fit up perfectly.
Pat
02-22-09, 07:39 AM
#81
Pole Position
PS:
I did not exactly understand the instruction about using WD-40 on hangers and bolts. When reading I thought that referred to the metal to metal connections of the hangers. Only when we tried to figure out how to get the rubber hangers off the metal rods located on the original exhaust pipes did we discover that we needed lubrication between the rubber and the rods. Yes, we used a large screw driver and pry bar to remove the hangers from the original exhaust. The rubber hangers were easy to install onto the Joe Z exhaust.
Pat
02-22-09, 08:38 AM
#82
Lexus Test Driver

Joe, when I move back to San Diego and decide to have you bolt on all your "bolt ons"............don't you guys do installations? I would much rather have the experts to work on my overpriced Prius worthy of an expert!
Nice work on the intake and exhaust!
Nice work on the intake and exhaust!
02-22-09, 12:00 PM
#84
Lexus Champion
")

 02-22-09, 06:39 PM
#87
Lead Lap
iTrader: (2)
Join Date: Oct 2008
Location: Ontario, Canada
Posts: 599
Likes: 0
Received 0 Likes
on
0 Posts
joe z,
got the wrong o2 sensor tool. The one i have looks like a deep well socket. It was too long to remove the o2 sensor without removing the bolts between the midpipes and the cats. Luckly i had two strong helpers that held the midpipes up while i unscrewed the o2 sensors.
Pat
got the wrong o2 sensor tool. The one i have looks like a deep well socket. It was too long to remove the o2 sensor without removing the bolts between the midpipes and the cats. Luckly i had two strong helpers that held the midpipes up while i unscrewed the o2 sensors.
Pat
Sure it's more exspensive than some of the generic tools available, but it sounds like the proper tool would work much better.
Is that a universal part # that I could request at my local Lex dealer?
Cheers
Colin
02-22-09, 08:15 PM
#88
^^^^The PN listed above the pict. of the tool is the proper Lexus PN. It's PN. 09224-00010-01. See the link below:
http://lexus.spxcorp.ca/detail.aspx?id=661&g=11&lang=EN
Lou
http://lexus.spxcorp.ca/detail.aspx?id=661&g=11&lang=EN
Lou
02-22-09, 08:34 PM
#89
Lexus Fanatic
iTrader: (10)
Join Date: Nov 2004
Location: Under an IS F since 2008
Posts: 13,441
Received 1,063 Likes
on
586 Posts
Joe, by what you've said, and what Pat has experienced and said, it sounds like we'd be better off with the proper Toyota/Lexus 02 sensor removal tool you have pictured above.
Sure it's more exspensive than some of the generic tools available, but it sounds like the proper tool would work much better.
Is that a universal part # that I could request at my local Lex dealer?
Cheers
Colin
Sure it's more exspensive than some of the generic tools available, but it sounds like the proper tool would work much better.
Is that a universal part # that I could request at my local Lex dealer?
Cheers
Colin
Snap On and a few other leading brands also sell the same tool design..
Using this low profile designed O2 sensor removal tool, will just make life 100 times easier for the installer(s)..
Joe Z
