When you click on links to various merchants on this site and make a purchase, this can result in this site earning a commission. Affiliate programs and affiliations include, but are not limited to, the eBay Partner Network.
Hey guys. Im having problems trying to install the illuminated sills for the passenger side. I got the drivers side going since it already had the connector. I tapped into the black wire in the b panel and connected it to the red wire on the unit then connected the negative which I believe the wire is brown on the unit to the ground wire on the b panel. It still doesnt work. Am I doing something wrong??? I know the unit works because I connected it to the drivers side and it works fine. Please help!
Based on the requests I had on my pics thread, I decided to post specific details on the installation of the OEM Lexus lighted door sills.
There have been some confusion on ths installation of illuminated door sills on the Lexus IS (250/350/F). This is due to the different level of pre-wiring done on the car depending on the year, model, or trim of your IS.
Some cars are pre-wired for plug-and-play installation. Some have the plugs but are not grounded properly. Others don't have the plugs at all. On my IS-F, there was a plug on the passenger side that's not grounded properly, and no plug on the driver side at all. So depending on how your car is wired, just follow the relevant section of this guide and it should work on your car.
The pictures indicating "driver" and "passenger" side are based on my IS-F.
To remove sills and B-pillar cover, just pull them off. They're just held on by plastic clips.
Scenario: Has plug, but not grounded properly
Scenario: No plug
Careful handling the + and ground wires! especially since they're placed so close to each other in the plug.
This installation results in a simple ON/OFF function of the illumination. For cars that come with it from the factory, they fade in with the interior lights. If that is your goal, then I suggest grounding the wire onto the footwell light. I considered this option but decided on the door switch because both tapped wires are in the B-pillar, and also based on my experience with a demo IS250 with it the fade-in is so barely noticeable I saw no point in it.
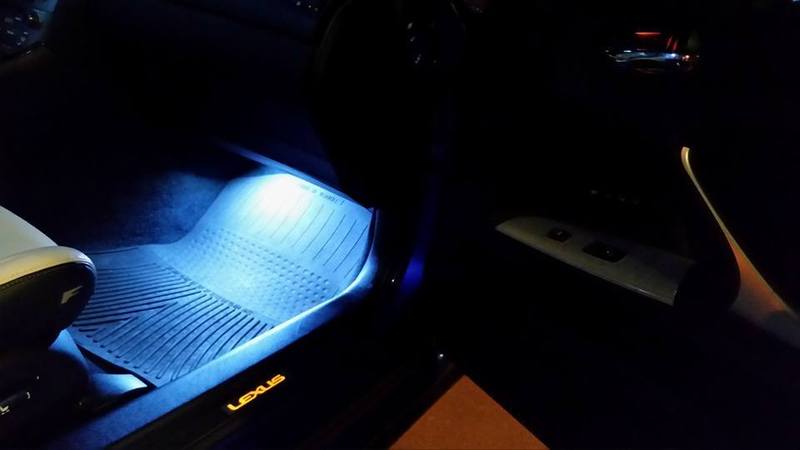
Result:
I want to attempt this, but the photos are missing from this. Do you still have them? Sounds like they helped out a lot.
I actually did this a little different way, I just went into the back of all the connectors and didn't have to splice any cables. Here is a picture of what I mean, with the wire on the left side going down into the white plug next to the orange wire. You can do this on all of the plugs, just make sure the wire is into the back of the plug securely, test it, tape it up, and you are good to go.
This way might make it a little more manageable for someone who is hesitant to do this.
I
Thank you very much for this write up, it was perfectly illustrated and was exactly what I needed to tackle this job!


 12-15-14, 11:42 AM


 special order it