When you click on links to various merchants on this site and make a purchase, this can result in this site earning a commission. Affiliate programs and affiliations include, but are not limited to, the eBay Partner Network.
Based on the other thread, I wouldn�t bother. That light output is worse than our crappy projectors.
Well the guy that compared had hid's in his headlights and compared w that. Another member posted a comparison w pictures wich makes the vland look much better imo.
One dude claimed he had a retrofit. Which means he did an absolute **** job, because the Mini D2S offered now are insanely good.
I havent seen anything posted yet that looks better than my bulb and clear lense upgrade on our stock projectors. Which isn’t anything impressive, but decent.
Wow, they look great, Definitely closest to 3is for sure. They are more like the ones Nigel offers.
One thing I really like better on my Spec-D ones is the brake light going all the way across.
Has anyone managed to work out if we can wire these in such a fashion that the inner lights on the trunk lid light up when the brakes are applied?
ive tried running a wire from the brake light wire to the running light wire on the trunk light section, but when the lights are on the brake lights are constantly lit.
wondering if there�s way to achieve such a thing. Relays?
Hey everyone, after some thinking I�ve managed to wire the light up using a normally open relay that when triggered by the brake light 12v, it closes the relay and sends 12v to the inner tail lights.
So now when I brake with the lights off (daytime) both the outer and inner running lights activate!
Such fun, and makes them similar looking to the other non vland lights, in that you get the L pattern when braking right across during the daytime when your lights are usually off.
Hey everyone, after some thinking I�ve managed to wire the light up using a normally open relay that when triggered by the brake light 12v, it closes the relay and sends 12v to the inner tail lights.
So now when I brake with the lights off (daytime) both the outer and inner running lights activate! Video link
Such fun, and makes them similar looking to the other non vland lights, in that you get the L pattern when braking right across during the daytime when your lights are usually off.
Can you post a write up of the steps and material?
Can you post a write up of the steps and material?
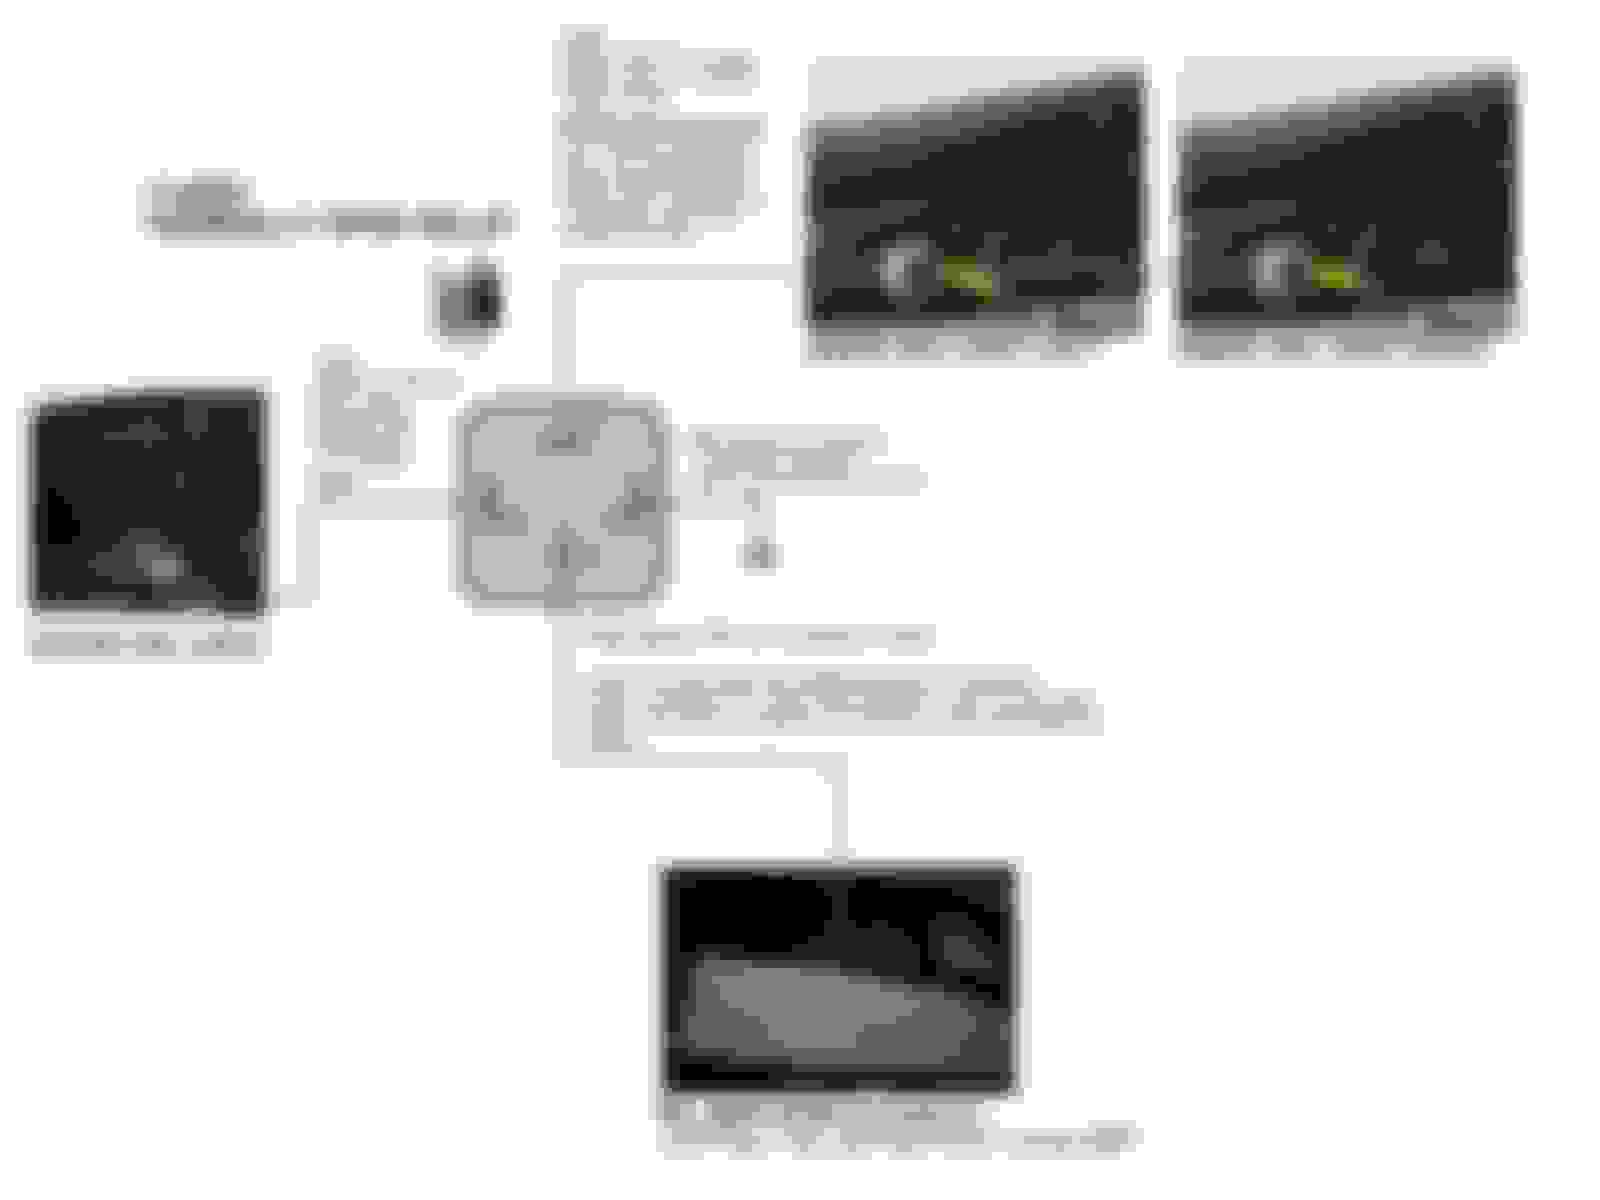
No problem, here are the steps I took... Diagram also provided to explain the words :-)
Hope it all makes sense. I would say, as a disclaimer that you should check your wire colours on the back of the VLAND lights are the same. I imagine they will be. Get a VOLT meter to double check. This is how I discovered what each colour was for. Also, this will invalidate your vlands warranty as your cutting wires on the units, you may want to adjust to suit or hook into your cars harness? Your choice. I�m not liable etc :-)
Materials
1. Fused relay � I used 10amp to match fuse weight the car recommends � Normally open relay (4 prong)
2. 10 amp roll of electrical wire
3. 10 amp spade connectors
3a. 2x 1N5822 shottky diodes.
4. Wire cutters
5. Electric insulating tape
6. Various tools to take clips off boot lid etc
Steps
Diagram Below also.
1. Remove tail lid carpeted cover to expose tail lid wiring and back of VLAND lights.
2. Pull back right hand (recommended if following these steps) boot carpet to expose one of the outer rear VLAND lights and wires.
3. Splice a long wire into the RED brake wire of the VLAND outer tail lamp. You may want to use a VOLT meter to double check what wires are what, in case yours are different.
4. Wrap splice in tape so you don�t short anything.
5. Run this wire up the tail lid hinges ready to plug into the relay.
6. Add a spade connector to this wire and plug it into PIN 86 of the relay.
7. Cut another similar length of wire and add a spade connector and plug that into PIN 30 of the relay and the other end into a 12v supply that is available or the battery. I used the ML Amplifier 12v In. Left hand plug, top left red wire. You may want to use a VOLT meter to double check what wires are what, in case yours are different.
8. Cut a length of wire and attach one end to a good earth. I used a bolt of the trunk lid supports. And plug the other end using spade connector to PIN 85 of the relay.
9. Cut the green wires of the inner vlands. Add an 1N5822 diode in-line with each wire as per diagram. Ensure the blocking side with white strip of diode is toward the VLAND light. These diodes will stop your number plate lights coming On when braking and your lights are off. And stop any back flow to other circuits it shares.
10. Finally run short lengths of wire from PIN 87 of the relay to the GREEN wire of the inner VLAND tail light. Ensure it is wired to the blocking side of the diodes.
You may want to use a VOLT meter to double check what wires are what, in case yours are different.
Testing
1. Ensure no exposed pins/ wires are touching anything conductive.
2. Go push the brake pedal/ask a friend. With the lights ALL OFF you should hear the relay click and both the outer and inner lights come on along with your brake lights.
3. Let off the brake and all should go off, you'll hear the relay click again.
4. Turn on your lights to ensure they light as before, try the brake again to ensure that the brake lights come on and go off on release.
5. If all ok, tape up all connections securely and stick the relay to somewhere on the trunk lid.
6. Reapply all carpet covers and tidy up!
Now you'll have a fancy looking rear end when braking during the day when your lights are usually OFF.
Good luck!
Last edited by jwgorrie; 12-30-19 at 03:24 PM.
Reason: Updated info
I posted this question on this thread earlier, but I'll put it here too!
Does anyone know if it's easy to disable/cut off the side marking lights?
I'm getting used to them now, but those 3 LED's facing sidewards on either side are extremely bright. To my first impression they looked a little out of place. I didn't notice it that much on other forum members photos. Besides that, they are not required in my country. Not completely sure yet, but think it may look better without the side markers, like the original tail lights.
Also the fitment of these new VLAND (red style) wasn't perfect for me at first. Like some (but not many) others mentioned in this topic, the outer light is rubbing the light (left side for me) part in the trunk when fully closed. Meanwhile I managed to adjust the fitment of the outer left unit, so now it doesn't rub the trunk light unit anymore
You might have to figure out if there a wire that gives those light power. I know its a safety thing here in the Us.
Originally Posted by jxdigital
I posted this question on this thread earlier, but I'll put it here too!
Does anyone know if it's easy to disable/cut off the side marking lights?
I'm getting used to them now, but those 3 LED's facing sidewards on either side are extremely bright. To my first impression they looked a little out of place. I didn't notice it that much on other forum members photos. Besides that, they are not required in my country. Not completely sure yet, but think it may look better without the side markers, like the original tail lights.
Also the fitment of these new VLAND (red style) wasn't perfect for me at first. Like some (but not many) others mentioned in this topic, the outer light is rubbing the light (left side for me) part in the trunk when fully closed. Meanwhile I managed to adjust the fitment of the outer left unit, so now it doesn't rub the trunk light unit anymore

 01-14-19, 05:50 AM