Fiberglass
 04-15-08, 10:41 AM
#16
Lead Lap

Join Date: Jan 2007
Location: MS
Posts: 799
Likes: 0
Received 0 Likes
on
0 Posts
So, basiclly you are saying that if I install a fiberglass in my trunk there will be no problem whatsoever?? Cuz that is my main issue. If so, do you think I will need to bring the car to the shop so often to maintain it or the install would be find for more than 5 years?
Finally, if you are worried about FG there are alternaltives. Here's the build log of the IS-350 I mentioned earlier and it has fome FG in the build - link. ICIX has some great FG build threads so search and read.
-Robert
 04-15-08, 01:45 PM
#17
Lexus Test Driver
Thread Starter
Join Date: Aug 2007
Location: 06-IS350-BLK-BLK-Lux pkg-Nav-ML-XM-HID 6K
Posts: 908
Likes: 0
Received 0 Likes
on
0 Posts
If the fiberglass enclosure is built correctly, then it will last longer than your car. That means proper materials like mat (weight, chopped, woven, etc), resin (you have to account for air temp when mixing the hardener, too much and it dries fast making thing brittle) and finishing (Bondo, Bondo with cat hair (extra fiber glass in it)). If your shop is telling you that it won't work, then maybe their FG enclosures won't. They either can't build them with the proper materials or don't build the walls thick enough.
Finally, if you are worried about FG there are alternaltives. Here's the build log of the IS-350 I mentioned earlier and it has fome FG in the build - link. ICIX has some great FG build threads so search and read.
-Robert
Finally, if you are worried about FG there are alternaltives. Here's the build log of the IS-350 I mentioned earlier and it has fome FG in the build - link. ICIX has some great FG build threads so search and read.
-Robert
Oh, BTW, the guy mentioned to me an alternative which is doing it by fiberglass and cover it with carpet or something like that. Iam not sure what does he mean. If you do, can you explan it to me,pics will help understanding the concept better

Thanks
04-15-08, 02:26 PM
#18
Lead Lap
Join Date: Jan 2007
Location: MS
Posts: 799
Likes: 0
Received 0 Likes
on
0 Posts
In the first link, the fiberglass was smoothed with Bondo and sanded smooth. Primed, sanded, primed, sanded, painted, probably wet sanded, painted, clear coated and polished. Very labor intensive.
Fiberglass and carpet. About halfway down, they show the sub enclosure in the trunk. After it is built, carpet is stretched and glued over the enclosure. It add nothing to the strength but you can do it without any of the Bondo and sanding. You can also cover with matching vinyl. Or like the first link, special vinyl like the carbon fiber look variety.
-Robert
04-16-08, 07:04 AM
#19
Lexus Test Driver
Thread Starter
Join Date: Aug 2007
Location: 06-IS350-BLK-BLK-Lux pkg-Nav-ML-XM-HID 6K
Posts: 908
Likes: 0
Received 0 Likes
on
0 Posts
In the first link, the fiberglass was smoothed with Bondo and sanded smooth. Primed, sanded, primed, sanded, painted, probably wet sanded, painted, clear coated and polished. Very labor intensive.
Fiberglass and carpet. About halfway down, they show the sub enclosure in the trunk. After it is built, carpet is stretched and glued over the enclosure. It add nothing to the strength but you can do it without any of the Bondo and sanding. You can also cover with matching vinyl. Or like the first link, special vinyl like the carbon fiber look variety.
-Robert
Fiberglass and carpet. About halfway down, they show the sub enclosure in the trunk. After it is built, carpet is stretched and glued over the enclosure. It add nothing to the strength but you can do it without any of the Bondo and sanding. You can also cover with matching vinyl. Or like the first link, special vinyl like the carbon fiber look variety.
-Robert
04-16-08, 10:52 AM
#20
Lead Lap
Join Date: Jan 2007
Location: MS
Posts: 799
Likes: 0
Received 0 Likes
on
0 Posts
The actual fiberglass comes in woven cloth, flat mat or loose fibers. The cloth/mat has different weights (thicknesses). If your enclosure is going to have a lot of tight corners, then you want to use the lightweight mat or cloth so that it lays flat against the mold. Let it dry before adding additional layers. Once it can hold its shape, remove it from the car to make additional layers easier. If you are going to put an MDF front or a mouting ring in, now is the time. If you are going to stretch around the mounting ring, fleece is the way to go. (These are general instructions. Check out the different tutorials at the different car audio forums I mentioned for exact details.)
I'm sure there are different resins as well but I'm not familiar enough with them to explain. The fumes from the curing resin are dangerous so work in a well ventilated area and wear a respirator. It's no fun to pass out from the fumes and find your head is now glued to the inside of your sub box.
-Robert
04-16-08, 06:11 PM
#21
Lexus Test Driver
Thread Starter
Join Date: Aug 2007
Location: 06-IS350-BLK-BLK-Lux pkg-Nav-ML-XM-HID 6K
Posts: 908
Likes: 0
Received 0 Likes
on
0 Posts
The actual fiberglass comes in woven cloth, flat mat or loose fibers. The cloth/mat has different weights (thicknesses). If your enclosure is going to have a lot of tight corners, then you want to use the lightweight mat or cloth so that it lays flat against the mold. Let it dry before adding additional layers. Once it can hold its shape, remove it from the car to make additional layers easier. If you are going to put an MDF front or a mouting ring in, now is the time. If you are going to stretch around the mounting ring, fleece is the way to go. (These are general instructions. Check out the different tutorials at the different car audio forums I mentioned for exact details.)
I'm sure there are different resins as well but I'm not familiar enough with them to explain. The fumes from the curing resin are dangerous so work in a well ventilated area and wear a respirator. It's no fun to pass out from the fumes and find your head is now glued to the inside of your sub box.
-Robert
I'm sure there are different resins as well but I'm not familiar enough with them to explain. The fumes from the curing resin are dangerous so work in a well ventilated area and wear a respirator. It's no fun to pass out from the fumes and find your head is now glued to the inside of your sub box.
-Robert
 04-16-08, 09:19 PM
#22
Zombie Slayer
The actual fiberglass comes in woven cloth, flat mat or loose fibers. The cloth/mat has different weights (thicknesses). If your enclosure is going to have a lot of tight corners, then you want to use the lightweight mat or cloth so that it lays flat against the mold. Let it dry before adding additional layers. Once it can hold its shape, remove it from the car to make additional layers easier. If you are going to put an MDF front or a mouting ring in, now is the time. If you are going to stretch around the mounting ring, fleece is the way to go. (These are general instructions. Check out the different tutorials at the different car audio forums I mentioned for exact details.)
I'm sure there are different resins as well but I'm not familiar enough with them to explain. The fumes from the curing resin are dangerous so work in a well ventilated area and wear a respirator. It's no fun to pass out from the fumes and find your head is now glued to the inside of your sub box.
-Robert
I'm sure there are different resins as well but I'm not familiar enough with them to explain. The fumes from the curing resin are dangerous so work in a well ventilated area and wear a respirator. It's no fun to pass out from the fumes and find your head is now glued to the inside of your sub box.
-Robert
You got it Robert! Use the "loose fiber" mat, chop mat, for the tight corners. Cut into small strips to fill gaps. With this medium many layers will be needed to build up a sufficient thickness to prevent flexing and air leakage. After chop mat layers, I like to switch to woven (looser weave)mat and finish with fiberglass cloth (tighter weave). If the angles/curves/radius' are not severe, a good alternative that is used is carpet used for covering enclosures. As long as the meduim is porous enough to become aturated with resin, then it will work. The carpet provides excellent thickness for enclosures. I do start with chop mat first though.
As far as resins are concerned.....this area is open to debate. Just today I used both a very high grade "surfboard" polyester resin which was blue in color prior to the addition of accelerant (MEKP). Which contradicts the belief that the redder in color the resin, the higher the quality. And I used common "Bondo" brand resin. The "blue" resin was easier to work with and did not gel as quickly, but both yielded equal results. My personal feeling is that as long as it is a "decent" brand you will do fine.
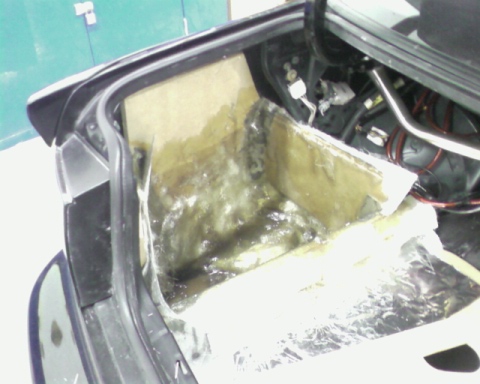
As to fumes.....I began a bottom half mold yesterday for a trunk enclosure and in my haste I did not grab my respirator (for those doing this at home...PLEASE use a respirator with charcoal filters!!!!!!). After laying a good deal of resin I reached in and a wave of fumes hit me like a truck. It sent me reeling back gagging. My eyes were on fire and it was hard to catch my breath. An associate commented that I was VERY flushed. I took a break right there and went outside to get a good deal of fresh air.
The particulates in some resins (mostly when using a spray gun) can actually build up and harden on the inside of the lung. An instructor of mine told a story of someone he knew that suffered from a collapsed lung from this exact scenario.
Here's a quick shot of the enclosure during the fiberglass laying process.
 04-17-08, 02:43 PM
#23
Lead Lap
Join Date: Jan 2007
Location: MS
Posts: 799
Likes: 0
Received 0 Likes
on
0 Posts
Here's the thread I was waiting on - http://www.diymobileaudio.com/forum/...ad.php?t=36143
Tips, hints, techniques and links to tutorials.
-Robert
Tips, hints, techniques and links to tutorials.
-Robert
04-18-08, 07:18 AM
#24
Lexus Test Driver
Thread Starter
Join Date: Aug 2007
Location: 06-IS350-BLK-BLK-Lux pkg-Nav-ML-XM-HID 6K
Posts: 908
Likes: 0
Received 0 Likes
on
0 Posts
You got it Robert! Use the "loose fiber" mat, chop mat, for the tight corners. Cut into small strips to fill gaps. With this medium many layers will be needed to build up a sufficient thickness to prevent flexing and air leakage. After chop mat layers, I like to switch to woven (looser weave)mat and finish with fiberglass cloth (tighter weave). If the angles/curves/radius' are not severe, a good alternative that is used is carpet used for covering enclosures. As long as the meduim is porous enough to become aturated with resin, then it will work. The carpet provides excellent thickness for enclosures. I do start with chop mat first though.
As far as resins are concerned.....this area is open to debate. Just today I used both a very high grade "surfboard" polyester resin which was blue in color prior to the addition of accelerant (MEKP). Which contradicts the belief that the redder in color the resin, the higher the quality. And I used common "Bondo" brand resin. The "blue" resin was easier to work with and did not gel as quickly, but both yielded equal results. My personal feeling is that as long as it is a "decent" brand you will do fine.
As to fumes.....I began a bottom half mold yesterday for a trunk enclosure and in my haste I did not grab my respirator (for those doing this at home...PLEASE use a respirator with charcoal filters!!!!!!). After laying a good deal of resin I reached in and a wave of fumes hit me like a truck. It sent me reeling back gagging. My eyes were on fire and it was hard to catch my breath. An associate commented that I was VERY flushed. I took a break right there and went outside to get a good deal of fresh air.
The particulates in some resins (mostly when using a spray gun) can actually build up and harden on the inside of the lung. An instructor of mine told a story of someone he knew that suffered from a collapsed lung from this exact scenario.
Here's a quick shot of the enclosure during the fiberglass laying process.
WOW
 I am printing this and taking it to the guy in the shop to shut his mouth
 \
\Thanks for the advice
 04-18-08, 07:23 AM
#25
Lexus Test Driver
Thread Starter
Join Date: Aug 2007
Location: 06-IS350-BLK-BLK-Lux pkg-Nav-ML-XM-HID 6K
Posts: 908
Likes: 0
Received 0 Likes
on
0 Posts
Here's the thread I was waiting on - http://www.diymobileaudio.com/forum/...ad.php?t=36143
Tips, hints, techniques and links to tutorials.
-Robert
Tips, hints, techniques and links to tutorials.
-Robert
Thanks Robert

Thread
Thread Starter
Forum
Replies
Last Post
Doodlesby
Lexus Audio, Video, Security & Electronics
4
12-05-09 01:02 AM
trinityhk
2Gen IS250 / IS350 / IS-F Classifieds (06-13)
12
08-21-07 10:07 PM
LayinLo
GS - 1st Gen (1993-1997)
9
12-04-05 03:37 AM
alternative, bondo, brittle, cat, chop, collapsed, enclosures, fiber, fiberglass, hair, lexus, lung, mat, materials