
Adding auto up/down window control.
 12-15-09, 10:24 PM
#1
This will add one-touch auto up/down and alarm control of the windows.
One thing that has always bothered me about the first gen SC series is the lack of one touch control of the driver and passenger side windows especially on the 98-00 models. So as others have I'm sure done I've decided to add the feature myself, also a side benefit is the ability to have remote operation of the windows with an aftermarket alarm.
While I'm adding my window modules I thought I'd post some step by step instructions for other folks who would like to do the same.
Approx. install time:
2-4 hours
Materials needed:
DEI 530T window module (about $50 online)
Aftermarket alarm for remote operation
10 AWG power/ground wire (approx. 5 feet of each)
4" cable ties
8" cable ties
Solder, soldering iron.
Heat shrink tubing that will work on 10,14, and 16 AWG wire.
Power drill
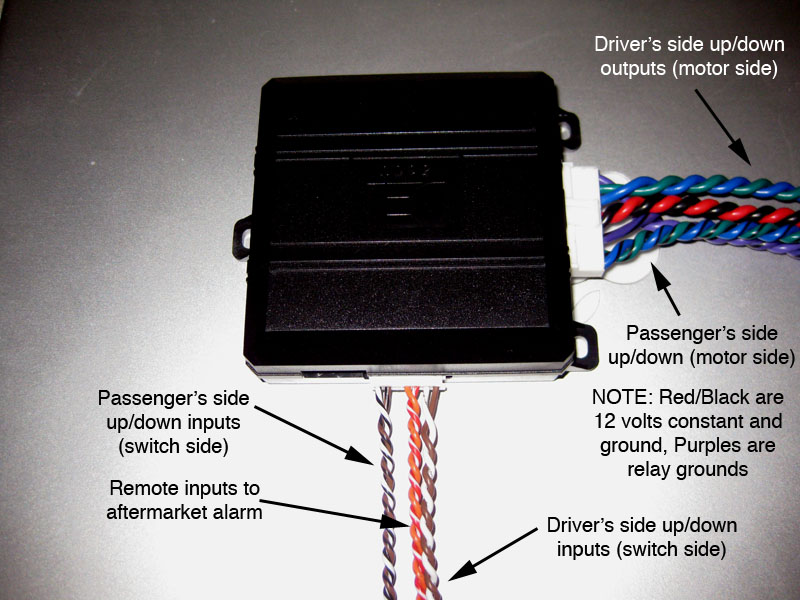
The unit unboxed:

As the picture shows the 530T has two harnesses, one for inputs and the other for power/motor output.
Wiring info:
Heavy gauge harness.
Violet - Ground Path, Motor #1
Green - Down, Motor #1
Blue - Up, Motor #1
Red - 12V Constant, 20A Fused
Black - Chassis Ground
Violet/Black - Ground Path, Motor #2
Green/Black - Down, Motor #2
Blue/Black - Up, Motor #2
Light gauge harness.
Brown - Up, Switch #1
White - Down, Switch #1
Red/White - (-) auxiliary input
Orange - (-) Ground when armed
Gray - (-) output during activation
Brown/Black - Up, switch #2
White/Black - Down, Switch #2
The next step is bench prepping the unit, I prefer to group wires together that go to similar locations by spinning them. (A power drill makes this easy, just don't spin them too much.) I removed the gray output during activation wire because it is not needed.
Here's a picture with a description of the function of the 530T wiring.
Wiring grouped according to where the wiring will be routed, ready to install.

Installation notes:
Wiring instructions for the SC (left side is 530T wire colors the right is the SC connection info):
---Power connections---
---Driver's side window down connections---
---Driver's side window up connections---
---Passenger's side window down connections---
Installation photos:
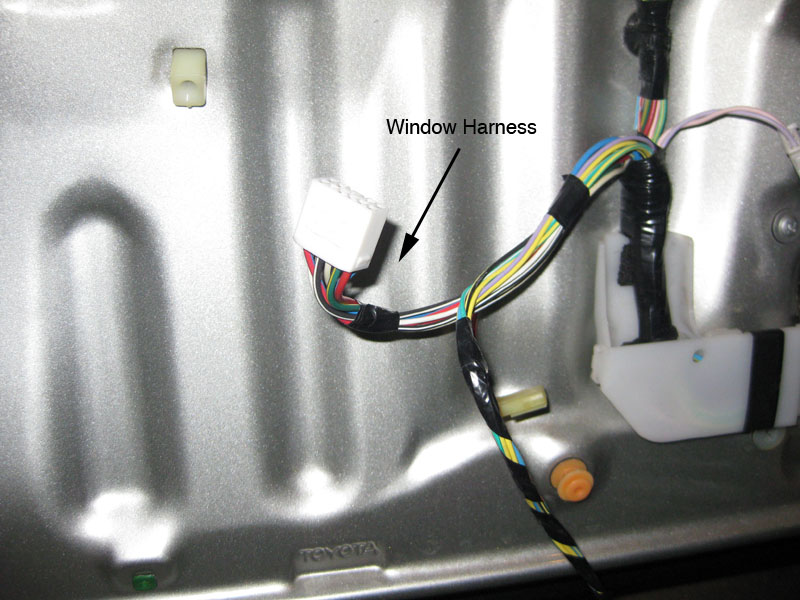
The window harness I will be working with.
There's an indent in the door that makes for a perfect mounting location for the window module.

The large gauge power and small gauge alarm trigger wiring run into the driver's door. This was the hardest part of the install for me.

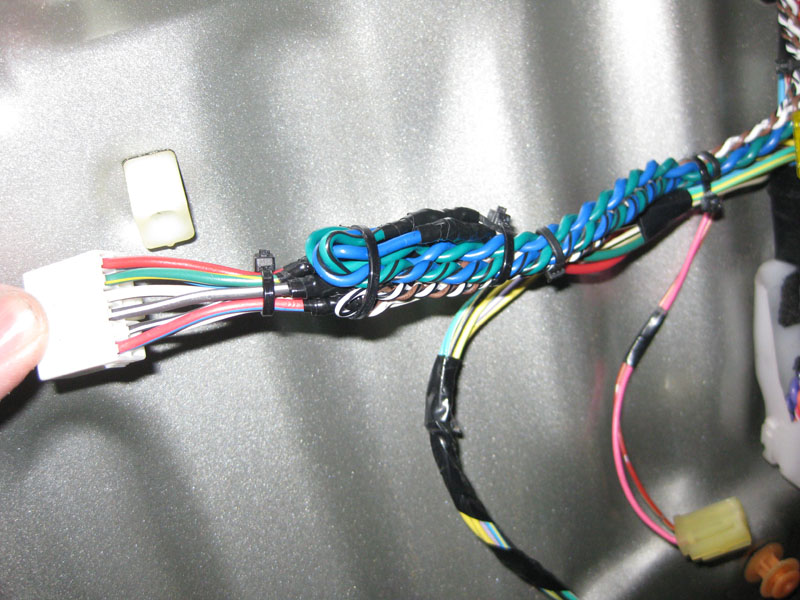
Cut window wiring listed above note that Green/White may actually be Black/White.

The harness wired, notice how the small gauge connections are all on the switch side.

After soldering and wire management.
Installation of the module complete.

Videos of operation:
One touch operation in action.
http://www.youtube.com/watch?v=LdMSVzuPZ24
iPhone control/alarm control.
http://www.youtube.com/watch?v=_7Pv4heXKy8
Hopefully this was helpful and not too confusing.
One thing that has always bothered me about the first gen SC series is the lack of one touch control of the driver and passenger side windows especially on the 98-00 models. So as others have I'm sure done I've decided to add the feature myself, also a side benefit is the ability to have remote operation of the windows with an aftermarket alarm.
While I'm adding my window modules I thought I'd post some step by step instructions for other folks who would like to do the same.
Approx. install time:
2-4 hours
Materials needed:
DEI 530T window module (about $50 online)
Aftermarket alarm for remote operation
10 AWG power/ground wire (approx. 5 feet of each)
4" cable ties
8" cable ties
Solder, soldering iron.
Heat shrink tubing that will work on 10,14, and 16 AWG wire.
Power drill
The unit unboxed:
As the picture shows the 530T has two harnesses, one for inputs and the other for power/motor output.
Wiring info:
Heavy gauge harness.
Violet - Ground Path, Motor #1
Green - Down, Motor #1
Blue - Up, Motor #1
Red - 12V Constant, 20A Fused
Black - Chassis Ground
Violet/Black - Ground Path, Motor #2
Green/Black - Down, Motor #2
Blue/Black - Up, Motor #2
Light gauge harness.
Brown - Up, Switch #1
White - Down, Switch #1
Red/White - (-) auxiliary input
Orange - (-) Ground when armed
Gray - (-) output during activation
Brown/Black - Up, switch #2
White/Black - Down, Switch #2
The next step is bench prepping the unit, I prefer to group wires together that go to similar locations by spinning them. (A power drill makes this easy, just don't spin them too much.) I removed the gray output during activation wire because it is not needed.
Here's a picture with a description of the function of the 530T wiring.
Wiring grouped according to where the wiring will be routed, ready to install.
Installation notes:
I will be installing this module in the driver's door. It's important to place this unit in an area that will not be affected by moisture.
As part of the install I will be running 10 AWG power and ground in to the door. Power must be a constant 12 volt source either from the ignition switch or straight from the battery. Also, for remote operation of the windows I will be running two 16 AWG wires to extend the Red/White and Orange wires for remote control of the windows.
As stated in the wiring info, I will be cutting the factory window wiring in two at the driver's door window switch and making connections. It's vitally important to cut the window wires and not just splice into them. Also leave plenty of length when you cut to make connections on the switch side and the motor side.
Wire colors should be correct for all model SC's Please use a multimeter to test all vehicle wiring before making connections! Remove the fuse from the unit until all connections have been made.
This will give you auto window up/down from the drivers switch.
This module will override the window lock button.
Wiring instructions for the SC (left side is 530T wire colors the right is the SC connection info):
---Power connections---
Red - connect to the 10 AWG power wire previously run into the door.
Violet, Violet/Black, Black - will connect to 10 AWG ground that was previously run into the door.
Violet, Violet/Black, Black - will connect to 10 AWG ground that was previously run into the door.
---Driver's side window down connections---
Green (heavy gauge) - cut the Green/Yellow wire at the window switch, connect this wire to the side that goes to the window motor.
White (small gauge) - connect to the switch side of the Green/Yellow wire that was cut in the previous step.
White (small gauge) - connect to the switch side of the Green/Yellow wire that was cut in the previous step.
---Driver's side window up connections---
Blue (heavy gauge) - cut the Red wire at the window switch, connect this wire to the side that goes to the window motor.
Brown (small gauge) - connect to the switch side of the Red wire that was cut in the previous step.
Brown (small gauge) - connect to the switch side of the Red wire that was cut in the previous step.
---Passenger's side window down connections---
Green/Black (heavy gauge) - cut the Green/White(or Black/White) wire at the window switch, connect this wire to the side that goes to the window motor.
White/Black (small gauge) - connect to the switch side of the Green/White(or Black/White) wire that was cut in the previous step.
---Passenger side window up connections---White/Black (small gauge) - connect to the switch side of the Green/White(or Black/White) wire that was cut in the previous step.
Blue/Black (heavy gauge) - cut the Red/Blue wire at the window switch connect, this wire to the side that goes to the window motor.
Brown/Black (small gauge) - connect to the switch side of the Red/Blue wire that was cut in the previous step.
---Aftermarket alarm connections(optional)---Brown/Black (small gauge) - connect to the switch side of the Red/Blue wire that was cut in the previous step.
Red/white (small gauge) - connect to an auxiliary output for remote window roll down
Orange (small gauge) - connect to a ground when armed or auxiliary output for window roll up
Once all the connections have been made reinsert the fuse and test. Now you should have auto up/down operation of the driver and passenger windows from the driver's switch!Orange (small gauge) - connect to a ground when armed or auxiliary output for window roll up
Installation photos:
The window harness I will be working with.
There's an indent in the door that makes for a perfect mounting location for the window module.
The large gauge power and small gauge alarm trigger wiring run into the driver's door. This was the hardest part of the install for me.
Cut window wiring listed above note that Green/White may actually be Black/White.
The harness wired, notice how the small gauge connections are all on the switch side.
After soldering and wire management.
Installation of the module complete.
Videos of operation:
One touch operation in action.
http://www.youtube.com/watch?v=LdMSVzuPZ24
iPhone control/alarm control.
http://www.youtube.com/watch?v=_7Pv4heXKy8
Hopefully this was helpful and not too confusing.
Last edited by Scotty; 04-19-10 at 11:52 PM. Reason: more info


Trending Topics
 12-16-09, 09:02 AM
#11
Driver School Candidate

Join Date: Dec 2009
Location: Ontario
Posts: 4
Likes: 0
Received 0 Likes
on
0 Posts
I know this might sound like a dumb question, but how would the auto up/down know if you want to window to open/close fully or just a bit? Mind you I don't own an SC yet, but I'm assuming the switch doesn't click when pressed fully up/down.
12-16-09, 11:25 AM
#12
Pole Position
iTrader: (9)

Join Date: Jul 2007
Location: Texas
Posts: 339
Likes: 0
Received 0 Likes
on
0 Posts
these guys are miss understanding
with what he just installed he will be able make the windows go up and down with the remote of his alarm system
right scott.
i think their talking about how if you hold the down button switch for a sec it will make the window go all the way down with one touch while sitting in car lol
 12-16-09, 11:43 AM
#13
these guys are miss understanding
with what he just installed he will be able make the windows go up and down with the remote of his alarm system
right scott.
i think their talking about how if you hold the down button switch for a sec it will make the window go all the way down with one touch while sitting in car lol
with what he just installed he will be able make the windows go up and down with the remote of his alarm system
right scott.
i think their talking about how if you hold the down button switch for a sec it will make the window go all the way down with one touch while sitting in car lol
So, for auto/one touch operation you just press the desired window switch and release quickly. If you want to partially open/close you press and hold the switch until the desired window height has been just like the switches work from factory.
What they were misunderstanding is that by default the SC only has one touch down on the driver's side. This will add one touch up and down for both sides.
Hope that helps explain it.