
Pimp my SC300!!!! Brand spankin new HID retrofit live on Clublexus.com!!!!!
 11-17-05, 08:43 AM
#46
Pole Position
Thread Starter
I'm back and in full effect after a 24 hour hiatas installing my audio equipment and refocusing my angle of this retrofit I'm happy to announce that I've picked up more plexiglass and will be designing a new mount for this style of retrofit. I'm doing the tracing and cutting now. God I wish I had access to a plastic laser cutter right about now. Gotta do it the old fashion way

 11-17-05, 03:47 PM
#48
Pole Position
Thread Starter
So far so good. Driver side's done. I'll finish the passenger side when I get back from Wisconsin later tonight/early morning then the retro should be shipping out to its rightful owner!
Let's see what we've got here


More in a few
Let's see what we've got here
More in a few
11-19-05, 12:50 PM
#49
Pole Position
Thread Starter
Ok...here's where the challenges come and you have to keep your cool. As most of you know I've been busy designing these new plexiglass mounts for the Lexus SC300 retrofit the las few days and yes its long over due. Well I got everything done to the T and was going to announce the completion this afternoon. However, here's where the parade got rained on. I'll let the pics do the talking.


Here the plexi snapped when my drill torqued the screw in the white tab. Am I pissed...yes but
back to the drawing board I go. This time I'm going to go to Home Depot and find a stronger material to use. When you have special retrofit cases like these, its keen to pace yourself and have alot of patience since its not the dime a dozen scenario plus you're crafting art (at least that's how I see it).
On the bright side, I'm glad it happened here during construction vs. while Lexant's driving etc.
The show must go on. We will have a much better retrofit then what we originally set out to do! Can you feel it? I know I do and I know it can be done...more later
11-19-05, 07:22 PM
#50
Pole Position
Thread Starter
I got a much thicker sheet of the special clear plastic I'm going to use to redo the new mounts. Pics will be up tomorrow afternoon after church
11-20-05, 05:35 PM
#52
Pole Position
Thread Starter
Originally Posted by 3rdelement
ya know if someone had access to a c&c machine and some thin guage metal,....they could make some money making those brackets.

here's one shot. I'm redoing another one since it broke when I was hollowing out one of those small square areas for the screw pegs. brb
 11-21-05, 12:21 AM
#54
Originally Posted by tiguy99
God I'd love to have one of those right now. I've had to cut these a certain way because my wheels kept breaking off making it a punk to cut out the sizes I need. Anyhow
here's one shot. I'm redoing another one since it broke when I was hollowing out one of those small square areas for the screw pegs. brb
here's one shot. I'm redoing another one since it broke when I was hollowing out one of those small square areas for the screw pegs. brb
Mike, I'm not sure what you're using to cut the Plexiglass with but, something like a "Rotorzip" or "Digital Dremel" will work wonders when cutting. IMHO
Jim
11-21-05, 12:59 AM
#55
Pole Position
Thread Starter
Jim you're right. I wish I had one of those woodshop table saws hehe. I'm using the black and decker dremmel saw with the drill bit and cutting wheel combo to do these mounts right. I had to go out and pick up another wheel holder tonight because the old one lost its grip. Hence my trip to home depot which resulted in my HIDs almost getting stolen off the car in the parking lot but thats another story
On a lighter note, I've perfected the passenger one and will touch up the driver's side but I like them and they pass my test. I'll have pics in the morning with some good daylight. Lets just say we're about 98%. Oh yeah the trims were painted as well. I'll have pics on the next post as well
On a lighter note, I've perfected the passenger one and will touch up the driver's side but I like them and they pass my test. I'll have pics in the morning with some good daylight. Lets just say we're about 98%. Oh yeah the trims were painted as well. I'll have pics on the next post as well
11-21-05, 11:19 AM
#56
Pole Position
Thread Starter


Basically I went back to the drawing board a total of 4-5 times since last week and came fourth with some very durable mounts I've very proud of. To construct them I took the trimmed base of the SC300 projector here
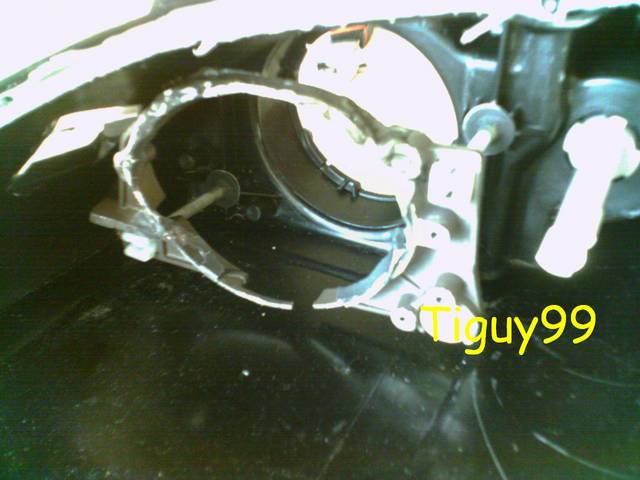
Basically I traced them out on a sheet of Optix brand Acrylic Safety Glazing plexiglass. It was a large sheet that measures about .236 thick .I hollowed out the necessary holes for the projectors to go through, enough room for the plastic screw tabs, the circle support with crosshairs and the screw holes and as a result we now have an amazing HID retrofit at hand.
Alright! with that said, I'm about to go test these and post shots in a few mins. All I have to say is LexAnt I wish Ithese were mine man. Everything is 10 times better than before. 1 thing I do recommend though Lex, is picking up a spare set of 4300K d2s HID bulbs to drive with. You'll discover more light usable light and in fact gain more projected color on the cuttoff beam edge with the 4300Ks vs. the 6000Ks. I found that out last week when I tested them with my own Philips bulbs. More in a bit
11-21-05, 01:50 PM
#57
Lexus Test Driver
iTrader: (1)

Join Date: Jul 2005
Location: USA
Posts: 932
Likes: 0
Received 0 Likes
on
0 Posts
Dude you are AMAZING, is there by any chance I can drop my car off to you and have this done for me since I'm from Chicago? The problem is that I have Viper HID's bi-xenon, but they are Valeo. Let me know how much you charge.
-Justin
-Justin
11-21-05, 02:51 PM
#58
Pole Position
Thread Starter
Here go some more semi final pics before this set goes out the door. These were taken a couple hours ago before the sun went down


Here's the main reason why I say semi final and not final. Pic #2 with the red circle depicts a small area on the bottom of the sanded lense that shows some remnants of the old lines. THESE are still a problem. During the test, I was able to see the beam pattern. Since most of the light comes out the bottom of the headlamp, I've learned that its crucial that this area stays clear.
What ended up happening here was the beam suffered out of this headlamp where the line isn't sharp as the passenger one where it has no lines in the same area. That beam comes out clear.
Right now I'm resanding this headlamp's lense so I can clear that area before I send them back to LexAnt. I'll have more shots of the newly cleared area in a few hours since I'll only have to do a few grits vs the entire range of sandpaper grit (which is very good news)
Brb
11-21-05, 04:22 PM
#59
Pole Position
Thread Starter
(Driver side Valeo)

(Passenger side Valeo on the right my E46 bosch ECE on the left)

(Passenger side Valeo on the right my E46 bosch ECE on the left)
11-22-05, 10:46 PM
#60
Pole Position
Thread Starter
Goodevening everyone! Who would have known that this episode of Pimp my SC300 would have turned into a DVD collector series! I've got a live update and some new info for fellow SC300 retrofitters and tomorrow's next wave of HID retrofitters alike.
First I'll update you on what's happening with this project and why I've been so quiet here the past day or 2.
To begin with, when I initially took on this project I knew it was going to be one of the toughest to do for several reasons. The Lexus cars are a made in a very unique way. Some have more user friendly components when it comes to upgrading certain components. Others don't
With that said, I'll share what the current challenge has been. As most of you know I've been at the 98% mark for the last 24-28 hours. The main issue I had was a dissatistaction with the output/beam pattern posted the other day.
To solve it (or so I thought) I redid the sanding on the driver side which took about all day today to do. I cleaned out that area and reassembled the lamp together and turned on the HIDs and observed some interesting observations. For one, the glare from that area did not go away even when that spot is gem clear. Second, the passenger side also had a decent amount of glare as well although not as much as the driver.
So I looked closer. The paint does its job well as I'd probably be Stevie Wonder by now had I not painted the trims black. So what can it be? Upon looking closer I discovered that the curve where the bottom lense curves upward at a 50% angle is making light bounce upward. This I cannot solve as its also an original intention of Lexus as they designed this light for halogen use.
So my solution is going to be a very special color trim upgrade to the bottom part of the lense to match the trim. I came upon this from placing special electric tape over the curve and saw that the glare went down about 60-75%.