c2ispy -- Valeo HID retrofit full-writeup --
 12-09-07, 03:30 AM
#16
Pole Position
Thread Starter
Join Date: Oct 2006
Location: HI
Posts: 251
Likes: 0
Received 0 Likes
on
0 Posts

 12-09-07, 04:35 AM
#17
Pole Position
Thread Starter
Join Date: Oct 2006
Location: HI
Posts: 251
Likes: 0
Received 0 Likes
on
0 Posts
Thanks JesLet for the inspiring picture... I just mocked up some brackets on paper, just got to wait to get it cut tomorrow. I left my camera in the car so updated pictures will be up tomorrow.
12-09-07, 05:15 AM
#19
Pole Position
Thread Starter
Join Date: Oct 2006
Location: HI
Posts: 251
Likes: 0
Received 0 Likes
on
0 Posts
Yeah, I'm going to use lexan..Did you have a bad experience with plexi-glass? The shop I bought it from makes signs and light panels for all the major hotels on Oahu. He said the material that im using (lexan) is pretty heat resistant and it can resist chips. Im going to take it to him to get my cuts done and see what he says. As for the PM you sent me, I dont think we have a cnc shop thats open to the public.
I'm actually a tour-guide on O'ahu! Haha, good to see you loved your visit. I actually have a friend in Tucson thats visiting in late Dec.
I'm actually a tour-guide on O'ahu! Haha, good to see you loved your visit. I actually have a friend in Tucson thats visiting in late Dec.
12-09-07, 05:31 AM
#20
Yeah, I'm going to use lexan..Did you have a bad experience with plexi-glass? The shop I bought it from makes signs and light panels for all the major hotels on Oahu. He said the material that im using (lexan) is pretty heat resistant and it can resist chips. Im going to take it to him to get my cuts done and see what he says. As for the PM you sent me, I dont think we have a cnc shop thats open to the public.
I'm actually a tour-guide on O'ahu! Haha, good to see you loved your visit. I actually have a friend in Tucson thats visiting in late Dec.
I'm actually a tour-guide on O'ahu! Haha, good to see you loved your visit. I actually have a friend in Tucson thats visiting in late Dec.
Tucson is like the opposite of Oahu ha ha. I stayed in Hilton rainbow tower. I love the place I love the people.
12-09-07, 10:57 PM
#22
Pole Position
Thread Starter
Join Date: Oct 2006
Location: HI
Posts: 251
Likes: 0
Received 0 Likes
on
0 Posts
Ok, so its been two days since my past update. I've made some progress even though im swamped with HW and work. First off, I yanked my headlights off, baked them, and took them apart. To learn how to bake/take your headlamps apart, click here .
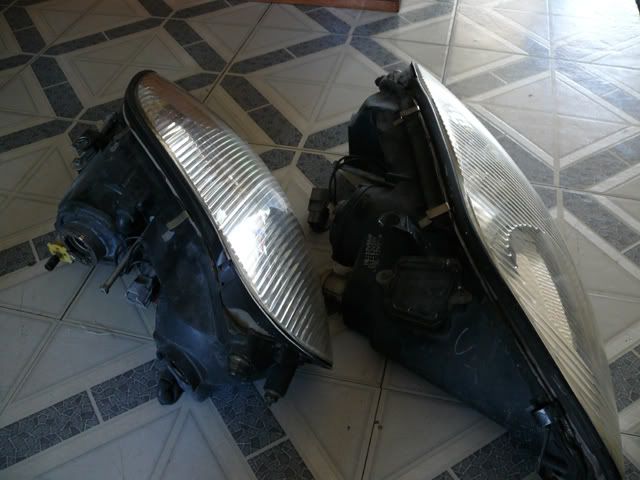
The 3" valeo is rather large and its almost the same size as the stock projector. Why the valeo? I chose it because I liked the cutoff and output from projectors that cost only $60 bucks.
To get the projector to sit properly in the OEM housing, you need to trim off the top left mounting tab diagonally:
Before:
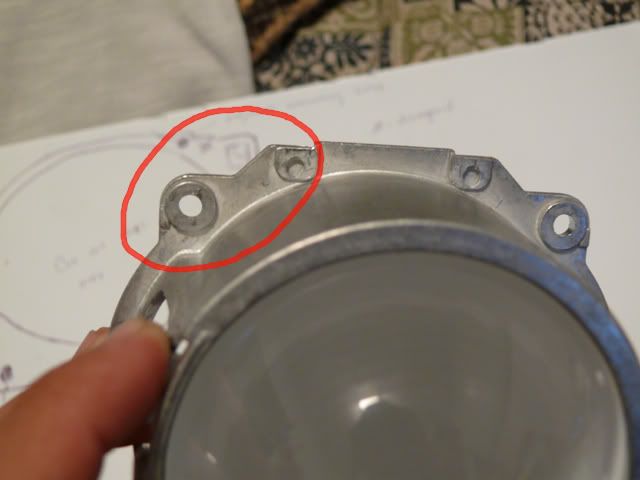
After:

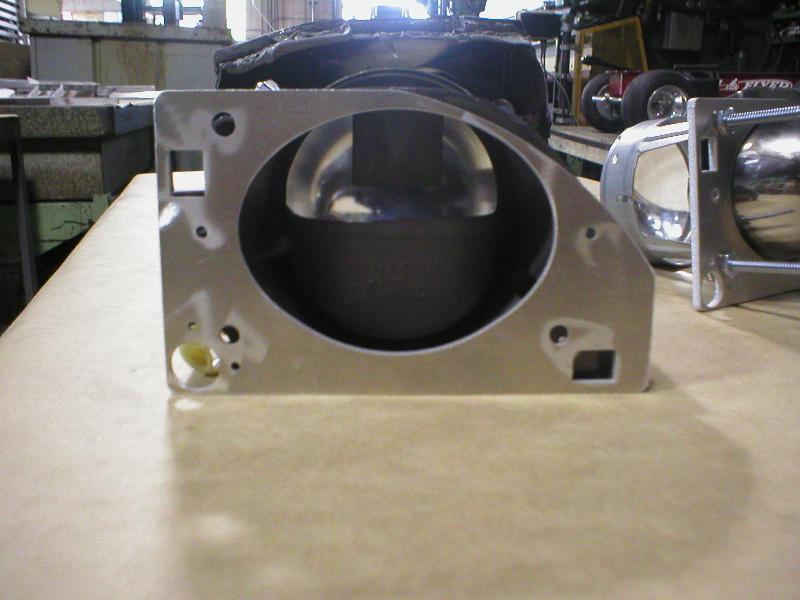
Did some test fitting:
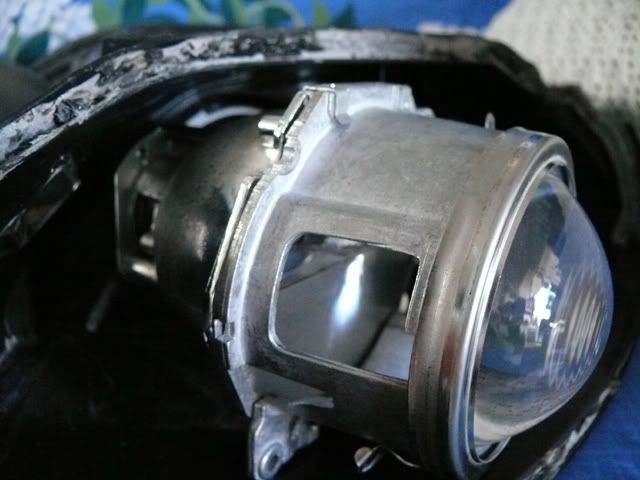
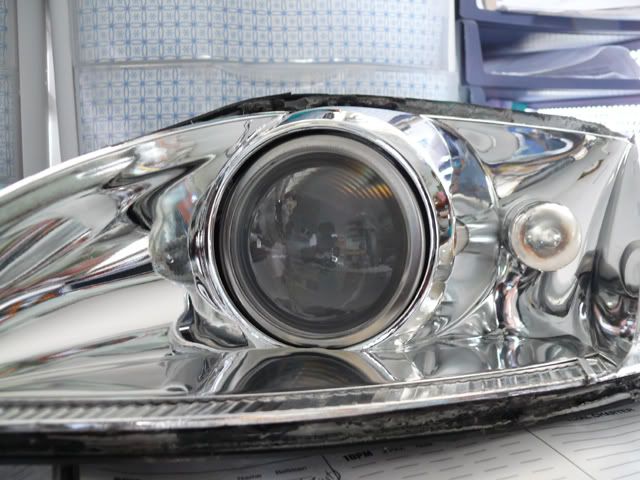
I used the OEM 3" bezel, and it fits like a charm!
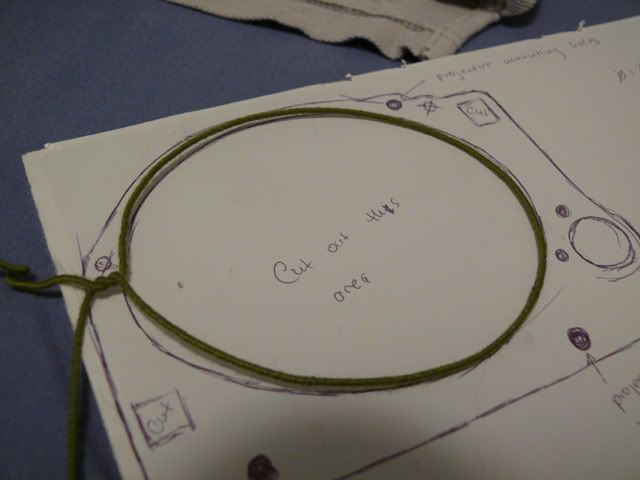
Ok next off is the mounting bracket. I took Jeslet's idea and ran with it. What I did for my bracket was.. I took a piece of aluminum wire, and wrapped it around the bowl of the projector:

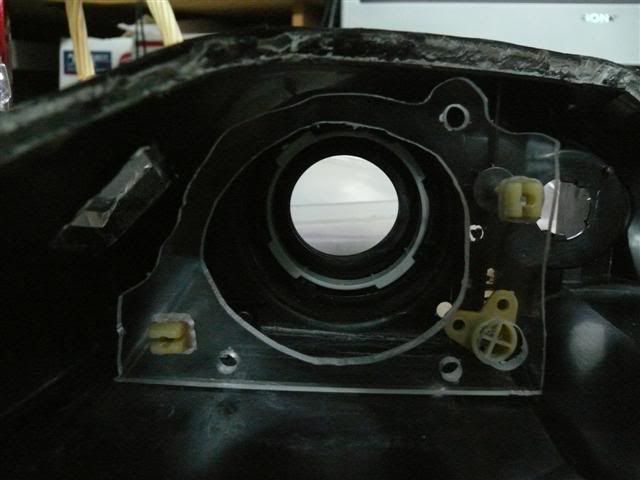
Now that you have an almost exact shape of the bowl, you want to trace the OEM bracket onto your medium of choice. In my case, I chose Lexan; a stronger, denser, version of plexi-glass. Once you've traced your OEM mounting bracket onto your material, take the piece of wire that you shaped around your bowl earlier, and place it strategically in the center of your tracing of your bracket:
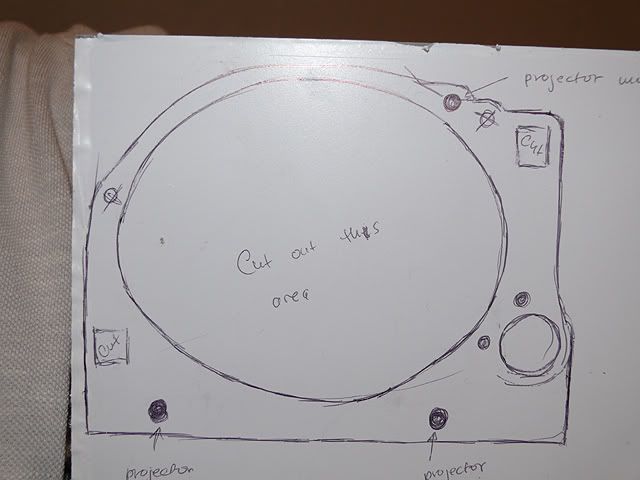
Once you got everything eye-balled, get your cutting tool: dremel, rotozip, etc, and cutout the necessary holes and extra material that might cause fitment issues inside your stock housing. I'll have more pictures of that tomorrow when I get my templates cut
Heres a picture of my template.. its not the greatest, but i made it in 3 minutes:
If you have any tips or advice for a newbie like me.. please chime in.. BTW this is my first time attempting a headlamp retro
Chris
The 3" valeo is rather large and its almost the same size as the stock projector. Why the valeo? I chose it because I liked the cutoff and output from projectors that cost only $60 bucks.
To get the projector to sit properly in the OEM housing, you need to trim off the top left mounting tab diagonally:
Before:
After:
Did some test fitting:
I used the OEM 3" bezel, and it fits like a charm!
Ok next off is the mounting bracket. I took Jeslet's idea and ran with it. What I did for my bracket was.. I took a piece of aluminum wire, and wrapped it around the bowl of the projector:
Now that you have an almost exact shape of the bowl, you want to trace the OEM bracket onto your medium of choice. In my case, I chose Lexan; a stronger, denser, version of plexi-glass. Once you've traced your OEM mounting bracket onto your material, take the piece of wire that you shaped around your bowl earlier, and place it strategically in the center of your tracing of your bracket:
Once you got everything eye-balled, get your cutting tool: dremel, rotozip, etc, and cutout the necessary holes and extra material that might cause fitment issues inside your stock housing. I'll have more pictures of that tomorrow when I get my templates cut
Heres a picture of my template.. its not the greatest, but i made it in 3 minutes:
If you have any tips or advice for a newbie like me.. please chime in.. BTW this is my first time attempting a headlamp retro
Chris
Last edited by c2ispy; 12-09-07 at 11:04 PM.
12-10-07, 12:18 AM
#24
Pole Position
Thread Starter
Join Date: Oct 2006
Location: HI
Posts: 251
Likes: 0
Received 0 Likes
on
0 Posts
I'm going to use a jigsaw.. I have a orbital jig so it can do most of the curves and circles. I'm going to do some test cuts on some scraps, and if it does melt, then I'll take it to the shop I bought it from since they have the facilities to cut this material properly.
12-10-07, 10:44 PM
#25
Pole Position
Thread Starter
Join Date: Oct 2006
Location: HI
Posts: 251
Likes: 0
Received 0 Likes
on
0 Posts
So I cutout my template with my rotozip. I recommend practicing on scraps unless you are pretty crafty with the rotozip/dremel already.
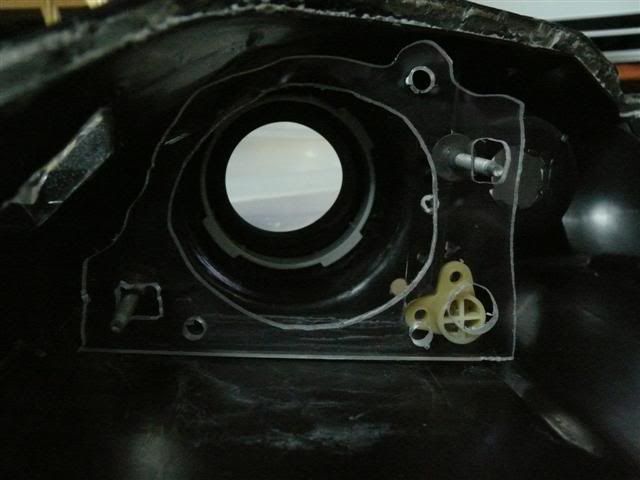
Heres my somewhat finalized template.. The circle on the bottom right and the three mounting whole still need adjusting but thats minor. I got the hard part done and it took me about 2-3 templates before I got it right. This lexan is DAMN STRONG! If you try to bend it, it doesnt chip it just bends, thats the good thing about lexan.
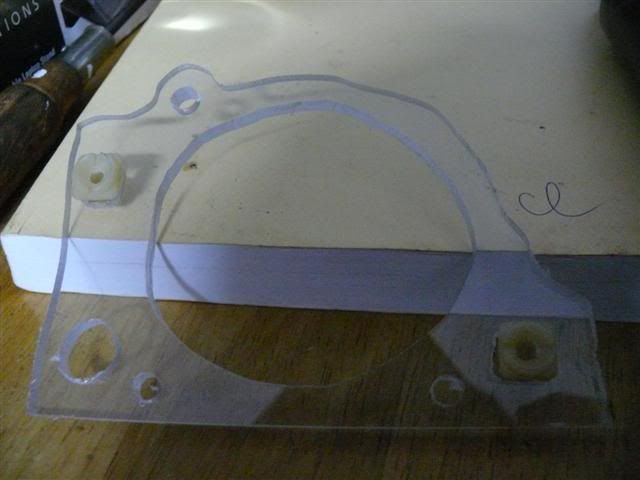
I got the plastic retainers in place and ready to bolt in.
And.. a little test fitting...
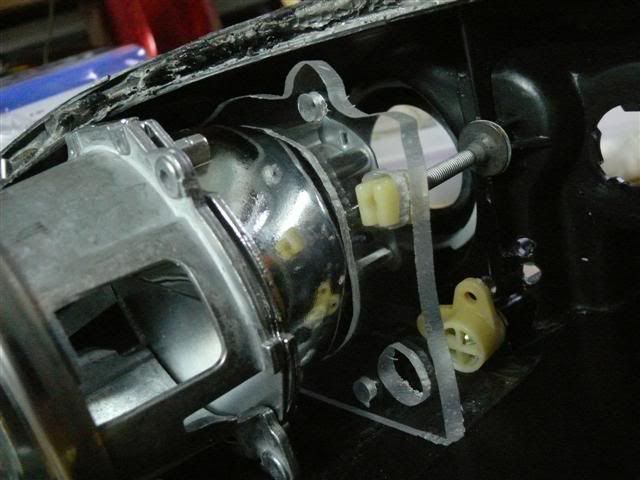
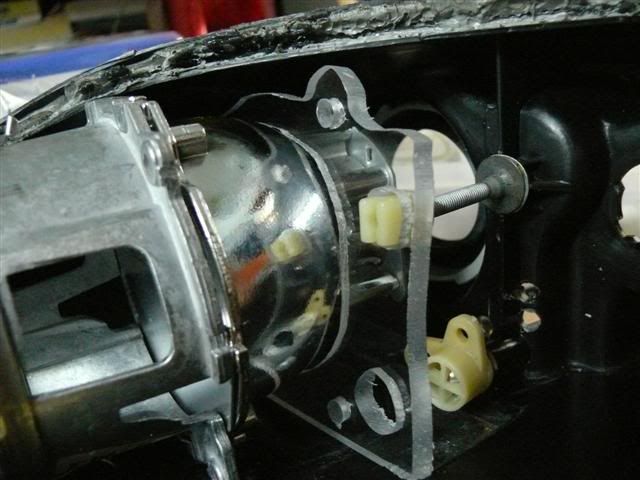
the other side will be cut out when I am happy with the fitment of the prototype. So far, I rate this retrofit a 6/10 difficulty wise. Stay tuned for more updates with my newby retrofitting
Heres my somewhat finalized template.. The circle on the bottom right and the three mounting whole still need adjusting but thats minor. I got the hard part done and it took me about 2-3 templates before I got it right. This lexan is DAMN STRONG! If you try to bend it, it doesnt chip it just bends, thats the good thing about lexan.
I got the plastic retainers in place and ready to bolt in.
And.. a little test fitting...
the other side will be cut out when I am happy with the fitment of the prototype. So far, I rate this retrofit a 6/10 difficulty wise. Stay tuned for more updates with my newby retrofitting
Last edited by c2ispy; 12-10-07 at 10:51 PM.
12-10-07, 10:51 PM
#26
Lexus Test Driver
Join Date: Oct 2006
Location: Field of Dreams
Posts: 1,039
Likes: 0
Received 0 Likes
on
0 Posts
The dremel should work fine. I have the XPR with all attachments. You can use the grinding bits to fine tune your rough cuts. If you have the saw attachment, that would work for the center cutout with the plastic clamped down. I used this attachment to cut a hole in my kitchen counter for my sink to drop in. So you know it's a quality tool that can handle a project.
12-10-07, 10:54 PM
#27
Pole Position
Thread Starter
Join Date: Oct 2006
Location: HI
Posts: 251
Likes: 0
Received 0 Likes
on
0 Posts
I just did this tonight with a router bit and I got fantastic results for freehand cutting. It starts to melt if you hold it in one area for a long time. But if you follow your lines quickly melting shouldn't be a problem.
 12-11-07, 12:49 AM
#29
I like everything but your bracket. I don't see that being a sturdy piece in the long run. Maybe a machine shop with a water jet can put your template into aluminum and not cost an arm & a leg...
Regardless, congrats on doing a retro, can't wait to see it finished!
Regardless, congrats on doing a retro, can't wait to see it finished!