
Tie Rod Inner Replacement
 07-19-10, 09:48 AM
#1
Driver School Candidate
Thread Starter

Join Date: Jun 2009
Location: MS
Posts: 38
Likes: 0
Received 0 Likes
on
0 Posts
Hi all,
I need to replace my inner tie rod (but the manual calls it a "rack". Is this hard to DIY?
I just got the outter tie rod replaced and the mechanic didn't say anything about the inner one. Now it needs to be replaced .
.
Any help would be great!
Chuck
I need to replace my inner tie rod (but the manual calls it a "rack". Is this hard to DIY?
I just got the outter tie rod replaced and the mechanic didn't say anything about the inner one. Now it needs to be replaced
. Any help would be great!
Chuck
 07-19-10, 10:27 AM
#2
Rookie

Join Date: Feb 2008
Location: utah
Posts: 60
Likes: 0
Received 0 Likes
on
0 Posts
its not hard and its not called a rack.. its an inner tie rod. the rack is the steering rack. my best advice is get a nice big heavy adjustable wrench and hammer and go get replacement inner tie rods so you know what you are trying to get off.
07-19-10, 10:47 AM
#3
Pole Position

Join Date: Dec 2004
Posts: 242
Likes: 0
Received 0 Likes
on
0 Posts
you need to get clear on whether he said to replace the inner tie rod, or the steering rack. is it a problem with leaking? that is the rack. it's a big deal. if it is a problem with the links being worn, but not the leaking, it may well be the inner tie rod. and there are inner tie rods and outer tie rods on both sides, not to mention ball joints and upper control arms. if you are going to do the work, or have it done, thing about replacing all the steering components that are worn. they generally wear out as a set.
but don't just start buying parts until you really know what parts need replacing. this is analogous to the "measure twice, cut once" saying.
but don't just start buying parts until you really know what parts need replacing. this is analogous to the "measure twice, cut once" saying.
07-19-10, 12:11 PM
#4
Driver School Candidate
Thread Starter
Join Date: Jun 2009
Location: MS
Posts: 38
Likes: 0
Received 0 Likes
on
0 Posts
Thank you all for your responses. It's not leaking and the driver side inner tie rod is loose and causing vibration at high speeds. Also had alignment done and had brakes replaced but still vibrating.
Any web site(s) on instructions on how to DIY?
Chuck
Any web site(s) on instructions on how to DIY?
Chuck
07-19-10, 12:49 PM
#5
Rookie
Join Date: Feb 2008
Location: utah
Posts: 60
Likes: 0
Received 0 Likes
on
0 Posts
this picture is not lexus but should do the trick.. this is with the rack boot out of the way too..
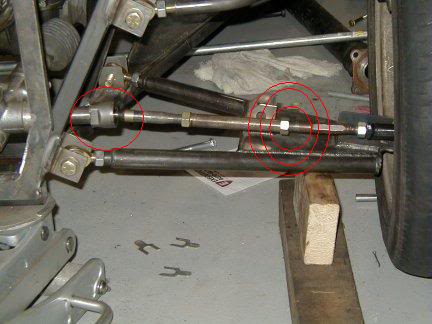
the part with the single red circle is where the inner tie rod screws into the rack. ive had best luck with a big adjustable wrench on the boxed part and hit it with a hammer till it breaks loose.. some times they can be really tough. some times they are easy.
the part with the 3 circles is where the outer tie rod end screws into the inner. there should be a jam nut on there. just break that nut loose and unscrew the inner from the outer. count the number of turns it takes to get out and remember the number.
put new inner in in reverse order and thread it back into the outer using the same number of turns... this is just so its close enough to get to the alignment shop. tighten jam nut. thread into rack and tighten.. sometimes i tap it with a hammer to get it as snug as possible.
07-19-10, 03:14 PM
#6

On the single red circle part above, I used a big plumber adjustable pipe wrench since the lip is too small to fit any of my regular wrenches or adjustable wrenches on there. And a good size hammer would do the trick. The rest are pretty simple. I got a quote at Firestones to replace my power steering rack and control arm for $1500. Got it in the garage and jack it up to see it's only the inner tie rod on the driver side, which cost $52 at AutoZone. So, I replaced it and brought it back to Firestone's for an alignment of $79 and now it's running straight.
07-19-10, 03:21 PM
#7
Driver School Candidate
Thread Starter
Join Date: Jun 2009
Location: MS
Posts: 38
Likes: 0
Received 0 Likes
on
0 Posts
Thanks again for everyone reply and help. Looks pretty easy but just wanted to make sure i wasn't missing anything. Sad thing about it i have to take to same guy already gave it the alignment the first time two weeks ago! 
Trending Topics
10-02-10, 04:12 PM
#9
Lexus Test Driver
iTrader: (1)

Join Date: Feb 2009
Location: north caroilina
Posts: 852
Likes: 0
Received 0 Likes
on
0 Posts
how do you get the passenger side there is a bracket in the way.... and 2 of those nuts and since i cant get the bracket off i cant remove the nut....... with my tool i bought driverside was a breeze i cant even budge the passenger side
10-02-10, 09:53 PM
#10
Lexus Test Driver

The passenger side inner can be a bit of a PITA... I can't remember all the specifics because its been a while, but there is a large aluminum nut that needs to be removed, and a lock washer that's peened over. The large aluminum nut is a left handed thread. I bought a 1 1/4" open end wrench and used a grinder to grind the end of it down to fit the nut. A normal open end is too wide. Toyota sells a SST for this. The OEM right inner is a bit pricey. I remember paying over $100 for it. Maybe closer to $130 from Sewell...
10-03-10, 09:26 AM
#12
Lexus Test Driver
It's coming back to me a little...
I think I took off the outer tie rod first, unbolted the steering damper, and took the whole thing off in one piece including the bracket. I unscrewed it right at the rack shaft after chiseling up that peened over lock washer.
It made it a lot easier to work on undoing that large aluminum left handed nut that holds on the bracket once I got the whole thing in a vise and had some room to work on it...
10-03-10, 10:42 AM
#13
Lexus Test Driver
iTrader: (1)
Join Date: Feb 2009
Location: north caroilina
Posts: 852
Likes: 0
Received 0 Likes
on
0 Posts
yeah im taking the rack out as we speak how does that bracket come off? it seems like it slides off after you take off that big aluminum nut i cant get off haha thanks for the help!!! got to love 2o year old cars post another message if you think of any other helpful hints!!!!
04-19-11, 10:32 AM
#14
It's coming back to me a little...
I think I took off the outer tie rod first, unbolted the steering damper, and took the whole thing off in one piece including the bracket. I unscrewed it right at the rack shaft after chiseling up that peened over lock washer.
It made it a lot easier to work on undoing that large aluminum left handed nut that holds on the bracket once I got the whole thing in a vise and had some room to work on it...
I think I took off the outer tie rod first, unbolted the steering damper, and took the whole thing off in one piece including the bracket. I unscrewed it right at the rack shaft after chiseling up that peened over lock washer.
It made it a lot easier to work on undoing that large aluminum left handed nut that holds on the bracket once I got the whole thing in a vise and had some room to work on it...
04-19-11, 11:02 AM
#15
Lexus Test Driver
That's correct... You've got it right. I used a hammer and chisel to peen over the new washer afterwards. It came out okay. Here's a pic of my ground down 1 1/4" open end wrench.