
Help! Idle loops up and down from 1100rpm to 1600rpm every 3 seconds
 12-10-15 | 04:20 PM
#31

Thread Starter
Rookie
Joined: Jun 2015
Posts: 53
Likes: 0
From: NY
I now have a similar problem, mine idles just fine when cold. After it heats up it does a surge and is running very rich, it started out of the clear blue. Visual check of caps looked okay and will do that at some point.
The thing about a problem when heating up is 2 things are happening that I can think of. One is the engine coolant temp sensor is supposed to say we are warm and lets back of that cold enrichment, and two its time for closed loop and let the O2 sensors take control.
Magda did you ever try seeing if there are any codes set? I'm not sure how fussy these are as far as the air meter mine did have that code, I had a really dirty air filter on that car. And its way down on my car project list so not sure when I'm going to fully dig into it.
Your doing good keep at it and if you figure it out please let us know what you find.
Your Norm light flashing means either the air ride is switched off or there is a fault code for that.

2. So far no codes set that I know of. I will try to check once I drive the car more. However my battery goes dead often thus it does not allow time for codes to set...
3. Is there a way to easily test Coolant Temp Sensor?
4. I will let this forum know if I solve the problem. It's the least I can do to thank everyone for their input and suggestions... A solution if I ever get one.
My LS400 once started increases slowly and gradually in rpms until it reaches approx 1200 then it starts to fluctuate between 800 and 1200rpms every second or so when in P or N... in a very regular fashion.
Recently even before installing "new old" throttle body I was driving the car quite often and there was no codes... at least the Check Engine Light was not lit. It used to fluctuate between 1200 and 1600 rpm in P and N -thus it looks like it is slightly better now. It does not pull like it used to but it still will not require pressing gas pedal to slowly reach 50 mph... Also it is pretty bad in terms of fuel economy.
No noticeable difference was observed in this behavior after replacing Old Clean Throttle Body to Ebay-bought cleaned "new-old " Throttle Body which was done this past week... (both throttle bodies had original sensors attached which I did not touch/adjust in any way)
However, for a while now I noticed that my BATTERY GOES DEAD nearly overnight - it probably went bad due to problems from the past. I went through car records... I discovered that alternator was replaced twice in this car by my housemate, within 2 years time -I think mechanics didn't diagnose the problem and replaced alternator because it was good money.
2011 September : Alternator replaced
2012 January : Battery replaced at PepBoys
2013 June : Alternator and L/F Oxygen Sensor Replaced
Back then I was not interested in car mechanics. Now the battery is 3 years old on its deathbed. I begin to think that maybe there is a parasitic draw which would explain why it goes dead so often. Or maybe the CAPACITORS on ECU cause strange problems -can they discharge battery like that?
SIDE INVESTIGATION of BATTERY PARASITIC DRAIN :
Today I checked Voltage and Continuity on most fuses, while the smart battery charger (NOCO GENIUS G26000) was connected to battery leads to make sure that my bad battery allows for voltage to flow to expose parasitic draw if any (I try not to make too many mistakes, but am new to electrical diagnostics). I used EXTECH true RMS multimeter.
I did not pull any fuses during that test. The battery was connected. I let the circuits go to sleep - the readings were done at least 5 hours after parking the car in the garage. The results were negative. All checked fuses had continuity and there was no measurable voltage present across fuses...
I also checked cartridge fuses under the hood - the same results.
[Cartridge fuses were tested in situ as well, after gently popping the top cap off with small screw driver. Basically I just touched meter leads to both sides of it up top with the cap off.]
Below are some pictures and explanation:

Kick panel / DASH FUSE PANEL fuses... All regular fuses showed 0mV and had continuity.
I could not access P/W, DEFOG nor DOOR cartridge fuses, thus I have not checked those... hope the power drain is not there. Not sure how to access them. Those 3 fuses described below:
* A P/W- 30 Amp: Preset Steering, Power Shoulder Anchor, Electric Moon Roof, Power Windows
* B DEFOG - 40 Amp: Rear Window Defogger
* C DOOR - 30 Amp : Theft Deterrent System, Seat Control System, Fuel Opener Control System

MAIN JUNCTION BLOCK / FUSES in ENGINE BAY.
I checked regular and cartridge fuses here. All checked fuses exhibited 0mV and good continuity.
The only fuse I did not check was cartridge fuse described as ALT 120A - I could not pop off the top...
* 3 ALT - 120 Amp: Fog, Tail & Stoplights, Turn Signal Lights, Defogger & Seat Heater, A/C & Heater System, Power Shoulder Belt Anchorage, Door Lock Control, Power Windows & Power Seats, Antenna Motor, Cigarette Lighter, Combination Meter, Wiper & Washer
UPDATE 2015-Dec-11: I managed to pop gently the top of 3 ALT-120Amp Cartridge Fuse and checked it. It showed 0mV and continuity.
I also rechecked other fuses in Engine Bay/Main Junction Block -they again showed 0mV and continuity, apart from 7-DOME-10Amp fuse which had 2mV and continuity. I assume that 2mV is not enough to draw battery power.
RELAYS listed below I left alone: * A - HEAD Headlight Control * B - ST Starter * C - ENGINE MAIN * D - MG CLT A/C Magnetic Clutch * E - HTR Heater Main * F - HORN* G - EFI Main

schematic layout of Main Junction Block Fuse panel.

Measuring Voltage across Cartridge fuse.

Popping off top cover from cartridge fuse in order to check voltage and continuity.
That's all for now...
Last edited by Magda; 12-11-15 at 03:42 PM.
 12-11-15 | 01:05 AM
#33

Lead Lap
Joined: Jul 2010
Posts: 4,525
Likes: 97
From: ca
Pull that 20 amp air sus fuse that should turn off the flashing light. Its to the right from center on that fuse box cover under the hood #3 picture up from the bottom here. Just to the right of the 2 round relays towards the bottom.
There can be codes with no check engine light.
ECT Engine coolant temperature sensor does have resistance values at different temps. If its never been changed just change it, it won't break the bank doing it. Your battery connections look horrible clean them real good, and not just the inside of the clamps but also where the wires connect to the clamps and the battery terminals too, you can use Vaseline or buy terminal protector to put on them to keep them from getting the corrosive skin on them. Check the battery electrolyte level also.
Battery drain, make real sure the trunk light isn't staying on, glove box light if it works too. They are lights that are out of sight and out of mind so you will not know if they are staying on or not.
It is not a good idea to change just one O2 sensor.
After dealing with the ECT, then you need to open up the little cover on the test port and you will uses a some what straightened average smallish paper clip that will plug into the little plug ports. I have a few things for you to test there. Take a picture like you did of the inside of that cover.
This will explain how to test for codes,
http://www.lexls.com/tutorials/intro/codereading.html
and its just easier to do this at the port under the hood. Plus I have other things for you to test there, I just don't have the position of the ports handy right now. Before doing anything try to read the codes. It would help if you had alligator clips for your probes ??? Or very thin probes, then you don't need to use a thin bare wire like that paper clip for the voltage tests in that test port. When you poke something in those ports you don't want anything metal touching it, could damage something.
Last edited by dicer; 12-11-15 at 01:39 AM.
12-11-15 | 04:18 PM
#34
Thread Starter
Rookie
Joined: Jun 2015
Posts: 53
Likes: 0
From: NY
 but fuel system pressure test may be a good idea...
 Vacuum leak is still a possibility. I did propane test but I might have missed the spot... A mechanic I know did test a few spots (not a thorough test) for vacuum leak as well.. In neither case change in rpms was noticed at any time...
12-11-15 | 06:04 PM
#35

Moderator
Joined: Aug 2011
Posts: 3,888
Likes: 904
From: Japan
How to check for parasitic drain with a multimeter.
Since a 10A fuse used for Toyota/Lexus cars has about 10 mΩ. So your dome fuse's voltage drop 2mV can be calculated as below.
I=E/R
=2mV/10mΩ
=200mA
There goes the current about 200mA.
12-11-15 | 09:42 PM
#36
Thread Starter
Rookie
Joined: Jun 2015
Posts: 53
Likes: 0
From: NY
I don't think 2mV is small enough as long as you measured it in accordance with the way
How to check for parasitic drain with a multimeter.
Since a 10A fuse used for Toyota/Lexus cars has about 10 mΩ. So your dome fuse's voltage drop 2mV can be calculated as below.
I=E/R
=2mV/10mΩ
=200mA
There goes the current about 200mA.
How to check for parasitic drain with a multimeter.
Since a 10A fuse used for Toyota/Lexus cars has about 10 mΩ. So your dome fuse's voltage drop 2mV can be calculated as below.
I=E/R
=2mV/10mΩ
=200mA
There goes the current about 200mA.
I checked the voltage drop at fuse tops without removing fuses just as you described.
For cartridge fuses I removed transparent top without removing fuse and checked across the fuse.
This DOME fuse had 1.7 to 2mV, but it was the result of my MISTAKE: trunk was open during the test thus the light was on drawing 2mV... Once I closed the trunk it went down to 0mV...
To summarize:
I retested all fuses of MAIN JUNCTION BLOCK (including cartridge fuses) in engine bay - all had continuity and showed 0mV at Vdc. No blown fuses observed.
I retested regular fuses of the DASH PANEL 0mV at Vdc and continuity was good. For some reason slot for RR.AC fuse was missing but I am not sure if it was supposed to be in my car.
Could not find at all 3 cartridge fuses of DASH PANEL that seem hidden: P/W, DEFOG, DOOR, thus they are not ruled out...
12-11-15 | 10:50 PM
#38
Thread Starter
Rookie
Joined: Jun 2015
Posts: 53
Likes: 0
From: NY
Pull that 20 amp air sus fuse that should turn off the flashing light. Its to the right from center on that fuse box cover under the hood #3 picture up from the bottom here. Just to the right of the 2 round relays towards the bottom.
There can be codes with no check engine light.
There can be codes with no check engine light.
Your battery connections look horrible clean them real good, and not just the inside of the clamps but also where the wires connect to the clamps and the battery terminals too, you can use Vaseline or buy terminal protector to put on them to keep them from getting the corrosive skin on them. Check the battery electrolyte level also.
and very dark when it is closed... I tested fuses for voltage drop and DOME fuse does not have a problem. but they are sooo expensive. And I'm soo broke now.
After dealing with the ECT, then you need to open up the little cover on the test port and you will uses a some what straightened average smallish paper clip that will plug into the little plug ports. I have a few things for you to test there. Take a picture like you did of the inside of that cover.
This will explain how to test for codes,
http://www.lexls.com/tutorials/intro/codereading.html
and its just easier to do this at the port under the hood.
This will explain how to test for codes,
http://www.lexls.com/tutorials/intro/codereading.html
and its just easier to do this at the port under the hood.

 I will try. So many new things to do.
 It would help if you had alligator clips for your probes ??? Or very thin probes, then you don't need to use a thin bare wire like that paper clip for the voltage tests in that test port. When you poke something in those ports you don't want anything metal touching it, could damage something.
12-12-15 | 02:42 AM
#39
Lead Lap
Joined: Jul 2010
Posts: 4,525
Likes: 97
From: ca
Its that little yellow colored fuse. You have two options for taking it out. In that same cover in the upper right corner is the little special tool that is for doing it. Or use needle nose pliers to do it just wiggle it a bit and pull it out. See they even have a spare fuse in the cover.
ECT some will say it has to be oem I say no it doesn't. I've used the Oreillys auto parts one.
There are 3 sensor looking thingys close together behind the coil. Its the very front one closest to the passenger side, the rear one has one wire that is the gauge sensor. The one towards the center and low is the cold start switch and and its like 21 mm so don't mistake it.
You got in the trunk? and it was closed, I'm glad it opened, hope you made sure the key lock worked first, that is like a vault, even a magician couldn't get out of it.
That is the proper port, and super good pictures.
When you get time and you have the engine running and warmed up first test the DC volts (so DC volt on meter) on OX1 by sticking the pin in the little port hole and connecting your plus probe to it and then connect the negative probe to the negative battery terminal or just to ground. Watch the volts it should read from 0 volts to .8 or so. You can use a low volt scale on your meter, because the voltage should not go over 1 volt. Make a note of what it does.
It should fluctuate between the high and low. After watching that for a few minutes or so, then do the same in the OX2 port. You can leave it running and just pull the pin and move it to the OX2. And be very careful not to let your wire get caught in the fan. Nor your hands. So its best to have it running before hooking the meter up to the ports. Always be aware of that fan and other rotating stuff on the front of the engine. Keep your meter on the driverside and run the wires over that side of the engine. Let us know what you read and what happens with that voltage you get from those 2 ports. They are the O2 sensor ports.
And as a note. You don't have to worry about using a DMM (Digital Multi Meter) to check voltages of any thing on the car as it will not load the circuit and damage anything, as they are a very high impedance instrument. Just make sure its on voltage and NOT the amps or Ohm's when checking voltage. And maybe Yamae has something to add to this too.
Oh and do you understand how the diagram in the little cover compairs to the plugs or ports???? It is just like it shows the terminals. Those 2 stand alone ones kinda in the middle are the OX ones. The IG has that rubber cover on it.
Last edited by dicer; 12-12-15 at 02:52 AM.
12-12-15 | 03:13 PM
#40
Thread Starter
Rookie
Joined: Jun 2015
Posts: 53
Likes: 0
From: NY
Its that little yellow colored fuse. You have two options for taking it out. In that same cover in the upper right corner is the little special tool that is for doing it. Or use needle nose pliers to do it just wiggle it a bit and pull it out. See they even have a spare fuse in the cover.

I tried the little tool and it does not fit there, does not grab the sides. Pliers just take the transparent top off. There is no easy way to pull those cartridge fuses out... as if one had to take them out by pushing from the bottom...
ECT some will say it has to be oem I say no it doesn't. I've used the Oreillys auto parts one.
There are 3 sensor looking thingys close together behind the coil. Its the very front one closest to the passenger side, the rear one has one wire that is the gauge sensor. The one towards the center and low is the cold start switch and and its like 21 mm so don't mistake it.
There are 3 sensor looking thingys close together behind the coil. Its the very front one closest to the passenger side, the rear one has one wire that is the gauge sensor. The one towards the center and low is the cold start switch and and its like 21 mm so don't mistake it.
http://www.lexussouthatlantaparts.co...942220010.html
Here is a diagram showing the sensor:
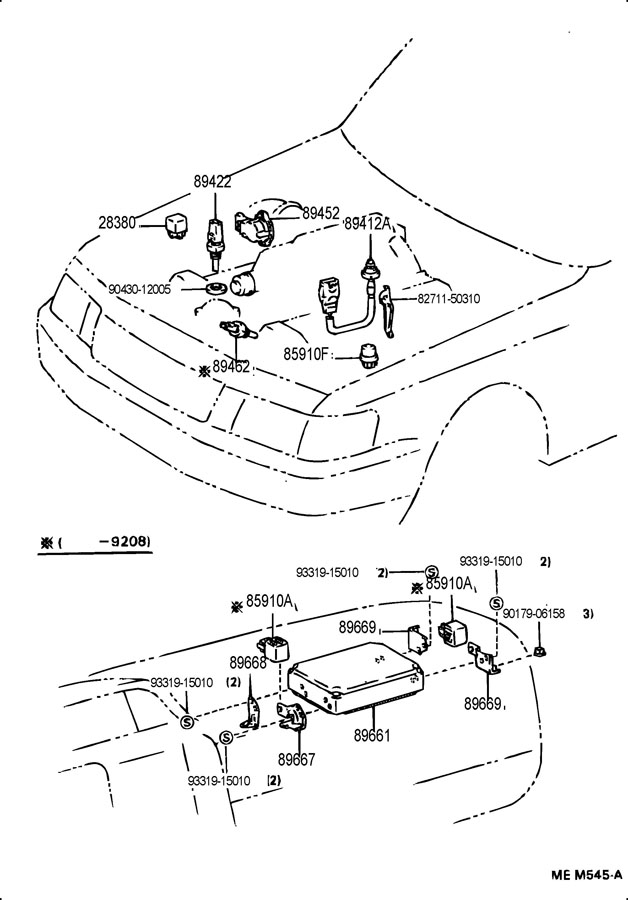
Part number 8942220010 SENSOR, OIL TEMPERATURE; SENSOR, WATER TEMPERATURE; SENSOR, WATER TEMPERATURE (FOR E.F.I.). SENSOR, WATER TEMPER; ENGINE BLOCK
LS400 (UCF10) $55.04 8942220010
Looks like the same sensor has different functions. There are multiple water temp sensors in the car, why do I have to change this particular one and not the others?
Do I need to order gasket as well?
part number 9043012005 BOLT, UNION (FOR NOZZLE LEKAGE PIPE No.3); GASKET; GASKET (FOR FUEL FILTER); GASKET (FOR FUEL PIPE No.2); GASKET (FOR FUEL PIPE SUPPORT); GASKET (FOR FUEL PIPE); GASKET (FOR FUEL PRESSURE REGULATOR); GASKET (FOR MANIFOLD PLUG); GASKET (FOR PULSATION DAMPER HOSE); GASKET (FOR TURBO OIL INLET PIPE); GASKET (FOR VACUUM HOSE UNION); GASKET (FOR WATER HOLE); GASKET, PIPE FUEL DELIVARY INLET; GASKET, SEAT (FOR SUPERCHARGER). GASKET; DELIVERRY PIPE SIDE; DELIVERY PIPE SIDE; HOSE SIDE; NO.2; PIPE SIDE; PNC 11118C

My trunk key lock does not work... I'm not sure if I have Houdini's skills.

That is the proper port, and super good pictures.
When you get time and you have the engine running and warmed up first test the DC volts (so DC volt on meter) on OX1 by sticking the pin in the little port hole and connecting your plus probe to it and then connect the negative probe to the negative battery terminal or just to ground. Watch the volts it should read from 0 volts to .8 or so. You can use a low volt scale on your meter, because the voltage should not go over 1 volt. Make a note of what it does.
It should fluctuate between the high and low. After watching that for a few minutes or so, then do the same in the OX2 port. You can leave it running and just pull the pin and move it to the OX2. And be very careful not to let your wire get caught in the fan. Nor your hands. So its best to have it running before hooking the meter up to the ports. Always be aware of that fan and other rotating stuff on the front of the engine. Keep your meter on the driverside and run the wires over that side of the engine. Let us know what you read and what happens with that voltage you get from those 2 ports. They are the O2 sensor ports.
And as a note. You don't have to worry about using a DMM (Digital Multi Meter) to check voltages of any thing on the car as it will not load the circuit and damage anything, as they are a very high impedance instrument. Just make sure its on voltage and NOT the amps or Ohm's when checking voltage. And maybe Yamae has something to add to this too.
Oh and do you understand how the diagram in the little cover compairs to the plugs or ports???? It is just like it shows the terminals. Those 2 stand alone ones kinda in the middle are the OX ones. The IG has that rubber cover on it.
Oh and do you understand how the diagram in the little cover compairs to the plugs or ports???? It is just like it shows the terminals. Those 2 stand alone ones kinda in the middle are the OX ones. The IG has that rubber cover on it.
I think I understand the diagram, but is it normal that there is so much strange grease there?... Is it diaelectric grease?
Last edited by Magda; 12-12-15 at 03:20 PM.
12-12-15 | 04:32 PM
#41
Lead Lap
Joined: Jul 2010
Posts: 4,525
Likes: 97
From: ca
Yeah I didn't see that one, take em both out. Pull up one them. Airsus fuses........
They are not easy to get out, with that cover off the little tool should grab it enough.
The picture doesn't show the gauge temp sensor. But that must be it, has more than one wire to it.
When there is power on a circuit never try checking ohms. And really to check something for continuity it should not be connected to the circuit. Some meters have a 9 volt battery for ohms, and some circuits use way less voltage than that, you could damage the circuit.
You really need the key lock for the trunk to work. If something happens its not going to be easy to get in. I would not want to be in the trunk with no flash light. You could get out if you knew how to do it.
12-12-15 | 04:54 PM
#42
Thread Starter
Rookie
Joined: Jun 2015
Posts: 53
Likes: 0
From: NY
I wonder how much damage did I do by checking all fuses my way with continuity check. My multimeter is extech true rms. it has 9v battery. ... I have done it 3 times within last week for all fuses on Lexus ... Stupid me.
I am new to electrical stuff thus I probably should not do it at all. Maybe I should just junk the car...
I am new to electrical stuff thus I probably should not do it at all. Maybe I should just junk the car...